

How to Insert a YouTube Video into PowerPoint the Right Way!
Trish Dixon
Embedding a YouTube video into PowerPoint is an effective way to enhance your presentation. This feature allows you to share visual content directly from the web, avoiding the need to store large video files on your computer. In this article, we will walk you through different methods to insert YouTube videos into PowerPoint slides, ensuring your presentations are both engaging and efficient.
Why Add YouTube Videos to PowerPoint?
YouTube videos can be highly beneficial when delivering a presentation. They add multimedia elements , helping your audience stay engaged. Embedding a video can make complex topics easier to explain and provide visual examples that support your message.
Inserting YouTube Video in PowerPoint: Step-by-Step Guide
Method 1: using the insert tab.
This is the most straightforward method for embedding YouTube videos directly from the platform.
Step 1: Open PowerPoint and Navigate to the Slide
- Launch PowerPoint and open the presentation where you want to add the YouTube video .
- Select the slide where the video should appear.
Step 2: Access the Insert Tab
- Click on the Insert tab at the top of the screen.
- This will show a range of options for inserting media, text, and objects into the slide.
Step 3: Choose Online Video
- In the Media group, find and click on the Video drop-down menu.
- From the list of options, select Online Video .
Step 4: Paste YouTube Video Link
- Open YouTube in your web browser and find the video you want to embed.
- Copy the video URL from the address bar.
- Paste the copied URL into the field that appears in PowerPoint .
- Click Insert , and the YouTube video will be embedded into your slide.
Step 5: Resize and Position the Video
- Once the video is inserted, you can resize it by dragging the corner handles.
- Position the video anywhere on the slide by clicking and dragging it to the desired spot.
This method requires an internet connection during the presentation to stream the video.
Method 2: Embedding Video with Embed Code
If the direct URL method doesn’t work, you can also embed YouTube videos using the embed code provided by YouTube .
Step 1: Copy Embed Code from YouTube
- Open YouTube and find the video you want to embed.
- Below the video, click on the Share button and select Embed from the available options.
- A box will appear with the embed code . Copy this code.
Step 2: Insert Embed Code into PowerPoint
- Return to PowerPoint and go to the slide where you want to insert the video.
- Click on the Insert tab and select Online Video .
- Instead of pasting a URL , paste the embed code in the From a Video Embed Code field.
- Click Insert .
Step 3: Adjust Video Size and Position
- Similar to the first method, you can adjust the size and position of the video on your slide.
This method is also dependent on having an internet connection during your presentation.
Method 3: Download and Insert YouTube Video as a File
If you want to ensure that your video works offline, you can download the YouTube video and insert it directly as a video file . This method doesn’t require an internet connection during the presentation.
Step 1: Download the YouTube Video
- Use a third-party video downloader to download the YouTube video . Ensure you comply with YouTube’s terms of service when downloading videos.
- Save the video in a format supported by PowerPoint , such as MP4 or WMV .
Step 2: Insert the Video File
- Open PowerPoint and select the slide where you want to add the video.
- Go to the Insert tab and choose Video from the Media group.
- Select Video on My PC , then browse for the video file you downloaded.
- Click Insert to embed the video into your slide.
Step 3: Resize and Position the Video
- Once the video is inserted, adjust its size and position on the slide.
This method ensures that the video will play even if you do not have an internet connection during your presentation.
Comparing Methods for Inserting YouTube Videos
Troubleshooting video playback in powerpoint.
Even when using the correct method, you might encounter issues with video playback in PowerPoint . Here are common problems and solutions:
Issue 1: Video Does Not Play During Presentation
This problem usually arises when there is no internet connection . If your video is embedded using a URL or embed code , ensure that your device is connected to the internet.
- Test your internet connection before presenting.
- If internet access is not guaranteed, consider downloading the YouTube video and inserting it as a video file for offline playback .
Issue 2: Video Quality Appears Poor
Low video quality can occur due to the default settings on YouTube or PowerPoint .
- When inserting a video, ensure the original video quality is high.
- Adjust the playback settings in PowerPoint to enable full-screen playback for better viewing.
Issue 3: Embedded Video Freezes
This issue may be caused by a slow internet connection .
- Download the video for offline playback to avoid issues caused by slow internet speeds.
- If downloading is not an option, try embedding the video using a lower resolution to reduce buffering time.
Tips for Optimizing YouTube Videos in PowerPoint Presentations
To make the best use of YouTube videos in your presentation, follow these tips:
Choose High-Quality Videos
Ensure the video you choose has high video resolution . Poor-quality videos can detract from your presentation’s professionalism. Opt for videos with a resolution of 720p or 1080p for a better viewing experience.
Add a Clear Introduction
Before playing the video, provide context. Explain why the video is important and what the audience should pay attention to. This prepares them for the content they are about to see.
Control Video Playback
PowerPoint gives you the option to start a video automatically or when clicked. In the Playback tab, you can choose whether the video plays on click or automatically as the slide appears. If you want more control, set the video to play on click .
Mute Background Audio
If you are narrating while showing the video, you might want to mute the audio from the video. You can adjust the volume of the embedded video within PowerPoint’s Playback settings.
Embedding YouTube Video in PowerPoint for Mac Users
The process of embedding YouTube videos in PowerPoint is similar on Mac devices, but there are a few differences.
- Open PowerPoint and navigate to the desired slide.
- Go to the Insert tab and click Video .
- Select Online Movie (instead of Online Video as in Windows).
- Paste the YouTube URL in the provided box and click Insert .
- Resize and position the video as needed.
Final Thoughts
Adding a YouTube video to your PowerPoint presentation can enrich your content and make your message more impactful. Whether you choose to insert a video via URL, embed code, or by downloading the video, each method has its advantages. Consider the presentation environment—whether you’ll have internet access or not—before deciding which method to use.
By following the steps outlined in this article, you’ll be able to embed YouTube videos smoothly, providing your audience with a dynamic and engaging presentation experience.
Frequently Asked Questions
How do i insert a youtube video into powerpoint.
To insert a YouTube video into PowerPoint, go to the Insert tab, click on Video, select Online Video, and paste the YouTube video URL.
Can I insert a YouTube video into PowerPoint without an internet connection?
Yes, you can download the YouTube video as a video file and insert it into PowerPoint for offline use.
What video formats are supported in PowerPoint?
PowerPoint supports video formats such as MP4, WMV, and AVI. It’s recommended to use MP4 for compatibility.
Why is my embedded YouTube video not playing in PowerPoint?
If your YouTube video is not playing, ensure that you have an active internet connection and that the video URL is correct.
Can I resize a YouTube video in PowerPoint?
Yes, after inserting the YouTube video, you can resize it by dragging the corner handles to fit your slide layout.
How can I mute the audio of a YouTube video in PowerPoint?
You can mute the audio by selecting the video, going to the Playback tab, and adjusting the volume settings.
- Recent Posts
- How to Fix Blurry Pictures in PowerPoint? (10 Easy Fixes) – October 22, 2024
- How to Extract an Image from a PowerPoint Template? – October 19, 2024
- How to Fill Text with an Image in PowerPoint: Expert Guide – October 18, 2024
Leave a Reply Cancel reply
Your email address will not be published. Required fields are marked *
Save my name, email, and website in this browser for the next time I comment.
Latest Posts
How to fix blurry pictures in powerpoint (10 easy fixes).
Learn how to fix blurry pictures in PowerPoint with easy tips like adjusting resolution, compressing images, or tweaking presentation settings.
How to Extract an Image from a PowerPoint Template?
Learn how to easily extract images from PowerPoint templates using various methods like Save as Picture, HTML, and Zip methods while preserving image quality.
How to Fill Text with an Image in PowerPoint: Expert Guide
Learn how to fill text with an image in PowerPoint with our detailed guide. Enhance your presentation with creative, image-filled text in just a few steps.
How to Put YouTube Videos in PowerPoint: A Step-by-Step Guide
Want to make your PowerPoint presentation a bit more engaging with a cool YouTube video? It’s actually pretty simple to do. By following a few easy steps, you can embed a YouTube video directly into your PowerPoint slide. This way, you won’t have to switch between applications during your presentation – it’ll all be right there in your slide show!
Step by Step Tutorial on How to Put YouTube Videos in PowerPoint
Before we dive into the steps, know that adding a YouTube video to your PowerPoint will enhance your presentation and keep your audience interested. No more boring bullet points, just a captivating video to emphasize your point!
Step 1: Find the YouTube video you want to embed
Locate the YouTube video that you want to add to your PowerPoint presentation.
Finding the right YouTube video is the first step. Make sure it’s relevant to your presentation’s content and will add value for your audience. Once you’ve found it, copy the URL from the address bar.
Step 2: Open your PowerPoint presentation
Open the PowerPoint presentation where you want to insert the YouTube video.
Make sure you’re on the slide where you want the video to appear before you move on to the next step. This will save you the hassle of moving it later on.
Step 3: Click on the ‘Insert’ tab
In PowerPoint, go to the ‘Insert’ tab on the menu bar.
The ‘Insert’ tab is where all the magic happens – from adding pictures and shapes to videos, it’s your go-to for jazzing up your slides.
Step 4: Select ‘Video’ and then ‘Online Video’
Within the ‘Insert’ tab, click on ‘Video’ and then select ‘Online Video’.
By selecting ‘Online Video’, you’re telling PowerPoint that you’re looking to add a video from the web, not one that’s saved on your computer.
Step 5: Paste the YouTube video URL
In the dialog box that appears, paste the YouTube video URL that you copied earlier.
After you paste the URL, PowerPoint will do a quick check to make sure it’s a valid link. If all is well, you’ll be able to move on to the next step.
Step 6: Resize and position the video on your slide
Once the video is embedded, you can resize and position it on your slide to fit your design.
Click and drag the corners of the video to resize it, and click and drag the video itself to move it around the slide. You can also use the format options to add effects like borders or shadows.
After you complete these steps, you’ll have a YouTube video embedded directly into your PowerPoint slide. No more awkward pauses while you exit the presentation to open up a browser. Your video will play seamlessly within your slide when you’re presenting, making for a smooth and professional presentation.
Tips for Putting YouTube Videos in PowerPoint
- Make sure you have a stable internet connection during your presentation, as the video will need to buffer.
- Test the video before your presentation to ensure it plays correctly.
- Keep the video short and to the point – you don’t want to lose your audience’s attention.
- Consider the volume of the video – ensure it’s audible for your audience but not overwhelming.
- If the video is long, use the ‘Trim Video’ feature in PowerPoint to show only the relevant part.
Frequently Asked Questions
Can i put a youtube video in powerpoint if i don’t have an internet connection.
No, you need an internet connection to play a YouTube video in PowerPoint as it streams directly from the website.
Will the video play automatically when I get to that slide?
You can set the video to play automatically or when clicked – it’s up to you. You’ll find these options in the ‘Playback’ tab once the video is inserted.
Can I put a YouTube video in any version of PowerPoint?
You can embed YouTube videos in PowerPoint 2010 and later versions. Earlier versions do not support this feature.
What if the YouTube video is removed or the link changes?
If the YouTube video is removed or the link changes after you have embedded it, the video will not play in your PowerPoint. Always check the video link before presenting.
Can I embed a video that is not from YouTube?
Yes, as long as it’s an online video, you can embed it by following the same steps and using the video’s direct link.
- Find the YouTube video you want to embed.
- Open your PowerPoint presentation.
- Click on the ‘Insert’ tab.
- Select ‘Video’ and then ‘Online Video’.
- Paste the YouTube video URL.
- Resize and position the video on your slide.
There you have it – putting YouTube videos in PowerPoint is a piece of cake! With this handy skill, you can now make your presentations more dynamic and engaging for your audience. Just remember to choose videos that complement your content and resonate with your listeners. And don’t forget to test everything beforehand to ensure a smooth-running presentation. Happy presenting, and may your slides be ever compelling!

Matthew Burleigh has been writing tech tutorials since 2008. His writing has appeared on dozens of different websites and been read over 50 million times.
After receiving his Bachelor’s and Master’s degrees in Computer Science he spent several years working in IT management for small businesses. However, he now works full time writing content online and creating websites.
His main writing topics include iPhones, Microsoft Office, Google Apps, Android, and Photoshop, but he has also written about many other tech topics as well.
Read his full bio here.
Share this:
Join our free newsletter.
Featured guides and deals
You may opt out at any time. Read our Privacy Policy
Related posts:
- How to Put Embedded Youtube Video in Powerpoint 2010
- How to Save Powerpoint as PDF with Notes
- How to Set Time for Slides in Powerpoint
- How to Add Page Numbers in Powerpoint 2010
- How to Loop a Slideshow on Powerpoint 2013
- How to Unhide a Slide in Powerpoint 2013
- How to Delete a Slide in Powerpoint 2010
- How to Make a Powerpoint Slide Vertical in Powerpoint 2013
- How to End Powerpoint on Last Slide in Powerpoint 2010
- Can You Save a Powerpoint as a Video in Powerpoint 2013?
- How to Embed a YouTube Video in Powerpoint 2013
- How to Hide a Slide in Powerpoint 2010
- How to Create a PowerPoint Presentation Step by Step: 2024 Guide
- How to Embed a Video in PowerPoint: The 2024 Guide
- How to Change Hyperlink Color in Powerpoint 2010 (An Easy 5 Step Guide)
- How to Copy a PDF File Into PowerPoint: A Step-by-Step Guide
- How to Insert Slide Number PowerPoint: The Ultimate 2024 Guide
- How to Rotate a Slide in PowerPoint: A Step-by-Step Guide
- How to Add a YouTube Video in Powerpoint Online
- How to Embed a Word Document Into PowerPoint 2000: A Step-by-Step Guide

Video For Business
How to embed a youtube video in powerpoint in 10 easy steps, by: glory agu and felix johnson.
Learn how to embed a YouTube video in PowerPoint with our easy 10-step guide. Enhance your presentations with engaging video content.
These days, presentations are more engaging and impactful when multimedia elements, such as YouTube videos, are incorporated. One of the most effective ways to captivate your audience is by embedding YouTube video in PowerPoint slides.
Comprehensive Adilo Review 2024: Why It’s the Best Video Hosting Platform and Why You Should Use It
Table of Contents
Host captivating videos that boost engagement, start a free trial, what is microsoft powerpoint.
Microsoft PowerPoint has become a very useful tool in our day-to-day activities, especially in official settings.
It is a powerful presentation software that allows users to create interactive and beautiful looking presentations. They can be used to present reports, seminars, and meeting agendas, as well as create graphic design projects.
PowerPoint can be a very useful tool in the hands of anyone who understands it.
It allows you to create presentations that not only capture and hold the attention of your audience but also create a lasting impression.
PowerPoint has a lot of design templates with different multimedia options, so you can make your content more beautiful as well as engaging.
With Microsoft PowerPoint tools and features, you can add text, images, charts, and multimedia such as audio and video and even graphs and charts. The reason for this flexibility is to help in passing across your information more effectively.
PowerPoint is majorly used in educational settings, business environments, and also for personal projects because of how versatile and easy it is. It is very user-friendly which makes it very accessible to people with different levels of technical expertise.
With it, you can work with multiple users on the same presentation at the same time, which makes it a great tool for team projects. You can save these projects in various formats, or they can even be shared online.
PowerPoint does this so that your presentations are accessible to a broader audience.
While we have established that PowerPoint can accommodate multimedia elements like photos and videos, we can also insert YouTube videos in PowerPoint presentations. Fortunately, this is a straightforward process.
In this guide, we’ll walk you through the simple steps to embedding a YouTube video in PowerPoint.
Handpicked For You:
- 15 Best Tools for Making Social Media Videos
- How to Create Powerful Sales Videos
- 5 Killer Explainer Video Script Templates & Examples
Here’s how to Embed YouTube Video in PowerPoint in 10 Easy Steps
Let’s begin.
Credit: Kelvin Stratvert | How to Insert YouTube Video In PowerPoint | Video Re-Hosted On Adilo – The Best Video Hosting Platform
Step 1: Open Your PowerPoint Presentation
The first step in embedding a YouTube video in PowerPoint is to launch your PowerPoint on your computer and open a presentation.
If you do not have a presentation prepared, you can create a new one by selecting a template or a blank slide and customizing it to your taste. PowerPoint provides a range of templates that you can choose from, making it easy to start a new presentation.
You can access these templates from the start screen or the “File” tab by selecting “New.”
Open Your PowerPoint Presentation
Step 2: Navigate to the Slide Where You Want to Embed the Video
Once your presentation is open, navigate to the specific slide where you want the YouTube video to appear.
You can do this by clicking on the slide in the slide navigation pane on the left side of the screen to make it active.
Make sure that the slide is appropriate for video content and has enough space to accommodate the size of the YouTube video without making other elements look like clutter.
Ensure that the slide layout is suitable for a YouTube video; a blank slide or a slide with minimal content is usually ideal for embedding a YouTube video.
Open the Slide You Wish to Embed the Video
Step 3: Go to the Insert Tab
When you have selected the slide you want, go to the “Insert” tab located on the ribbon at the top of the screen. The “Insert” tab has various options for adding different types of content to your slide, including images, shapes, charts, and media.
This tab is your gateway to adding multimedia elements that can enhance your presentation.
Use the Insert Function
Step 4: Click on Video
In the “Insert” tab, locate the “Video” option. Click on it. This option allows you to add video content to your slide. You will see a drop-down menu with different options for adding video content. You will typically see options like “Video on My PC” and “Online Video.”
Select the Video Option
Step 5: Select Online Video
From the drop-down menu, select “Online Video.” This option allows you to embed videos from online sources, such as YouTube or Adilo.
A new window will appear, providing you with a search bar where you can look for the desired video. The ability to embed online videos directly into your presentation adds a dynamic element to your slides.
Step 6: Search for the YouTube Video
In the “Online Video” window, you will see a search bar where you can type the keywords for the YouTube video you want to embed.
Enter the relevant keywords and press enter or click on the search icon. PowerPoint will then display a list of search results that match your query. This search functionality within PowerPoint makes it convenient to find and select the video you need.
Also, you can search for the YouTube video directly on the YouTube app or the web and copy the URL of the YouTube video you want to embed.
The URL is located in the address bar at the top of your browser. Click on the URL to highlight it, then right-click and select “Copy” or press “Ctrl+C” on your keyboard.
Search for the YouTube Videos
Step 7: Choose the Desired Video
Browse through the search results to find the YouTube video that you want to embed in your presentation. Once you find the YouTube video, click on it to select it.
You can preview the YouTube video to ensure it is the correct one before proceeding. Selecting the right YouTube video is quite important. You don’t want to select a YouTube video that does not align with the content and purpose of your presentation.
Choose Your Desired Video
Host Engaging Audio That Drives Conversions
Step 8: insert the video.
After selecting the desired YouTube video, click on the “Insert” button. PowerPoint will then embed the YouTube video into your slide.
The YouTube video will appear as a placeholder on your slide, indicating that it has been successfully added. You can adjust its size and position as needed. We will see how to do that in the next step.
This step integrates the YouTube video into your presentation, ready for you to customize it to your taste.
In the case where you copied the URL, as we explained in step 6, go to the “Online Video” dialog box, and you’ll see a field labelled “From a Video Embed Code or URL.”
Click inside this field and paste the YouTube URL you copied earlier by right-clicking and selecting “Paste” or pressing “Ctrl+V.
Insert Your Video
Step 9: Resize and Position the Video
With the YouTube video now embedded in your slide, you can resize and reposition it to fit your presentation’s layout.
Click on the YouTube video to select it, and then drag the corner handles to resize it. You can also click and drag the YouTube video to move it to the desired location on the slide.
Adjusting the size and position of the YouTube video ensures that it complements the other elements on your slide.
Step 10: Set Video Playback Options, Preview and Save Your Presentation
After embedding and positioning the YouTube video, you can set several playback options for embedded YouTube videos.
To access these options, click on the YouTube video to select it, then go to the “Playback” tab in the PowerPoint ribbon. Here, you can choose whether the YouTube video should start automatically or when clicked, set it to loop, and adjust other playback settings.
Before saving your presentation, preview your slide to ensure everything looks as expected. You can do this by entering the “Slide Show” mode.
This mode allows you to view your presentation as your audience will see it, ensuring that the YouTube video plays correctly and is visually appealing.
If everything looks good, save your presentation by clicking on the “File” tab in the PowerPoint ribbon and selecting “Save As”. Choose a location on your computer, enter your desired file name, and click “Save”.
This final step ensures that all your changes are saved and your presentation is ready for sharing.
Customize Video Playback Options
See? Very easy.
Why Embed a YouTube Video in PowerPoint?
Now you know the steps of embedding YouTube video in PowerPoint, it’s important to understand the benefits also.
Videos can help illustrate your points more effectively, provide visual interest, and keep your audience engaged. YouTube offers a vast library of videos that can enhance your presentation’s content, making it more relatable and compelling
Embedding YouTube video in PowerPoint can make your presentation less bogus.
This is important for presentations because you want to give your audience as much information as possible without them reading through the entire document themselves.
It takes the important information and puts it in a pictorial or video form that can easily be understood at a glance. Other media such as graphs and charts can also be added to make the presentation as informative as possible without it being too lengthy with texts.
Tips for Embedding YouTube Video in PowerPoint
- Ensure Internet Connectivity : Since the video is embedded from YouTube, you’ll need an active internet connection to play it during your presentation.
- Use High-Quality Videos: Select videos with high resolution to ensure they look good when projected on a large screen.
- Cite Your Sources : If the video is not your own, be sure to give credit to the creator to avoid plagiarism.
- Check for Ads : Be aware that some YouTube videos may contain ads that can interrupt your presentation. Consider using YouTube videos that are ad-free or downloading the video if you have the rights to do so.
Host, Organize, Manage and Share Your Videos On Adilo - Completely Ad-Free
Final thoughts on embedding videos on powerpoint.
Embedding a YouTube video in PowerPoint is a powerful way to enhance your presentations and engage your audience.
By following these 10 easy steps, you can seamlessly embed YouTube videos into your slides, making your content more enriched, visually appealing and impactful.
This simple yet effective technique can elevate the quality of your presentations, making them more memorable and engaging.
As an experienced SEO and Social Media Strategist, I have dedicated the past four years to helping businesses enhance their online visibility and achieve remarkable growth. With a strong background in SEO and a passion for content strategy, I specialize in crafting compelling, optimized content that resonates with target audiences and drives engagement.
My expertise extends to guiding businesses of all sizes in leveraging video marketing tools. With a keen eye for innovation, I've honed the ability to identify game-changing video marketing tools and tactics that propel brands ahead of the competition. Whether through content strategy or hands-on writing, I am committed to delivering results that elevate brands to new heights.
Glory Agu is a seasoned SEO content writer and social media strategist with a passion for helping businesses increase their online visibility and achieve transformative growth.
Glory’s journey began with a passion for creating content that not only engages but also drives measurable results. Throughout her career, she has collaborated with a diverse range of clients, from small and medium-sized businesses (SMBs) to established brands, helping them amplify their online presence and connect more effectively with their target markets. Glory’s work is rooted in a deep understanding of digital trends, which she continuously leverages to stay ahead of the curve and deliver content that is both timely and impactful.
Glory specializes in crafting SEO-optimized content that ranks well on search engines while maintaining a conversational and relatable tone that resonates with readers. Her expertise extends to identifying and implementing cutting-edge video marketing tools and strategies that have a transformative impact on brand engagement and conversion rates. With a keen eye for innovation, she is constantly seeking out game-changing tactics that propel brands to new heights. Whether through detailed long-form articles, dynamic product reviews, engaging social media content, or strategic content planning, Glory’s goal is to create value-driven content that supports her clients’ business objectives.
Glory’s foundation in digital marketing and content marketing was built through a series of specialized online courses, where she honed the skills and knowledge necessary to excel in this field. While her formal education in school wasn’t directly related to her current career, these courses provided her with practical insights and up-to-date industry knowledge required to succeed. This commitment to continuous learning has been instrumental in staying ahead in a rapidly evolving digital landscape, ensuring that she delivers the most effective and innovative solutions to her clients. Additionally, Glory’s passion for education is reflected in her experience teaching ESL (English as a Second Language) to Chinese children, further enhancing her ability to communicate complex ideas in simple, relatable ways.
- Top 20 Video Streaming Hosting Providers For This Year
- [Updated] Top 50 Video Marketing Statistics You Need To Know this Year
- Creating Successful TikTok Marketing Campaigns for Law Firms
- Top 21 Video Marketing Best Practices
Felix Johnson
Felix is the Senior Content Editor and Strategist at Adilo, where he harnesses his expertise in social video marketing, online video platforms, video editing, e-commerce, e-learning, and marketing to to help businesses drive results. With a keen eye for storytelling and a pulse on industry trends, Felix crafts actionable content that empowers brands to elevate their video marketing strategies and thrive in the digital landscape.
Felix is the Senior Content Editor and Strategist at Adilo, where he leverages his deep understanding of social video marketing, online video platforms, video editing, e-commerce, e-learning, and marketing to drive tangible results for businesses. With a passion for storytelling and a finger on the pulse of industry trends, Felix creates actionable content that empowers brands to elevate their video marketing strategies and achieve success in the dynamic digital world.
Felix has amassed extensive experience in the ever-evolving landscape of digital marketing. His journey has seen him wear many hats, from hands-on video editing and production to developing comprehensive video marketing strategies. This diverse background allows Felix to approach content creation with a holistic perspective, ensuring that every piece of content aligns with broader business goals.
Felix’s expertise spans a wide spectrum within the digital marketing realm:
- Social Video Marketing: Felix understands the nuances of different social media platforms and how to optimize video content for maximum reach and engagement.
- Online Video Platforms: He possesses in-depth knowledge of various video hosting and sharing platforms, enabling him to guide businesses in selecting the right tools for their needs.
- Video Editing: Felix is skilled in video editing techniques that captivate audiences and convey brand messaging effectively.
- E-commerce and E-learning: He recognizes the power of video in driving sales and enhancing online learning experiences.
- Marketing Strategy: Felix develops data-driven content strategies that align with business objectives and deliver measurable results.
Felix holds a Bachelor’s degree in Marketing with a specialization in Digital Media. His academic foundation, combined with his practical experience, provides him with a well-rounded understanding of the digital marketing landscape.
Felix envisions a future where businesses of all sizes harness the full potential of video marketing to connect with their audiences on a deeper level. He is committed to empowering brands with the knowledge and tools they need to create compelling video content that drives growth and fosters lasting relationships with customers.
- Top 12 Vimeo Alternatives For Screen Recording This Year
- Free Video Ad Creation Software, Apps and Services That Are Super Easy to Use this Year
- The Best Voice-Over Classes, Training Courses, and Voice Coaching to Grow Your Talent
- The 10 Different Types of Explainer Videos & Examples of Each
Related Articles

Social Media
The complete guide to tiktok marketing (everything you need to know).
By Glory Agu
20 Mins Reading Time

Filmora vs Vegas Pro: The battle of the best editing software
12 Mins Reading Time

Why TikTok Marketing? Is it right for you + why it works so well in 2024
10 Mins Reading Time
You’re using an older browser version. Update to the latest version of Google Chrome , Safari , Mozilla Firefox or Microsoft Edge for the best site experience. You are using an outdated browser, so there may be issues with displaying the page. To make the website work correctly, use the latest version of one of these browsers: Google Chrome , Safari , Mozilla Firefox or Microsoft Edge .
- Corporate Training
- Course Selling
- Academic Learning
- Learning Basics
- Instructional Design
- Online Training Tools
- Manufacturing
- Products iSpring Suite iSpring Learn
- Use Cases Training organizations Onboarding Compliance Training Induction Training Product Training Channel Partner Training Sales Training Microlearning Mobile Learning
- Why iSpring
- Company About Us Case Studies Customers Partnership Course Development Contact Us
- Knowledge Hub Knowledge Hub Academy Webinars Articles Guides Experts on iSpring
- Language EN English Français Deutsch Español Italiano Nederlands Português Polski 中文 日本語 العربية Indonesia
- Shopping Cart
How to Embed a YouTube Video in PowerPoint

content creator
Helen Colman See full bio →

One sure and simple way to enhance a Microsoft PowerPoint presentation and audience engagement is to add a video from YouTube. This website is chock-full of educational and entertaining videos that can add a dynamic element to your content. Whether you want to use your own footage or “borrow” it from someone else’s channel, here are some step-by-step guides on how to insert videos into PowerPoint presentations.
- How to Embed a YouTube Video in PowerPoint as an Online Video
- How to Insert a Video Into PowerPoint Using an Embed Code
- How to Insert a YouTube Video as a Screencast
- How to Add a YouTube Video via iSpring Suite
1. How to Embed a YouTube Video in PowerPoint as an Online Video
Starting from version 2010, Microsoft PowerPoint includes a built-in tool for inserting videos from YouTube into slides. Follow these 5 steps to embed a YouTube video in a PowerPoint presentation:
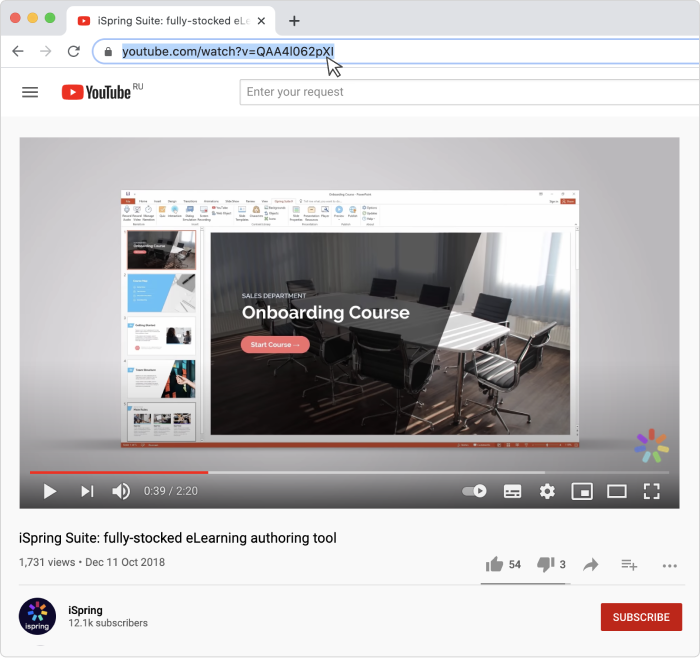
- Click on the thumbnail of the web video and click the Insert tab.

Pros and Cons
- Quick and easy
- Requires that viewers have a stable internet connection
- Playback is not customizable
- Can’t be done in PPT version 2007 and earlier
2. How to Add a Video in Presentations Using an Embed Code
A more advanced way to embed YouTube videos in PowerPoint presentations is to use the embed code. This method allows you to customize the YouTube video’s attributes by using the YouTube API parameters.
Here’s a brief guide on how to embed a YouTube video in your PowerPoint slide:
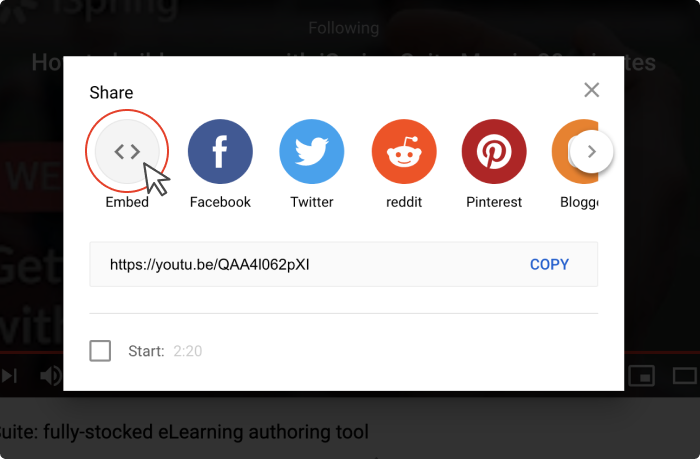
- Click on the Insert button or Enter.
Note: Before you add the YouTube video to PowerPoint, you can add some parameters to the code to make the video play the way you need it to. For example, you can let the video start playing automatically after a user opens the PowerPoint slide it has been placed in, or you can specify how many seconds from the start the video will begin and when it will end.
You can read about all the available YouTube API parameters here .
- More control over the online video’s playback and appearance with the help of parameters
- More time consuming than inserting a link
- An internet connection is required
3. How to Insert YouTube Videos in PowerPoint as Screencasts
While all of the above tips require viewers to have an internet connection, you can make your presentation internet independent by making a screen capture of the YouTube video by using the built-in screencasting tool. This option is available in PowerPoint 2013 and later versions.
Here is how to embed a YouTube video in PowerPoint as a Screencast:

- Open the YouTube video you want to add and click Select Area on the control menu. You’ll see a cross-haired cursor. By clicking on it and dragging it, you can select the area of the screen that you want to record. Note: It automatically records the audio and the mouse pointer. To turn off these options, deselect Audio and Record Pointer on the control dock.

- When you’ve finished, save your presentation with a video: File tab > Save . The recording is now embedded in the selected PowerPoint slide.
- Video can be played offline
- The quality of the captured video content is lower than that of the original version
- Requires more time than other techniques (the time required depends on the duration of the video you capture)
- May violate author’s rights
4. How to Put a YouTube Video in PowerPoint via iSpring Suite
This method assumes that you need to add YouTube videos in PowerPoint presentations and then turn your PPT deck to HTML5 so users can open and view them in a browser or convert the entire PowerPoint presentation to video format . This is a perfect way to go if you want to insert a YouTube video into a PowerPoint document and then share your presentation online and protect it from plagiarism and unfair use. You can do this easily with the help of iSpring Suite, one of the most robust PowerPoint add-ins.
iSpring Suite
Fully-stocked eLearning authoring toolkit for PowerPoint. No training required to start!

Here are the simple steps on how to add a YouTube video to a PowerPoint deck before publishing it to the Web:
- Download iSpring Suite and install it on your computer.

- Click on OK to insert a video into PowerPoint.
- To see how your PowerPoint presentation looks in a browser, click on the Preview button.

- Sharing options: slides can be shared online so learners can see them in a browser from any device (PC, laptop, tablet, or smartphone) and on any OS (Windows, Mac, etc.)
- Presentation can’t be edited by external sources after conversion, so copyrights will be protected
- Slides are safe behind a wall of protections – watermarks, passwords, and time and domain restrictions
- The PowerPoint presentation can’t be opened in offline mode
- Requires downloading third-party software
More than just a converter!
With iSpring Suite, you can not only insert a YouTube video into PowerPoint and convert your presentation to an online format, but you can also create versatile eLearning content. This is a top-rated authoring toolkit that allows you to create engaging online courses, quizzes, video tutorials, role-plays, and eLearning interactions. And no experience or tech skills are required.
Start your free iSpring Suite trial now →
How to Choose the Best Way to Embed YouTube Videos in Presentations
To simplify matters, take a look at this chart. It compares the pros and cons of all described methods in one place, so you can choose the one that’s most suitable for your needs.
FAQ on How to Embed YouTube Videos in PowerPoint
1. what video formats are supported in powerpoint presentations.
Here are the video file formats you can add to your presentations.
- Windows Video (.asf)
- Windows Video (.avi)
- MP4 Video (.mp4, .m4v, .mov)
- Movie (.mpg, .mpeg)
- Windows Media Video (.wmv)
2. How do you embed YouTube videos in PowerPoint Presentations and have them play automatically?
This method works for the “Embed It as an Online Video” option. Once you’ve added a video in PowerPoint, you can control how it will play: automatically, when clicked, or in the click sequence.
To set this up, go to the Playback tab of the PPT ribbon. It appears when you select the video on a presentation slide.

Then click the drop-down menu next to Start and choose Automatically if you want the video to begin as soon as you open the slide.

3. Why can’t I embed YouTube videos in my PowerPoint Presentation?
There may be different reasons why you can’t embed YouTube videos in PowerPoint. To understand this issue, check out this article by Microsoft.
4. PowerPoint can’t insert a video from the selected file. How can I fix it?
There could be several reasons why PPT isn’t allowing you to insert a video from the selected file. The first possible issue is a video format compatibility — PPT may not support the format of the video you are trying to insert. One more reason is codec issues. Codecs are software used to compress or decompress a video or audio file. If your system doesn’t have the correct codec, the file will not play. Check out this article by Microsoft to find out details.
5. Can I download YouTube videos?
There are certain limitations and legal aspects that you should be aware of. YouTube’s Terms of Service specify that videos are intended for streaming, not for downloading, and unauthorized downloading can violate copyright laws. There are also third-party services — free YouTube downloader apps that allow you to download videos from YouTube. But using such services might be against YouTube’s policies, potentially leading to the suspension of your account.
YouTube offers an official way to access videos through its own app for offline viewing, which is YouTube Premium, a subscription-based service. This is legal and permitted by YouTube’s policies.
Additionally, if you are the owner of the content or have explicit permission from the owner, you can download the video directly from YouTube’s site.
There are several ways to add YouTube videos to PowerPoint. Embedding YouTube videos may require different amounts of time and have various playback options. If you want to customize video playback, the best option will be to embed video content in your slide. If your task is capturing a video and inserting it into a PowerPoint presentation that will be played offline, record a screencast. And, finally, in case you want to share your presentation online and are concerned with its security, use iSpring Suite .
Useful Resources on PowerPoint
We hope you found our step-by-step guide helpful. Are you a PowerPoint lover? If so, here are some other helpful articles that will provide all the tips on how to get the most out of PowerPoint and grab your audience’s attention:
- How to Share a PowerPoint Presentation Online
- How to Protect PowerPoint Presentations
- How to Add Narration to a PowerPoint Presentation
- How to Convert PowerPoint Presentation to an eLearning Module
- How to Remove the Background From a Picture in PowerPoint
Table of Contents
Create online courses and assessments in record time.

Content creator
Helen Colman
She enjoys combining in-depth research with expert knowledge of the industry. If you have eLearning insights that you’d like to share, please get in touch .

How to Email a PowerPoint Presentation: 5 Proven Ways
22 PowerPoint Add-ins and Plug-ins – Free & Paid for 2024
How to Create an eLearning Course – A Comprehensive Guide
We use cookies to collect info about site visits and personalize your experience. See our Cookie Policy for more details.
Manage your cookies
Essential cookies are always on. You can turn off other cookies if you wish.
Essential cookies
Analytics cookies
Social media cookies
Critical PowerPoint Shortcuts – Claim Your FREE Training Module and Get Your Time Back!

How to Embed a YouTube Video in PowerPoint (Step-by-Step)
- PowerPoint Tutorials
- Pictures, Icons, Videos, Etc.
- February 25, 2015
This is your SUPER GUIDE for how to embed a YouTube video in PowerPoint, covering all versions of PowerPoint (find your version below).
Adding videos to your presentations is a great way to create more engaging content and backup your main points with PROOF.
Before you get started embedding your video though, there are 3 considerations to take into account
Note: You are limited to what you can do with online videos in PowerPoint, compared to videos you embed from your computer. To learn all about these differences, read our guide
YouTube Video Considerations
1. which version of powerpoint you are using.
There are various techniques for the different versions of PowerPoint and add-ins you can install to make this process (and your life) easier.
The guide below covers PowerPoint versions 2007, 2010, 2013 and the latest Office 365 version of PowerPoint.
2. Do you want the YouTube video’s entire playlist on your slide?
If so, you need to navigate to your video through the YouTube channel’s playlist, which drove me crazy when I was trying to figure this out.
Also, inserting a playlist isn’t available in PowerPoint 2007.
3. Do you need to trim your YouTube video?
If you want to take advantage of all the PowerPoint video editing features, you will need to find a way to download your YouTube video and embed it in PowerPoint.
That’s because the FULL range of PowerPoint video editing tools is only available for videos you directly embed into PowerPoint from your computer.
To see everything you can do with videos embedded directly from your computer (instead of from an online source like YouTube), read our guide here .
PowerPoint 2019 (Office 365) Embed a YouTube Video
1. find your youtube video’s proper url.
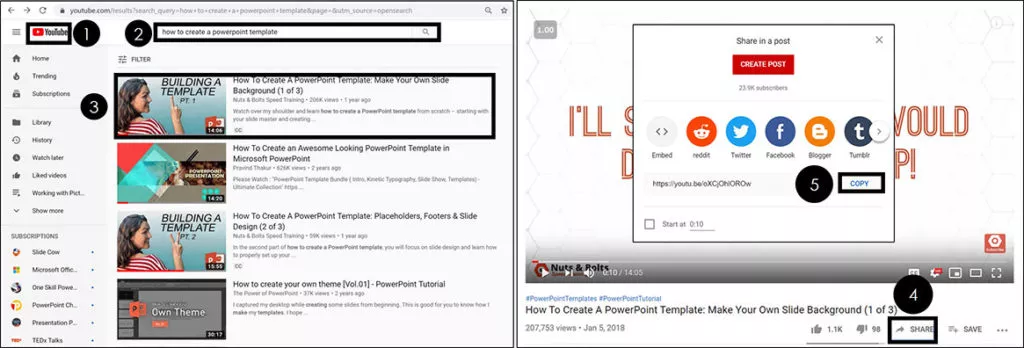
To find the right URL for your YouTube video to embed into PowerPoint, follow these steps:
- Navigate to YouTube.com
- Use the Search Bar to find your video
- Select your video to open the YouTube Player
- Click Share at the bottom of the video player
- Click Copy
The same is true if you are using an online video from another source.
You want to make sure you use the Share button (or similar feature) to get the proper URL for your video before you embed it into PowerPoint.
Otherwise it might not play properly, as discussed below.
WARNING: Get the right YouTube URL
You want to make sure you copy your video’s URL using the share button. DO NOT use the URL from your web browser.
That’s because the URL in your web browser tends to start where you last left off in the video and not at the beginning of the video.

In the picture above this is reflected in the URL with T=60s. This means the video will start 60 seconds into the video, and not from the beginning.
This can lead to an embarrassing presentation, where you play the video at the punchline that you want to make instead of the full video that leads up to the punch line.
2. Embed your YouTube video into PowerPoint

To embed a YouTube video in PowerPoint, simply:
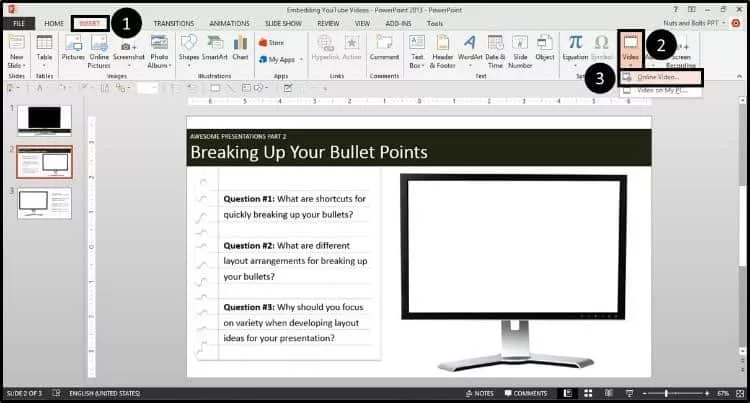
- Navigate to the Insert tab
- Select the Video drop down (within the Media group)
- Choose Online Video
- Where it says Enter the URL for the Online Video , Paste in (Ctrl + V) your URL
- Click Insert
Clicking Insert , a message at the bottom of your screen will tell you the video is processing. Once it’s done, the video appears on your slide as you can see below
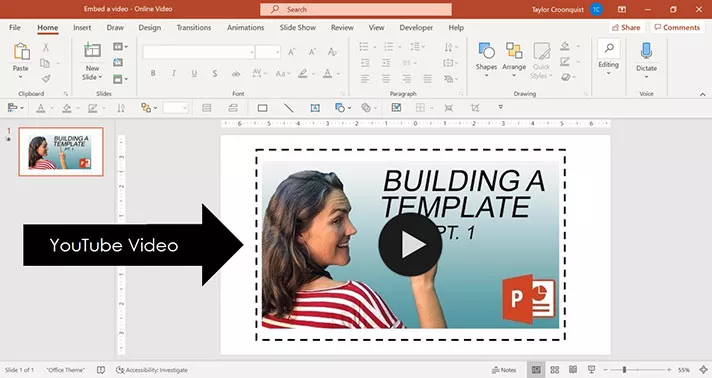
How to trim a YouTube video
Keeping in mind that you are limited in what you can do with online videos in PowerPoint (like YouTube videos), you can adjust the start time of your YouTube video.
This allows you to start your YouTube video at a certain time within the video, so you can just show the most relevant part of the video that backs up your presentation.
The trick to doing this is to adjust it BEFORE you copy the YouTube video’s URL.
If you want to trim both the start and end times of your video, you’ll need to download the YouTube video, embed the video from your PC and then use the Trim command.
To learn how to embed a video in PowerPoint (including trimming the video’s length), read our guide here .
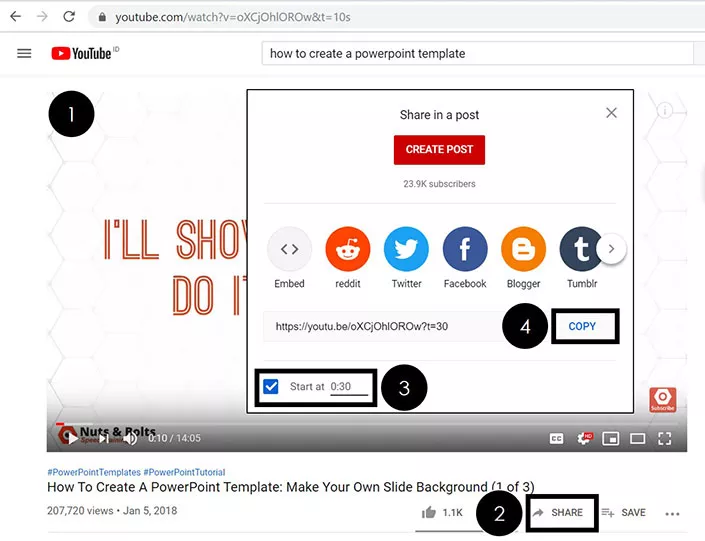
To trim a YouTube video to a certain start time, simply:
- Open your YouTube video’s watch page
- Click the Share button
- Adjust the video’s Start at time
Adjusting the YouTube video’s start time, you’ll see the new start time reflected in the URL, as pictured below.

PowerPoint 2013: Embed a YouTube video in PowerPoint
There are two ways to embed YouTube videos in PowerPoint 2013: the new dedicated YouTube option in PowerPoint, and the old embed code method.
Warning: New YouTube Option
Although the new YouTube option in PowerPoint simplifies the embedding process…you DO lose the capability to format your YouTube videos and/or embed an entire YouTube playlist.
To format the appearance of the YouTube video in PowerPoint 2013 or to grab a playlist, you still need to use the old embed code method (the second method).
I’ve covered both methods in the tutorials below. You’ll notice I used an image of a computer screen to frame the video and create a cool effect…just another tip for making your videos come to life!
There are two methods for adding YouTube videos in PowerPoint:
Method #1 – The dedicated YouTube option (simplest but least flexible)
Method #2 – Using the embed code (most flexible)
Although the words ‘embed code’ wig most people out, rest assured that you don’t need to know ANYTHING about coding to pull the second method off…YouTube does all of the hard work for you
Method #1: Dedicated YouTube option
1. search the youtube dialog box.
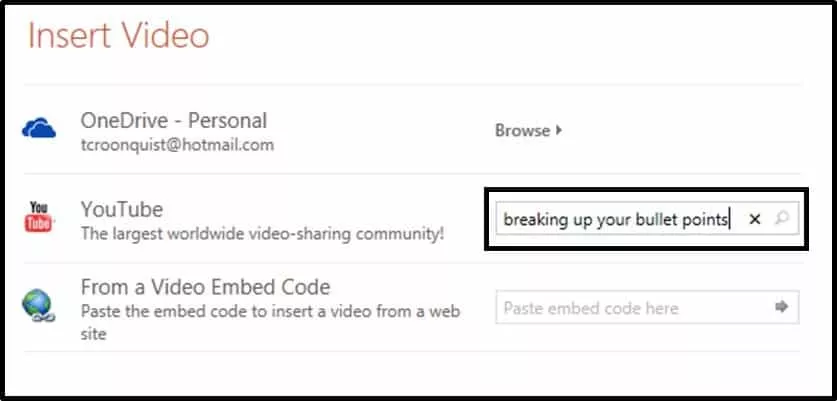
Within the online video dialog box, go to the YouTube search box and type the name of the video you are searching for (in this case I’ve typed ‘breaking up your bullet points’), and then hit Enter.
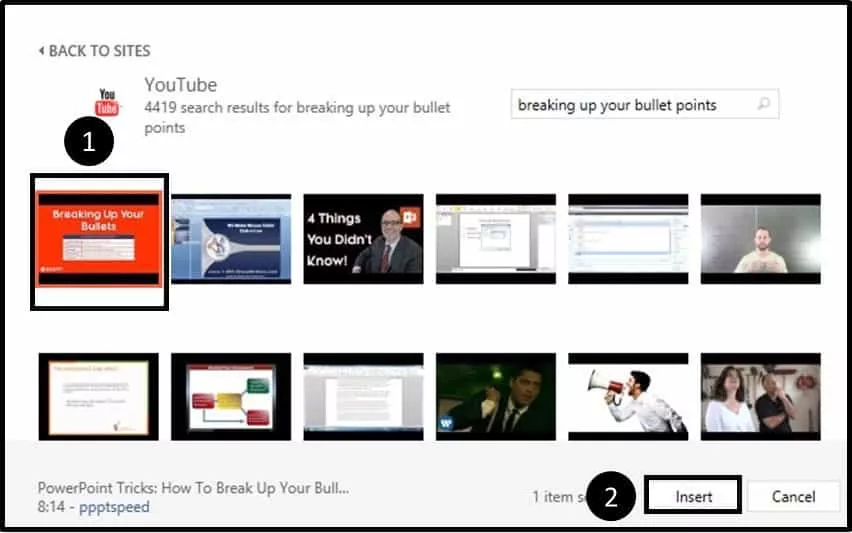
The dialog box searches YouTube and displays the video results. In this case the video we want is on the far left so I will select it and hit Insert.
2. Resize the YouTube video to fit your screen
Note: If you are using an image like I am, you want to extend the YouTube video until its controls cover up the bottom of the picture…which will make it look more realistic.
With the video setup, double-click the embedded YouTube video to load the video and see what it looks like.
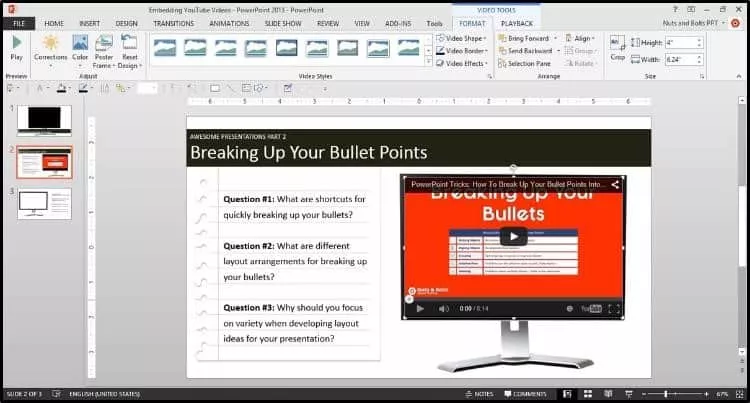
What about the playlist and other formatting options?
Although this new YouTube embedding method is EXTREMELY fast and easy, notice that you are not given any options to remove the YouTube controls (on the bottom or the top of the video) and there was no option to include the entire YouTube playlist (assuming there is one associated with that video).
You can see the difference in this picture:

For more control over these additional features, you need to know how to embed a YouTube video using the embed code method, which is SUPER straightforward and easy…continue reading on to see how.
Method #2: Using the embed code
This technique not only works for embedding a YouTube playlist into your presentation, but will also work for embedding other online videos into your presentation.
1. Navigate to your YouTube video through the channel playlist
Assuming that you want a video’s entire playlist, you need to navigate to the channel where the playlist exists, and open the video through the playlist. If you don’t care about the playlist, simply search YouTube as you normally would.
This might seem SUPER weird, but as you will see in a minute, it works.
To get the playlist for this video, you can see that I’ve navigated to the Nuts & Bolts channel page (fancy that!), selected the playlists option, found my playlist and then found the video that I want within the playlist.
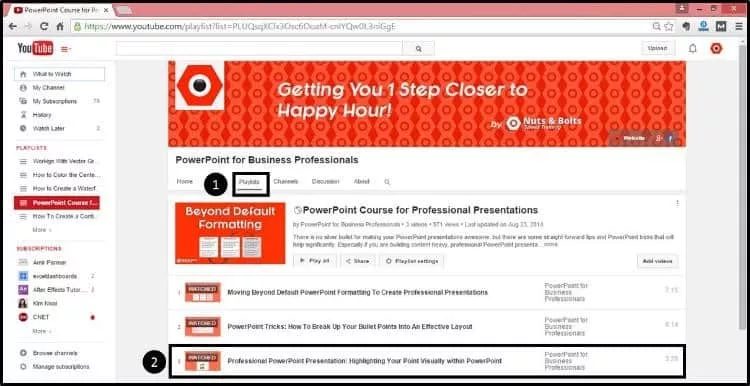
Select the video (through the playlist) to open the video in YouTube as you normally would. Notice in the picture below, to the right of the video, you can see the entire playlist.
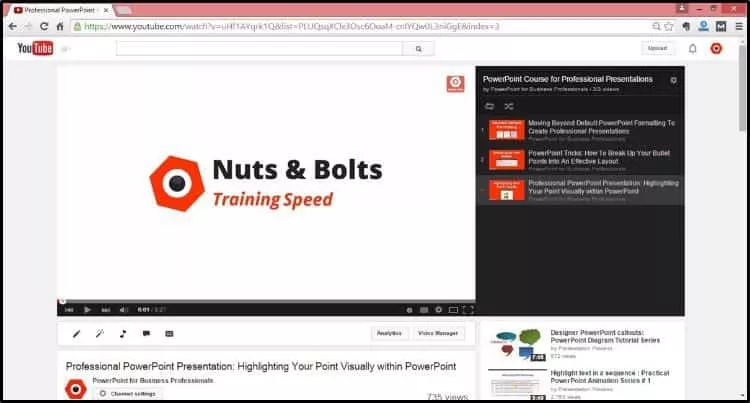
2. Navigate to the embed code
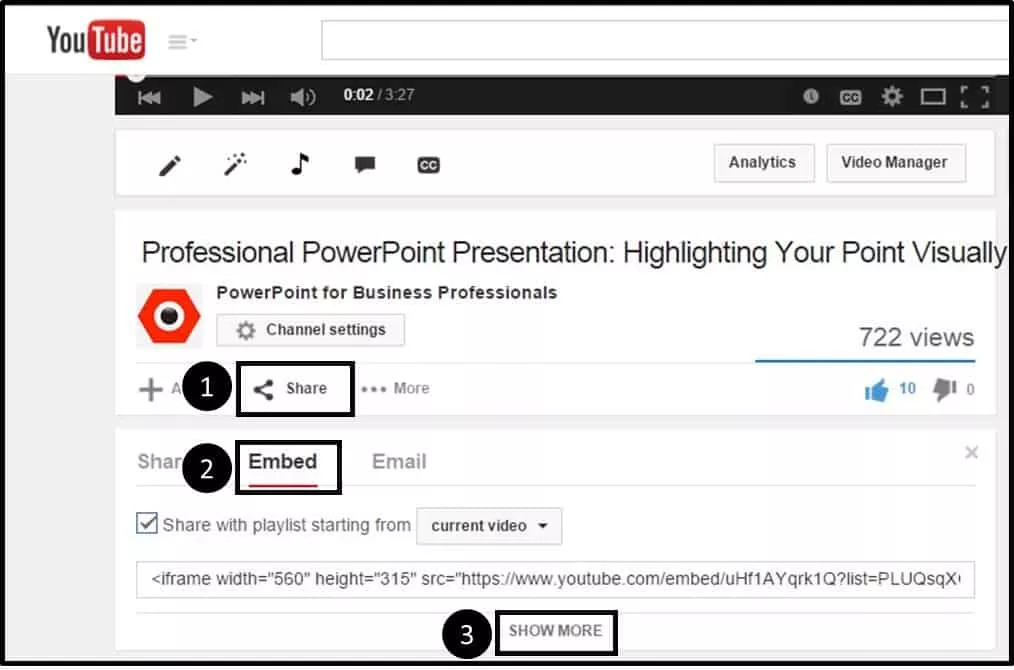
3. Choose how you want your video to play
When embedding a YouTube video in PowerPoint 2013, there are few options you want to pay attention to, primarily:
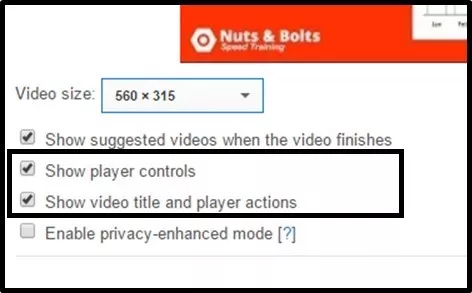
Option #1: Show Player Controls – This includes the pause, play and other navigational features at the bottom of the YouTube video.
Option #2: Show Video Title and Player Actions – This includes the tile of the video, share buttons on the far right and a playlist dropdown…assuming the video is part of a playlist and you navigated to it through the playlist itself.
Leaving these selected, the YouTube video will play in PowerPoint as demonstrated below.
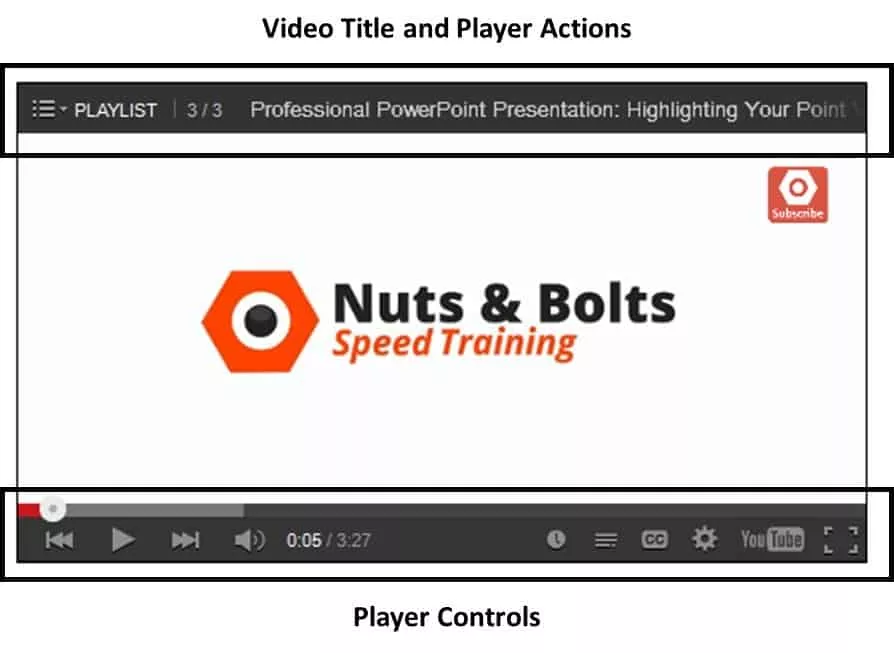
If you uncheck both of these options, your YouTube video will play in your PowerPoint presentation as pictured below (you can obviously do a hybrid of these controls as well).

Other video options include:
Video size – Not terribly important as you can manually resize your video within PowerPoint anyway.
Show suggested videos when the video finishes – This is optional and depends on whether you want people to continue watching other videos once the video finishes. This option is not available if you navigate to the video through the playlist as I described above.
Enable privacy – Enhanced mode – This last option is only relevant if you are embedding the YouTube video on a website…choosing this option will not work in PowerPoint.
4. Copy and Paste the Embed Code
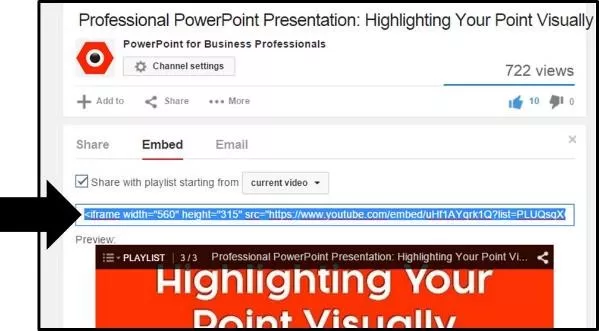
Alternatively, you can simply right-click the video, select ‘Get embed code’ and then hit CTRL + C to copy.

With the embed code copied, back in PowerPoint 2013, navigate to the Insert tab, open the Insert Video dropdown and select Online Video.

In the dialog box that pops open, in the ‘From a Video Embed Code’ option, hit CTRL + V on your keyboard to paste the embed code into the dialog box and then hit Enter.
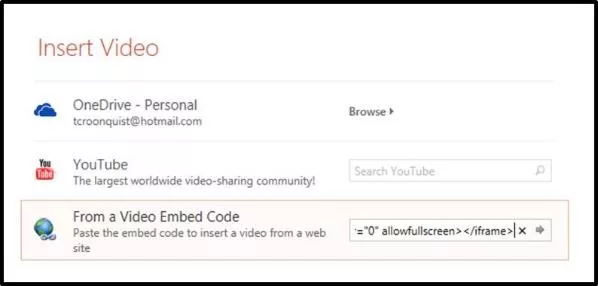
A black box is inserted into your layout that you now want to resize and position.
If you are using a blank TV or computer monitor image (as I am in this example) you want to stretch the video down to cover the bottom of the monitor so that the YouTube controls cover the controls on the static image…it will look more realistic this way.
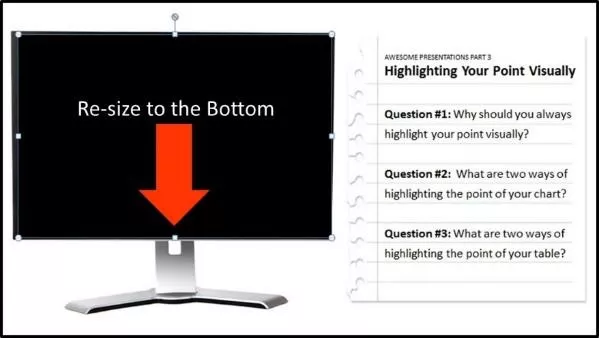
Note: Going this route has given us more control over the look and feel of our YouTube video and we were able to get the playlist feature in the upper left-hand corner.
PowerPoint 2010: Embed a YouTube video in PowerPoint
Believe it or not, there are three ways to embed YouTube videos in PowerPoint 2010:
- The free add-in (see Method #1 on the PowerPoint 2007 tab)
- Using the Shock Wave ActiveX Control (see Method #2 on the PowerPoint 2007 tab)
- Using the dedicated YouTube embed option
In this tutorial, I will focus on the third and newest method, which is a HUGE improvement over the previous methods: using the dedicated YouTube embed code option.
This method gives you the most flexibility in formatting your YouTube video in PowerPoint AND it allows you to embed an entire playlist…something that was not possible in PowerPoint 2007.
For the tutorial, I used an image of a computer screen to frame the video and create a cool effect…just another tip for making your videos come to life!
1. Find your YouTube video

When embedding a YouTube video in PowerPoint 2010, there are few options you want to pay attention to, primarily:
Option #2: Show Video Title and Player Actions – This includes the tile of the video, share buttons on the far right and a playlist dropdown (see ‘getting the playlist’ below) on the left…assuming the video is part of a playlist.
Leaving these selected, your YouTube video will play in PowerPoint as demonstrated below.
If you uncheck both of these options, your YouTube video will play in your PowerPoint presentation as displayed here:
Video size – This is not terribly important as you can manually resize your video within PowerPoint anyway.
Show suggested videos when the video finishes – This is optional and depends on if you want people to continue watching other videos once the video finishes.
Enable privacy – Enhanced Mode – This is only relevant if you are embedding the video on your website…choosing this option will not work in PowerPoint.
As YouTube states “Enabling this option means that YouTube won’t store information about visitors on your web page unless they play the video.”
4. Copy and paste the embed code
With the YouTube embed code copied, back in PowerPoint, navigate to the Insert tab, select Video and then select the ‘Video from Web Site’ option.

In the dialog box that pops open, hit CTRL + V on your keyboard to paste the YouTube embed code into the dialog box, and then click on Insert.
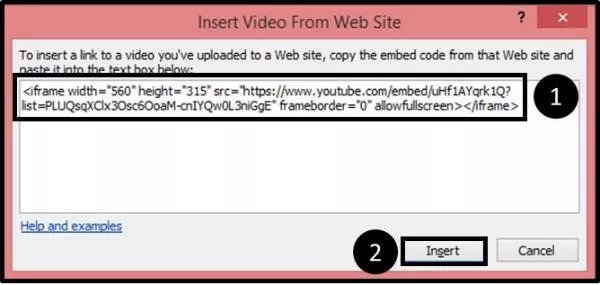
A black box is inserted onto your slide that you then want to resize and position.
Note: If you have the option to show the player controls at the bottom of your video, you will want to stretch the video out to cover the image you are using (in this case a blank computer screen) so that the YouTube video controls show on top of the controls on your image.
That way, when you play the video, it will look more realistic.
To see how the video lines up within your frame (which can be tough when you have a black box on top of a black frame), simply double click the video in the Normal View, and the YouTube video will load.
Notice in the picture below how the YouTube controls replace the controls on the bottom of the static picture I’m using, creating a more realistic effect in PowerPoint.
PowerPoint 2007: Embed a YouTube in PowerPoint
There are two methods for inserting YouTube videos in PowerPoint 2007, and a number of trouble shooting issues you need to be aware of.
Method #1: The Easy Way – Using add-ins like the free one built by Microsoft MVP Shyam, which does all of the hard work for you.
Method #2: The Harder Way – Adding the Developer tab to your Ribbon, adding a Shockwave ActiveX Object, and then manually manipulating the URL of your YouTube video.
Which one is best depends on how many YouTube videos you need to add to your PowerPoint presentations and how often you plan to do so.
If you frequently need to install YouTube videos in PowerPoint, you should definitely get the free add-in for PowerPoint 2007 and/or consider upgrading to a more recent version of PowerPoint which gives you additional YouTube options like adding playlists.
Warning: Compatibility Issues
If you are sharing your files with people using other versions of PowerPoint, you also need to be aware of the compatibility issues.
YouTube videos inserted in more recent versions of PowerPoint (2010 and 2013) will not necessarily play when opened in PowerPoint 2007…they might, it just depends on how they were added.
That said, any YouTube video successfully inserted in an earlier version of PowerPoint, will always play in a later version.
Method #1: The Easy Way
Embedding YouTube videos in PowerPoint 2007 normally requires getting and manipulating the video’s URL. This easy method of using an add-in is awesome because it does all of the hard work for you!
It takes a minute in the beginning to download and install the add-in, but once it’s all set up, with just a few clicks (as you’ll see below), you can quickly grab your YouTube videos and play them directly in PowerPoint.
A big thanks to Microsoft MVP Shyam Pillai for developing this great free add-in!
1. Download the free add-in
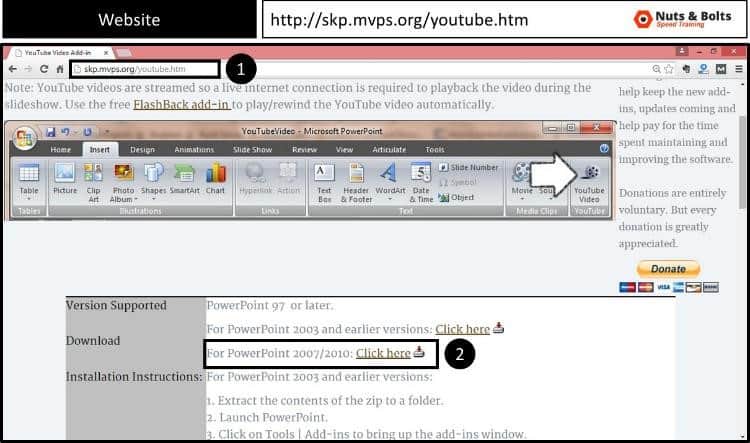
2. Extract the zipped file

3. Copy the PowerPoint add-in
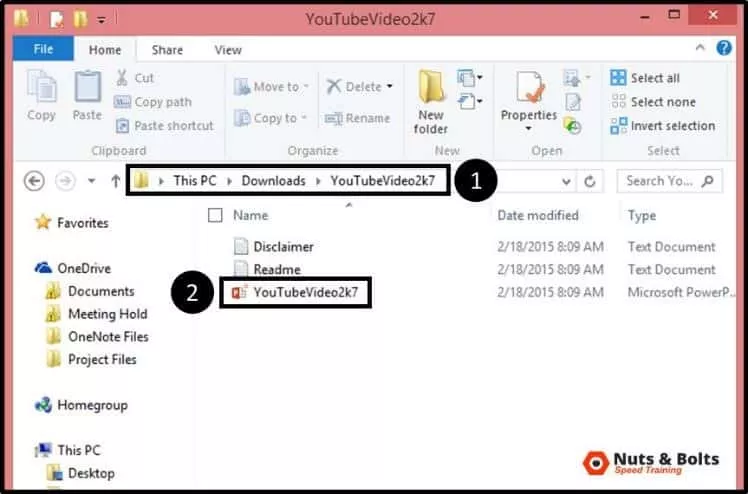
4. Add the PowerPoint add-in
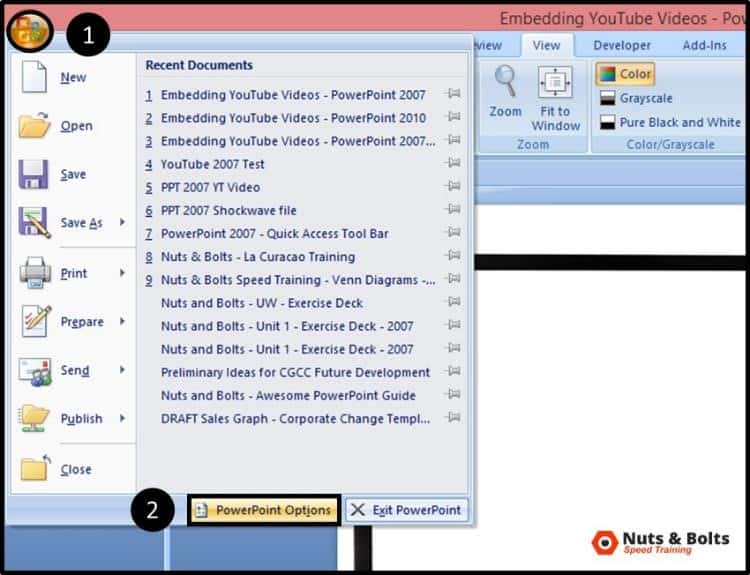
Back in PowerPoint 2007, open the Windows button in the upper left-hand corner and select PowerPoint Options.
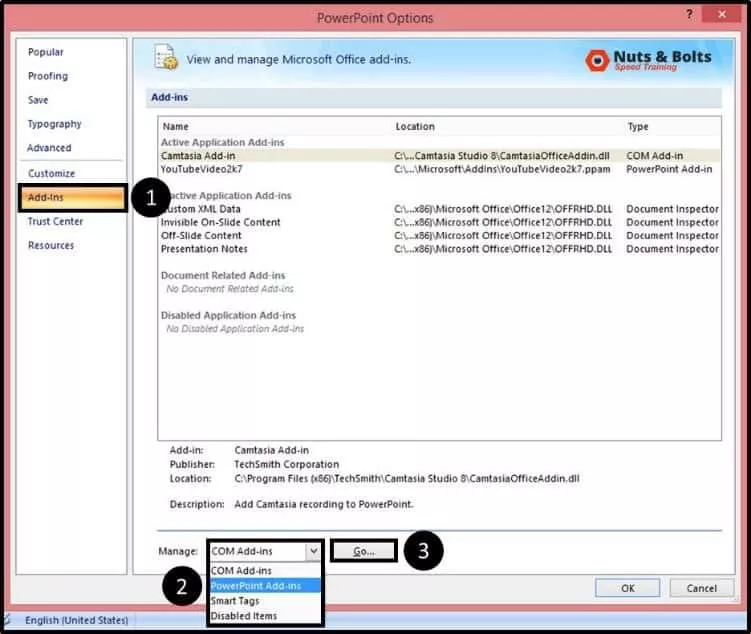
Select Add-ins on the left, use the drop-down at the bottom of the screen to filter to PowerPoint Add-ins and the select Go.
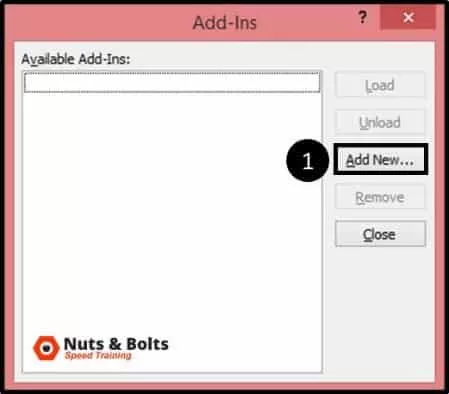
In the Add-Ins dialog box that opens, select Add New.
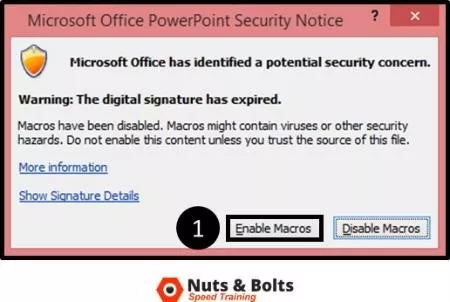
Clicking OK, a macro dialog box might open. If it does, select Enable Macros.
You should now see the YouTubeVideo2k7 add-in in the window with a check mark next to it. Click Close.
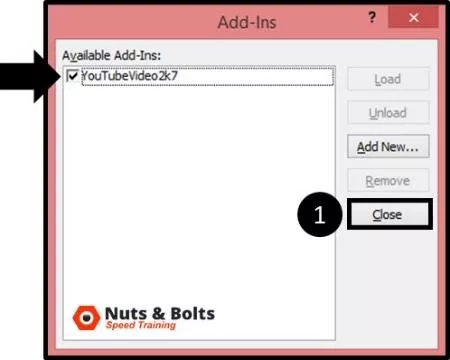
With the add-in installed, if you now open up the Insert tab in PowerPoint 2007 or 2010, you will have an added command at the end of the Insert Tab for quickly embedding YouTube videos.
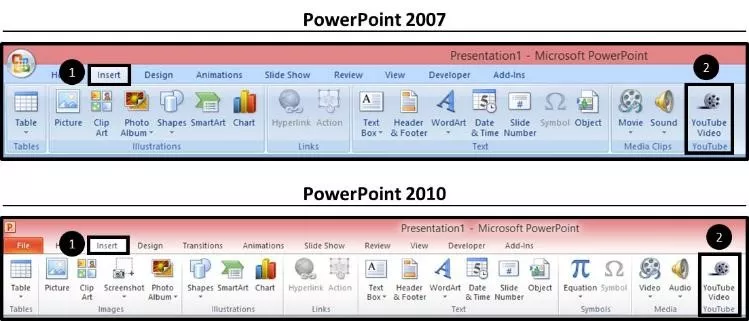
Now that you have the PowerPoint 2007 Add-In installed, let’s take a look at how to use it.
5. Navigate to YouTube and copy your video’s URL

Warning: Get the right URL
Be VERY careful here!
PowerPoint 2007 cannot play YouTube playlists, which you can tell by the length of the URL. Notice in the picture below the difference in length between the video and the video plus its playlist.
If you accidentally embed the longer URL into PowerPoint 2007, the YouTube video will not play, regardless of how you try to troubleshoot. If you want to embed a playlist in PowerPoint, you need to upgrade to PowerPoint 2010 or PowerPoint 2013.
You need to grab the shorter URL which is everything up until the ‘&list’ or ‘&index” separator. With the shorter URL selected, hit CTRL + C on your keyboard to copy it.
6. Insert the YouTube video using the add-in

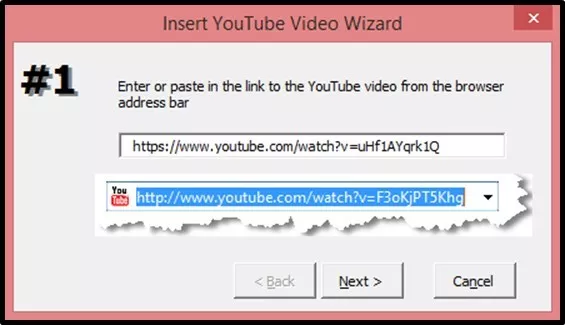
Hit CTRL + V to paste in your YouTube URL, then hit Next.
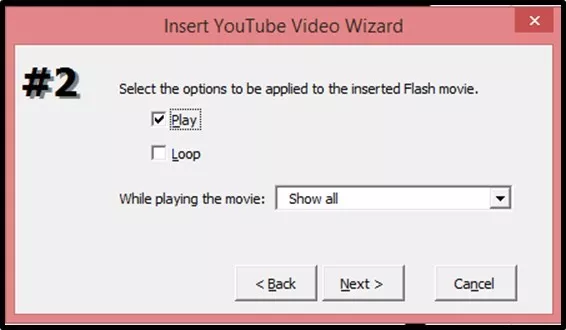
You can select options for your video like Play and Loop. I will simply hit Next.
You can then choose to resize the video here if you like. But as we can do this on our own in a second, I will again simply hit Next.
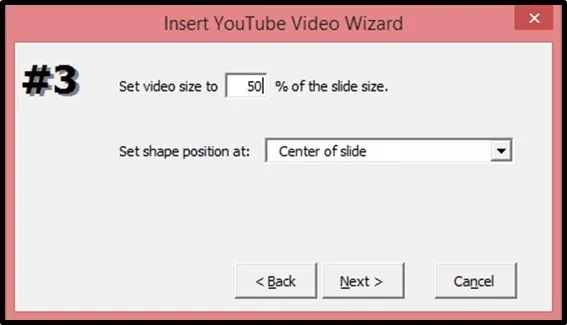
On the last screen, hit Finish
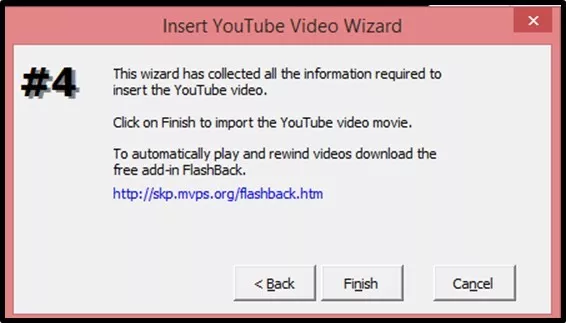
The YouTube video is now inserted into your slide as a white box with an X through it.
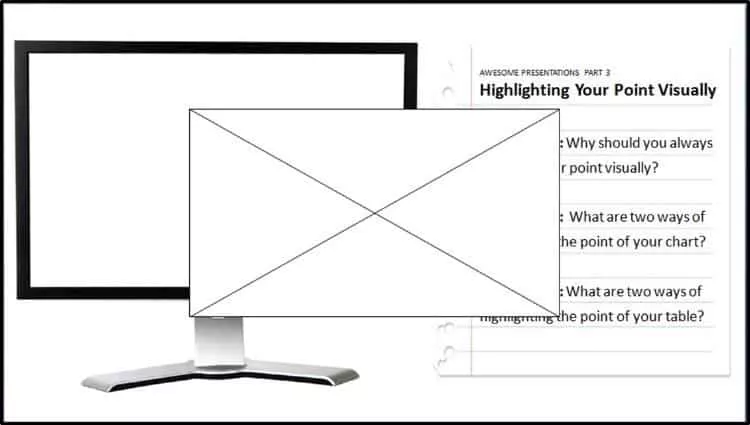
7. Resize the YouTube video
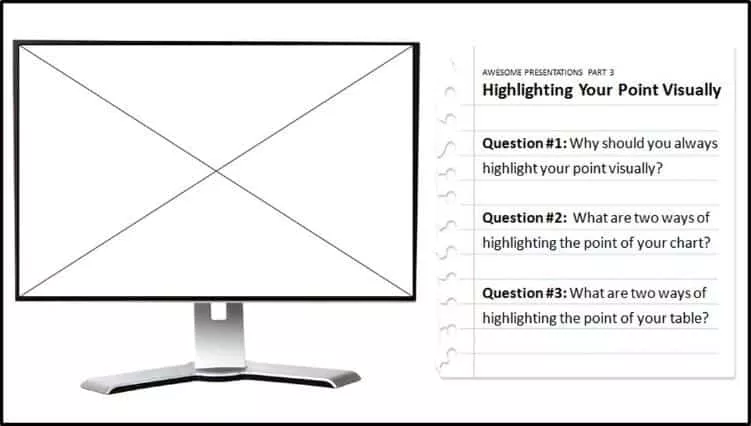
As you resize the video, the entire box might turn white, but no worries, you are still fine.
8. Launch the YouTube video
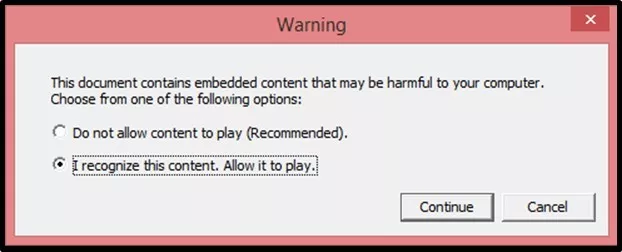
Assuming you are connected to the internet, the video will load and you will be able to play the video directly from within your PowerPoint 2007 presentation.
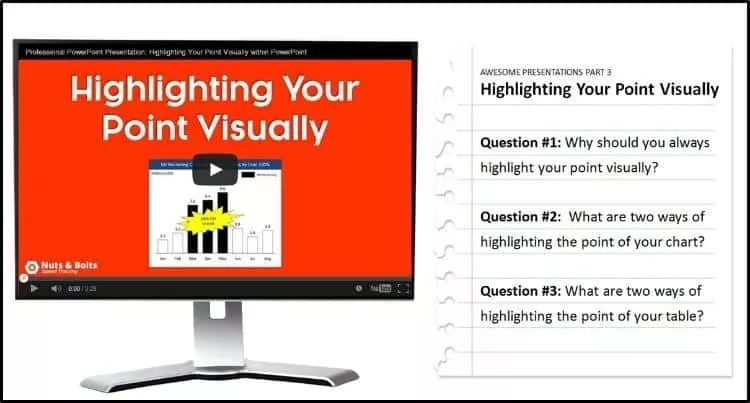
Method #2: The Hard Way
If that sounds scary to you, I highly recommend the easier method described above, using the free add-in.
1. Add the Developer Tab to your ribbon
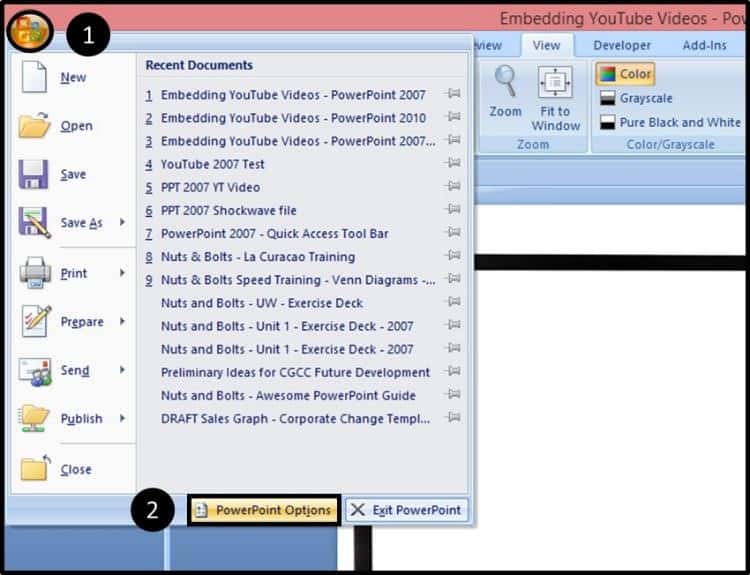
2. Insert a Shockwave file

Within the dialog box, navigate down to Shockwave ActiveX Control, click OK.
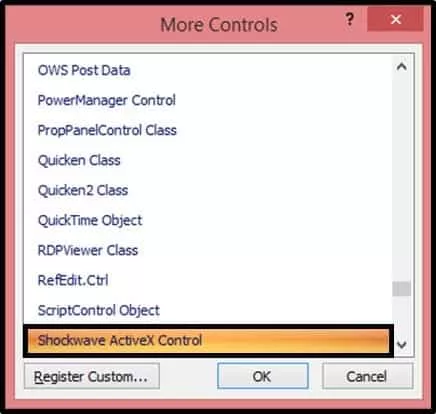
And then draw a rectangle on your slide (where your YouTube video will go).
Note that you cannot draw the Shockwave ActiveX Control on top of another object, so you will have to draw it on a blank part of your slide (assuming you have something on your slide).
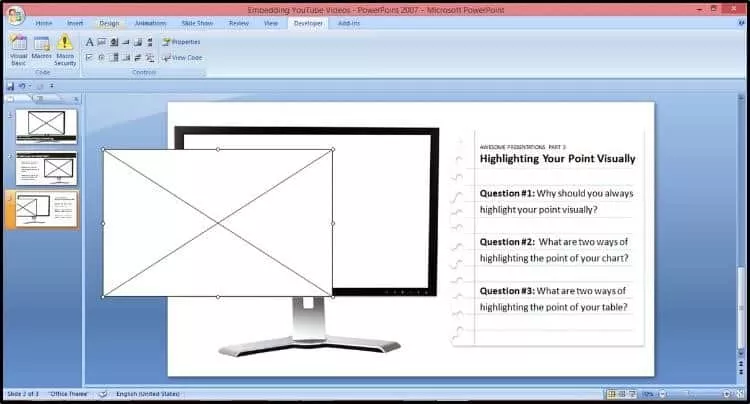
The Shockwave ActiveX object will look like a white box with an X through it. Resize and position the object on your slide, in this case I’m stretching it out to fit on top of my blank computer screen image.
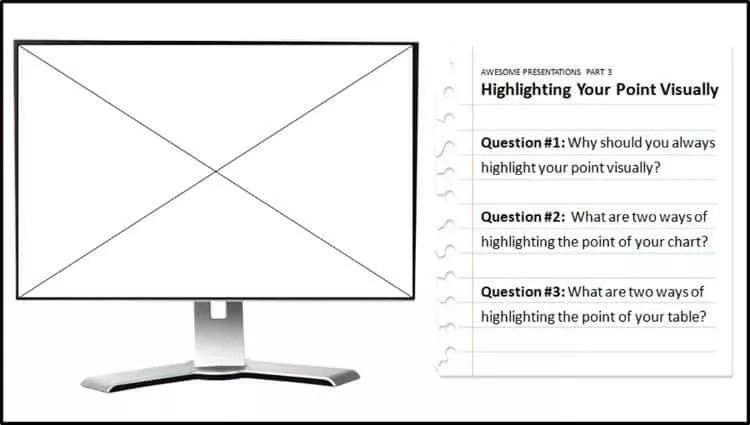
Now we are ready to get our YouTube video
3. find your youtube video’s url.
Navigate to YouTube and find your Video’s URL…but be VERY careful here! PowerPoint 2007 cannot play YouTube playlists, it can only play individual videos, so you need to be careful you don’t accidentally grab a video + its playlist.

If you want to embed a playlist in PowerPoint, you need to upgrade to PowerPoint 2010 or PowerPoint 2013 and use the embed code method. See the PowerPoint 2013 tutorial below.
With the shorter URL selected, hit CTRL + C on your keyboard to copy.
4. Open up the properties of your Shockwave ActiveX object
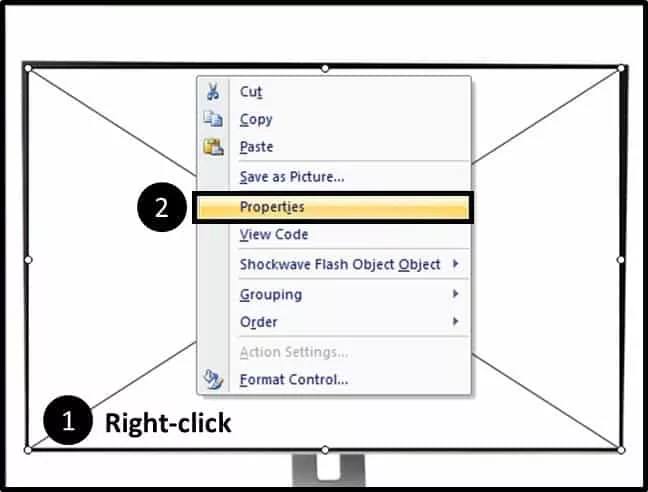
In the Properties dialog box, scroll down to the Movie section and paste in your URL.
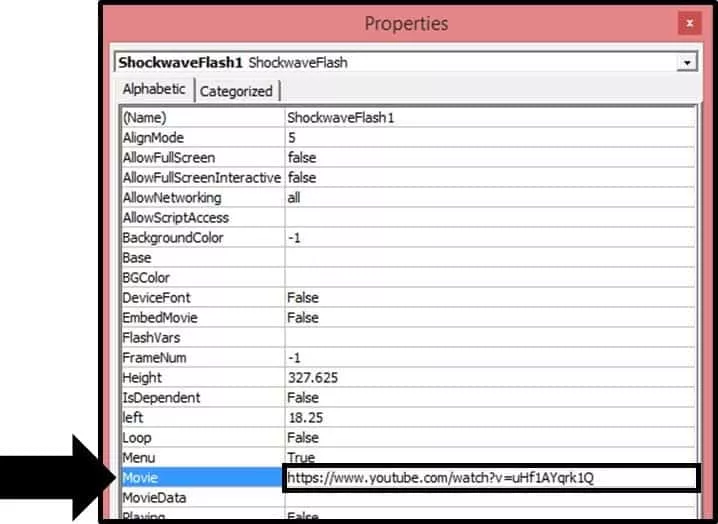
5. Adjust the YouTube URL within the dialog box
To get the YouTube video to play correctly in PowerPoint 2007, you need to make two adjustments:
#1: Delete the ‘watch?’ from the URL #2: Replace the ‘=’ with ‘/’
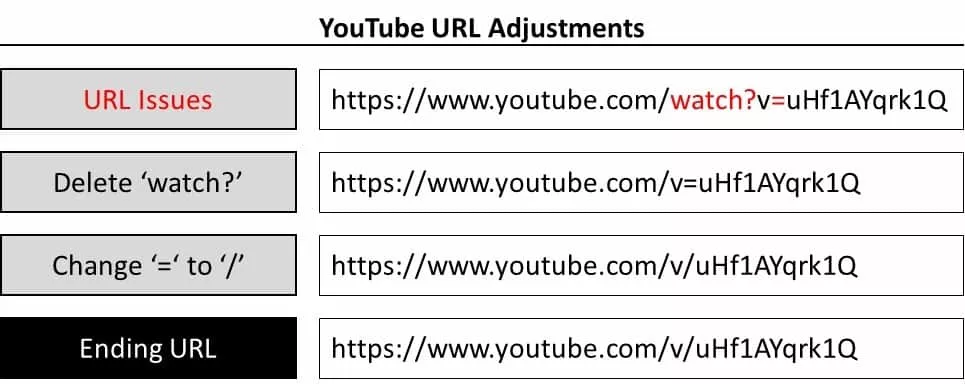
With the URL adjusted, hit OK to close the dialog box.
6. Run your presentation
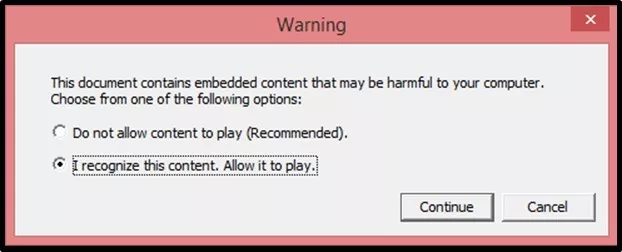
So that’s how to embed a YouTube in PowerPoint, regardless of which version of PowerPoint you have.
This allows you to quickly and easily add interactive media features to your presentation.
The other advantage of embedding a YouTube video, is it does not increase the size of your presentation. That means that you don’t need to worry about compressing your presentation.
If you enjoyed the depth of this post and want to boost your PowerPoint skills for the professional world, visit us here .
What’s next?
Related articles.
- What is a broken link chart in PowerPoint (and how to fix it)?
- Bar chart trick: Right aligning categories (PPT, Word, and Excel)
- PowerPoint settings: program level vs. presentation level
- What is a linked Excel chart in PowerPoint?
- Set Up Slide Show: Customize how your PPT presentations run
About The Author
This Post Has 5 Comments
You may use Allavsoft to download YouTube video to AVI, WMV to put a youtube video in PowerPoint
Thanks for the tip!
This article certainly is thorough. Just an FYI, we’ve built a PowerPoint add-in at https://www.liveslides.com/websites/youtube/ that makes it significantly easier to embed and play YouTube videos (any web content really) directly in PowerPoint. Seriously, just a couple steps and you’re ready to roll.
Thanks for sharing, Jason. I’ve never used your software but we usually like anything that helps us save time. Cheers
Hey John, and thanks for sharing the software! Sounds like a handy program that can save you time – we like that! Just make sure you don’t abuse any copyright issues when downloading videos from the web 😉
Comments are closed.
Popular Tutorials
- How to Strikethrough Text (l̶i̶k̶e̶ ̶t̶h̶i̶s̶) in Word, Excel & PowerPoint
- How to Make Animated Fireworks in PowerPoint (Step-by-Step)
- Strikethrough Shortcut (l̶i̶k̶e̶ ̶t̶h̶i̶s̶) for Word, Excel & PowerPoint
- How to Create a Flash Card Memory Game in PowerPoint (Like Jeopardy)
- Keyboard Shortcuts Not Working: Solved
PowerPoint Tutorial Categories
- Strategies & Opinions
- Shortcuts & Hacks
- Presentation Design
- New Features
- Miscellaneous
- Charts & Data Viz
We help busy professionals save hours and gain peace of mind, with corporate workshops, self-paced courses and tutorials for PowerPoint and Word.
Work With Us
- Corporate Training
- Presentation & Template Design
- Courses & Downloads
- PowerPoint Articles
- Word Articles
- Productivity Resources
Find a Tutorial
- Free Training
- For Businesses
We help busy office workers save hours and gain peace of mind, with tips, training and tutorials for Microsoft PowerPoint and Word.
Master Critical PowerPoint Shortcuts – Secure Your FREE Training Module and Save Valuable Time!
⌛ Master time-saving expert techniques.
🔥 Create powerful presentations.
🚀 Propel your career to new heights.
We value your privacy – we keep your info safe.
Discover PowerPoint Hacks Loved by Industry Giants - KKR, AmEx, HSBC!
Over 114,880 professionals in finance, marketing and sales have revolutionized their PPT skills with our proven methods.
Gain FREE access to a full module of our premium PowerPoint training program – Get started today!
We hate spam too and promise to keep your information safe.
You are currently viewing a placeholder content from Facebook . To access the actual content, click the button below. Please note that doing so will share data with third-party providers.
Blog > How to add a YouTube Video in PowerPoint

How to add a YouTube Video in PowerPoint
07.08.20 • #powerpointtips.
Sometimes, you want to show your audience a YouTube video during a presentation. Some people do so by opening the browser, going to YouTube and then typing the video title into the search bar, when in fact there is a much easier and more convenient way. In the this post, you'll learn how you can directly insert a YouTube Video into PowerPoint that plays automatically on your slide. Also, we have got some great suggestions about videos you could show your audience.
You can watch our video (which is by the way inserted from YouTube as well) down below and learn how to add a video to your slides in just one minute! If you don't feel like watching the video, you can also follow the step-by-step guide down below.
Step-by-Step Tutorial
- Go to Insert in the PowerPoint task line on the top.
- Click on Video on the top right corner. Then choose the option Online Video .

- A window will open which will ask you to insert the video’s URL.
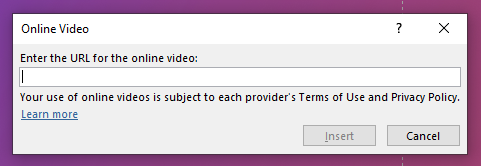
- Open the YouTube video you would like to embed in your browser. You can simply right click on the address bar in the browser and copy the URL. Alternatively, perform a right mouse click on the video, and then click on Copy Video URL .
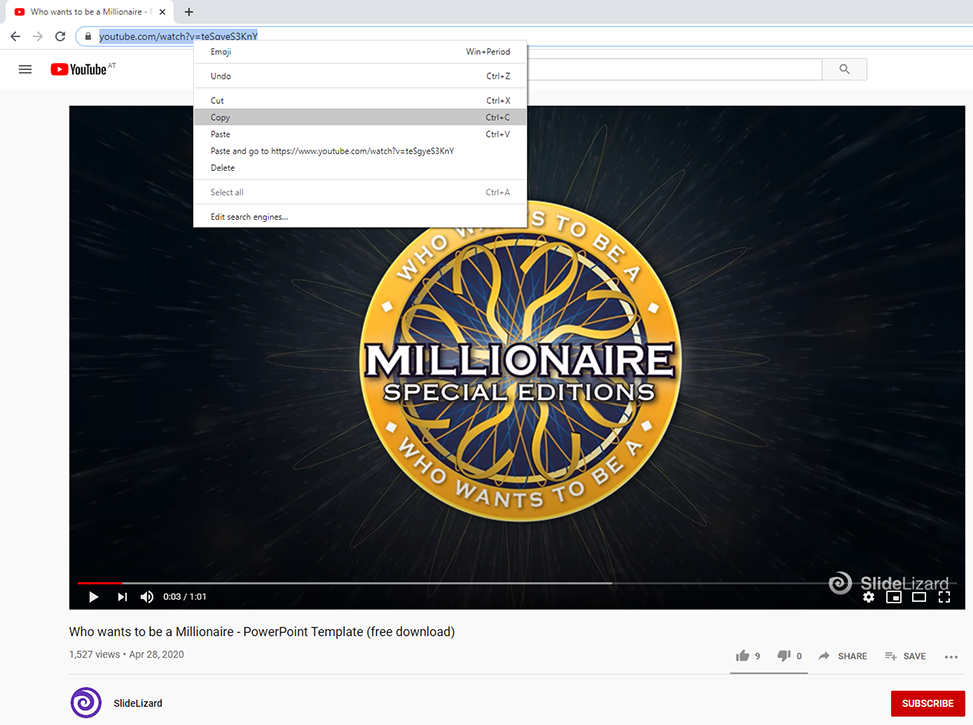
- Go back to PowerPoint and insert the URL by either pressing CTRL+V or right click and then Paste . Then click on Insert .
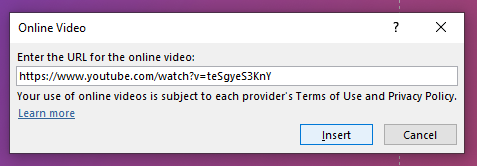
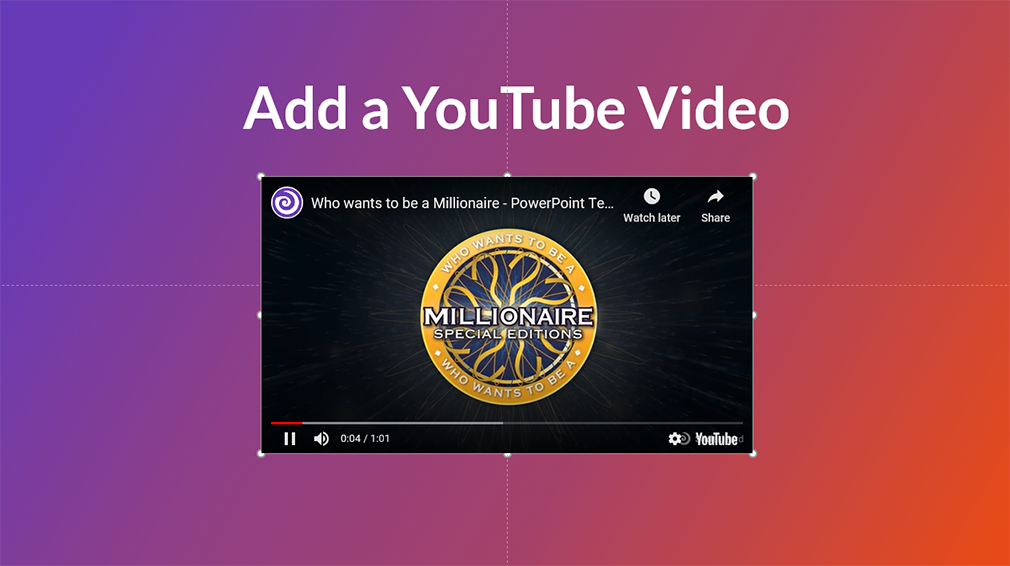
- Your video will then be inserted on your current slide. Just like any element, you can change its size or move it around now.
- To start the video (either while editing or in presentation mode), simply click on the play button.
YouTube video with offline playback
With the previously described option, it is necessary to have a stable internet connection while presenting. As that can not always be guaranteed, there is also a way of inserting YouTube videos that work offline. Follow these steps:
- Open the YouTube Video in your Browser. Copy the URL by clicking the address bar and then Right Click > Copy.
- Open the website y2mate.com . Paste your copied URL into the text field, then click Start .

- Choose one of the options for download (and click the Download button. We recommend 1080p or 720p.
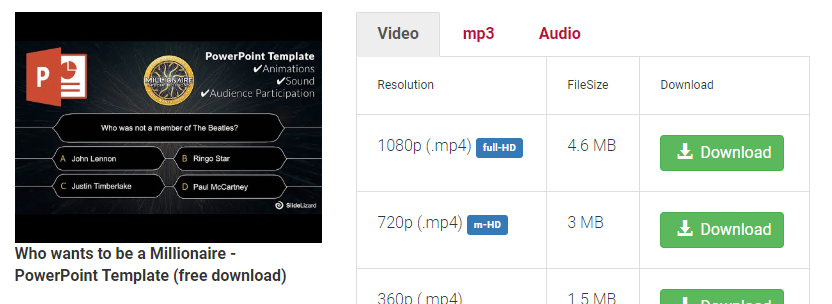
- A window will open, and your video will convert. When it's ready, click Download .mp4" .
- After your file has downloaded, you should see it in your Downloads folder in the browser. By clicking "Show in folder", you'll see where it's saved on your device.

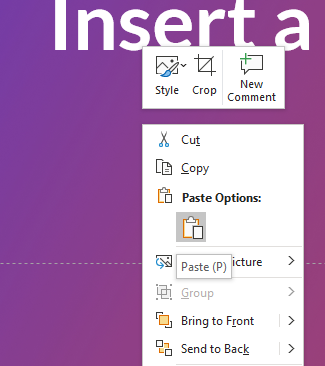
- Right click on the file in your folder and click Copy .
- Go to the PowerPoint slide where you want your video to be placed. Right click and Paste . Your video should now appear and play if you click on it.
What kinds of videos can I use in a presentation?
Videos are an amazing way to liven up your presentation. Especially when you're talking for a long time, the audience tends to get tired. That's where a variation of multimedia elements, such as videos, can be helpful. We recommend putting videos in the main part of a presentation, but of course you may also start or finish by presenting a video to your audience. There is no limit for the type of video, the only guideline you should follow is relevance. Before mindlessly pasting a video to your slide, ask yourself: "What purpose does this video fulfill within my presentation?" Is it supposed to inform and teach the audience, is it something you really want everybody to see, or is it just a funny little clip to lighten the mood? All of those purposes are fine. With this tip, you're one step closer to a wonderful presentation! If you want to learn more about successful presentations and Audience Engagement, check out our blogpost Top 10 Tools for increasing Audience Engagement .

Set the start of your video
After you've added a video from YouTube, it starts to play by default when you click anywhere on the slide during the presentation. That's usually fine, but can sometimes be annoying, e.g. when you have more than one video on one slide. In that case, it is helpful to set the Start to When clicked on . The video then won't start until you click directly on it. You can do that by first clicking on your video, going to the Playback tab on the right and then select When clicked on in the Start-selection. By choosing Automatically here, your video will start automatically, without having to click on it.
Add a video from your device
If you want to add a video that is saved on your computer, you can do so by following the tutorial in our article Insert a local Video .
Useful Keyboard Shortcuts
How can I insert a YouTube video to PowerPoint?
Go to Insert > Video > Online Video. Copy the video URL from the address bar and paste it to the window that opens. Click Insert and your video should appear instantly.
Can I play a video directly on my PowerPoint slides?
Yes. You can insert a video from YouTube by using the URL, and it will be played directly on your slide. In our tutorial , you'll learn how to do so.
Can I play an offline video from YouTube in PowerPoint?
Yes, it is possible to play an offline YouTube video on your PowerPoint slides. We show you how it is done in our tutorial .
Related articles
About the author.

Pia Lehner-Mittermaier
Pia works in Marketing as a graphic designer and writer at SlideLizard. She uses her vivid imagination and creativity to produce good content.

Get 1 Month for free!
Do you want to make your presentations more interactive.
With SlideLizard you can engage your audience with live polls, questions and feedback . Directly within your PowerPoint Presentation. Learn more

Top blog articles More posts

LIZ - the artificial intelligence in PowerPoint

Create an Agenda in PowerPoint + Free PowerPoint Template

Get started with Live Polls, Q&A and slides
for your PowerPoint Presentations
The big SlideLizard presentation glossary
.pps file extension.
A .pps file is a slide show. They are similiar to .ppt files but they open as a slide show if you double-klick them. They later got replaced by .ppsx files.
Informal Communication
informal communication can be used when talking to your friends or your family
Community Events
Community events are about bringing people together, creating positive change and making new friends.
Nonverbal Communication
Nonverbal communication means that the communication is based on someone's voice and body instead on the use of words.
Be the first to know!
The latest SlideLizard news, articles, and resources, sent straight to your inbox.
- or follow us on -
We use cookies to personalize content and analyze traffic to our website. You can choose to accept only cookies that are necessary for the website to function or to also allow tracking cookies. For more information, please see our privacy policy .
Cookie Settings
Necessary cookies are required for the proper functioning of the website. These cookies ensure basic functionalities and security features of the website.
Analytical cookies are used to understand how visitors interact with the website. These cookies help provide information about the number of visitors, etc.

Disclosure: MyeLearningWorld is reader-supported. We may receive a commission if you purchase through our links.
3 Easy Ways to Embed a YouTube Video in PowerPoint
Last Updated: 11/07/2023
By Scott Winstead
- Share on Facebook
- Share on LinkedIn
- Share on Reddit
- Share on Pinterest

Whether you’re creating a presentation for work or school, making an online course , or sharing a slideshow with friends and family, you might be wondering how to embed a YouTube video in PowerPoint. As an instructional designer , I’ve seen firsthand how much a well-placed video can impact learning outcomes and audience engagement. Adding a relevant YouTube video is an innovative and dynamic way to make your PowerPoint presentation stand out and leave a lasting impression on your audience while also reinforcing key points in your overall message.
But how exactly can you put a YouTube video in PowerPoint? The good news is it’s actually pretty easy and straightforward. In the guide below, I’ll walk you through the simple steps on how to embed a YouTube video in PowerPoint presentations.
3 Different Ways to Insert YouTube Videos into PowerPoint
1. embed it as an online video.

PowerPoint already has a built-in tool that lets you easily integrate a YouTube video onto your slide.
All you have to do is choose the slide on which you want to put the video, go to the Insert tab, and select Video → Online Video -> before pasting the URL or searching for the video directly within the interface. Yes, that’s right, PowerPoint has a functionality that lets you search YouTube videos right from within the presentation.
Once you have it, click Insert and watch your YouTube video appear in PowerPoint!
You can resize and position the video within the slide to be just the way you want it.
This is the fastest and easiest way to add a YouTube video to PowerPoint, but I’ve found it does have some minor drawbacks. It requires you to be online with an internet connection for it to work, you can’t customize the playback, and the feature might not be available in some older versions of PowerPoint, so your mileage may vary here.
2. Use an embed code
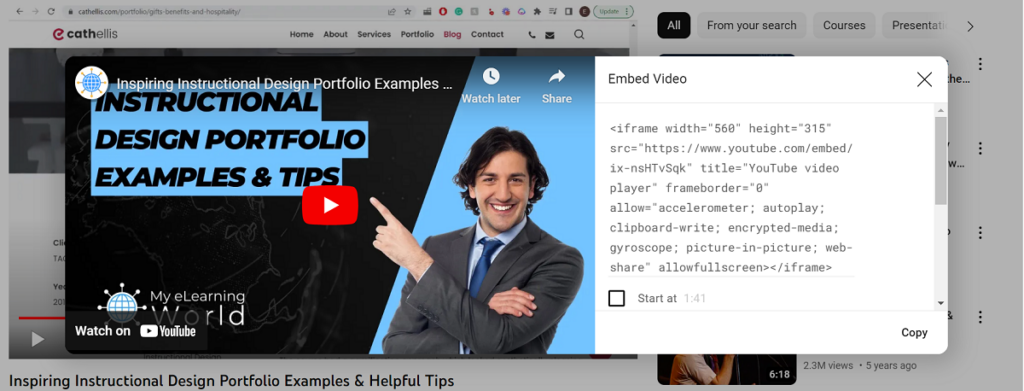
Another way to add YouTube videos to PowerPoint is by using the embed code feature.
By using the embed code, you can customize the video’s attributes using the YouTube API parameters. This means you can tweak everything from the video’s quality and size, to its start and end time, and even its playback speed.
Here’s how to embed a YouTube video in PowerPoint using this method:
- Go to YouTube and select the video you want to embed
- Click Share and then Embed
- Copy the code provided in the box
- Go back to PowerPoint, choose Insert, then select Video -> Online Video -> From a Video Embed Code
- Add the embed code and hit Enter
I like this method because of the customization options it offers when creating the embed code on YouTube, but again, it does require you have an internet connection for the video to play in your slideshow.
3. Screen record the video and add it

The third way to embed a YouTube video in PowerPoint is by recording the video on your screen and inserting it as a local file. This will allow you to show the video even when you don’t have an internet connection.
To do this, first download and install a screen recorder like VEED, Movavi Screen Recorder , or Loom .
Then, using your screen recording software, you can record your computer screen as you play the YouTube video, thus creating a local file which you can save and insert into your PowerPoint presentation.
This is a great way to embed YouTube videos in PowerPoint without having an internet connection, but it does take
Once you’ve recorded your desired clip, go to PowerPoint, choose Insert, then Video -> Video on my PC, and select the file you just recorded with Movavi Screen Recorder.
Now you can play your YouTube video in PowerPoint anytime, even if you don’t have an internet connection.
Of course, this method is more time-consuming as you need to record the clip each time you want to add it, but if you don’t have access to an internet connection this is a great way to embed YouTube videos in PowerPoint.
Other Useful Resources
Looking to really take your PowerPoint presentations to new heights? Here are some other guides you might find useful:
- How to Add Audio to PowerPoint Slides
- The Best Free PowerPoint Add-Ins and Plugins
- How to Share a PowerPoint Presentation Online
- How to Create Stunning PowerPoint Visuals
- How to Make Video Lectures Using PowerPoint
A Final Word on How to Embed a YouTube Video in PowerPoint
I hope this guide has shown you how to embed a YouTube video in PowerPoint presentations.
As you’ve seen, there are several different ways you can go about it depending on which best suits your needs.
If you don’t have an internet connection, screen recording is the way to go; or if you need extra customization, try using the embed code option.
Whichever method you choose, preparing presentations with YouTube videos will help make them more engaging and dynamic!
Have any questions about how to embed YouTube videos in PowerPoint? Let us know by commenting below.
What Is The ADDIE Model For Instructional Design? Everything You Should Know
Top 27 online instructional design certificate programs [2024 update], leave a comment cancel reply.
Save my name, email, and website in this browser for the next time I comment.
Home Blog PowerPoint Tutorials How to Embed a Youtube Video in PowerPoint
How to Embed a Youtube Video in PowerPoint
One of the most effective ways to avoid death by PowerPoint is to include a video in your presentation to explain complex topics. Since YouTube has an infinite archive of content on virtually any imaginable topic, you can easily find relevant videos to embed in your presentations. Furthermore, many presenters prefer to include videos from their organizations in their slide decks.
While embedding a YouTube video without a third-party tool was challenging, PowerPoint 2013 and later editions, such as using the newest edition of PowerPoint in Microsoft 365, is relatively easy. So, how to Embed a Video in PowerPoint? Below is a list of methods by which you can embed videos from YouTube in PowerPoint.
1. Insert from Start via URL
The easiest way to insert an online video from start to end, including a YouTube video to PowerPoint, is via Insert > Media > Video > Online Videos .
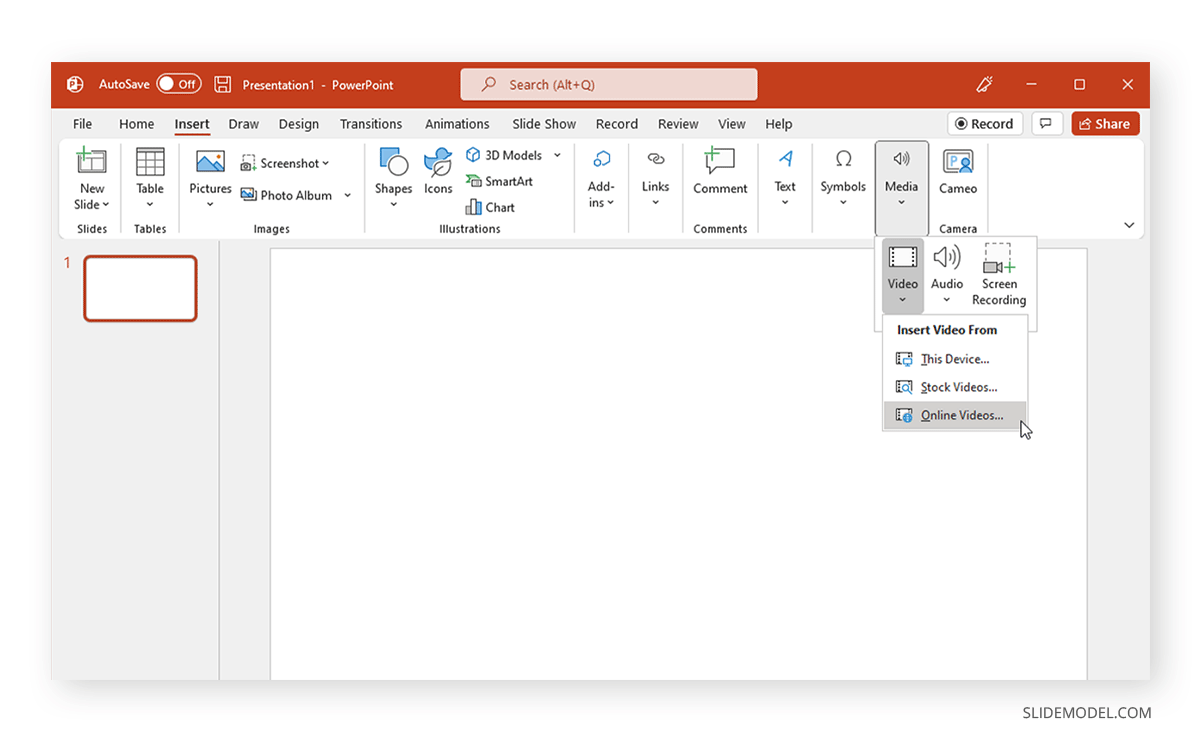
This will enable adding a URL from supported websites, including video hosting platforms like YouTube, Vimeo, SlideShare, Stream, and Flip.
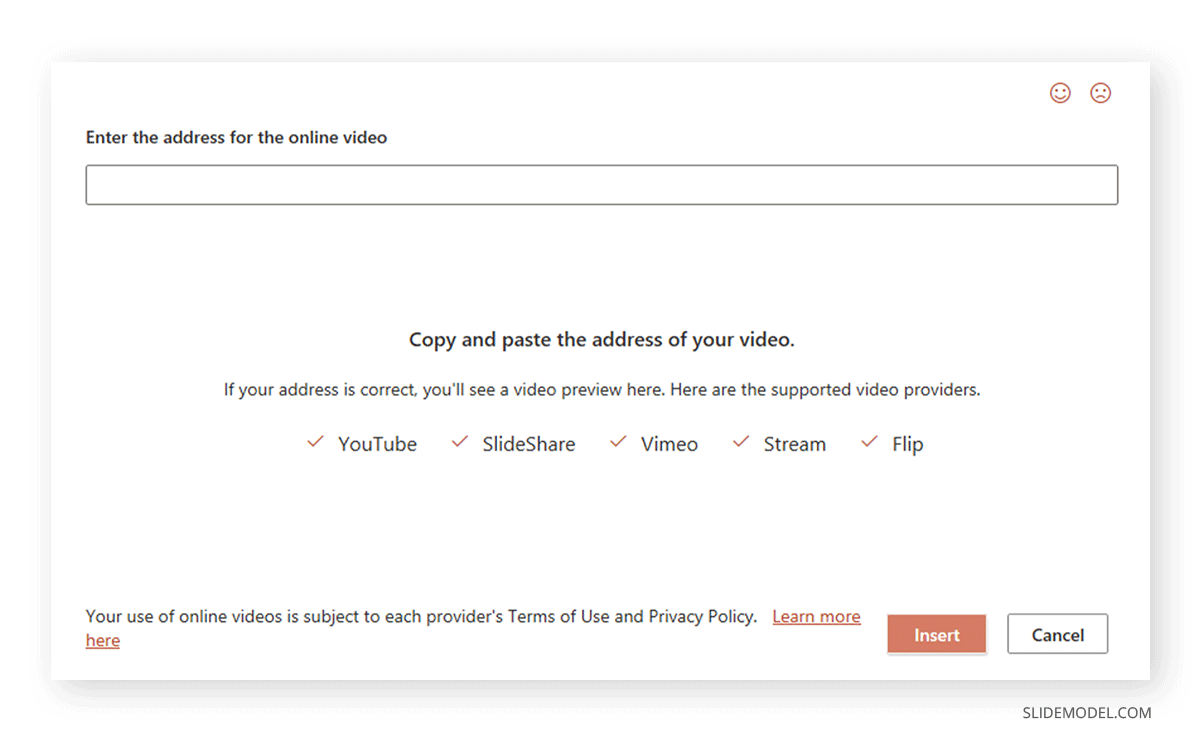
Add the URL and click Insert to add the YouTube video to your presentation.
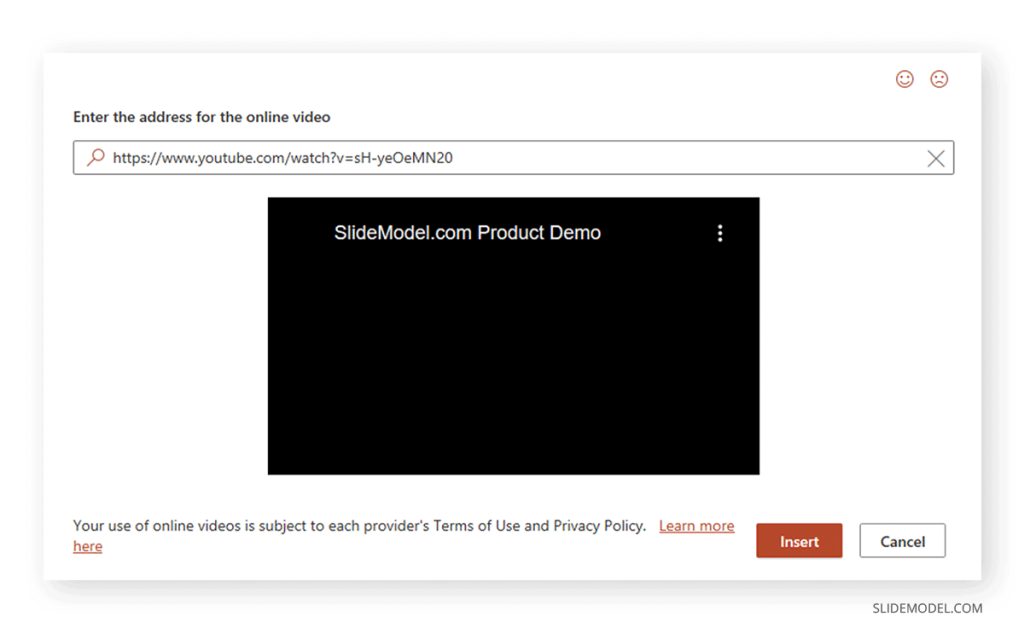
2. Insert from Specific Time via URL
It is possible that you might want to add a video not from the start but from a specific time (e.g., after 20 seconds). To do this, go to the Share button below the video.
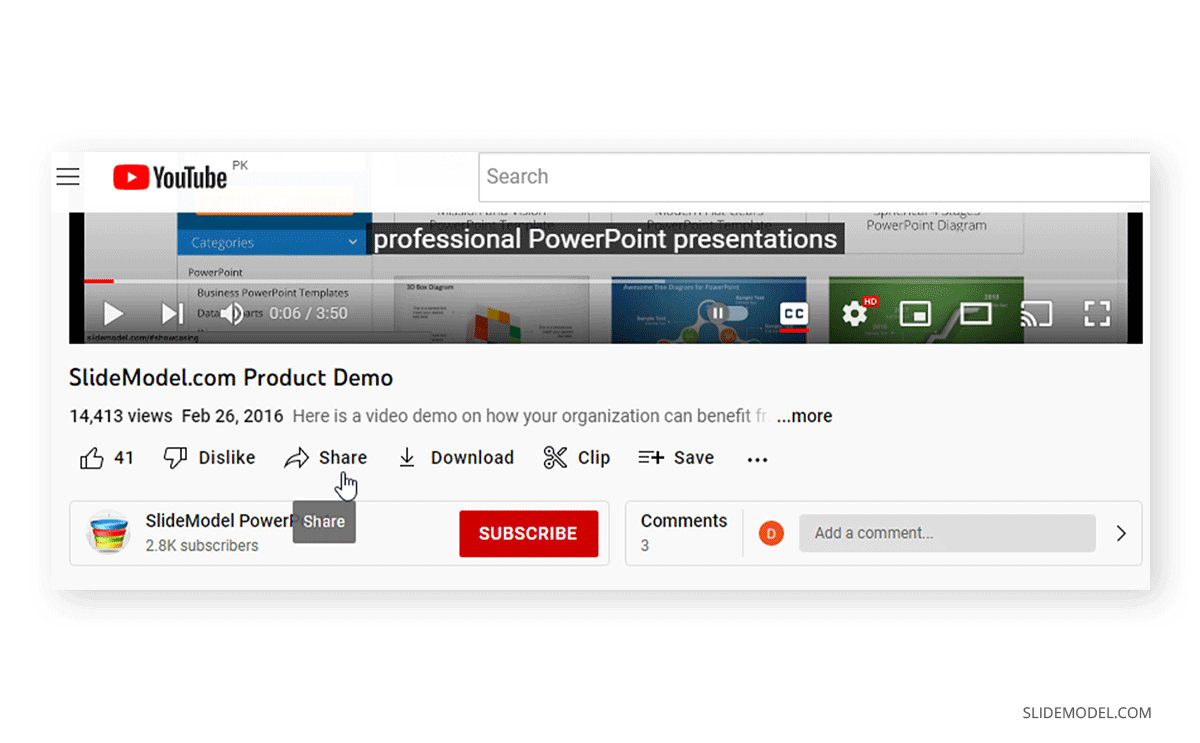
Select the time to start the video, and copy the URL.
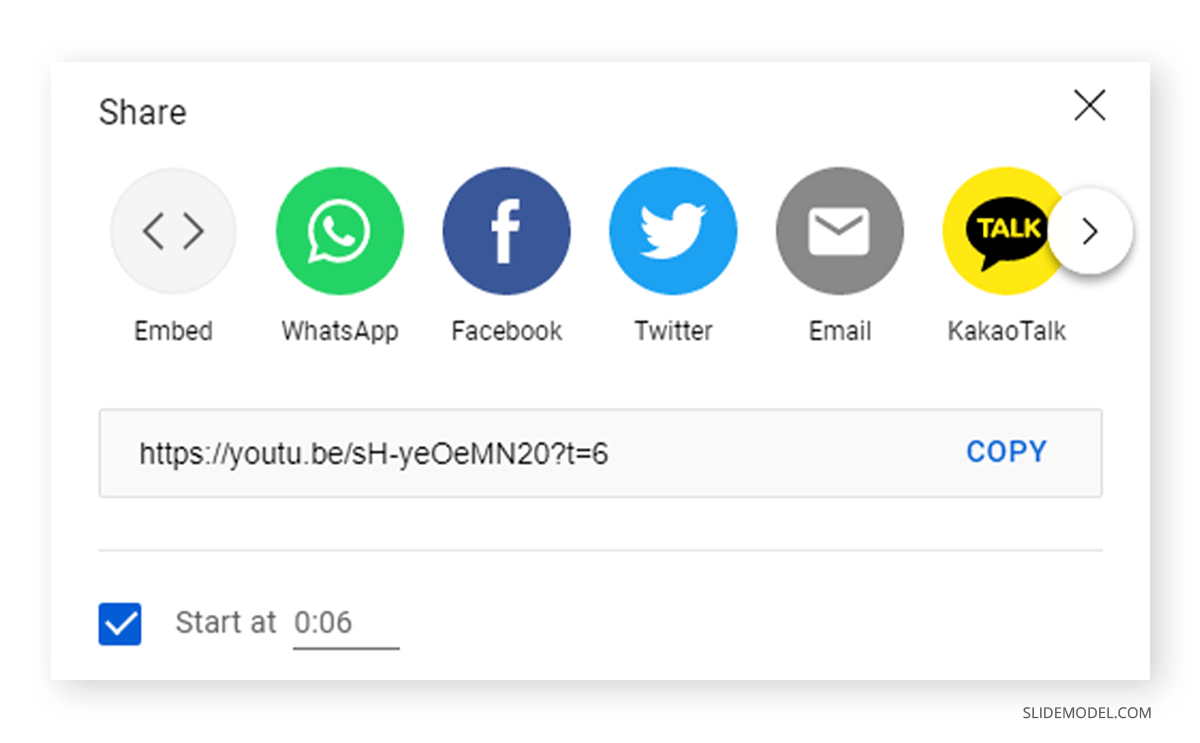
Now, insert the URL which contains the specific time. You will notice that the end of the URL will include the time after which the video starts.
3. Use Embed Code
In older versions of PowerPoint, such as PowerPoint 2013, there was an option to embed a video, where you could specify the embed code separately. The new edition of PowerPoint enables adding the embed code as a URL. Click the Share option below the YouTube video to copy the embed code.
From the given options, select Embed . From there, you can also specify the time you intend to start and if you want the video controls to show when it is playing.
Copy the embed code to include in your presentation slide.
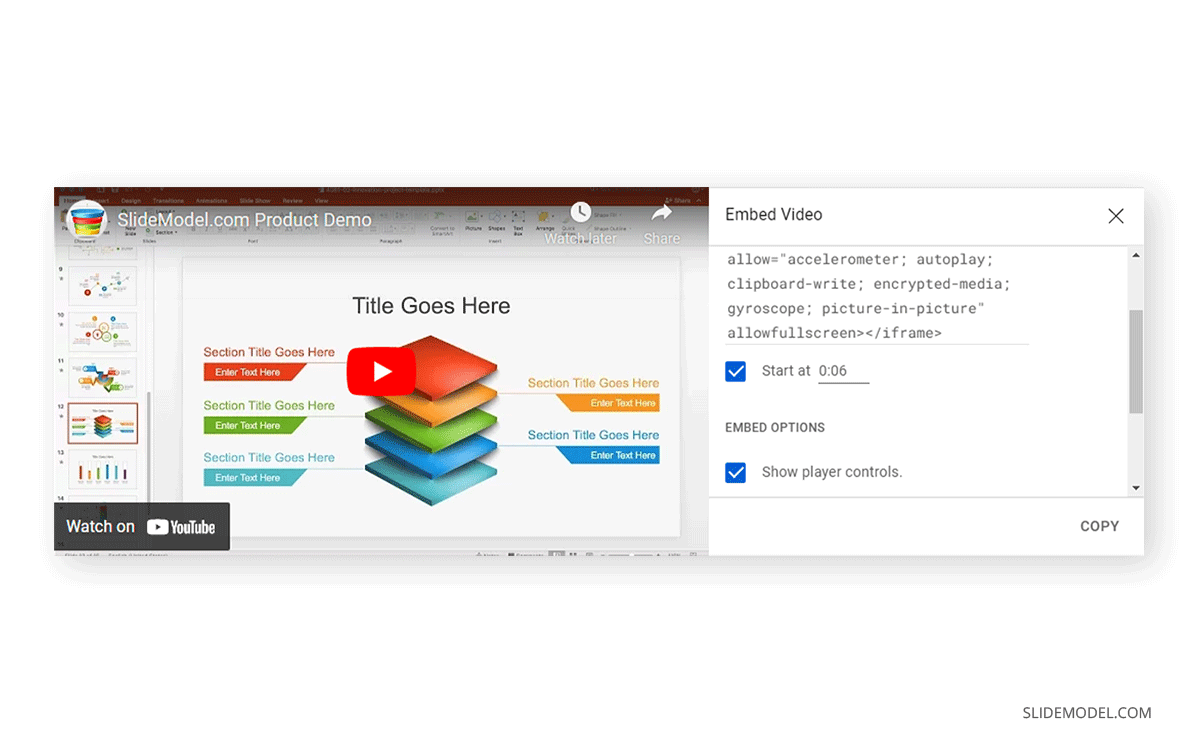
Instead of URL, enter the embed code via Insert > Media > Video > Online Videos.
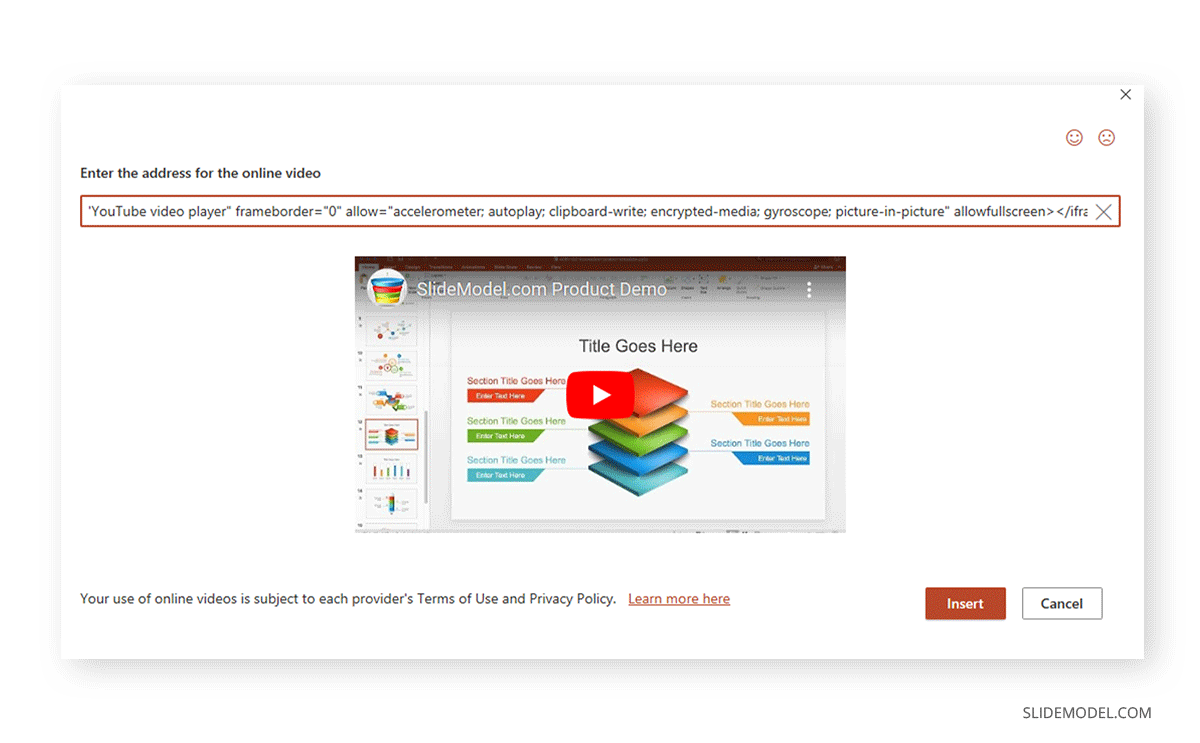
Using the methods mentioned above, you can embed and insert a YouTube video in PowerPoint and customize it further using the Ribbon menu options. Such as changing size, adding frame, adding effects, etc.
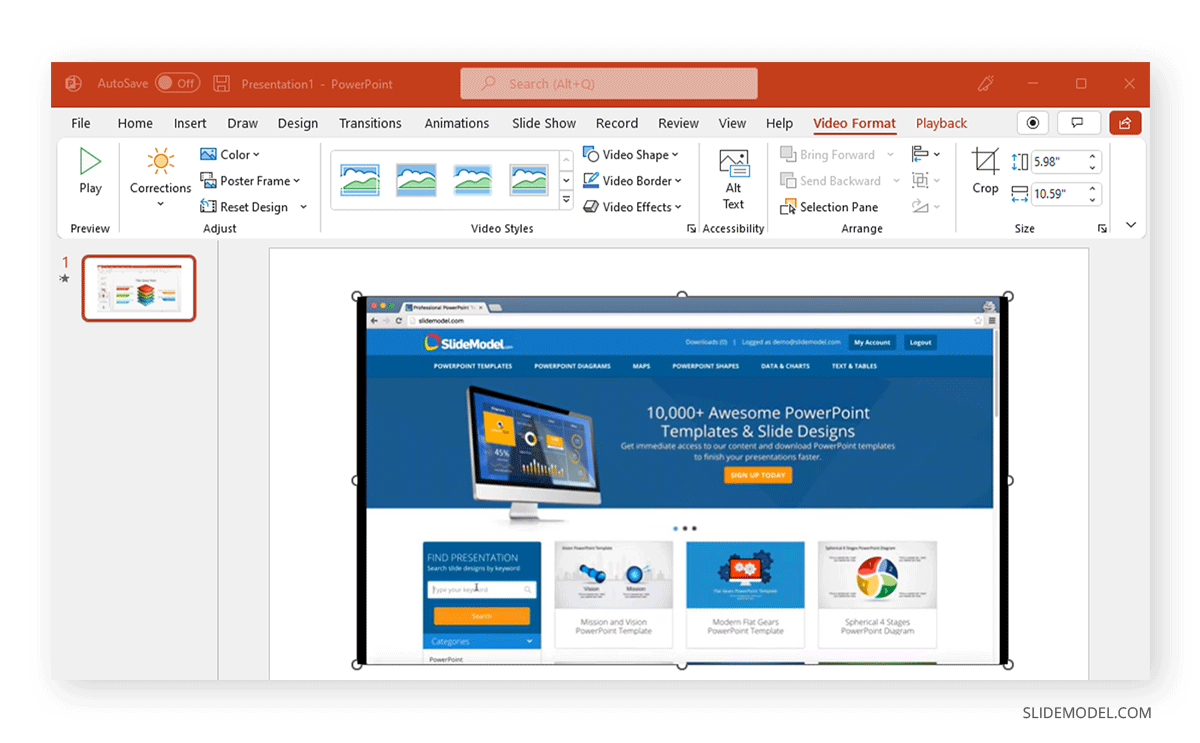
4. Download YouTube Video
Under certain circumstances, you can legally download a video offline. The following conditions apply when downloading YouTube videos legally:
- You are a premium YouTube member.
- Downloads are allowed in your country.
- You are downloading videos you have uploaded.
- The developer has enabled the download of the video.
To get the video, click the Download button below the YouTube video. Doing this usually makes the video available for streaming offline. However, premium users can also save copies of the videos on their mobile devices.

If you are a premium YouTube user saving a video on your SD card , tap your YouTube profile picture, go to Settings > Backgrounds & Downloads, and toggle to enable Use SD Card . If this option is not enabled, your videos will be downloaded to your phone’s internal memory. Unfortunately, videos don’t show up the same way on desktop devices, and using third-party tools isn’t legal.
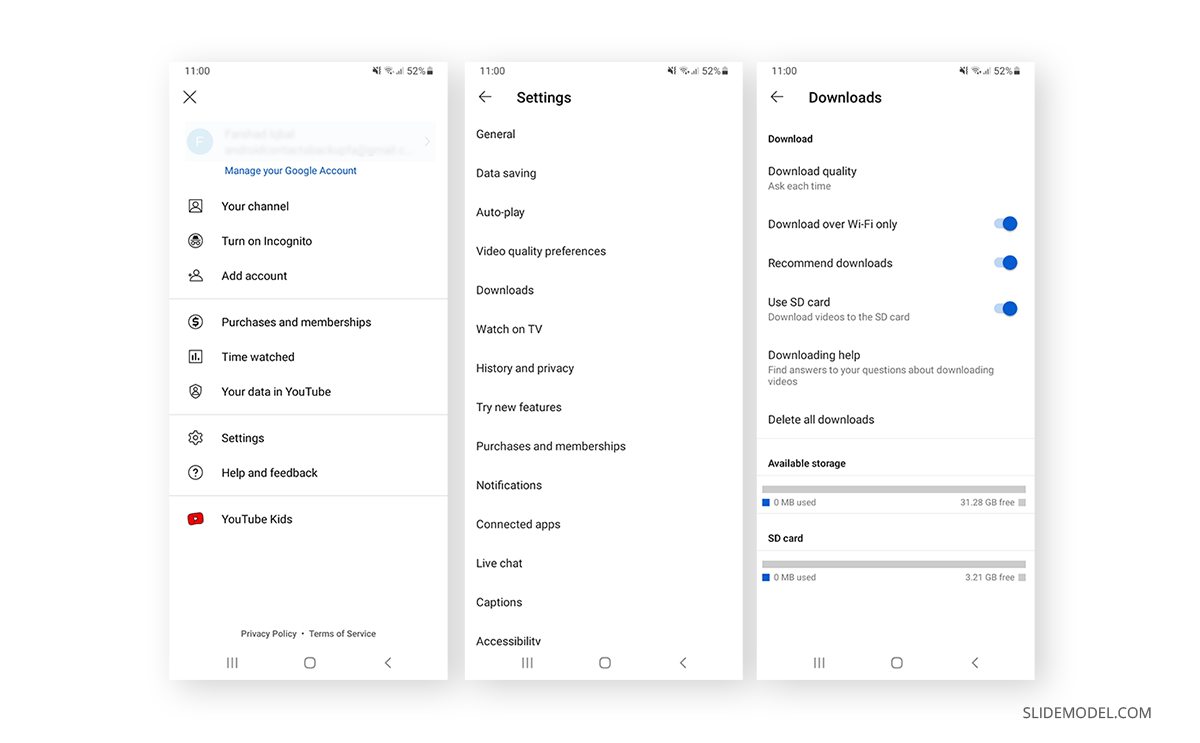
How to insert an offline video in PowerPoint? You can insert downloaded YouTube videos via Insert > Media > Video > This Device .
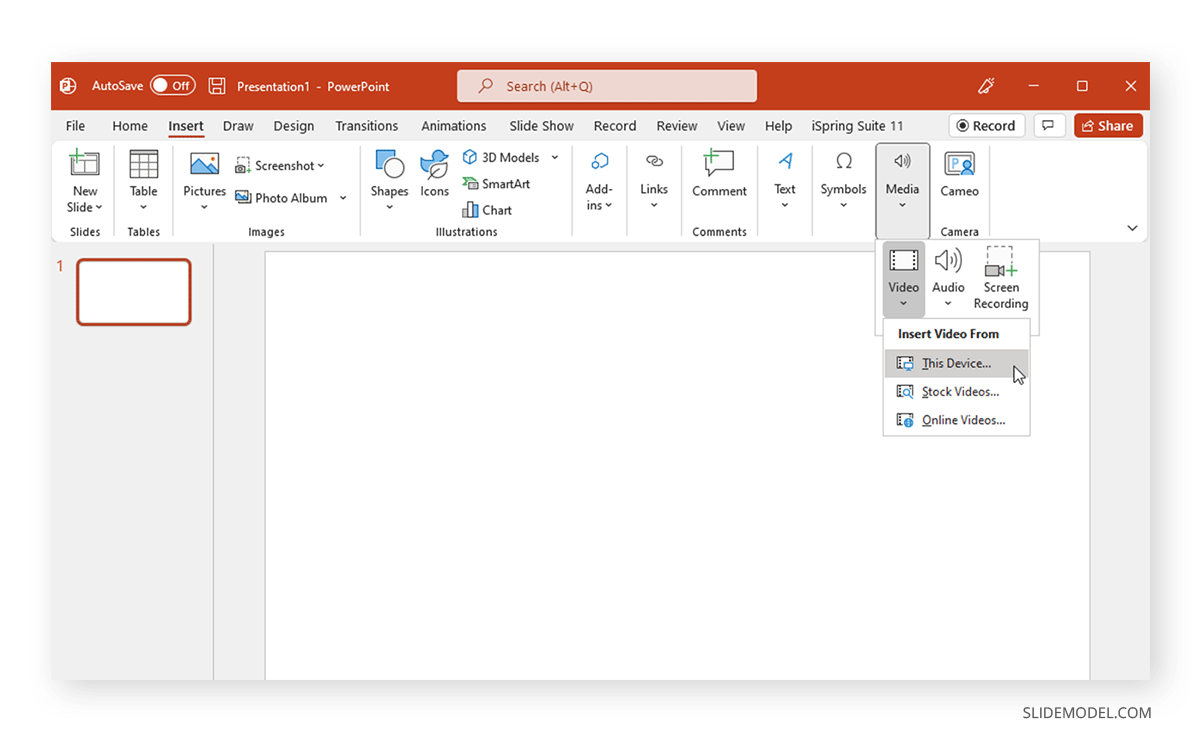
Select the video from your device, and you can insert it offline into your slide.
If you use Google Slides instead of Microsoft PowerPoint, you can still insert videos into your Google Slides presentations. Learn how to insert a video in Google Slides .
5. Embed a Video in PowerPoint Using a Third-Party Tool
Various third-party tools enable embedding videos in PowerPoint. Some of these tools became quite useful when the YouTube embed feature did not work correctly in older versions of PowerPoint. One such tool is iSpring Pro , a comprehensive app for authoring video tutorials that enables adding videos from YouTube to PowerPoint.
Once installed, iSpring adds a new tab in PowerPoint. Click the YouTube option from the iSpring tab, and insert the URL. You can also pick a time to start the video to avoid playing it from the start.
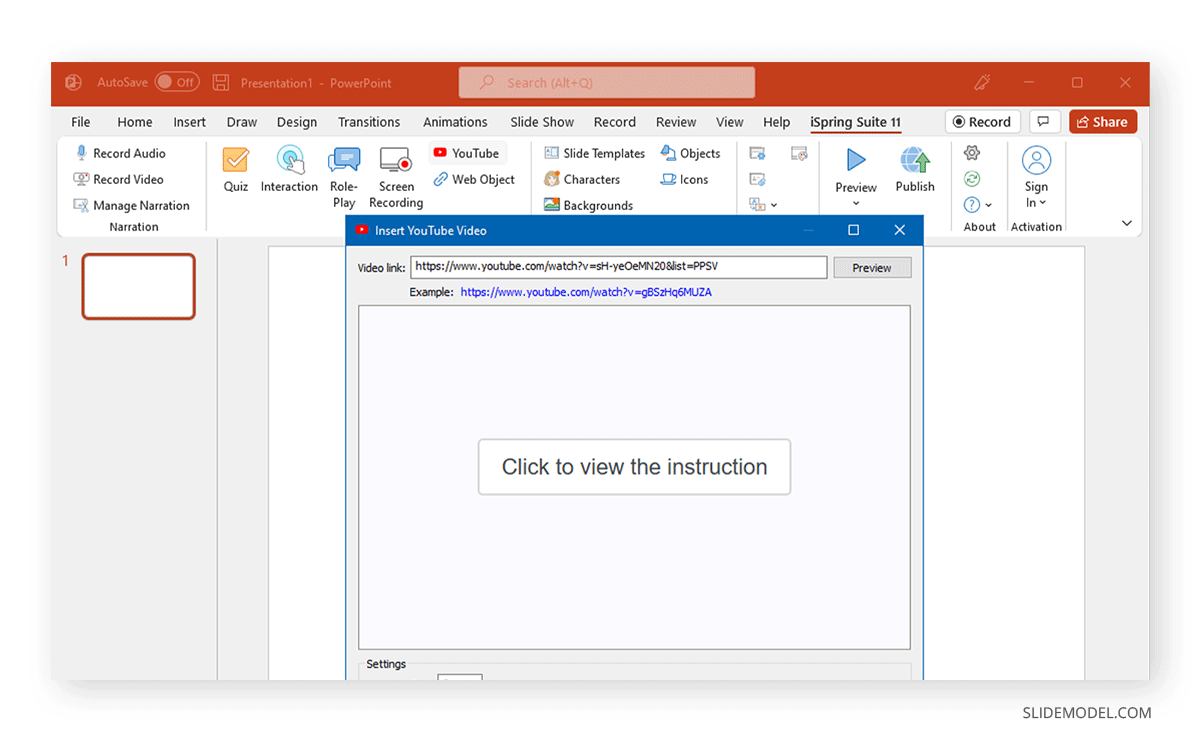
Using iSpring, you can add characters, quizzes, objects, and other exciting features to make the added videos more enjoyable and your presentations more interactive.
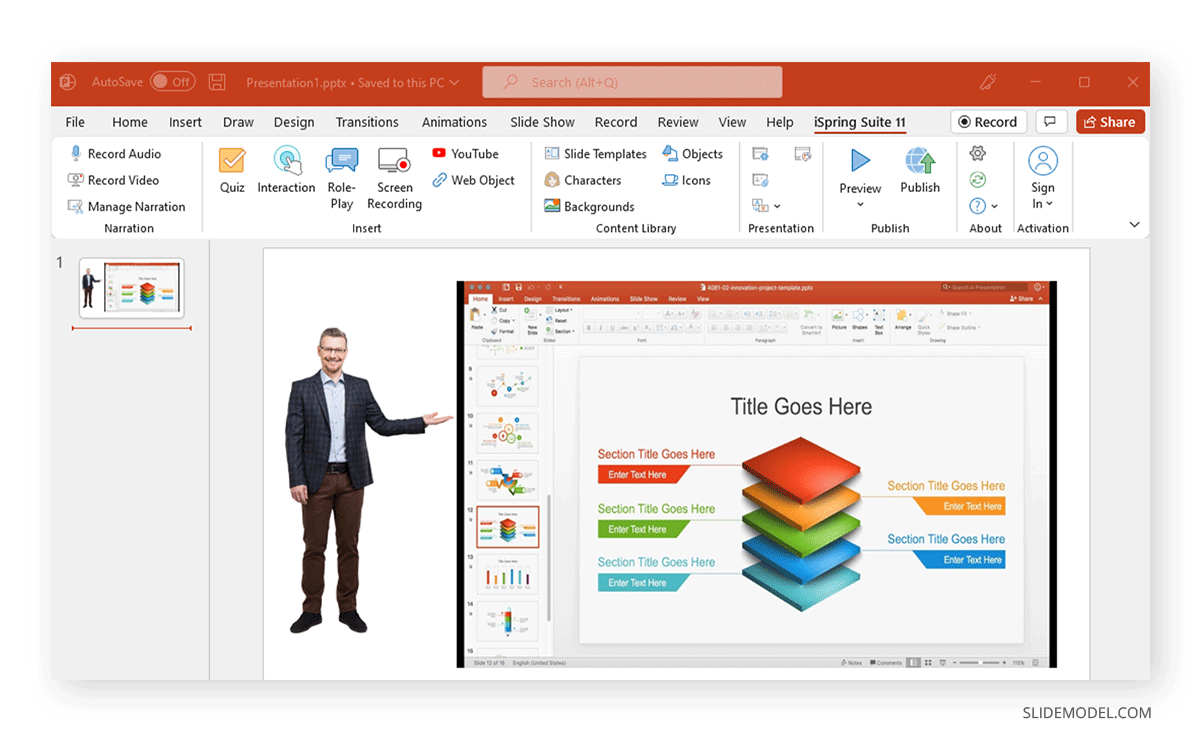
Adding a video from an online or offline source in PowerPoint is easier than it used to be, and YouTube videos function seamlessly, providing the internet connection is stable. However, if you are authorized to download a video, you can use it offline to circumvent potential connection issues.
Alternatively, discover our tutorials on how to convert PowerPoint to video , how to convert Google Slides to video and how to insert a video into PowerPoint .
Like this article? Please share
Presentation Skills, Presentation Tips, Presentation Videos Filed under PowerPoint Tutorials
Related Articles
Filed under Presentation Ideas • October 23rd, 2024
Formal vs Informal Presentation: Understanding the Differences
Learn the differences between formal and informal presentations and how to transition smoothly. PPT templates and tips here!
Filed under Design • October 22nd, 2024
The Rules of PowerPoint Presentations: Creating Effective Slides
Create powerful slide decks by mastering the rules of PowerPoint presentations. Must-known tips, guidance, and examples.

Filed under Google Slides Tutorials • October 16th, 2024
How to Add Voice Memos to Google Slides
Make your slides more interesting by learning how to add voice memos to Google Slides presentations. Step-by-step instructions here.
Leave a Reply
How to Insert and Embed YouTube Videos in PowerPoint Presentation Slides | Microsoft Powerpoint
Inserting and embedding YouTube videos into PowerPoint presentations can enhance the overall quality of your slides and engage your audience more effectively. With the rise of video content on the internet, incorporating videos from platforms like YouTube can make your presentation more dynamic and visually appealing. In this article, we will guide you through the process of inserting and embedding YouTube videos in PowerPoint presentation slides using Microsoft PowerPoint.
Why Insert YouTube Videos in PowerPoint?
There are several reasons why you may want to insert YouTube videos in your PowerPoint presentations. Here are a few benefits:
Engage your audience: Videos are more engaging than static images or text. By incorporating YouTube videos into your presentation, you can capture your audience’s attention and keep them interested in your content.
Visual appeal: Videos can make your slides more visually appealing and help convey complex ideas or concepts more effectively.
Demonstrate a process or product: If you are presenting a tutorial, demonstration, or showcasing a product, embedding a YouTube video can provide a clear and concise visual representation of what you are trying to convey.
Save time: Instead of creating your own videos from scratch, you can leverage existing YouTube videos that are relevant to your presentation topic. This can save you time and effort in creating new content.
Overall, incorporating YouTube videos into your PowerPoint presentations can help you deliver a more impactful and engaging presentation to your audience.
How to Insert YouTube Videos in PowerPoint
There are two main ways to insert YouTube videos into PowerPoint presentations: using the "Insert" tab in Microsoft PowerPoint or embedding the video using a video link. Let’s explore both methods in detail:
Method 1: Inserting YouTube Videos using the Insert Tab
Open Microsoft PowerPoint and navigate to the slide where you want to insert the YouTube video.
Click on the "Insert" tab in the top menu bar.
In the "Insert" tab, click on the "Video" option in the Media group.
A drop-down menu will appear with two options: "Online Video" and "Video on My PC". Click on "Online Video".
A dialog box will appear prompting you to enter the URL of the YouTube video you want to insert. Copy the URL of the YouTube video you wish to embed and paste it into the dialog box.
Click on the "Insert" button to add the YouTube video to your PowerPoint slide.
The YouTube video will appear on your slide as an embedded video player. You can resize and reposition the video player as needed.
To play the video during your presentation, simply click on the "Play" button within the video player.
Method 2: Embedding YouTube Videos using a Video Link
Another way to insert YouTube videos into PowerPoint presentations is by embedding the video using a video link. Here’s how to do it:
Open your web browser and navigate to the YouTube video you want to embed in your PowerPoint presentation.
Copy the URL of the YouTube video from the address bar of your web browser.
Return to your PowerPoint presentation and navigate to the slide where you want to insert the YouTube video.
A dialog box will appear prompting you to enter the URL of the YouTube video you want to insert. Paste the URL of the YouTube video into the dialog box.
Tips for Inserting and Embedding YouTube Videos in PowerPoint
Here are some tips to help you effectively insert and embed YouTube videos in PowerPoint presentations:
Choose relevant videos: Select YouTube videos that are relevant to your presentation topic and enhance the content of your slides.
Check video compatibility: Ensure that the YouTube video format is compatible with PowerPoint. Most popular video formats such as MP4, AVI, and WMV are supported by PowerPoint.
Download videos for offline use: If you are unsure about internet connectivity during your presentation, consider downloading the YouTube video and inserting it into your PowerPoint presentation as a video file.
Customize video playback options: Right-click on the embedded YouTube video player in PowerPoint to access playback options such as play, pause, mute, and full screen.
Test the video playback: Before your presentation, test the video playback to ensure that the YouTube video plays smoothly without any issues.
Practice timing and transitions: Incorporate YouTube videos at appropriate points in your presentation and practice the timing of video playback to ensure a seamless transition between slides.
In conclusion, inserting and embedding YouTube videos in PowerPoint presentations can enhance the overall quality of your slides and engage your audience more effectively. By following the steps outlined in this article, you can easily incorporate YouTube videos into your presentations using Microsoft PowerPoint. Experiment with different videos and techniques to create engaging and dynamic presentations that leave a lasting impression on your audience.
Leave a Comment Cancel reply
Save my name, email, and website in this browser for the next time I comment.


Nice to meet you.
Enter your email to receive our weekly G2 Tea newsletter with the hottest marketing news, trends, and expert opinions.
How to Embed a YouTube Video in PowerPoint (On or Offline)
November 1, 2018

Viewers retain 95% of a message when they watch it in a video, compared to 10% when reading it in text.
If you've mastered how to upload a video to YouTube — or just have a favorite YouTube video — and now want to showcase it in a relevant business presentation, I highly recommend doing so. Video is proven to be more engaging, effective, and memorable than any other medium.
So if you’re about to give a presentation on the job and you’re worried about retaining the audience’s attention, consider including a relevant video.
How to embed a YouTube video in PowerPoint
- Navigate to PowerPoint slide
- Copy the YouTube video link that you wish to add
- On the Insert tab in PowerPoint, click Movie, then Online Movie. Paste the link and insert
- Format the video using the Video Format and Playback tabs
If you’re presenting on PowerPoint , adding a video may not feel intuitive. In fact, it can quickly become frustrating. This should not be keeping you up the night before the presentation. I’ll guide you through the steps so you can focus on more important things — like perfecting the message you want to get across — before the big day.

This article demonstrates how to embed YouTube videos in PowerPoint. Keep reading to learn how with a url or embed code, or jump ahead for the offline method, how to embed a video from your files .
There are two ways to add a video to PowerPoint: embedding it from YouTube or inserting a video file from your computer. I’ll go over each of these and how you can edit your video to make it as attractive and seamless as possible.
Videos should help your presentation, not hurt it or slow it down. So let’s dive into how to enhance your PowerPoint presentation with videos!
How to embed a YouTube video
YouTube videos are easy to embed once you know which buttons to push. You can embed videos from your own YouTube channel (learn how to make a YouTube channel here) or from someone else's.
Keep in mind that if you use the following method, you will have to be online when you give your presentation, otherwise the video will not play.
1. Navigate to PowerPoint slide
Decide which slide you want to feature your video. Let that slide be dedicated solely to the video itself. If you try to add a lot of text to the slide, it may become overwhelming. However, it is wise to continue using the same background or color scheme throughout the presentation.
2. Choose the YouTube video
Now, open up YouTube. Navigate to the video you wish to include. Once on that video’s page, copy the URL at the top of the browser.
3. Embed the YouTube video in PowerPoint
Back in PowerPoint, go to the Insert menu. It is situated right next to Home at the top of your screen. Next, go to Video (or Movie , depending on if you have a Mac or PC) and click it. In that drop-down menu, select Online Movie .
From there a window will pop up asking that you enter the URL for the online video. So go ahead and do so! Paste the URL you just copied into the empty field and then hit Insert.
That window will disappear and your video will appear on the PowerPoint slide.

4. Format YouTube video in PowerPoint
Once embedded, you should have a new tab on the menu banner available to you — the Video Format tab. Here, you’ll find a variety of editing options available to you.
You can choose from a wide range of borders and special effects. You can also crop and resize the video.
If you click Format Pane on the right, a sidebar will pop open. This can help make some of these editing options more easily accessible. You can choose for yourself which way you’d like to work.
If you go to the Playback tab, located to the right of the Video Format tab, you can see additional editing options. This Playback tab is most likely where you’ll make the majority of your changes.
Here you can trim the video, decide at what time you’d like to it to fade in or out, and you can play with the volume. But the editing features don’t stop there! My favorite options are choosing how to start the video, and whether or not the video plays full screen or remains the same size.
I’ll walk you through each of the above options now.
How to start a video at a certain time
In the Playback tab, look toward the middle of the banner where it says Start. You’ll notice a drop-down menu is available. In Click Sequence is automatically selected for you, which means the video will begin playing as you continue hitting enter or clicking to advance the presentation. If you want to change that, hit the drop-down menu and select your start preference.
Personally, I like to select When Clicked On because then I have full authority over when the video plays. In Click Sequence is fine, too, but if you accidentally hit Enter too many times during your presentation it might start playing before you are ready.
Another reason I prefer When Clicked On is so I can pause and take a moment to introduce the concept surrounding the video before playing it. That way your audience knows exactly what and why they’re about to watch it.
How to play a video full screen
If you want your video to take up the entire screen when it plays, check the box located below the Start drop-down menu. It is intuitively named Play Full Screen.
How to embed videos into PowerPoint from your files
If you want to add a video that is saved to your computer, it’s easy to do so. The good news with these is the internet connection will not impact video quality during your presentation.
1. Navigate to your PowerPoint slide
Again, choose the slide you want to present the video on. Just like when we embedded the video, I highly recommend either having no text on the slide or only including an accompanying headline. Let the video breathe a little and be the center of attention. It just looks like a cleaner design this way!
2. Select your video
From your slide, click Insert. It is the second tab on your menu banner right next to Home. A new banner will open up revealing all the Insert options. Go all the way to the right and click on Video . In that drop-down menu, select Movie from File.
From there, a new “Choose a Movie” window will appear giving you access to all the files on your computer. Find and select the video you want to include in your PowerPoint presentation.
3. Insert the video into PowerPoint
Double click on the video or click Insert in the bottom right corner. The window should disappear and your video should appear within PowerPoint. Most likely, it has taken over the entire slide and looks overwhelming. Fortunately, you can edit it to look how you want!
4. Format video
Now that the video is in your PowerPoint, you can play around with the formatting of it. You’ll automatically be directed to a new tab on the menu banner called Video Format.
On the right of your screen, if you click Format Pane an editing sidebar will appear.
You can edit the brightness of the video, crop it, add a border, and change the size of it there. Change the size of the video simply by dragging the corners until you’re satisfied.
Once you’re comfortable with how the video looks, you can navigate to the Playback tab. There you can choose when and how the video starts during your presentation. My personal preference is for it to start when I click on it specifically.
To do this, navigate to where it says Start in the middle of the banner.
Use the drop-down menu next to it. You’ll notice In Click Sequence is automatically selected. That means the video will start when you hit enter or click the screen to advance the presentation. If you don’t mind that, go ahead and keep it!
If you’re nervous about public speaking and/or this presentation has high stakes, you might let your nerves get the best of you and hit Enter too many times. I know I’ve done this before. When it happens, you have to apologize and rewind the video to the beginning again. Awkard.
Since I prefer having more control, I’m going to select When Clicked On from that drop-down menu. That way the video only starts when I specifically click on the Play button within the PowerPoint slide.
Right below that menu is a checkbox with the words Play Full Screen. Not surprisingly, if you want your video to become full-screen when you play it, you should check that box.
How to change the poster frame
After embedding your video, one still image from the video will appear as the “poster frame.” This is the image that represents the video until you hit play. If you aren’t happy with the image that was automatically loaded, you can change it to something more exciting!
Hit play on the video in PowerPoint. Allow it to play until you find a frame you want to use. Pause it on that frame.
Now go to the Video Format tab. Select Poster Frame. A drop-down menu will appear. From there, hit Current Frame.
Now when you navigate to that slide, the image you picked should be the new poster frame.
Your presentation now has a video!
See, embedding a video from YouTube or your files is not nearly as time-consuming as you thought! Now you can move on and focus on the big picture of your PowerPoint, not worry over minuscule details.
Best of luck delivering your presentation!
Curious what other presentation tools are available to you? Check out the best presentation software .

Holly is the director of content marketing at G2. An avid reader and writer, Holly graduated from the University of Missouri with a dual major in Journalism and English. She firmly believes in the power of content and is constantly seeking ways to better engage and delight readers.
Recommended Articles

How to Make Instructional Videos Your Audience Will Love
When you’re interested in learning something new, whether it be how to fix something that has...
by Mara Calvello

The Secret to Making a Stand-Out Product Video
A stand-out product video compels consumers to pay attention.
by Cristian Stanciu

How to Download Instagram Videos: Save IG Videos on any Device
Gone are the days when you can share just one picture in an Instagram post. Now, not only can...
by Kristen McCabe

Get this exclusive AI content editing guide.
By downloading this guide, you are also subscribing to the weekly G2 Tea newsletter to receive marketing news and trends. You can learn more about G2's privacy policy here .
How-To Geek
How to embed a youtube video in powerpoint.

Your changes have been saved
Email is sent
Email has already been sent
Please verify your email address.
You’ve reached your account maximum for followed topics.
Quick Links
Finding a youtube video’s embed code, embedding a youtube video in powerpoint, searching the youtube video in powerpoint.
During a presentation, a mix of media always performs best. Using images, graphs, charts, and videos not only makes your presentation more informative but also more engaging for the audience. If you have a YouTube video you’d like to use during your presentation, it’s as simple as embedding it in a slide. Here’s how.
Rather than linking to a YouTube video in your presentation, embedding it in the slide is usually the better option. It gives your presentation a more professional look because you won't be leaving your slide to pop open the YouTube website. Keep in mind, though, that even with the video embedded in your presentation, you’ll still need to be connected to the internet to play the video.
First, head over to YouTube and find the video you want to embed. Once you’re there, select the “Share” option, which you'll find in the video description.
A window will appear, giving you a few different vehicles for sharing the video. Go ahead and click the “Embed” option in the “Share a link” section.
Another window will appear, providing the embed code along with a few other options. If you wanting to start the video at a particular time, select the “Start at” box and enter the time when you’d like the video to start. Additionally, you can select whether you’d like to player controls to appear and if you want to enable privacy-enhanced mode.
Note: Privacy-enhanced mode keeps YouTube from storing information about visitors that visit your website that the video is embedded on unless they play the video. Since we will be using the embed code in a PowerPoint presentation, this option is not necessary.
Select “Copy” at the bottom right of the window to copy the embed code to your clipboard. Alternatively, select the code and use the Ctrl+C shortcut.
We’re finished with YouTube, for now, so head on over to PowerPoint and open your presentation.
Select the slide where you want to embed the YouTube video. On the “Insert” tab, click the “Video” button.
On the drop-down menu, select the “Online Video” option.
The Insert Video window that appears lets you search YouTube for a video or paste in that embed code you copied from the YouTube website. Paste the embed code and click the arrow to complete the action.
Your video will now appear in the presentation. To resize the video, click and drag the corners.
Note that at first, the video will appear as a black rectangle. Don’t worry---this is normal. Simply right-click the video and then select “Preview.”
This will give you a quick preview of how the video will look during your presentation.
You can also search for a YouTube video from that Insert Video window in PowerPoint. Type in your search terms and then click the search icon.
Several options will appear---888,341 in the case of the Rick Astley’s Never Gonna Give You Up video for which we searched. Select the one you want to use.
Then select “Insert” at the bottom-right of the window.
That’s all there is to it. Generally, we recommend searching the actual YouTube website and using the embed code the way we described earlier---mostly because the site is much easier to search and you can watch the videos before selecting the one you want. Still, if you know exactly what you're after, this method might work fine for you.
- Microsoft Office
- Office 2016
How to Embed a YouTube Video in PowerPoint

Table of Contents
What is microsoft powerpoint.
Microsoft PowerPoint is a versatile presentation software that allows users to create dynamic slideshows through an assortment of design and animation features. It is widely used among businesses and educational institutions for organizing and delivering presentations in meetings, classrooms, and seminars.
Who is Microsoft PowerPoint best suited for?
Product marketers , educators, and corporate trainers benefit greatly from using Microsoft PowerPoint. It allows for the creation of engaging and interactive presentations that can effectively communicate complex information and concepts. Its robust features make it ideal for creating visually appealing slideshows that can captivate audiences and enhance the retention of information.
Common FAQs on How to Embed a YouTube Video in PowerPoint
You can embed a YouTube video by copying the video's URL and using the "Insert" tab in PowerPoint to choose "Video" > "Online Video..." There, you can paste the URL to embed the video directly into your slide.
This issue can arise due to an unstable internet connection or if the PowerPoint version does not support online video playback. Ensure your PowerPoint is up-to-date and check your internet connectivity.
No, when you embed a YouTube video, you need an active internet connection during the presentation to stream the video.
Embedding a YouTube video works on newer versions of PowerPoint such as PowerPoint 2013 and later. If you're using an older version, you might have to update or use alternative methods.
Poor video quality can be attributed to low internet bandwidth. Try playing the video outside of PowerPoint to assess if the issue persists. If the problem is specific to PowerPoint, consider downloading the video for offline playback if license permits.
Enjoyed this interactive product demo of Microsoft PowerPoint?
Create your own interactive product demo in minutes. Drive growth, scale enablement and supercharge product led-onboarding with Supademo.
Sign up for free here with no credit card required.
Create elegant interactive product demos in minutes.
Start a 14-day free trial, no credit card required.
Related articles

How to use the SEMRush keyword gap tool

How to Create a Zoom Account

How to create a campaign in MailerLite
Get the fastest, easiest interactive demo platform for teams.
Our Recommendations
- Best Small Business Loans for 2024
- Businessloans.com Review
- Biz2Credit Review
- SBG Funding Review
- Rapid Finance Review
- 26 Great Business Ideas for Entrepreneurs
- Startup Costs: How Much Cash Will You Need?
- How to Get a Bank Loan for Your Small Business
- Articles of Incorporation: What New Business Owners Should Know
- How to Choose the Best Legal Structure for Your Business
Small Business Resources
- Business Ideas
- Business Plans
- Startup Basics
- Startup Funding
- Franchising
- Success Stories
- Entrepreneurs
- The Best Credit Card Processors of 2024
- Clover Credit Card Processing Review
- Merchant One Review
- Stax Review
- How to Conduct a Market Analysis for Your Business
- Local Marketing Strategies for Success
- Tips for Hiring a Marketing Company
- Benefits of CRM Systems
- 10 Employee Recruitment Strategies for Success
- Sales & Marketing
- Social Media
- Best Business Phone Systems of 2024
- The Best PEOs of 2024
- RingCentral Review
- Nextiva Review
- Ooma Review
- Guide to Developing a Training Program for New Employees
- How Does 401(k) Matching Work for Employers?
- Why You Need to Create a Fantastic Workplace Culture
- 16 Cool Job Perks That Keep Employees Happy
- 7 Project Management Styles
- Women in Business
- Personal Growth
- Best Accounting Software and Invoice Generators of 2024
- Best Payroll Services for 2024
- Best POS Systems for 2024
- Best CRM Software of 2024
- Best Call Centers and Answering Services for Busineses for 2024
- Salesforce vs. HubSpot: Which CRM Is Right for Your Business?
- Rippling vs Gusto: An In-Depth Comparison
- RingCentral vs. Ooma Comparison
- Choosing a Business Phone System: A Buyer’s Guide
- Equipment Leasing: A Guide for Business Owners
- HR Solutions
- Financial Solutions
- Marketing Solutions
- Security Solutions
- Retail Solutions
- SMB Solutions
Business News Daily provides resources, advice and product reviews to drive business growth. Our mission is to equip business owners with the knowledge and confidence to make informed decisions. As part of that, we recommend products and services for their success.
We collaborate with business-to-business vendors, connecting them with potential buyers. In some cases, we earn commissions when sales are made through our referrals. These financial relationships support our content but do not dictate our recommendations. Our editorial team independently evaluates products based on thousands of hours of research. We are committed to providing trustworthy advice for businesses. Learn more about our full process and see who our partners are here .
How to Upload PowerPoint Presentations to YouTube
Putting a presentation on YouTube can be a great way to reach co-workers and customers, and it's easy to do. Here's how.

Table of Contents
PowerPoint presentations have been a popular tool for decades, and they still hold power in the business world. From a small work meeting to a crowded TED Talk, there are many professional discussions and lectures made easier by PowerPoint.
PowerPoint presentations can be recorded and shared at a later date. By uploading PowerPoint presentations to YouTube , you can increase your reach to co-workers, clients or friends. Doing so also allows your audience to view presentations on their own time without missing any important information. Microsoft even does what it can to simplify this process, but you still have to follow a few important steps.
How to upload PowerPoint presentations to YouTube
1. record your powerpoint presentation.
The first step is to record your PowerPoint presentation so that once it’s uploaded, viewers will be able to hear and see the entire presentation. You can use the Insert menu to add individual recordings to each slide. To do this, go to Click Insert > Media > Audio > Record Audio.
To record the entire slideshow, go to the Slide Show tab, and select Record Slide Show. Then, choose whether to record from the beginning or from the current slide. This option will include all narration, animations and slide transitions in the PowerPoint video.
Click Slide Show > Record Slide Show > Start Recording
Once your presentation is fully recorded, it’s ready to be converted into a video and uploaded to YouTube.
2. Turn your PowerPoint presentation into a video
To upload a PowerPoint presentation, you must convert it into a video. That includes all of the media – narration, animation, pointer movements and slide transitions – that go with it. So, once the presentation is up on YouTube, viewers will be able to watch it as if they were viewing it in real time.
There are two main ways to convert a PowerPoint presentation into a video: saving the file in a video format and saving the presentation as a PowerPoint Show. The advantage of saving the file as a PowerPoint Show is that your presentation will automatically jump to full-screen mode when someone opens it. This is ideal for business owners who are looking to send their video presentation to certain people instead of uploading it to YouTube.
Video presentations are saved as Windows Media Video (WMV) files, while PowerPoint Show presentations are saved in their own PowerPoint Show format (PPSX).
To save the presentation as a video, select File > Export > Create a Video > Select Video Quality > Use Recorded Timings and Narrations > Create Video.
To save the presentation as a PowerPoint Show, simply save the file under a new format. Click File > Save As > Browse > Save as Type > PowerPoint Show > Save.
3. Add audio to your PowerPoint presentation
You can add audio to a PowerPoint presentation on a PC or a Mac. Audio options include sound bites, music and narration. Adding sound helps further engage viewers, especially if you’re including commentary like you would if you were actually presenting the PowerPoint slideshow.
While in edit mode for your PowerPoint presentation, follow these steps to add audio to a PowerPoint presentation on a PC:
Click Insert > Audio. Then, select Audio on my PC from the available menu options. All available audio files on your computer will come up in the dialog box. Select the file you want to add to the presentation and click Insert at the bottom of the dialog box.
Choose Audio Tools Playback to edit the options for the presentation. From here, you can edit options such as Fade, Sequence and Loop Mode.
Here’s how to add audio to a PowerPoint presentation on a Mac:
Click Insert > Audio. Select either Audio Browser or Audio from File. The former allows you to add the audio from iTunes, while the latter browses your computer for the correct file. Choose the audio file. From the Audio Format tab, you can edit options such as Loop Mode, Play Across Slides and Hide During Slideshow.
4. Upload your PowerPoint presentation to YouTube
After converting the presentation into a video format, sign in to your YouTube account, and click Upload at the top of the page. Select the presentation video you want to upload, and then adjust the video privacy settings.
Once the video is uploaded, click Publish to make it viewable to others. Be sure to use a catchy title that best represents the topic of your presentation so the right audience can find it.
5. Share your PowerPoint presentation with co-workers
Uploading presentations to YouTube is a great way for colleagues and customers to learn about a business on their own time. It also can be a great way to advertise changes or updates to a business. Make sure your connections know where to find your presentation and encourage them to share it with their own network. Share the link on your business LinkedIn page and social platforms , email it to co-workers, include it in an email marketing newsletter. There are many ways to market your presentation and increase its reach, so you can build a loyal audience and continue to post engaging content.
Tips for creating a good presentation video
When putting together your presentation, you don’t want to do the bare minimum and hope it impacts viewers. Here are some tips for creating an engaging PowerPoint presentation video, using the right presentation tools , your audience will love:
- Use simple visuals : Presentations work best when the visuals are simple. Don’t clutter the screen; embrace white space for improved readability. Limit pages full of long lists of bullet points. Instead, highlight only the most important facts.
- Choose a theme that fits the topic of your presentation : PowerPoint offers templates, but you may want to customize one to avoid coming across as cookie-cutter. Remember that the use of color is important to convey messages. Cool tones, such as blue and green, work best for background colors, while warm shades, such as red and orange, are best for text and charts.
- Include video clips and audio in meaningful ways : A crashing symbol between slides is more likely to come across as cheesy than engaging. Use engaging yet professional videos and audio clips that add to the presentation, not distract the audience from the topic. This includes narration, an explainer video that is relevant to the subject or simple transitions from slide to slide.
- Remember your audience : The top tip for creating a good video is to always keep your small business demographic in mind. Imagine the video from viewers’ perspective and allow that to shape the features you add.
- Don’t overcrowd your slides with text : Using too many words on each slide will be overwhelming to your audience following along. Instead, include one-sentence summaries or bullet points (but limit them), then add audio commentary to expand on them further.
- Tell a story : While you want to approach the presentation in a professional manner, don’t turn it into a lecture. Use anecdotes and engaging stories to communicate your message. Rather than talking to your audience, have a discussion with them — even if they can’t interact in the moment. Approach the entire presentation like a conversation rather than a lecture.
Maintaining your business’s YouTube Page
Creating a YouTube page for your business and sharing video presentations isn’t enough. To reap the full benefits of your PowerPoint presentations, be sure to promote your content, interact with viewers in the comments section and update your page regularly. This will attract more subscribers and establish your brand as an expert in its sector.

Building Better Businesses
Insights on business strategy and culture, right to your inbox. Part of the business.com network.
Sign up for our daily newsletter
- Privacy Policy
- Advertise with Us
How to Create a YouTube Video with PowerPoint
Few people nowadays have the patience or willingness to sit through multiple slide presentations. Online videos, on the other hand, are a powerful means to build user engagement in an era of lower attention spans. As long as the videos look professional, your audience will pay attention to whatever you have to say.
Follow these simple steps to convert your hard work that went in to creating a PowerPoint into an accessible and compact YouTube video.
Also read: 4 Free Online Tools to Add a Censor Bleep to Your YouTube Videos
Step 1: Clean Up Your Slides
If you want to give a professional finish to the video, try breathing life into the slides first.
Open the file with PowerPoint 2010 and click “View,” followed by “Slide Master,” to apply uniformity in alignment, bullets, fonts and spacing. After saving the Master template, go to “Slide Sorter” view and apply a minimalist, standard design. You can use an academic or corporate template as long as it’s minimal and clean.

Too much text in a slide will disrupt the attention span of the typical YouTube viewer. Get rid of bullet lists, fancy animations, flowcharts and tables. If you previously used a slide to describe something complex, break it down into easily digestible ideas spread across multiple slides.
Use screenshots and full-slide, high-resolution images to fill up your new presentation. PowerPoint 2010 allows you to insert online pictures with a Creative Commons license and from the Bing search engine.

You can also use the “Pictures with Captions” layout along with “Design Ideas” to create a robust background for video frames. Use free stock images for new picture ideas.

Also read: 14 Useful PowerPoint Templates to Set Up a Digital Planner
Step 2: Insert Audio
Background narration is the most important component of a high-quality YouTube video. You can download royalty-free music , but the best YouTube videos always come with speaker narration. Go to “Insert,” followed by “Audio,” where PowerPoint allows you to record your own voice for each slide.

There’s a chance you aren’t getting a very high-quality audio with PowerPoint alone. It’s far better to work with a pre-recorded audio clip and a tight script. You can use a voice recording app like Audiophile or an actual digital voice recorder. Our aim is to achieve professional results by filtering out echo and background noise.

For a fifty-slide presentation, you should aim for no more than ten seconds of recorded narration per slide. Go to “Slide Show,” followed by “Rehearse Timings,” to get the timings right for each slide. Import the MP3 files into their corresponding slides and play them in automatic mode.

Finally, you are only required to set up the slide show. Check the options for “Play Narration” and “Use Timings” along with “Browsed by an individual (window).”

Also read: How to Create and Manage Your YouTube Clips
Step 3: Insert Video Clips (Optional)
If you did a good job with rehearsed narrations and images as described earlier, you can skip this part. However, a mini video clip within a video is a powerful way to retain your YouTube viewer’s attention. Unlike in the past, playing a video clip automatically from your PowerPoint is very easy.
Go to “Insert,” followed by “Video,” where you can embed any video from YouTube’s “Share” menu and play it on your own presentation.

Always make sure that it is your own video. You can always choose Creative Commons videos from YouTube, Vimeo and other sites. Use PowerPoint’s “Playback” option which is displayed after you embed a new video.
Step 4: Save PPT as Video
After clicking “File,” followed by “Save As,” save the PowerPoint as a WMV file. Your video is now ready for upload on YouTube and any other video-sharing sites.

Step 5: Upload Video on YouTube
Upload the desired video output to your YouTube channel. If it is aimed at prospects alone, you might want to keep it private or unlisted with no embedding or comments allowed.

Do you agree that converting your PowerPoint files to a five- or seven-minute video is a good investment of time? Please let us know your thoughts. Want to make the most of your time? Learn these PowerPoint keyboard shortcuts .
Our latest tutorials delivered straight to your inbox
Sayak Boral is a technology writer with over eleven years of experience working in different industries including semiconductors, IoT, enterprise IT, telecommunications OSS/BSS, and network security. He has been writing for MakeTechEasier on a wide range of technical topics including Windows, Android, Internet, Hardware Guides, Browsers, Software Tools, and Product Reviews.


How to Upload a PowerPoint to YouTube: Step-by-Step Guide
Have you ever wondered how to upload a PowerPoint to YouTube? That’s a fairly common question among many Microsoft PowerPoint users.
After creating a PowerPoint presentation, you may want to share it on YouTube to reach a greater audience.
Unfortunately, YouTube can only accept video files. A PowerPoint presentation may have video and audio elements embedded in it, but it is still not a video file.
You need to convert your presentation to a video file to upload it to YouTube. This tutorial will show you exactly how to do that.

Step 1: Create Your PowerPoint Presentation
Create your PowerPoint presentation as you normally would. However, keep in mind that you won’t be doing a live presentation, so try to include everything you need to make a great video, including audio clips.
Your audio could be music, sound bites, a narration (your voice recordings), or a combination of all these. Make sure to use them meaningfully.
Here is how to add audio to your presentation:
1. Click the Insert tab on the ribbon
2. Click Audio from my PC
Browse through the audio files on your computer and select the one you want to add to your presentation.
3. Click the Insert button to add the file
Step 2: Convert Your Presentation to a Video
This next step on how to upload a PowerPoint to YouTube is crucial because you can’t share your file on the widely accessible video platform without converting it to a video format.
Here’s how to convert your presentation to a video.
1. Click the File tab on the PowerPoint (2010 version or later)

2. Click the Export tab
3. Click Create a Video from the list of options

You can tweak some of the settings, including slide durations, video resolution, and narrations.
You can leave the resolution to full HD if you don’t know what to select. Simply let YouTube handle the file compression.
You can simply set how long you want each slide to display, especially if your presentation doesn’t have recorded narrations and timings. For example, you can set individual slides to show for 15 seconds.
4. Next, click the Create Video box below the settings
5. Click Save on the next dialog box to export your presentation in video format
Your PowerPoint presentation is now ready for YouTube.
Step 3: Upload to YouTube
Now that you’ve converted your presentation to a video, it’s time to upload it to YouTube. Here’s how to do that:
1. Sign in to your YouTube account or click the app on your mobile device
2. Click the Create icon on the top right corner of the window
3. Click Upload video

On a mobile device, tap the circled plus sign at the center bottom of the screen and tap Upload a video .
4. Locate the PowerPoint video file and click Open
You may be asked to create a YouTube channel if you don’t already have one. You can rename the file, write a description, set the privacy, and apply other settings when the upload is complete.
Tips to Make Your Video Better
Although your presentation will be viewed on YouTube, you still need to remember a few simple tips for a great video.
- Keep the visuals as simple as they can be; presentations generally work best that way. You don’t want to clutter the entire screen. Instead, allow a few empty spaces on each slide for improved readability
- Highlight only the most essential facts. Your audience should not have to endure a long list of bullet points. Remember that you are presenting, not writing a book
- Make use of themes or templates to give your presentation a uniform feel. You might mar an otherwise good presentation unless you are an expert with lots of experience creating eye-catching yet appealing presentations
- Use audios, effects, and transitions in meaningful ways. You want to engage your audience, but at the same time, you don’t want to appear cheesy
Why You Should Share Your PowerPoint Presentation on YouTube
Learning how to upload a PowerPoint to YouTube gives you the advantage of reaching a wider audience, whether or not they have a presentation program on their computers.
While Microsoft PowerPoint is a fairly popular presentation program, not everyone has ready access to it. Some of your clients, co-workers, students, or friends may not have the software on their computers. Others may have it (or some other similar application) but don’t know how to use it.
However, just about anyone can access YouTube from a computer, smartphone, or other mobile devices. It’s as simple as searching for your video on the platform and clicking play – no downloads or any other technical know-how required.
Closely related to this is that users don’t even need a computer to view your presentation. Not many mobile devices have a PowerPoint program, but they can all play videos, whether it’s an iPod, iPhone, or mobile phone.
Also, you don’t have to worry about specific PowerPoint versions. Usually, presentations in one version of PowerPoint might not work too well on another. A video eliminates all that worry. Users can even view the presentation on a DVD player by downloading it to disk.
You can easily embed the video in your blog or on any web page. Video files have better web support than presentation formats.
In a nutshell, more people can access your PowerPoint presentation if you share it on YouTube. You can copy and share the link to your video to make it easy for people to watch it.
Wrapping Up
Hopefully, you now know how to upload a PowerPoint to YouTube. Don’t worry if your video presentation doesn’t come out as you expected at first. You can also tweak things around until you get exactly what you want. The key is to experiment with the settings during the conversion process.
You can reach more people you can ever imagine with a YouTube presentation. Remember to set proper metadata (or description) so that people can easily find your video on YouTube.
Jamie Keet is a Technology Instructional Coach with a deep-rooted passion for educational technology. With a background that combines a marketing diploma, a degree in management, and a master's in educational technology, Jamie has spent the last 25 years in education, working across all grades and adult learning. His experience in the classroom has shaped his approach to tech education, focusing on making technology accessible and engaging for everyone.
Jamie's goal is simple: to help users feel confident and successful with technology, encouraging them to explore and learn on their own. He believes in breaking down the barriers that prevent people from getting started with technology, whether they're students in a classroom or individuals looking to improve their tech skills.
Outside of his professional work, Jamie enjoys keeping up with the latest tech trends and finding new ways to incorporate them into his teaching. His approach is all about simplicity, clarity, and making technology fun and accessible for all.
Further reading

Boosting Classroom Collaboration with Microsoft Teams

Streamlining Classroom Workflow with Microsoft To Do

Unlocking the Potential of My Day with the Outlook Calendar Update

New Microsoft Outlook Features: Revolutionizing Professional Communication

Discovering Bing Chat: The New Wave of Interactive Browsing

How to Insert Microsoft Excel Data into Microsoft Word and PowerPoint
- Latest Posts
- Microsoft Excel Tutorial
- Microsoft Word Tutorial
- Microsoft PowerPoint Tutorial
- Microsoft OneNote Tutorial
- Microsoft Outlook Tutorial
- Augmented Reality
- Education Technology
- General Tech
- Google Apps Tutorials
- Graphic Design
- Microsoft Apps
- Microsoft Edge Tools
- Microsoft Excel
- Microsoft Forms
- Microsoft Immersive Reader
- Microsoft OneNote
- Microsoft Power Apps
- Microsoft PowerPoint
- Microsoft Sway
- Microsoft Teams
- Microsoft Translator
- Microsoft Tutorials
- Microsoft Whiteboard
- Online Teaching
- Productivity Apps
- Remote Learning
- Teaching Apps
- Video Editing Help
- Virtual Reality
- YouTube Help
- PRO Courses Guides New Tech Help Pro Expert Videos About wikiHow Pro Upgrade Sign In
- EDIT Edit this Article
- EXPLORE Tech Help Pro About Us Random Article Quizzes Request a New Article Community Dashboard This Or That Game Forums Popular Categories Arts and Entertainment Artwork Books Movies Computers and Electronics Computers Phone Skills Technology Hacks Health Men's Health Mental Health Women's Health Relationships Dating Love Relationship Issues Hobbies and Crafts Crafts Drawing Games Education & Communication Communication Skills Personal Development Studying Personal Care and Style Fashion Hair Care Personal Hygiene Youth Personal Care School Stuff Dating All Categories Arts and Entertainment Finance and Business Home and Garden Relationship Quizzes Cars & Other Vehicles Food and Entertaining Personal Care and Style Sports and Fitness Computers and Electronics Health Pets and Animals Travel Education & Communication Hobbies and Crafts Philosophy and Religion Work World Family Life Holidays and Traditions Relationships Youth
- Browse Articles
- Learn Something New
- Quizzes Hot
- Happiness Hub
- This Or That Game
- Train Your Brain
- Explore More
- Support wikiHow
- About wikiHow
- Log in / Sign up
- Computers and Electronics
- Presentation Software
- PowerPoint Insertions
5 Ways to Embed a Video File in Microsoft PowerPoint
Last Updated: June 14, 2024 Fact Checked
Embedding a Web Video
Embedding a video file, embedding a stock video, using android, linking movie files (powerpoint 2007).
This article was co-authored by Mitch Harris and by wikiHow staff writer, Rain Kengly . Mitch Harris is a Consumer Technology Expert based in the San Francisco Bay Area. Mitch runs his own IT Consulting company called Mitch the Geek, helping individuals and businesses with home office technology, data security, remote support, and cybersecurity compliance. Mitch earned a BS in Psychology, English, and Physics and graduated Cum Laude from Northern Arizona University. This article has been fact-checked, ensuring the accuracy of any cited facts and confirming the authority of its sources. This article has been viewed 1,155,906 times.
If you want to spruce up your PowerPoint presentations, you can add a video to your slides. If you have a video file on your computer, you can easily embed it into your presentation. You can also embed YouTube videos, use looping stock videos, or, on older versions of PowerPoint, link to the videos. This wikiHow will show you how to add a video to Microsoft PowerPoint using your Windows, Mac, or Android device.
The Best Ways to Embed a Video in PowerPoint
- Copy a YouTube URL. In PowerPoint, click "Insert' → "Video" → "Online Videos/Movie". Paste the URL and click "Insert".
- To embed a video file, click "Insert" → "Video" → "This Device" → select a file → "Insert".
- To use a stock video, click "Insert" → "Video" → "Stock Videos" → select a video → "Insert".

- You must have a subscription to use Office 365 . [1] X Trustworthy Source Microsoft Support Technical support and product information from Microsoft. Go to source
- Adding a video to your PowerPoint can help you make a great presentation .

- You can insert a video from supported websites such as: YouTube, SlideShare, Vimeo, Microsoft Stream, and Flip.

- On Mac, this will look like Online Movie .

- You'll see a preview of the video.

- To adjust when the video plays, click the drop-down menu next to Start: . Select In Click Sequence , Automatically , or When Clicked On .
- Check the boxes to apply any of the following: Play Full Screen , Hide While Not Playing , Loop until Stopped , and/or Rewind after Playing .
- Click Volume to adjust the video's volume. Select Low , Medium , High , or Mute .

- Select the web video and click the Video Format tab.
- Click Poster Frame on the left of the toolbar.
- Click Image from File… .
- Select From a File , Stock Images , Online Pictures , or From Icons .
- Select the image source from the chosen method, and then click Insert .

- Stock videos work best as a background graphic to your PowerPoint text, since these videos loop seamlessly

- The stock video will be added to your slide. By default, it will cover the entire slide.

- PowerPoint is available for Android in the Google Play Store .

- The menu will open.

- If you want to take a video using your camera, tap Open Camera instead.
- The video file will be added to your PowerPoint.

- Videos can only be "embedded" (included in the presentation file itself) in PowerPoint 2010 or newer.

- Click the Office button and select "Publish."
- Select "Package for CD" and then select your presentation.
- Ensure that "Linked files" is selected in the "Options" menu.
Community Q&A
Tips from our Readers
- In the newest version of PowerPoint, to embed a YouTube video, all you have to do is go to insert, video, online video and then paste the link for the video.
You Might Also Like

- ↑ https://support.microsoft.com/en-us/office/insert-a-video-from-youtube-or-another-site-8340ec69-4cee-4fe1-ab96-4849154bc6db#OfficeVersion=Windows
- ↑ https://support.microsoft.com/en-us/office/insert-audio-or-video-in-powerpoint-for-android-95e0a2af-35fb-405a-8536-cdcd934f659a
- ↑ https://support.office.com/en-us/article/My-movie-doesn-t-play-190cf574-183d-4b7f-b627-3783a14b7b07?ui=en-US&rs=en-US&ad=US
- ↑ https://support.office.com/en-us/article/Add-and-play-a-movie-in-a-presentation-f3fcbd3e-5f86-4320-8aea-31bff480ed02
About This Article

1. Open the slide. 2. Click Insert . 3. Click Movie . 4. Click Movie from File or Video on my PC . 5. Select the video and click OK . 6. Click Playback . 7. Choose how to play the video. 8. Save your presentation. Did this summary help you? Yes No
- Send fan mail to authors
Reader Success Stories
Rjan Berglund
May 26, 2017
Is this article up to date?
Jun 20, 2017
Nov 7, 2016
Jul 27, 2016

Featured Articles

Trending Articles

Watch Articles

- Terms of Use
- Privacy Policy
- Do Not Sell or Share My Info
- Not Selling Info
Keep up with tech in just 5 minutes a week!

How to embed YouTube in powerpoint?
How to Embed YouTube in PowerPoint: A Step-by-Step Guide
Direct Answer: How to Embed YouTube in PowerPoint?
To embed YouTube in PowerPoint, follow these simple steps:
- Create a new PowerPoint presentation or open an existing one.
- Insert a new media element , such as a video or audio file, by clicking on "Insert" > "Video" or "Audio" in the toolbar.
- Search for the YouTube video you want to embed by typing its URL in the "From Online Services" section of the "Insert Media" dialogue box.
- Select the YouTube video from the search results and click "Insert".
- Customize the video settings as needed, such as adjusting the playback controls, resolution, and volume.
- Save your PowerPoint presentation to embed the YouTube video.
Preparing Your PowerPoint Presentation for YouTube Embedding
Before you start embedding YouTube videos in your PowerPoint presentation, make sure you have the following components ready:
- A stable internet connection : You need a reliable internet connection to access YouTube and embed the video.
- A YouTube account : You need a valid YouTube account to access and share your content.
- A PowerPoint version : PowerPoint 2013 or later versions support embedding YouTube videos.
Why Embed YouTube in PowerPoint?
Benefits of Embedding YouTube in PowerPoint:
- Enhanced engagement : Embedding videos can increase audience engagement and participation by making your presentation more interactive and engaging.
- Improved content delivery : Videos can help you convey complex information in a more concise and easily digestible format.
- Cost-effective : You don’t need to create and upload your own videos, reducing production costs and saving time.
- Easy updating : If you need to update the video, you can simply replace it in your PowerPoint presentation without having to re-render the entire presentation.
Troubleshooting Common Issues:
- Video not playing : Check that your internet connection is stable and the video is publicly accessible.
- Audio only playing : Ensure that the video is set to play in "Audio Only" mode or adjust the volume settings.
- Volume not working : Check that the volume settings are correct and the video is not muted.
Best Practices for Embedding YouTube in PowerPoint:
- Use high-quality videos : Choose videos with high quality audio and video to ensure a smooth playback experience.
- Optimize your video selection : Select videos that are relevant to your presentation topic and audience to maintain engagement.
- Customize video settings : Adjust playback controls, resolution, and volume to ensure a seamless viewing experience.
Common Mistakes to Avoid:
- Inconsistent formatting : Ensure that the video embedding is consistent throughout your presentation to maintain a professional appearance.
- Inadequate video selection : Avoid using videos that are too long, irrelevant, or distracting to your audience.
- Insufficient testing : Test your presentation before sharing it to ensure that the video embeds correctly and functions smoothly.
Conclusion:
Embedding YouTube videos in PowerPoint is a simple and effective way to enhance your presentations and engage your audience. By following the steps outlined in this article, you can create a more interactive and engaging presentation that showcases your content in a more dynamic way. Remember to keep your video selection relevant, customize video settings, and test your presentation before sharing it with others. With practice and patience, you’ll master the art of embedding YouTube videos in PowerPoint and take your presentations to the next level!
- Can You add links on TikTok?
- How to change YouTube email?
- How to write review of literature example?
- How much is an alternative teaching certificate?
- How can I find prostitutes on Facebook?
- How to not get calls from WhatsApp?
- How to write a graduate personal statement?
- Does university of maryland track demonstrated interest?
Leave a Comment Cancel Reply
Your email address will not be published. Required fields are marked *
Save my name, email, and website in this browser for the next time I comment.
How to Save PowerPoint Recording
Saving PowerPoint recordings allows you to easily share narrated presentations as videos for various purposes
How to Save a PowerPoint Recording: A Step-by-Step Guide
Step 1: open your powerpoint presentation.

Step 2: Go to the "Slide Show" Tab

Step 3: Click on "Record Slide Show"

Step 4: Start Recording

Step 5: Stop and Preview the Recording

Step 6: Save the Recording as a Video

Step 7: Choose a File Location and Save
Faqs can take you forward, can i edit my recording before saving it, what video formats can i save my recording in, can i include both audio and video in my recording, create ppt using ai.
Just Enter Topic, Youtube URL, PDF, or Text to get a beautiful PPT in seconds. Use the bulb for AI suggestions.
character count: 0 / 6000 (we can fetch data from google)
upload pdf, docx, .png, .mp4
less than 2 min
How to Use AI to Create a Google Slides Presentation: A Step-by-Step Guide
23 October 2024
What is Generative AI Presentation? A Comprehensive Guide to AI Presentation Generators
What is AI Presentation? A Comprehensive Guide to AI-Powered PPT Presentations
How to add a YouTube video to Canva
25 October 2024
How to SuperScript in Canva
How to Add a Template to PowerPoint
How to upload PowerPoint to YouTube
How to Use AI in Presentations: A Detailed Guide
22 October 2024
How to Make a Presentation Using AI for Free
Stunning presentations in seconds with AI
Install MagicSlides app now and start creating beautiful presentations. It's free!

Get AI-Generated Presentations Ready in Seconds
Free AI PPT Tools

IMAGES
VIDEO
COMMENTS
Trimming a video. PowerPoint for the web can't trim videos, and online videos can't be trimmed. If you have a video that you want to trim, you must save it to your computer, then insert it on your slide in a desktop version of PowerPoint. Newer Mac versions
Tips for Optimizing YouTube Videos in PowerPoint Presentations. To make the best use of YouTube videos in your presentation, follow these tips:. Choose High-Quality Videos. Ensure the video you choose has high video resolution.Poor-quality videos can detract from your presentation's professionalism.
Locate the YouTube video that you want to add to your PowerPoint presentation. Finding the right YouTube video is the first step. Make sure it's relevant to your presentation's content and will add value for your audience. Once you've found it, copy the URL from the address bar. Step 2: Open your PowerPoint presentation
Final Thoughts On Embedding Videos On PowerPoint. Embedding a YouTube video in PowerPoint is a powerful way to enhance your presentations and engage your audience. By following these 10 easy steps, you can seamlessly embed YouTube videos into your slides, making your content more enriched, visually appealing and impactful.
Open PowerPoint and select the slide you want to insert the screen recording into, click Insert, and select Screen Recording. Open the YouTube video you want to add and click Select Area on the control menu. You'll see a cross-haired cursor. By clicking on it and dragging it, you can select the area of the screen that you want to record ...
To find the right URL for your YouTube video to embed into PowerPoint, follow these steps: Navigate to YouTube.com Use the Search Bar to find your video Select your video to open the YouTube Player Click Share at the bottom of the video player Click Copy The same is true if you are using an online video from another source.
Go to the PowerPoint slide where you want your video to be placed. Right click and Paste. Your video should now appear and play if you click on it. What kinds of videos can I use in a presentation? Videos are an amazing way to liven up your presentation. Especially when you're talking for a long time, the audience tends to get tired.
Whether you're creating a presentation for work or school, making an online course, or sharing a slideshow with friends and family, you might be wondering how to embed a YouTube video in PowerPoint.As an instructional designer, I've seen firsthand how much a well-placed video can impact learning outcomes and audience engagement. Adding a relevant YouTube video is an innovative and dynamic ...
Insert an online video in a PowerPoint presentation. This will enable adding a URL from supported websites, including video hosting platforms like YouTube, Vimeo, SlideShare, Stream, and Flip. Add the URL and click Insert to add the YouTube video to your presentation. How to Embed a Video in PowerPoint by inserting an online video URL 2.
Learn how to add video to PowerPoint. You can add, format, and record video in PowerPoint and export your presentation as a video. ... Online Videos: Add a video from YouTube or paste in an embed code. Screen recording. Select Insert > Screen Recording. Select the area you want to record. Select Record. Record your presentation. Select Slide ...
Click on the "Insert" button to add the YouTube video to your PowerPoint slide. The YouTube video will appear on your slide as an embedded video player. You can resize and reposition the video player as needed. To play the video during your presentation, simply click on the "Play" button within the video player. Tips for Inserting and Embedding ...
Viewers retain 95% of a message when they watch it in a video, compared to 10% when reading it in text. If you've mastered how to upload a video to YouTube — or just have a favorite YouTube video — and now want to showcase it in a relevant business presentation, I highly recommend doing so. Video is proven to be more engaging, effective, and memorable than any other medium.
During a presentation, a mix of media always performs best. Using images, graphs, charts, and videos not only makes your presentation more informative but also more engaging for the audience. If you have a YouTube video you'd like to use during your presentation, it's as simple as embedding it in a slide. Here's how.
Open for all the info!! 🖤.....Hi y'all and Happy Tuesday! Today I'm sharing how I screen record for videos on YouTube using Microsoft Powerpoint plus how to...
What is Microsoft PowerPoint? Microsoft PowerPoint is a versatile presentation software that allows users to create dynamic slideshows through an assortment of design and animation features. It is widely used among businesses and educational institutions for organizing and delivering presentations in meetings, classrooms, and seminars. Who is Microsoft PowerPoint best
1. Record your PowerPoint presentation. The first step is to record your PowerPoint presentation so that once it's uploaded, viewers will be able to hear and see the entire presentation. You can ...
Learn how to record a PowerPoint Presentation with audio and video simply by using the build-in PowerPoint functionalities and tools. You will learn how to...
Use PowerPoint's "Playback" option which is displayed after you embed a new video. Step 4: Save PPT as Video. After clicking "File," followed by "Save As," save the PowerPoint as a WMV file. Your video is now ready for upload on YouTube and any other video-sharing sites. Step 5: Upload Video on YouTube
Learn how to publish your own video using Microsoft PowerPoint with narration, annotations, animations, and timings. As full disclosure, I work at Microsoft ...
Watch as your PowerPoint presentation transforms into a dynamic video, now accessible to a vast YouTube audience. Conclusion: In the ever-evolving landscape of digital communication, adapting your PowerPoint presentation for YouTube is more than a choice—it's a strategic imperative.
After creating a PowerPoint presentation, you may want to share it on YouTube to reach a greater audience. Unfortunately, YouTube can only accept video files. A PowerPoint presentation may have video and audio elements embedded in it, but it is still not a video file. You need to convert your presentation to a video file to upload it to YouTube.
Adjust the playback settings. Select the video and click the Playback tab. You'll be able to edit how your video plays on the slide. To adjust when the video plays, click the drop-down menu next to Start:.Select In Click Sequence, Automatically, or When Clicked On.; Check the boxes to apply any of the following: Play Full Screen, Hide While Not Playing, Loop until Stopped, and/or Rewind after ...
Direct Answer: How to Embed YouTube in PowerPoint? To embed YouTube in PowerPoint, follow these simple steps: Create a new PowerPoint presentation or open an existing one.; Insert a new media element, such as a video or audio file, by clicking on "Insert" > "Video" or "Audio" in the toolbar.; Search for the YouTube video you want to embed by typing its URL in the "From Online Services" section ...
Recording your PowerPoint presentation allows you to create a video version of your slides, complete with voiceovers, annotations, and transitions. This feature is especially useful for creating tutorials, online courses, or sharing presentations without needing to present live. ... Youtube to PPT using AI Turn YouTube videos into informative ...
When you make a recording of a presentation, all its elements (narration, animation, pointer movements, timings, and so on) are saved in the presentation itself. In essence, the presentation becomes a video that your audience can watch in PowerPoint. So you have two options for turning your presentation into a video that's ready to view:
Add, format, and record video Video; Add and record audio Video; Next: Share and co-author Try it! Add and record audio, such as music, narration, or sound bites, to your PowerPoint presentation and select the playback options. Add audio from your PC.