
How To Make a PowerPoint Presentation On Your Phone (Tips & Tricks)
Are you looking for a convenient way to create a presentation on the go? With the help of your phone, you can easily create and share professional-looking PowerPoint presentations.
In this article, we’ll provide tips and tricks on how to make a PowerPoint presentation on your phone.
We’ll cover downloading Microsoft PowerPoint, creating a new presentation, adding content to your presentation, customizing your presentation, saving your presentation, and sharing your presentation.
Plus, we’ll discuss the benefits of making a presentation on your phone.
Read on to learn more!
Table of Contents
Short Answer
Making a PowerPoint presentation on your phone is possible with the right app.
Microsoft PowerPoint for Android and iOS is the official PowerPoint app and works for making presentations on your phone.
You can create and edit presentations, add transitions, animations, and more.
Additionally, you can access PowerPoint presentations from OneDrive, Dropbox, and Box.
Once you’re finished, you can easily share your presentation with others.
Downloading Microsoft PowerPoint
Creating a PowerPoint presentation on your phone is easier than ever with the help of the Microsoft PowerPoint app.
To get started, youll need to download the app on your phone.
The app is available for both iOS and Android devices, and its free to download from the App Store or Google Play Store.
Once the app is downloaded, open it and youll be ready to start making your presentation.
When you first open the app, youll be asked to sign in with your Microsoft account .
If you dont have an account, you can create one for free.
Once youre signed in, youll be taken to the home screen where you can begin creating your presentation.
The app also offers a variety of features to help you make a great presentation.
You can access templates for different types of presentations, or you can start from a blank slide.
Youll also find a range of tools and features to help you customize the presentation.
From adding text, images, and videos, to animating your content and adding transitions and other effects, the app has everything you need to make your presentation look professional and engaging.
With the Microsoft PowerPoint app, making a presentation on your phone is now easier than ever.
So, if youre looking for a quick and easy way to share your ideas, make sure to give it a try.
Creating a New Presentation
Creating a new presentation on your phone using the Microsoft PowerPoint app is easy and straightforward.
After you’ve downloaded and opened the app, simply tap on the ‘Create’ button on the home screen.
This will open up a new blank presentation where you can start adding text, images, videos, and other content.
You can even customize the slides with animations, transitions, and other effects.
When you create a new presentation, you have the choice of two different layouts: a traditional slide-by-slide presentation or a more creative storyboard format. With the storyboard format, you can add multiple slides with different content in each one, and the app will automatically arrange them into a cohesive, eye-catching presentation.
Once you’ve finished creating your presentation, you can save it and share it with anyone you want.
Whether you’re presenting to a group or just sending a few slides to a colleague, the Microsoft PowerPoint app makes it easy to create a professional-looking presentation on your phone.
Adding Content to Your Presentation
Adding content to your presentation is the most important part of creating a successful PowerPoint presentation on your phone.
To start, first choose the layout of your slides you can use a blank slide, a template, or you can customize the layout.
Once you have the layout chosen, you can start adding your content.
Text is the most common type of content to add to a presentation.
To add text, simply tap the text box icon on the top of the screen and start typing.
You can customize the font, size, color, and style of the text to match your presentations theme.
Images, videos, and audio are also important components to a successful presentation.
To add an image, tap the image icon on the top of the screen and select the image you would like to add.
You can also make videos and audio recordings directly in the app.
To do this, tap the video/audio icon and then select the recording option.
Once you have added all of your content, you can customize the presentation with animations, transitions, and other effects.
To add an animation, tap the animation icon and select the type of animation you would like to add.
To add a transition, tap the transition icon and select the type of transition you would like to add.
By adding content, customizing the presentation with animations and transitions, and saving the presentation, you can create an engaging and interesting PowerPoint presentation on your phone.
With the Microsoft PowerPoint app, making a presentation is now easier than ever.
Customizing Your Presentation
Once youve created your slides, its time to customize them to make your presentation look professional and engaging.
The Microsoft PowerPoint app offers a variety of tools to help you do this.
You can use the text and design tools to change the font, size, and color of your text to make your slides more visually appealing.
You can also add animations, transitions, and other effects to make your presentation more dynamic.
For example, you can animate text or images to make them appear on the screen with a dramatic entrance.
You can also add a transition between slides to create a smooth flow from one slide to the next.
The Microsoft PowerPoint app also offers a variety of templates and themes to choose from.
You can select a theme that matches the tone of your presentation, or create your own custom template.
This will give your presentation a cohesive look and help to keep your audience engaged.
When youre finished customizing your presentation, dont forget to save it.
You can save it as a file, or you can even upload it to the cloud to make it easier to share with others.
Now youre ready to share your presentation and impress your audience.
Saving Your Presentation
Once youve finished creating your PowerPoint presentation on your phone, its time to save and share it.
Microsoft PowerPoint makes it easy to save your presentation to the cloud, so that you can access it from any device.
To save your presentation, tap the Save button in the upper right-hand corner of the app.
Youll be prompted to choose a location to save your presentation, such as iCloud Drive or OneDrive.
Select the location of your choice and then tap Save.
You can also save your presentation in a variety of formats, such as PowerPoint, PDF, and JPEG.
To choose a format, tap the Export button in the upper right-hand corner of the app.
Select the format you want and then tap Export.
Your presentation will then be saved to your device in the format you selected.
Once youve saved your presentation, you can easily share it with anyone who has a Microsoft account.
To share your presentation, tap the Share button in the upper right-hand corner of the app.
Youll be prompted to enter the email addresses of the people you want to share your presentation with.
Enter the email addresses of your recipients and then tap Share.
Your presentation will then be shared with the people you specified.
Now that youve saved and shared your presentation, you can rest assured that your ideas and information will be seen by your intended audience.
With the Microsoft PowerPoint app, you can easily create an engaging and professional presentation on your phone.
Sharing Your Presentation
Once you have created your PowerPoint presentation on your phone, you’ll want to share it with others.
Fortunately, sharing a presentation from your phone is a simple process.
With the Microsoft PowerPoint app, you can upload your presentation to the cloud and then share it with anyone you choose.
This allows you to quickly and easily share your presentation with friends, family, colleagues, or anyone else who needs to see it.
You can also save the presentation directly to your phone, and then use an app like Dropbox or Google Drive to upload it.
This makes it easy to share your presentation with anyone you want.
You can also share your presentation directly via email or social media, or embed it in a website or blog post.
With so many options available, you’ll be able to share your presentation with anyone you want in no time.
Benefits of Making a Presentation on Your Phone
Creating a presentation on your phone has many benefits.
For one, its convenient and easy to do.
You can quickly and easily create a presentation wherever you are, without having to lug around a laptop or tablet.
You can also save time by creating the presentation on your phone and then sharing it with anyone you want.
Additionally, the Microsoft PowerPoint app makes the process simple and straightforward.
With the apps intuitive interface, you can easily add text, images, videos, and other content to your presentation.
You can also customize the slides with animations, transitions, and other effects.
Finally, you can save the presentation and share it with anyone you want, allowing you to share your ideas with the world.
With the Microsoft PowerPoint app, creating a presentation on your phone is now easier than ever.
Final Thoughts
Creating a PowerPoint presentation on your phone is a great way to quickly and easily share your ideas with others.
With the Microsoft PowerPoint app, it’s now easier than ever to create a professional-looking presentation in just a few steps.
So why wait? Download the app now and start making presentations on the go!
James Wilson
James Wilson has extensive knowledge in the information technology industry.His second love, besides dealing with computers, is smart home technology. He is continually updating information to better comprehend this problem and has a deep understanding of the apartment’s support system.
Recent Posts
Can You Create a Poll in Microsoft Outlook Email? Here's How!
Do you want to get feedback from your contacts quickly and efficiently? If so, then creating a poll in Microsoft Outlook email is the perfect solution! Polls are a great way to quickly collect data...
How To Fix Microsoft Outlook Cannot Connect To Server? (Here's The Solution)
Have you ever experienced the frustration of not being able to connect to your Microsoft Outlook server? It can be a major inconvenience when you need access to your emails, and it can be hard to...
How to Make PowerPoint Presentation on Mobile Phone

PowerPoint is a great tool for making slideshows, whether for work, school, or personal use. But sometimes you don’t have access to a computer or laptop, and you must make a presentation on the go.
That’s where PowerPoint for Android comes in handy. It lets you create, edit, and present your slides from your mobile device. Here are the steps to follow:
1. Download and install Microsoft PowerPoint from the Google Play Store. It’s free to download and use.

2. Open the app. You’ll need a Microsoft account to sign in and access some features.

3. Tap the plus icon at the right corner to create a new presentation.

4. You can choose from various templates or start with a blank slide.

5. To add text to your slide, tap on the text box and type your content. You can use the formatting toolbar at the top to change the font size, color, alignment, and style of your text. You can also add bullet points, numbered lists, and indents .

6. To add images to your slide, tap on the picture icon on the toolbar and select an image from your gallery, camera, or online sources.

7. You can rotate and crop using the handles and options on the screen.

8. To add shapes or tables to your slide, tap on the insert icon on the toolbar and choose what you want to add.

9. You can customize the color, size, and style of your elements using the options on the screen.

10. To add notes to your slide, tap on the Notes icon. You can use these notes as reminders or cues when you present your slides.

11. To save your presentation, tap the three dots in the upper right corner and choose where you want to save it. You can save it locally on your device or online on OneDrive.

12. To present your slides, tap on the present icon on the toolbar.

With just a few clicks and taps here and there, users can create professional-looking PPTs on a mobile phone without needing access to desktop computers or laptops. Making it perfect for anyone who wants to give a quick yet effective presentation anytime anywhere!
About The Author
Rully novrianto, related posts.

How to Create a Genogram in PowerPoint to Understand Family History

How to Convert PowerPoint to MP4 in PowerPoint 2013

How to Use Canva for PowerPoint Presentation

Three Methods to Export PDF to PowerPoint

The 5 Best Apps to Make Slideshow Presentations on Your iPhone
There are lots of high-quality iPhone apps to choose from if you need to make a slideshow presentation from your phone.
Back in the day, creating a slideshow presentation meant turning on the PC and opening PowerPoint. Now, with so many great apps out there, you can create an impressive presentation right from your iPhone. Whether you need a slideshow for school, work, or just personal use, you have plenty of options.
When you’re done, you can send your slideshow presentation to your PC or share it straight from your device. If you’re wanting to know how to create a slideshow presentation on your
iPhone, this list will show you all the best apps to try.
1. Microsoft PowerPoint
The most popular program for creating slideshows, Microsoft PowerPoint, has an official app for iPhone. Like the desktop version, you can create a new PowerPoint and edit each slide. Add your pictures, text, and transitions to make it your own. With all the same features that are available on a desktop, nobody will be able to tell you made it on your iPhone.
Microsoft PowerPoint syncs with OneDrive, so if you use Outlook for school or work you can find your PowerPoint in your OneDrive account. You can also share and edit your PowerPoint presentation on the go, and even add new collaborators.
Aside from OneDrive, Microsoft PowerPoint also syncs with Box, Dropbox, Edmodo, and more. With Microsoft PowerPoint, you get all the features you want in one app.
Download: Microsoft PowerPoint (Free, subscription required)
2. Google Slides
A popular alternative to Microsoft PowerPoint, Google Slides has many of the same features with a major difference. That is, Google Slides is totally free and doesn’t require any subscription. All you need is a free Google account to access Google Slides.
Related: Microsoft PowerPoint vs. Google Slides: Which One Should You Be Using?
Google Slides also makes it easy to make a slideshow presentation on your iPhone. With great templates, plenty of effects, and easy editing, you can create something impressive in minutes.
Google Slides is also better for collaborating than Microsoft PowerPoint. The reason is that not everyone has Microsoft 360 or wants to pay for a subscription. Whereas most people have a Google account or can make one for free in under a minute. To collaborate with others, all you need to do is enter their email and they will get invited to edit the slideshow. Google Slides also syncs with your Google account, so you can access your slideshow on any device with access to Google.
For these reasons, Google Slides is a must-try if you’re looking to create a slideshow on your iPhone.
Download: Google Slides (Free)
Keynote is Apple’s presentation software, designed to compete with Microsoft PowerPoint. Keynote comes pre-installed on all iOS devices running the latest version iOS, so there’s a good chance you already have this app.
Like Microsoft PowerPoint and Google Slides, you can create a slideshow using a template and add your own text, images, and transitions. Keynote comes with 40 templates pre-installed, giving you plenty of options to choose something unique. Keynote also has some notable features that differentiate it from the competition. For example, there’s a feature called Instant Alpha that will remove the backgrounds from an image. You can also import live videos and photos to your slideshow.
Keynote is also the best slideshow app for rehearsing your presentation. Keynote has a built-in timer that shows you the time, presentation notes, and the slide on one page. You can rehearse your slides and see how long it takes to make sure you hit your time limit.
Related: The Best Slideshow Maker Apps
With all these features, Keynote is a great app to create your next slideshow. However, the collaboration feature isn’t as strong as Microsoft PowerPoint or Google Slides. So if you need several collaborators, one of the other options might work better.
Download: Keynote (Free)
Canva is one of the most popular graphic design apps in the App Store right now. With Canva, you can create flyers, brochures, and even logos. However, most people aren’t aware that Canva has a powerful Slideshow feature as well.
With many great slideshow templates available, you are sure to find something that stands out and will impress your audience. In fact, Canva has thousands of slideshow templates available—more than any other slideshow app. After you find your template, you can easily add your photos and text.
Since Canva has many customization features for photos, you can edit your images before importing them to your slideshow as well. Once your slideshow is completed, you can access it through the Canva website or save it to your device.
Canva is the best choice for a slideshow app if you don’t have any collaborators and want to make something truly unique. It works great for school projects, creative presentations, and showcasing your art or photographs.
Download: Canva (Free, in-app purchases available)
5. Adobe Spark Page
Adobe Spark Page is a beginner-friendly Adobe app that allows you to make impressive web pages, newsletters, and slideshows. Most Adobe apps like Photoshop or Premiere have a steep learning curve. For this reason, the name Adobe can scare off beginners. Thankfully, Adobe Spark Page is an exception.
Related: How to Make a Slideshow on iPhone
With a simple-to-use interface and dozens of premium theme combinations, you can make a slideshow right from your iPhone. The slideshow presentations made with Adobe Spark Page are simple, professional, and look great on large screens. All creations made on Adobe Spark Page are available on your Adobe account so you can access your slideshows anywhere. You can also create a public access link and share it over text or email.
While lacking some features like collaboration, it’s still a great slideshow app that’s simple and easy to use on the go. As long as you don’t need collaborators, this app is a must-try.
Download: Adobe Spark Page (Free, in-app purchases available)
Want to Make a Slideshow Presentation on iPhone? There Are Options
With so many apps available for creating a slideshow on your iPhone, you can certainly find something that fits your needs. Whether you need a professional slideshow for work or a creative slideshow for a class, there’s an iPhone app for you out there. Who knows, maybe you won’t ever need to make a slideshow on your computer again.
- Pitch Decks & Investor Materials
- B2B Graphic Design
- Startup Consulting
- Trainings & Workshops
- Case studies
- Downloadable resources
Presentation Tips: How to make mobile friendly presentations
- Presentation design

Welcome back to our article series on practical and short tips to help you create better presentations.
So far, we’ve tackled the issue of compressing presentations , followed by some tips on how to make a presentation printer friendly. Now we’re going to dive into yet another topic that is often overlooked when creating a presentation and that is making sure your presentation is mobile friendly.
Why is this important?
We’re living in a world where smartphones have become ubiquitous (and for some people, their smartphone is even more than that, as it’s almost become an extension of their body). In 2020, for the first time ever, mobile internet traffic surpassed desktop traffic.
More and more businesses adopt a mobile first approach when it comes to their website, apps and overall user experience of their clients. So why don’t we apply the same logic to presentations too?
Whether we’re sending a presentation through email (either before or after a meeting), holding an online meeting or giving a webinar, high chances that someone from the audience will view it on their mobile device.
So here are some simple tips on how to create your own mobile-friendly presentation.
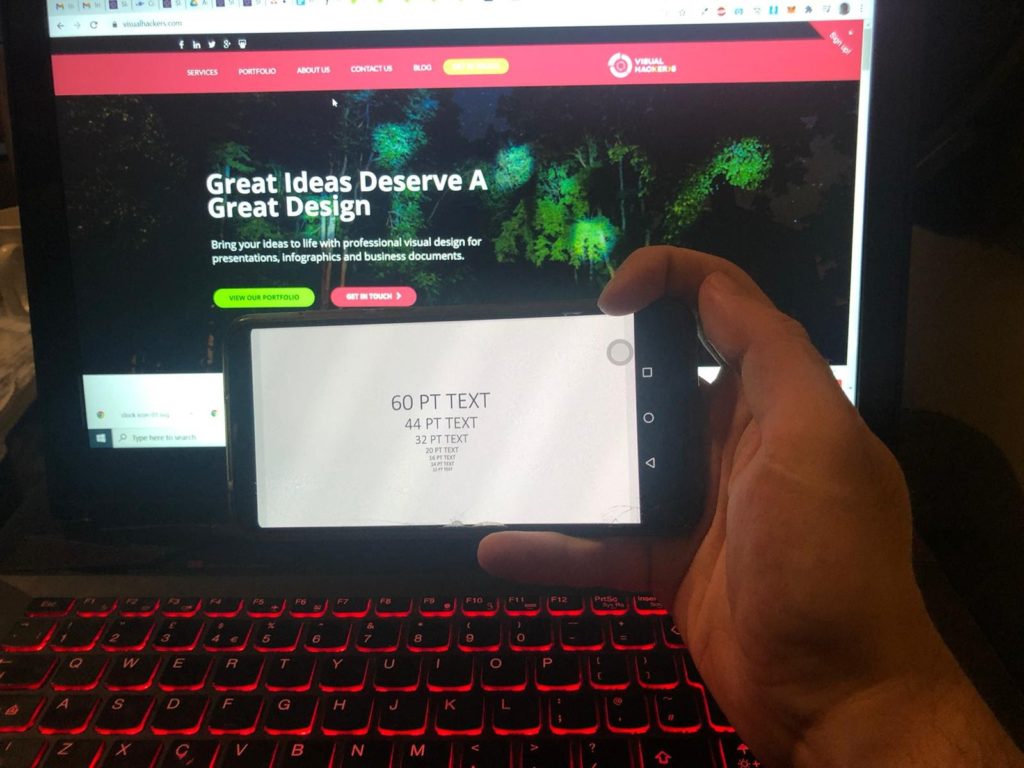
1. Larger Text Size
This is probably the most important guideline out of all and it makes sense why. If the text size is too small, your presentation is unreadable and people will stop paying attention.
So make sure your text sizes are large enough to be viewed on a mobile screen. But how large is “large enough” you may be wondering?
Well I’ve done this quick experiment with various font sizes on my own phone to test it out.
I put different sized-lines and took the picture from how I would see it. Feel free to judge yourself and see what is the smallest size that your eyes are comfortable with.
As a rule of thumb, I’d go with at least a 60 point size for headlines and a 30-32 point size for body content. You could probably get away with a bit smaller text, but I wouldn’t go smaller than 20 points.
2. Less is more
Due to the small size of mobile devices, you definitely don’t want to overcrowd your slides. Keep them simple, uncluttered and follow the cardinal rule of “1 idea = 1 slide”. I’d take that one step further and say even “1 sub-idea = 1 slide”
What do I mean by that? Well, let’s say you have a slide called “5 Success Factors for X” and typically you’d add all 5 points on your slide, along with some accompanying graphics like icons or numbers or pictures (we hope that by this point, you stopped using bullet points in your presentations).
But in a mobile version, after enlarging your text to be the minimum readable size, you might want to split those 5 points into 2 slides, or even have one success factor per slide.
If you’re worried that your presentation will get too long in this case, then don’t. In the end, your audience will still see the same amount of content in the same amount of time, so why not at least space out that content for a better understanding?
3. Large images
When adding images to your presentation, make sure they are large enough so that the audience doesn’t have to squint to see them.
Ideally the image should occupy the whole slide and work as a background with minimal content on top of it. But if you need to add more than one image, make sure that each image takes up at least a quarter of the slide.
Because of this, I don’t recommend using more than 4 images on your slide, and if you need to use more (for example to showcase multiple products), just remember guideline #2 and split it up across multiple slides.
4. Show & tell, don’t write
As a result of guideline #2, you’d have to keep your slide content to a minimum. When thinking whether to keep a certain word or phrase, think of it from this perspective: is this something I can visually illustrate or represent with an image or icon?
Graphics don’t even have to be a literal representation of the content, but can be more subtle and indirect in order to cover more of the slide content while you explain the context
5. Make a higher contrast
Contrast is one of design’s key principles, and it plays an even bigger role on a smaller screen size.
Make sure your slide content, whether it’s text, graphics, images or charts, has enough contrast between its different parts. Contrast doesn’t refer just to color contrast, but also contrast in size or placement.
A good way to tell if your presentation has enough contrast is to slightly squint your eyes when viewing your presentation on your mobile. If some colors get blended together or if pieces of text look the same when they shouldn’t (eg. a main point and a sub-point), then you have to increase the contrast of those elements.
6. Clean & simple charts & diagrams
Charts and diagrams can easily become overwhelming on small screens if you’re not careful. A standard chart in Powerpoint would have both axes, it would have a legend, a slide title, maybe some data labels or some trend lines and so on. If you have all of these elements, then it can become over cluttered and people won’t be able to properly distinguish them.
Try and think of any unnecessary elements and remove them. Remember that less is more. For example, if you have a bar chart, you should keep either your vertical axis or your data labels, you shouldn’t keep both.
7. No fancy stuff
For the purpose of a simpler and seamless viewing experience, don’t overdo it with animations and transitions. In fact, if they don’t serve a real useful purpose, just take them out completely (I’d argue that 80-90% of animations are useless beyond just being flashy and we rarely use them).
Without animations and transitions you will also make sure that who is viewing the presentation will have a minimum risk of the presentation lagging. Another way to achieve this is to just save your presentation as a PDF and send it like that.
Creating a mobile friendly doesn’t require a huge amount of extra work, you just have to keep these tips in mind from the very beginning.
Following these guidelines will help your presentation stand out from a mobile viewer’s perspective, giving them a better overall experience. And that in turn will better reflect back on you, as you’ll be perceived as a professional that has a high attention to details, cares about the audience and does not let things to chance.
Top articles
- Infographics
- Personal branding
- Pitch deck design
- PowerPoint tutorial
- Public speaking
- Visual communication
Sign up for our monthly newsletter
Leave a reply cancel reply.
Save my name, email, and website in this browser for the next time I comment.
This site uses Akismet to reduce spam. Learn how your comment data is processed .
- Presentation Hacks
5 Tips to Create a Mobile Friendly Presentation
- By: Caitlin McGuire
We live in a mobile-based culture. With $1,000 computers in our pockets, the average audience member expects that your presentation is not only available on their mobile device but also optimized for their mobile device.
As a presenter, you’re probably focused on creating an engaging slide deck, but you may not be thinking about how it will look on a mobile device for your audience members on the go. That’s why we’ve put together 5 tips to optimize your slide deck for not just a big screen, but the small screen as well.
Use Larger Fonts While smaller font size may be okay on a large display, it will only get smaller when it’s viewed on a mobile display. By selecting a larger font size, you ensure your audience can read it on the presentation screen and also on the go with their mobile device.
Export as a PDF Viewing a presentation in PowerPoint on a mobile device can be clunky and difficult to navigate. By exporting your presentation as a PDF, your audience can quickly open the file and follow along on their mobile device.
Keep Charts Easy to Read Perhaps the most difficult part of a presentation to view on a mobile device are charts that are complicated and filled with finite data. If you are looking to keep your presentation mobile friendly, be sure to keep your charts easy to read – more data does not always make your points clearer and easier to digest.
Use Visuals When Possible On a mobile device, text can be difficult to read, especially in-depth content. That’s why you should replace text-based content with visual displays whenever possible. Along with giving your audience the ability to comprehend more quickly, you also create a larger retention rate across your audience.
Design in a Mobile Friendly Resolution In regards to screen resolution, each device is a bit different: the resolution for a large display is different than that of a small, mobile device. When designing in a way that is optimized for a mobile device, select the highest resolution you can. This allows your presentation to look great on any display.
As a presenter living in the digital age, optimizing your presentation is a vital part of your design. However, as you create your design, optimizing for mobile may not be at the forefront of your mind. Implementing these 5 tips will not just leave your presentation looking good on the big screen but on the small screen as well. That means your audience can take your presentation with them when they leave, spreading your mission even further and faster than you thought possible.
Unsure of where to start your next presentation design? Contact our team today to find out how we can create a powerful design that will leave your audience wowed.

Caitlin McGuire
Join our newsletter today.
© 2006-2024 Ethos3 – An Award Winning Presentation Design and Training Company ALL RIGHTS RESERVED
- Terms & Conditions
- Privacy Policy
- Diversity and Inclusion

Cloud Storage

Custom Business Email

Video and voice conferencing

Shared Calendars

Word Processing

Spreadsheets
Presentation Builder

Survey builder

Google Workspace
An integrated suit of secure, cloud-native collaboration and productivity apps powered by Google AI.
Tell impactful stories, with Google Slides
Create, present, and collaborate on online presentations in real-time and from any device.
- For my personal use
- For work or my business

Jeffery Clark
T h i s c h a r t h e l p s b r i d g i n g t h e s t o r y !

E s t i m a t e d b u d g e t

Make beautiful presentations, together
Stay in sync in your slides, with easy sharing and real-time editing. Use comments and assign action items to build your ideas together.

Present slideshows with confidence
With easy-to-use presenter view, speaker notes, and live captions, Slides makes presenting your ideas a breeze. You can even present to Google Meet video calls directly from Slides.

Seamlessly connect to your other Google apps
Slides is thoughtfully connected to other Google apps you love, saving you time. Embed charts from Google Sheets or reply to comments directly from Gmail. You can even search the web and Google Drive for relevant content and images directly from Slides.

Extend collaboration and intelligence to PowerPoint files
Easily edit Microsoft PowerPoint presentations online without converting them, and layer on Slides’ enhanced collaborative and assistive features like comments, action items, and Smart Compose.

Work on fresh content
With Slides, everyone’s working on the latest version of a presentation. And with edits automatically saved in version history, it’s easy to track or undo changes.

Make slides faster, with built-in intelligence
Assistive features like Smart Compose and autocorrect help you build slides faster with fewer errors.

Stay productive, even offline
You can access, create, and edit Slides even without an internet connection, helping you stay productive from anywhere.
Security, compliance, and privacy

Secure by default
We use industry-leading security measures to keep your data safe, including advanced malware protections. Slides is also cloud-native, eliminating the need for local files and minimizing risk to your devices.
Encryption in transit and at rest
All files uploaded to Google Drive or created in Slides are encrypted in transit and at rest.
Compliance to support regulatory requirements
Our products, including Slides, regularly undergo independent verification of their security, privacy, and compliance controls .
Private by design
Slides adheres to the same robust privacy commitments and data protections as the rest of Google Cloud’s enterprise services .

You control your data.
We never use your slides content for ad purposes., we never sell your personal information to third parties., find the plan that’s right for you, google slides is a part of google workspace.
Every plan includes

Collaborate from anywhere, on any device
Access, create, and edit your presentations wherever you are — from any mobile device, tablet, or computer — even when offline.

Get a head start with templates
Choose from a variety of presentations, reports, and other professionally-designed templates to kick things off quickly..

Photo Album

Book Report

Visit the Slides Template Gallery for more.
Ready to get started?
How To Make PPT In Mobile?

If you are unable to make a ppt on mobile or face some issues while creating a ppt. You can simply download Microsoft PowerPoint and learn how to make ppt on mobile.
- 1 How to make ppt on mobile via Microsoft PowerPoint
- 2 How to make ppt on mobile via Google slides
- 3 At the last
Can we make a PPT on mobile?
Can i edit ppt on phone, which app opens ppt in mobile.
Do you want to know how to make ppt on mobile? We’ll show you how to make ppt on mobile instantly through the Microsoft PowerPoint app. At the same time, you can make it via Google slides to share with others easily. It is very easy for you to make a PowerPoint presentation (ppt) on any topic because of the plenty of options available. Here’s how to make ppt on mobile.
Also read: How To Format Phone- The Factory Reset Way!
How to make ppt on mobile via Microsoft PowerPoint
If you are a college-going student and do not have any device except a mobile phone, then this blog post is for you. Here we’ll explain how to create ppt very quickly and effortlessly using your mobile via Microsoft PowerPoint.
- First, you have to locate Microsoft PPT in the play store on your phone.
- Next, install the app and open it.
- Then, it will ask you for permission as soon as you open it.
- Allow these permissions and move to the next step.
- Afterwards, add your credentials like email, phone number, and subsequently, if don’t wish to register then, you can sign in later.
- Please, click on the (+) icon.
- After that, decide the location of the PPT you wish to create.
- Now, you’ll see many options like blank, and colourful. Out of these options, you’ve to choose the appropriate one, according to your needs.
- After that, click twice to add a title, after that whatever title you wish to retain, save it on your PDF.
- Further, select the text and edit it.
- If you wish, you can change the colour, and font size according to your needs.
- Subsequently, you’ll see an option to add subtitles below the title.
- Tap on the plus button and then write whatever you wish to add to the page.
- Further, you can add many more options to your page by clicking on the desired options.
- Now, if you wish to add anything else to your presentation, then click on the insert option. And can do changes according to your needs.
- You’ll now see the 3 dots after completion of your presentation, click on them.
- In the end, you’ve to click on the Save option to save the presentation in pdf format.
Also read: How to Update WhatsApp Without Play Store?
How to make ppt on mobile via Google slides
If you wish to make a ppt on your mobile phone. Here we’ll explain how to create ppt very easily and quickly using your mobile via Google docs.
- First, open your presentation in the Google slide on your mobile phone.
- Next, click on the new slide option at the bottom right.
- Finally, click on the layout you wish to add to your slide.
So, if you’re looking to make Powerpoint presentations then, these websites will surely help you to make ppt on mobile. And you can easily download these apps by searching them on the Google play store.
- Microsoft PowerPoint mobile
- Google slides
- Polaris office
- Office suite
Also read: How To Use Apple Pay In India?
At the last
Finally, you’ll be able to easily download the Microsoft PowerPoint app for Android and iOS through the Google play store. And further, your PPT will be saved, you can go to the file manager, and wherever you enter the location, you can see that your file will have been saved. Finally, you can open your PPT, and if you wish and you can also share your PPT too.
Yes, you can create PowerPoint presentations on your mobile device using PowerPoint for Android phones, available as a free download from Google Play. Refer to the app’s animated guide for quick tips.
Yes, you can edit PowerPoint presentations on your phone using the Google Slides app for Android. You can upload and download files, open and edit PPT, PPTX, and ODP files, and export presentations in various formats.
Microsoft PowerPoint is the official Android app for opening PowerPoint presentations on mobile devices. It allows you to view, edit, and create presentations directly on your phone.
Are you looking to sell your phone online or recycle an old phone ? if yes, then Cashify is the best choice.

I’m an enthusiastic writer with a passion for technology. I enjoy writing and sharing my expertise and experiences with the latest gadgets in the market.
Featured Videos
Latest reviews, highlights of the story.
- We’re all aware of PPT which is a type of file extension in which any kind of document can be seen through slides.
- If you’re still searching for a method to make ppt on mobile, we are here to help you.
- This guide will help you understand how to make ppt on mobile via Microsoft PowerPoint.
Best Recharge Plans
All jio prepaid recharge plans for march 2024, all bsnl prepaid recharge plans for march 2024, all vi prepaid recharge plans list for march 2024, all vi postpaid plans in india, all jio postpaid recharge plans march 2024, what are the disadvantages of buying refurbished iphones, how to block sim card on jio / airtel / vi and more, do apple refurbished products have scratches condition explained, read these 5 points before buying a refurbished iphone, 3 best refurbished apple iphones to buy in 2024, recent news, motorola edge 50 pro india price and storage variant leaked, realme 12x 5g to debut in india on this date with 45w charging, lenovo tab m11 arrives in india with large display: price, specs, samsung galaxy m55 5g renders leak, will use snapdragon 7 gen 1, poco c61 with glass back arrives in india at this affordable price, new launches, samsung galaxy m15, samsung galaxy f15 5g, samsung galaxy a55 5g, vivo v30 pro, honor magic 6 ultimate, nothing phone 2a, realme 12x 5g, asus zenfone 11 ultra, realme narzo 70 pro 5g.
- Slide Editor
How to Add Video in PPT in Mobile
Table of contents.
Mobile phones have evolved to be powerful tools, enabling us to do various tasks on the go, including creating and editing presentations. One common query people have is “how to add video in PPT in mobile”, and this article is your go-to guide for that.
Can You Edit a PowerPoint on Mobile Phones and Tablets?
Yes, Microsoft PowerPoint presentations can be opened, edited, and created on mobile phones and tablets using the Microsoft PowerPoint app available on iOS and Android devices.
Top 10 Use Cases of Adding Video in PPT
- Demonstrations : Embedding a video that demonstrates a process or product in a PowerPoint slide can provide a clear visual representation.
- Testimonials : Insert video testimonials from customers or clients to add credibility to your presentation.
- Training Modules : For educational or training presentations, videos can serve as a helpful tool for learning and understanding concepts better.
- Storytelling : Use video to share a story or case study, adding a narrative element to your presentation.
- Data Visualization : Video can be a dynamic way to display graphs, charts, or other data visualizations.
- Interactive Content : Add interactive videos that allow users to engage with the content actively.
- Event Highlights : Share highlights or snippets from events or conferences.
- Product Demos : Show off your product in action by embedding a video demonstration.
- Tutorial Guides : Step-by-step video tutorials can guide the audience through a process or technique.
- Employee Training : For internal presentations, videos can be an effective medium for training new employees.
How to Add Video to PowerPoint Mobile?
- Open the PowerPoint app on your mobile device and select the presentation you want to edit.
- Go to the slide where you want to insert the video.
- Tap on the “Insert” tab in the toolbar and select “Video”.
- Choose the source of your video, such as from your device’s gallery, and insert it into the slide.
How to Embed a Video in PowerPoint from YouTube, PC, or Mac?
- From YouTube: Copy the embed code from the YouTube video and paste it into the PowerPoint slide.
- From PC: Go to the “Insert” tab, select “Video”, and choose “Video on My PC” to insert a video file from your computer.
- From Mac: Click on “Insert”, select “Video”, and choose “Movie from File” to insert a video file from your Mac.
How to Add Video and Pictures to PowerPoint for Android Mobile?
- Open the PowerPoint app on your Android device and open the presentation.
- Go to the slide where you want to add the video or picture.
- Tap on the “Insert” tab and choose “Video” or “Picture” accordingly.
- Select the file you want to insert from your device’s gallery.
How Do You Put a Video on a PowerPoint from a Phone?
- Open the PowerPoint app on your phone and open the presentation.
- Go to the slide where you want to add the video.
- Tap on the “Insert” tab and select “Video”.
- Choose the video from your phone’s gallery and insert it into the slide.
Difference Between Linking Videos vs. Embedding Videos into PowerPoint
Linking a video means the video file is stored externally and just linked to the PowerPoint file, while embedding a video means the video file is included in the PowerPoint file itself.
How to Create PowerPoint Slideshow With Pictures In Mobile?
- Open the PowerPoint app on your mobile device and create a new presentation.
- Tap on the “Insert” tab and select “Picture”.
- Choose the pictures you want to include in the slideshow from your device’s gallery.
- Arrange the pictures on the slides and add transitions or animations as desired.
5 Ways to Embed a Video File in Microsoft PowerPoint
- From Your Computer : Insert a video file directly from your computer’s storage.
- Online Video : Insert a video from online platforms like YouTube or Vimeo.
- Embed Code : Use the embed code provided by video hosting platforms to insert the video into your PowerPoint slide.
- Google Drive : Insert a video stored on your Google Drive.
- Streaming : Stream a video from the internet by inserting the video’s URL.
What is the Best Way to Make a PowerPoint Presentation on Mobile?
The best way to make a PowerPoint presentation on mobile is to use the Microsoft PowerPoint app, which provides a user-friendly interface and various tools and features for creating professional-looking presentations.
Speechify Slides
Pricing: Free to try
Speechify Slides is the best AI slide editor for individuals and teams. Create stunning presentations, add text to speech , voice overs, royalty free background music and free stock images. All your projects are free to use for personal or commercial use.
Top Features : Templates, text to video, real-time editing, resizing, transcription, video marketing tools.
Speechify is clearly the best option for your slides or presentations. It also provides seamless integration with the Speechify Studio suite of AI products for people who need to create stunning videos and voice overs. Perfect for teams of all sizes.
Frequently Asked Questions
How do you make a video presentation on mobile.
Use the PowerPoint app and follow the steps to insert a video into your presentation.
How to make ppt with animation in mobile?
Use the PowerPoint app and use the “Animations” tab to add animations to your slides.
Why can’t insert video in ppt?
Ensure that your video format is compatible with PowerPoint and that your internet connection is stable.
Can we make PPT in mobile phone?
Yes, you can use the Microsoft PowerPoint app to create presentations on your mobile phone.
How to make a video PPT in mobile phone?
Use the PowerPoint app and insert a video file into your presentation slide.
Can we insert video in PPT on mobile?
Yes, you can insert a video into a PowerPoint presentation on mobile by using the PowerPoint app.
How to make animation in ppt in mobile?
Use the “Animations” tab in the PowerPoint app to add animations to your slides.
- Previous How to Attach YouTube Video to PPT: Your Ultimate Guide to Elevating Presentations
- Next Character.ai: Everything to Know

Cliff Weitzman
Cliff Weitzman is a dyslexia advocate and the CEO and founder of Speechify, the #1 text-to-speech app in the world, totaling over 100,000 5-star reviews and ranking first place in the App Store for the News & Magazines category. In 2017, Weitzman was named to the Forbes 30 under 30 list for his work making the internet more accessible to people with learning disabilities. Cliff Weitzman has been featured in EdSurge, Inc., PC Mag, Entrepreneur, Mashable, among other leading outlets.
Recent Blogs

Ultimate guide to ElevenLabs
Voice changer for Discord

How to download YouTube audio

Speechify 3.0 is the Best Text to Speech App Yet.

Voice API: Everything You Need to Know

Best text to speech generator apps

The best AI tools other than ChatGPT

Top voice over marketplaces reviewed
Speechify Studio vs. Descript

Everything to Know About Google Cloud Text to Speech API
Source of Joe Biden deepfake revealed after election interference

How to listen to scientific papers

How to add music to CapCut

What is CapCut?
VEED vs. InVideo

Speechify Studio vs. Kapwing

Voices.com vs. Voice123
Voices.com vs. Fiverr Voice Over
Fiverr voice overs vs. Speechify Voice Over Studio
Voices.com vs. Speechify Voice Over Studio
Voice123 vs. Speechify Voice Over Studio
Voice123 vs. Fiverr voice overs
HeyGen vs. Synthesia
Hour One vs. Synthesia
HeyGen vs. Hour One
Speechify makes Google’s Favorite Chrome Extensions of 2023 list
How to Add a Voice Over to Vimeo Video: A Comprehensive Guide
How to Add a Voice Over to Canva Video: A Comprehensive Guide
What is Speech AI: Explained
How to Add a Voice Over to Canva Video
Speechify text to speech helps you save time
Popular blogs.
The Best Celebrity Voice Generators in 2024
YouTube Text to Speech: Elevating Your Video Content with Speechify
The 7 best alternatives to Synthesia.io
Everything you need to know about text to speech on tiktok.
The 10 best text-to-speech apps for Android
How to convert a PDF to speech
The top girl voice changers.

How to use Siri text to speech
Obama text to speech
Robot Voice Generators: The Futuristic Frontier of Audio Creation
Pdf read aloud: free & paid options, alternatives to fakeyou text to speech.
Only available on iPhone and iPad
To access our catalog of 100,000+ audiobooks, you need to use an iOS device.
Coming to Android soon...
Join the waitlist
Enter your email and we will notify you as soon as Speechify Audiobooks is available for you.
You’ve been added to the waitlist. We will notify you as soon as Speechify Audiobooks is available for you.
How to Make a PPT in Mobile?

PPTs are the most important thing to showcase a business in board meetings, and staff meetings and to describe the working of the company in a better manner. If you want to know: how to make a ppt in mobile? Then here in this article, you will learn all about making of ppts.
One can easily make a ppt for his/her personal work or for the company’s work after reading this article, in which I have mentioned images along with instructions so that you don’t get stuck in the process.
If you don’t know anything about how to make a ppt in mobile or PPTs in general, then I highly suggest you to read the first paragraph completely and do not skip it. One of the best ways to learn the making of the ppts :
- Have a mobile or secondary mobile
- Download PowerPoint by Microsoft or Office360
- Install the “ PowerPoint App ”
- Open the “PowerPoint”
- In office360 click on the “Plus(+)” icon
- Tap on the “Presentation”
- Follow the steps as shown below
You need a secondary mobile phone but if you don’t have a secondary mobile follow the step on the same mobile, you are reading this article.
First, let’s know some basic things about ppt:
Table of Contents
What is called a PPT?
A ppt is nothing but a way to present something revolving in your mind about any project thing, product or company’s business and by means of ppt, you give the graphics to the idea. A ppt is nothing but a graphical presentation of a thing.
Why is a ppt necessary?
Although you can express ideas through your words and by other means, when you explain things using graphical representations, then it leaves an excellent mark on your customers and staff. This makes one believe in the product and things without any doubt and it helps you grow or establish your name as a professional.
Also, Read – How to send WhatsApp messages without saving phone number
Do I need to use PPT?
Being a college student and working on a project which has some graphics, then you should showcase your project using a ppt template without any doubt because it will create an impact on you as a student.
But if you are working in a company and your boss wants a presentation on a topic, it is mandatory to work on a ppt. A ppt is so simple to understand because of less difficulty in functioning and features and a lot of graphics present in make a ppt interesting to understand.
I don’t know how to make a ppt?
If you have no idea about presentations or ppts, then you need not worry, as GoKeeda is present to teach you everything from “installing software” to “how to make a ppt” or “how to export a ppt into video” or “how to export a ppt in photo” or “how to export a ppt in pdf”?
All basic concepts are clear about PowerPoint. Now let’s move on to the main topic, you are waiting for “how to make a ppt in mobile phone?”
How to Download PowerPoint in Mobile
Follow these steps on your mobile:
- Open Play Store
- Search “PowerPoint”
- Tap on “Install”
- Tap on “Open”

Now, your device is set to perform some amazing tasks and you will love performing these tasks on your device.
How to Make a PPT in Mobile
After downloading PowerPoint from Microsoft, you get so many options in the PowerPoint app to make a dynamic and graphically attractive presentation on your mobile. The app provides you with almost everything you need to make the best presentation, you will learn about how to make a ppt in mobile?
After installation, open the app and for the first time, you need to set up the app according to your preferences.
Once you open the app, you will see the app interface shown in the pic
Now, tap on the “+” icon or button then you will see the number of templates
Choose a template, and you will be redirected to the home page of the app
Delete all the two elements or boxes

Start Making a PPT
At the bottom of the app, there are numerous options:
Layout : The layout option lets you add or select a layout for the template. There are numerous layouts you can choose from.
Comment : To comment on a thing or element, you can choose the comment. This will help you in the future to resolve the problems.
Table : To insert a table in the ppt, select this tool and insert the table.
Picture : To insert a picture whether it is stored in your mobile or online images, select this option and you will be shown some of the options to add or insert images.
Shape : To insert shapes of different types and sizes, click on the shape you want to add to your ppt.
Text Box : To write something in a ppt, click on the text box and start writing anything you want.
Camera : Choosing this option led you to the camera option, through which you can add pictures of yourself in real-time.
Insert a circle shape in ppt
Here, I have inserted a circular shape and drawn the shape on the page, after drawing some of the options started showing here on the bottom bar of the PowerPoint.
You can modify or make changes in the circle, you can change the color of the shape, and border, write text inside the shape, can change the color of the text, and make it bold or italic.
You can also assign the text in the center.
You can see the bottom bar of the app, in the bottom right corner of the app, there is an arrow sign on the bar, tap on this button and you will see some of the best options in the PowerPoint.
There are numerous options available:
Transitions
Also Read – How to Start a Business?

In this option, you can alter the text into different forms and types, you can change the font type, color of the fonts, formatting of the fonts, and a number of changes you can make.
- Change the Font Types: Arial, Comic Sans, Courier, etc
- Colors: Change the colors of the fonts
- Clear Formatting
- Font Formatting
- Make fonts bold, Italic, underlined, or Correction
- Bullet Points
- Alignment of Text
- Rotation of Text
- Add New Slides
To insert images or pictures in the ppt which is stored on your mobile device, you can do so by selecting options as per your need. Here in this option, you will get so many options to insert slides, make comments, text boxes, etc.

What you get in insert option:
- New Comment
You can use all the options to add or insert the respective elements in the ppt. While you are making a ppt for an institution or a company, you should always use graphics, using graphics will make your ppt 1000 times better than anyone’s ppt.
In this option, there are a number of functions or things which you can use for a special purpose. What will get here is:

- Lasso Select: to select a particular area you want.
- Eraser: The eraser makes you erase things like pen and pencil marks.
- Pen: If you want to write something on the page in a ppt in your handwriting then you can use the pen option which will help you do this.
- Highlighter: To highlight any text on the page you can use this option.
- Colors of the pen, highlighter, etc.: To change the color of the pen or pencil.
- Thickness: You can change the thickness of the pen or pencil.
- Ink to shape: If you draw a rough shape using the pen or ink to shape option then the PowerPoint will make the shape accurate.
In the design option, there are only three options you can use:

- Themes: Using this option you can change the theme of the ppt. Remember one thing if you change the theme of the ppt, it will completely change the theme for all the pages in the ppt.
- Slide Size: This option leads you to change the size of the pages of the ppt. There are two options available only- Portrait and Landscape.
- Background: To change the color or pattern of the background.
Transitions word defines itself, you can use some of the features of PowerPoint to make a ppt interactive.

- Transitions Effects: Transitions effect works only for the slide after slide transition, which means if you move to the next page in a ppt then it will pass to that page through a transition effect that you have applied in the page/slide.
- Effect Options: Effects are of two types- smoothly and through black.
- Apply To All: This will apply transitions or effects to all the slides of the ppt.
Animations work on the text, picture, video, or any element which you have used on a slide, it makes the element appear in different modes. If you use animations, this will create a good impact on the people or clients.

There are three types of effects:
- Entrance Effects
- Emphasis Effects
- Exit Effects
You can choose an effect and change the properties of the effects like how you want to use it, and at what time you want to use it at the time of the presentation.
This is nothing but a showcasing option, this option will make you showcase your ppt to your client or in a company meeting.

There are some options available:
- From Beginning
- From Current Slide
- Custom Slide Show
- Rehearse with Coach (Preview)
This option leads you to review the ppt you have made, you can make new comments or see comments available in the ppt. Options available like:
- Smart Lookup
- Show Comment
- Show Markup
To zoom in or out, to make the slide fit to the size of the screen, and to view the direction of the slides.

I hope, through this article, how to make a ppt in mobile? now you know everything about PowerPoint and can make a good ppt for your project or company’s profile or anything.
If you have any questions regarding PowerPoint, comment below
All your questions will be answered within a day
Also, Read – Top 8 free apps for photo editing
1 thought on “How to Make a PPT in Mobile?”
- Pingback: Best Affiliate Marketing Platforms for Beginners in 2023 - GoKeeda
Leave a Comment Cancel reply
Save my name, email, and website in this browser for the next time I comment.

How to turn PowerPoint slides with my cell phone
Nowadays, PowerPoint presentations are an essential tool in the professional and academic field. However, the need to be next to a computer to control slide progress can be limiting and impractical. Fortunately, mobile technology gives us an efficient solution: controlling PowerPoint slides directly from our cell phone. In this article, we'll explore various ways to move through PowerPoint slides using your mobile device, allowing you to enjoy greater mobility and flexibility during your presentations. Take your presentation to the next level and discover how to scroll through PowerPoint slides with your cell phone.
1. Technical requirements to use your cell phone as a remote control in PowerPoint
In order to use your cell phone as a remote control in PowerPoint, you need to have some specific technical requirements. Below are the features that your device must have:
– Your cell phone must have a Bluetooth connection to be able to pair with the computer or device from which you are making the PowerPoint presentation.
– It is recommended that your cell phone has at least one version of operating system compatible with PowerPoint remote control application. Check the official Microsoft page to verify that your operating system be compatible.
– Make sure your cell phone has enough battery for the duration of the presentation, as it will be necessary to have the screen on the entire time you are using the remote control.
Once your cell phone meets these technical requirements, you can use it as a PowerPoint remote control in a simple and effective way. Connect your cell phone to the device from which you are presenting via Bluetooth and open the PowerPoint remote control application on your cell phone. You can advance and rewind slides, as well as interact with other PowerPoint functions, all from the comfort of your cell phone.
2. Steps to establish the connection between the cell phone and the PowerPoint presentation
Once you have prepared your cell phone and the PowerPoint presentation, follow these steps to establish the connection between both devices:
- Open the PowerPoint application on your cell phone.
- Login to your microsoft account if required.
- Select the presentation you want to display.
- Enable the “Slide Show” option in the app.
Next, you will need to establish a connection between your cell phone and the device through which you want to project the PowerPoint presentation. Follow the following steps:
- Make sure your cell phone and the device are connected to the same network Wi-Fi access.
- On the projection device, open a web browser and visit the website indicated in the PowerPoint app on your phone.
- Enter the access code that appears on the screen on your cell phone and press "Connect."
- Once connected, your PowerPoint presentation will be displayed on the projection device.
This connection between your cell phone and the PowerPoint presentation allows you to easily control slide playback from the convenience of your mobile device. This is ideal for interactive presentations, where you can advance, rewind or pause the slides as needed, without having to be near the projection device. Take advantage of this functionality and enjoy a smoother and more convenient presentation experience!
3. Using Remote Control Apps to Turn Slides in PowerPoint
In the digital age we live in, it is increasingly common to use remote control applications to facilitate PowerPoint presentations. These applications allow you to manage the slides from a distance, providing greater flexibility and comfort to the presenter. Below, we mention some of the most popular applications to perform this task:
1. Microsoft PowerPoint Remote: This application developed by Microsoft allows you to control PowerPoint slides from a mobile device, be it a smartphone or tablet. You just need to download the application and synchronize it with the device you are using to present. Once connected, you can change slides, adjust the volume, start or stop the presentation, among other functions. It's an easy-to-use and reliable option, especially for those who are already familiar with Microsoft software.
2. Google Slides Remote: If you prefer to use Google Slides instead of PowerPoint, this application will allow you to control your slides remotely. Like the Microsoft option, you just need to download the app to your mobile device and sync it with the presentation. From there, you can advance, go back or pause the slides, as well as adjust the screen brightness, among other additional functions.
3. Keynote Remote: For those who use Keynote in their presentations, this application from Apple is the ideal option. Not only does it allow you to control the slides, but also annotate them or make additional annotations from your mobile device. Plus, it offers the convenience of being able to use an Apple Watch as a remote control. If you're an Apple user, this app is definitely worth trying to improve your Keynote presentations.
In conclusion, with remote control applications available in the market, flipping slides in PowerPoint has become much easier and more convenient. Whether using Microsoft PowerPoint Remote, Google Slides Remote or Keynote Remote, you can control your presentations remotely and make your presentations more dynamic. Try them and discover the comfort that these applications provide in your presentations.
4. How to configure scroll controls on your cell phone for a smooth presentation
Setting up the scroll controls on your phone properly is essential to ensure a smooth and seamless presentation. To achieve this, follow these simple steps:
First, make sure you have the latest version of the operating system On your cellphone. This will ensure that you have access to all the latest features and improvements related to scroll controls.
Once you have updated your operating system, go to your phone's settings and look for the "Display Settings" section. Within this section, you will find the “Scroll Controls” option. Click on it to access configuration options.
Within the “Movement Controls” section, you will have the option to customize different aspects, such as sensitivity and type of movement. Adjust the sensitivity according to your personal preferences, keeping in mind that high sensitivity may result in faster movements, while low sensitivity will allow for more precise control.
Additionally, you can choose between different types of movement, such as vertical or horizontal scrolling. Depending on the nature of your presentation and how you want to interact with it, select the most appropriate type of movement.
Remember that setting scroll controls appropriately will allow you to have complete control over your presentation, facilitating a smooth and uninterrupted experience. Don't hesitate to experiment and adjust the different parameters according to your personal needs and preferences. Now you are ready to give an impeccable presentation from your cell phone!
5. Tips to avoid connection problems during the presentation with your cell phone
1. Keep your cell phone updated: Before the presentation, make sure your phone is running the latest version of the operating system. Updates typically include performance improvements and bug fixes that may solve problems of connection.
2. Use a stable Wi-Fi network: It is advisable to connect to a Wi-Fi network rather than relying solely on mobile data. Look for a network with a strong and stable signal to avoid interruptions during the presentation. If Wi-Fi is not available, consider sharing mobile data with other device for a more reliable connection.
3. Close unnecessary applications: Before starting the presentation, close all unnecessary applications and services. This will free up cell phone resources and help maintain a stable connection. Additionally, avoid downloading or streaming heavy content during your presentation, as this can affect connection speed and cause interruptions.
6. Customizing the cell phone's functions as a slide controller in PowerPoint
Did you know that your cell phone can become a practical slide controller for PowerPoint? With a little customization, you can leave traditional devices behind and use your own mobile phone to make presentations more conveniently and easily. Next, we will show you how to adapt the functions of your cell phone to make the most of this tool.
1. Download the appropriate app: To get started, you'll need to download an app on your phone that allows you to control PowerPoint from your device. There are various options available for both iPhone and Android. Some of the most popular apps are “Microsoft Office Remote” and “Remote for PowerPoint,” which offer an intuitive interface and additional features to enhance your presentation experience.
2. Set up the remote connection: Once you have installed the application, make sure that your cell phone and your computer are connected to the same Wi-Fi network. Open PowerPoint on your computer and enable the remote control option. In your cell phone application, look for the option to connect the device with PowerPoint and follow the steps indicated. Once the connection is made, your cell phone will act as a wireless controller.
3. Customize your controller: Now that you have your phone configured as a slide controller, you can customize the functions to your needs. In your chosen app, look for the customization options and adjust the actions you want to perform. For example, you can advance and rewind slides, activate the virtual laser pointer, adjust the volume and many other useful functions for your presentation.
7. Recommendations to maximize efficiency when using your cell phone as a remote control in PowerPoint
To maximize efficiency when using your cell phone as a remote control in PowerPoint, follow these recommendations:
1. Connect your cell phone and computer to the same network: Make sure that both your cell phone and the computer you are presenting on are connected to the same Wi-Fi network. This will allow a stable connection and avoid possible interruptions during the presentation.
2. Download a remote control app: There are various applications available in app stores, both for Android and iOS devices, that allow you to control PowerPoint from your cell phone. Find one that fits your needs and make sure it's compatible with the version of PowerPoint you're using.
3. Familiarize yourself with the app's controls and functions: Before using your phone as a remote control in PowerPoint, take some time to explore all the features and controls of the application you downloaded. Make sure you know how to move slides forward and back, activate the laser pointer, handle videos or animations, etc. This will help you have more precise and smooth control during your presentation.
Question: Is it possible to scroll through PowerPoint slides using my cell phone? Answer: Yes, it is possible to scroll through PowerPoint slides using your cell phone. There are several ways to do this depending on the type of cell phone you have and the version of PowerPoint you are using.
Question: What requirements do I need to meet to be able to show the slides with my cell phone? Answer: To be able to scroll through PowerPoint slides with your cell phone, you will need to have a version of PowerPoint compatible with your mobile device, as well as a stable internet connection or a Bluetooth connection, depending on the method you choose to use.
Question: How can I cycle through PowerPoint slides using an android cell phone ? Answer: To cycle through PowerPoint slides using a Android cell phone , you can download the official PowerPoint app from the app store Google Play . Once downloaded and installed, you can open your presentations and use the remote control function to advance or rewind the slides using your cell phone.
Question: What if I have an iPhone, how can I scroll through PowerPoint slides? Answer: If you have an iPhone, you can download the PowerPoint app from the Apple App Store. Once installed, you can open your presentations and use the remote control function to advance or rewind the slides from your cell phone.
Question: Is there any other way to scroll through PowerPoint slides using my cell phone? Answer: Yes, in addition to using the PowerPoint mobile apps, you can also use the remote control function from your cell phone using a Bluetooth connection. To do this, make sure that both your cell phone and your computer are paired via Bluetooth and then you can use your cell phone as a remote control to advance or rewind the slides.
Question: Can I use my cell phone? as access point to turn PowerPoint slides? Answer: Yes, if you have a cell phone with a hotspot function, you can share your cell phone's Internet connection with your computer and use the PowerPoint mobile applications or the remote control function via Bluetooth to turn the slides .
Question: What other features can I use? from my cell phone to control my PowerPoint presentation? Answer: In addition to the slide forward and rewind feature, the PowerPoint mobile apps also allow you to make annotations. in real time , zoom in on slide details, and use presenter mode to access notes and presentation details on your phone while projecting slides on a large screen.
Future perspectives
In short, the ability to scroll through PowerPoint slides using your cell phone has become a practical and convenient option. Through the mobile application designed specifically for this purpose, you will be able to control your presentations remotely and without the need to depend on external equipment. By simply connecting your cell phone to the same Wi-Fi network as your computer, you can access all the necessary features to scroll through your slides quickly and efficiently. This option is especially useful for those who need a greater degree of mobility and flexibility when giving presentations, avoiding having to always be near their computer. So don't hesitate to take advantage of this technological option to take your presentations to the next level. Good luck!
You may also be interested in this related content:
- How to Format PC from Command Prompt
- How to Know If GTA 5 Runs on My PC
- How can I exchange my cell phone for another at Telcel?

I am Sebastián Vidal, a computer engineer passionate about technology and DIY. Additionally, I am the creator of tecnobits.com, where I share tutorials to make technology more accessible and understandable for everyone.
Critical PowerPoint Shortcuts – Claim Your FREE Training Module and Get Your Time Back!
How to Make a PowerPoint Presentation (Step-by-Step)
- PowerPoint Tutorials
- Presentation Design
- January 22, 2024
In this beginner’s guide, you will learn step-by-step how to make a PowerPoint presentation from scratch.
While PowerPoint is designed to be intuitive and accessible, it can be overwhelming if you’ve never gotten any training on it before. As you progress through this guide, you’ll will learn how to move from blank slides to PowerPoint slides that look like these.

Table of Contents
Additionally, as you create your presentation, you’ll also learn tricks for working more efficiently in PowerPoint, including how to:
- Change the slide order
- Reset your layout
- Change the slide dimensions
- Use PowerPoint Designer
- Format text
- Format objects
- Play a presentation (slide show)
With this knowledge under your belt, you’ll be ready to start creating PowerPoint presentations. Moreover, you’ll have taken your skills from beginner to proficient in no time at all. I will also include links to more advanced PowerPoint topics.
Ready to start learning how to make a PowerPoint presentation?
Take your PPT skills to the next level
Start with a blank presentation.
Note: Before you open PowerPoint and start creating your presentation, make sure you’ve collected your thoughts. If you’re going to make your slides compelling, you need to spend some time brainstorming.
For help with this, see our article with tips for nailing your business presentation here .
The first thing you’ll need to do is to open PowerPoint. When you do, you are shown the Start Menu , with the Home tab open.
This is where you can choose either a blank theme (1) or a pre-built theme (2). You can also choose to open an existing presentation (3).
For now, go ahead and click on the Blank Presentation (1) thumbnail.

Doing so launches a brand new and blank presentation for you to work with. Before you start adding content to your presentation, let’s first familiarize ourselves with the PowerPoint interface.
The PowerPoint interface

Here is how the program is laid out:
- The Application Header
- The Ribbon (including the Ribbon tabs)
- The Quick Access Toolbar (either above or below the Ribbon)
- The Slides Pane (slide thumbnails)
The Slide Area
The notes pane.
- The Status Bar (including the View Buttons)
Each one of these areas has options for viewing certain parts of the PowerPoint environment and formatting your presentation.
Below are the important things to know about certain elements of the PowerPoint interface.
The PowerPoint Ribbon

The Ribbon is contextual. That means that it will adapt to what you’re doing in the program.
For example, the Font, Paragraph and Drawing options are greyed out until you select something that has text in it, as in the example below (A).

Furthermore, if you start manipulating certain objects, the Ribbon will display additional tabs, as seen above (B), with more commands and features to help you work with those objects. The following objects have their own additional tabs in the Ribbon which are hidden until you select them:
- Online Pictures
- Screenshots
- Screen Recording
The Slides Pane

This is where you can preview and rearrange all the slides in your presentation.
Right-clicking on a slide in the pane gives you additional options on the slide level that you won’t find on the Ribbon, such as Duplicate Slide , Delete Slide , and Hide Slide .

In addition, you can add sections to your presentation by right-clicking anywhere in this Pane and selecting Add Section . Sections are extremely helpful in large presentations, as they allow you to organize your slides into chunks that you can then rearrange, print or display differently from other slides.

The Slide Area (A) is where you will build out your slides. Anything within the bounds of this area will be visible when you present or print your presentation.
Anything outside of this area (B) will be hidden from view. This means that you can place things here, such as instructions for each slide, without worrying about them being shown to your audience.

The Notes Pane is the space beneath the Slide Area where you can type in the speaker notes for each slide. It’s designed as a fast way to add and edit your slides’ talking points.
To expand your knowledge and learn more about adding, printing, and exporting your PowerPoint speaker notes, read our guide here .
Your speaker notes are visible when you print your slides using the Notes Pages option and when you use the Presenter View . To expand your knowledge and learn the ins and outs of using the Presenter View , read our guide here .

You can resize the Notes Pane by clicking on its edge and dragging it up or down (A). You can also minimize or reopen it by clicking on the Notes button in the Status Bar (B).
Note: Not all text formatting displays in the Notes Pane, even though it will show up when printing your speaker notes. To learn more about printing PowerPoint with notes, read our guide here .
Now that you have a basic grasp of the PowerPoint interface at your disposal, it’s time to make your presentation.
Adding Content to Your PowerPoint Presentation
Notice that in the Slide Area , there are two rectangles with dotted outlines. These are called Placeholders and they’re set on the template in the Slide Master View .
To expand your knowledge and learn how to create a PowerPoint template of your own (which is no small task), read our guide here .

As the prompt text suggests, you can click into each placeholder and start typing text. These types of placeholder prompts are customizable too. That means that if you are using a company template, it might say something different, but the functionality is the same.

Note: For the purposes of this example, I will create a presentation based on the content in the Starbucks 2018 Global Social Impact Report, which is available to the public on their website.
If you type in more text than there is room for, PowerPoint will automatically reduce its font size. You can stop this behavior by clicking on the Autofit Options icon to the left of the placeholder and selecting Stop Fitting Text to this Placeholder .
Next, you can make formatting adjustments to your text by selecting the commands in the Font area and the Paragraph area of the Home tab of the Ribbon.

The Reset Command: If you make any changes to your title and decide you want to go back to how it was originally, you can use the Reset button up in the Home tab .

Insert More Slides into Your Presentation
Now that you have your title slide filled in, it’s time to add more slides. To do that, simply go up to the Home tab and click on New Slide . This inserts a new slide in your presentation right after the one you were on.

You can alternatively hit Ctrl+M on your keyboard to insert a new blank slide in PowerPoint. To learn more about this shortcut, see my guide on using Ctrl+M in PowerPoint .
Instead of clicking the New Slide command, you can also open the New Slide dropdown to see all the slide layouts in your PowerPoint template. Depending on who created your template, your layouts in this dropdown can be radically different.

If you insert a layout and later want to change it to a different layout, you can use the Layout dropdown instead of the New Slide dropdown.
After inserting a few different slide layouts, your presentation might look like the following picture. Don’t worry that it looks blank, next we will start adding content to your presentation.

If you want to follow along exactly with me, your five slides should be as follows:
- Title Slide
- Title and Content
- Section Header
- Two Content
- Picture with Caption
Adding Content to Your Slides
Now let’s go into each slide and start adding our content. You’ll notice some new types of placeholders.

On slide 2 we have a Content Placeholder , which allows you to add any kind of content. That includes:
- A SmartArt graphic,
- A 3D object,
- A picture from the web,
- Or an icon.
To insert text, simply type it in or hit Ctrl+C to Copy and Ctrl+V to Paste from elsewhere. To insert any of the other objects, click on the appropriate icon and follow the steps to insert it.
For my example, I’ll simply type in some text as you can see in the picture below.

Slides 3 and 4 only have text placeholders, so I’ll go ahead and add in my text into each one.

On slide 5 we have a Picture Placeholder . That means that the only elements that can go into it are:
- A picture from the web

To insert a picture into the picture placeholder, simply:
- Click on the Picture icon
- Find a picture on your computer and select it
- Click on Insert
Alternatively, if you already have a picture open somewhere else, you can select the placeholder and paste in (shortcut: Ctrl+V ) the picture. You can also drag the picture in from a file explorer window.

If you do not like the background of the picture you inserted onto your slide, you can remove the background here in PowerPoint. To see how to do this, read my guide here .
Placeholders aren’t the only way to add content to your slides. At any point, you can use the Insert tab to add elements to your slides.
You can use either the Title Only or the Blank slide layout to create slides for content that’s different. For example, a three-layout content slide, or a single picture divider slide, as shown below.

In the first example above, I’ve inserted 6 text boxes, 3 icons, and 3 circles to create this layout. In the second example, I’ve inserted a full-sized picture and then 2 shapes and 2 text boxes.
The Reset Command: Because these slides are built with shapes and text boxes (and not placeholders), hitting the Reset button up in the Home tab won’t do anything.
That is a good thing if you don’t want your layouts to adjust. However, it does mean that it falls on you to make sure everything is aligned and positioned correctly.
For more on how to add and manipulate the different objects in PowerPoint, check out our step-by-step articles here:
- Using graphics in PowerPoint
- Inserting icons onto slides
- Adding pictures to your PowerPoint
- How to embed a video in PowerPoint
- How to add music to your presentation
Using Designer to generate more layouts ideas
If you have Office 365, your version of PowerPoint comes with a new feature called Designer (or Design Ideas). This is a feature that generates slide layout ideas for you. The coolest thing about this feature is that it uses the content you already have.
To use Designer , simply navigate to the Design tab in your Ribbon, and click on Design Ideas .

NOTE: If the PowerPoint Designer is not working for you (it is grey out), see my troubleshooting guide for Designer .
Change the Overall Design (optional)
When you make a PowerPoint presentation, you’ll want to think about the overall design. Now that you have some content in your presentation, you can use the Design tab to change the look and feel of your slides.
For additional help thinking through the design of your presentation, read my guide here .
A. Picking your PowerPoint slide size
If you have PowerPoint 2013 or later, when you create a blank document in PowerPoint, you automatically start with a widescreen layout with a 16:9 ratio. These dimensions are suitable for most presentations as they match the screens of most computers and projectors.
However, you do have the option to change the dimensions.
For example, your presentation might not be presented, but instead converted into a PDF or printed and distributed. In that case, you can easily switch to the standard dimensions with a 4:3 ratio by selecting from the dropdown (A).
You can also choose a custom slide size or change the slide orientation from landscape to portrait in the Custom Slide Size dialog box (B).

To learn all about the different PowerPoint slide sizes, and some of the issues you will face when changing the slide size of a non-blank presentation, read my guide here .
B. Selecting a PowerPoint theme
The next thing you can do is change the theme of your presentation to a pre-built one. For a detailed explanation of what a PowerPoint theme is, and how to best use it, read my article here .
In the beginning of this tutorial, we started with a blank presentation, which uses the default Office theme as you can see in the picture below.

That gives you the most flexibility because it has a blank background and quite simple layouts that work for most presentations. However, it also means that it’s your responsibility to enhance the design.
If you’re comfortable with this, you can stay with the default theme or create your own custom theme ( read my guide here ). But if you would rather not have to think about design, then you can choose a pre-designed theme.
Microsoft provides 46 other pre-built themes, which include slide layouts, color variants and palettes, and fonts. Each one varies quite significantly, so make sure you look through them carefully.
To select a different theme, go to the Design tab in the Ribbon, and click on the dropdown arrow in the Themes section .

For this tutorial, let’s select the Frame theme and then choose the third Variant in the theme. Doing so changes the layout, colors, and fonts of your presentation.

Note: The theme dropdown area is also where you can import or save custom themes. To see my favorite places to find professional PowerPoint templates and themes (and recommendations for why I like them), read my guide here .
C. How to change a slide background in PowerPoint
The next thing to decide is how you want your background to look for the entire presentation. In the Variants area, you can see four background options.

For this example, we want our presentation to have a dark background, so let’s select Style 3. When you do so, you’ll notice that:
- The background color automatically changes across all slides
- The color of the text on most of the slides automatically changes to white so that it’s visible on the dark background
- The colors of the objects on slides #6 and #7 also adjust, in a way we may not want (we’ll likely have to make some manual adjustments to these slides)

Note: If you want to change the slide background for just that one slide, don’t left-click the style. Instead, right-click it and select Apply to Selected Slides .
After you change the background for your entire presentation, you can easily adjust the background for an individual slide.

Inside the Format Background pane, you can see you have the following options:
- Gradient fill
- Picture or texture fill
- Pattern fill
- Hide background
You can explore these options to find the PowerPoint background that best fits your presentation.
D. How to change your color palette in PowerPoint
Another thing you may want to adjust in your presentation, is the color scheme. In the picture below you can see the Theme Colors we are currently using for this presentation.

Each PowerPoint theme comes with its own color palette. By default, the Office theme includes the Office color palette. This affects the colors you are presented with when you format any element within your presentation (text, shapes, SmartArt, etc.).

The good news is that the colors here are easy to change. To switch color palettes, simply:
- Go to the Design tab in the Ribbon
- In the Variants area, click on the dropdown arrow and select Colors
- Select the color palette (or theme colors) you want
You can choose among the pre-built color palettes from Office, or you can customize them to create your own.
As you build your presentation, make sure you use the colors from your theme to format objects. That way, changing the color palette adjusts all the colors in your presentation automatically.
E. How to change your fonts in PowerPoint
Just as we changed the color palette, you can do the same for the fonts.

Each PowerPoint theme comes with its own font combination. By default, the Office theme includes the Office font pairing. This affects the fonts that are automatically assigned to all text in your presentation.

The good news is that the font pairings are easy to change. To switch your Theme Fonts, simply:
- Go to the Design tab in the Ribbon
- Click on the dropdown arrow in the Variants area
- Select Fonts
- Select the font pairing you want
You can choose among the pre-built fonts from Office, or you can customize them to create your own.
If you are working with PowerPoint presentations on both Mac and PC computers, make sure you choose a safe PowerPoint font. To see a list of the safest PowerPoint fonts, read our guide here .
If you receive a PowerPoint presentation and the wrong fonts were used, you can use the Replace Fonts dialog box to change the fonts across your entire presentation. For details, read our guide here .
Adding Animations & Transitions (optional)
The final step to make a PowerPoint presentation compelling, is to consider using animations and transitions. These are by no means necessary to a good presentation, but they may be helpful in your situation.
A. Adding PowerPoint animations
PowerPoint has an incredibly robust animations engine designed to power your creativity. That being said, it’s also easy to get started with basic animations.
Animations are movements that you can apply to individual objects on your slide.

To add a PowerPoint animation to an element of your slide, simply:
- Select the element
- Go to the Animations tab in the Ribbon
- Click on the dropdown arrow to view your options
- Select the animation you want
You can add animations to multiple objects at one time by selecting them all first and then applying the animation.
B. How to preview a PowerPoint animation

There are three ways to preview a PowerPoint animation:
- Click on the Preview button in the Animations tab
- Click on the little star next to the slide
- Play the slide in Slide Show Mode
To learn other ways to run your slide show, see our guide on presenting a PowerPoint slide show with shortcuts .
To adjust the settings of your animations, explore the options in the Effect Options , Advanced Animation and the Timing areas of the Animation tab .

Note: To see how to make objects appear and disappear in your slides by clicking a button, read our guide here .
C. How to manage your animations in PowerPoint

The best way to manage lots of animations on your slide is with the Animation Pane . To open it, simply:
- Navigate to the Animations tab
- Select the Animation Pane
Inside the Animation Pane, you’ll see all of the different animations that have been applied to objects on your slide, with their numbers marked as pictured above.
Note: To see examples of PowerPoint animations that can use in PowerPoint, see our list of PowerPoint animation tutorials here .
D. How to add transitions to your PowerPoint presentation
PowerPoint has an incredibly robust transition engine so that you can dictate how your slides change from one to the other. It is also extremely easy to add transitions to your slides.
In PowerPoint, transitions are the movements (or effects) you see as you move between two slides.

To add a transition to a PowerPoint slide, simply:
- Select the slide
- Go to the Transitions tab in the Ribbon
- In the Transitions to This Slide area, click on the dropdown arrow to view your options
- Select the transition you want
To adjust the settings of the transition, explore the options in the Timing area of the Transitions tab.
You can also add the same transition to multiple slides. To do that, select them in the Slides Pane and apply the transition.
E. How to preview a transition in PowerPoint

There are three ways to preview your PowerPoint transitions (just like your animations):
- Click on the Preview button in the Transitions tab
- Click on the little star beneath the slide number in the thumbnail view
Note: In 2016, PowerPoint added a cool new transition, called Morph. It operates a bit differently from other transitions. For a detailed tutorial on how to use the cool Morph transition, see our step-by-step article here .
Save Your PowerPoint Presentation
After you’ve built your presentation and made all the adjustments to your slides, you’ll want to save your presentation. YOu can do this several different ways.

To save a PowerPoint presentation using your Ribbon, simply:
- Navigate to the File tab
- Select Save As on the left
- Choose where you want to save your presentation
- Name your presentation and/or adjust your file type settings
- Click Save
You can alternatively use the Ctrl+S keyboard shortcut to save your presentation. I recommend using this shortcut frequently as you build your presentation to make sure you don’t lose any of your work.

This is the standard way to save a presentation. However, there may be a situation where you want to save your presentation as a different file type.
To learn how to save your presentation as a PDF, see our guide on converting PowerPoint to a PDF .
How to save your PowerPoint presentation as a template
Once you’ve created a presentation that you like, you may want to turn it into a template. The easiest – but not technically correct – way, is to simply create a copy of your current presentation and then change the content.
But be careful! A PowerPoint template is a special type of document and it has its own parameters and behaviors.
If you’re interested in learning about how to create your own PowerPoint template from scratch, see our guide on how to create a PowerPoint template .
Printing Your PowerPoint Presentation
After finishing your PowerPoint presentation, you may want to print it out on paper. Printing your slides is relatively easy.

To open the Print dialog box, you can either:
- Hit Ctrl+P on your keyboard
- Or go to the Ribbon and click on File and then Print

Inside the Print dialog box, you can choose from the various printing settings:
- Printer: Select a printer to use (or print to PDF or OneNote)
- Slides: Choose which slides you want to print
- Layout: Determine how many slides you want per page (this is where you can print the notes, outline, and handouts)
- Collated or uncollated (learn what collated printing means here )
- Color: Choose to print in color, grayscale or black & white
There are many more options for printing your PowerPoint presentations. Here are links to more in-depth articles:
- How to print multiple slides per page
- How to print your speaker notes in PowerPoint
- How to save PowerPoint as a picture presentation
So that’s how to create a PowerPoint presentation if you are brand new to it. We’ve also included a ton of links to helpful resources to boost your PowerPoint skills further.
When you are creating your presentation, it is critical to first focus on the content (what you are trying to say) before getting lost inserting and playing with elements. The clearer you are on what you want to present, the easier it will be to build it out in PowerPoint.
If you enjoyed this article, you can learn more about our PowerPoint training courses and other presentation resources by visiting us here .
🔒 Unlock the PowerPoint Shortcuts Trusted by Industry Leaders KKR, American Express, HSBC, and More!
Join over 114,880 professionals from diverse fields including consulting, investment banking, advertising, marketing, sales, and business development who have supercharged their PowerPoint game with our proven methods.
✅ Customize compelling presentations effortlessly.
✅ Master time-saving techniques for faster deck creation.
✅ Boost your career prospects with top-notch PowerPoint skills.
Get FREE access to the Critical PowerPoint Shortcuts module of our premium training course by entering your name and email below.
DISCLAIMER: PC Users Only!
We respect your privacy and will keep your info safe and confidential.
About The Author

Popular Tutorials
- How to Strikethrough Text (l̶i̶k̶e̶ ̶t̶h̶i̶s̶) in Word, Excel & PowerPoint
- How to Make Animated Fireworks in PowerPoint (Step-by-Step)
- Strikethrough Shortcut (l̶i̶k̶e̶ ̶t̶h̶i̶s̶) for Word, Excel & PowerPoint
- How to Create a Flash Card Memory Game in PowerPoint (Like Jeopardy)
- Keyboard Shortcuts Not Working: Solved
PowerPoint Tutorial Categories
- Strategies & Opinions
- Shortcuts & Hacks
- Pictures, Icons, Videos, Etc.
- New Features
- Miscellaneous
- Charts & Data Viz
We help busy professionals save hours and gain peace of mind, with corporate workshops, self-paced courses and tutorials for PowerPoint and Word.
Work With Us
- Corporate Training
- Presentation & Template Design
- Courses & Downloads
- PowerPoint Articles
- Word Articles
- Productivity Resources
Find a Tutorial
- Free Training
- For Businesses
We help busy office workers save hours and gain peace of mind, with tips, training and tutorials for Microsoft PowerPoint and Word.
Master Critical PowerPoint Shortcuts – Secure Your FREE Training Module and Save Valuable Time!
⌛ Master time-saving expert techniques.
🔥 Create powerful presentations.
🚀 Propel your career to new heights.
We value your privacy – we keep your info safe.
Discover PowerPoint Hacks Loved by Industry Giants - KKR, AmEx, HSBC!
Over 114,880 professionals in finance, marketing and sales have revolutionized their PPT skills with our proven methods.
Gain FREE access to a full module of our premium PowerPoint training program – Get started today!
We hate spam too and promise to keep your information safe.

5 Of The Best Apps To Create And Edit Presentations On Android Devices
W hether you're attending school or are part of the corporate world, you're likely no stranger to presentations. They're a staple in both academic and professional settings as they're one of the best ways to share ideas with your class, client, or higher-ups. Normally, you'd rely on your computer to create your presentations, but it isn't exactly convenient for on-the-fly edits. After all, you can't just open your laptop as you're running to class or on an elevator on the way to a board meeting. You'd need something more portable for last-minute tweaks like adding speaker notes or changing the image caption in your slides.
Thankfully, you're not without options as there's a plethora of apps on the Play Store designed to help you whip up or polish presentations right from your Android device. What's even better is that some of these apps don't require you to be online, so you can stay productive anytime, anywhere. We've narrowed down the search and came up with five of the best presentation apps for Android you need to try.
Read more: The 10 Worst Smartphones Of All Time
Google Slides
If you're already in the Google ecosystem and using apps like Drive, Meet, and Calendar, Google Slides is one of the top presentation apps for you. One of its main draws is its seamless interconnectivity with other Google products. Create a presentation in the Slides app, and it will pop up in Drive automatically. Punch in your Google Meet meeting ID, and you can show your presentation directly in Slides -– no need to install the Meet app itself. Connect Slides with your Calendar, and you can also start presenting your Slides file for a scheduled meeting in Meet. Another nifty presentation feature of Slides is its live Q&A session that allows you to display questions on the screen as you go.
Editing and creating presentations from scratch is a breeze in Slides, too. There are several Slides templates to get you started, along with a handful of themes and layouts you can switch to depending on your style and content. Slides comes with all the standard formatting options at your disposal, including font styles, sizes, colors, and emphasis (e.g., bold, italics, underline). Just like in other Google products like Docs and Sheets, Slides lets you leave comments and enable offline use for certain files.
Google Slides won't cost you a dime — all you need is a Google account. The downside, however, is that the Android app has limited font styles and doesn't let you add slide transitions. For those extras, you'll need to open your presentation in the web app on a computer.
Microsoft Powerpoint
Microsoft PowerPoint is most people's go-to presentation platform, and for good reason. The mobile app mirrors the look and functionality of its desktop and web counterparts, so you won't have a hard time navigating and using the platform. You'll find nearly all the editing tools you'd expect from the desktop and web apps, including layout adjustments, text formatting, drawing capabilities, themes, transitions, animations, and review and view modes for inserting comments and notes. Even the handy search functionality is featured in the mobile app. PowerPoint also syncs to your OneDrive in real-time (provided you're connected to the internet), making it pretty easy to switch editing between your phone and computer.
Similar to desktop and web apps, the PowerPoint mobile app allows you to present directly on your device in full-screen, complete with extra presentation aids. There's an ink tool for live annotations that you can choose to keep in the file like drawings. The app also offers a button to display a blank screen, a handy tool for Q&A sessions, or when you're using PowerPoint for quizzes and need to temporarily hide questions from students.
Downloading the PowerPoint mobile app is free, but there's a catch: if you're using a free personal account, you can only view presentations you've previously made using the desktop/web app. You can't create a new presentation or edit existing ones without subscribing to a premium plan first.
One of the affordable alternatives for Microsoft Word , WPS Office comes complete with a presentation maker and editor too. What makes it stand out from other presentation apps is its extensive collection of templates, sorted into neat categories like education, business, nature, minimal, work report, album, and medical. You can choose from at least 70 templates for education-related presentations, 40 templates for business presentations, and 30 templates for work reports, most of which are free to edit. Speaking of editing, WPS Office includes most of the standard tools you need. There are text styling features, transitions, animations, and layout options. You can also insert different extra content like a picture, background music, audio, video, shape, table, and chart into your slides.
On the other hand, WPS Office's presentation tools are beyond the basics. You can opt to auto-play your presentation for convenience, selectively hide or show certain slides, and annotate the slides with the ink tool. Another handy presentation feature is the PPT Recorder which allows you to record your presentation in full-screen, complete with audio and ink annotations. There's also a Miracast option right within the app, so you can readily cast the presentation to a bigger screen.
WPS Office is free to download and use, but you do need to sign into an account to create a presentation. If you feel like the free account is too basic, feel free to upgrade to WPS Pro which comes with extra features like document merging, image-to-PDF converter, PDF editor, document recovery, and bigger cloud space.
While you probably know Canva as a free photo editing app for Android, it's actually an excellent platform for creating and editing presentations on mobile as well. However, you'll notice it doesn't quite echo the vibe of Google Slides, PowerPoint, or WPS Office as its interface is a world away from the three (but you really won't need to spend days getting the hang of it, thanks to its intuitive and user-friendly design). Canva's customizable templates are also different from other presentation apps not only because they come in varied styles (e.g., elegant, corporate, pastel), themes (e.g., game, brainstorm, quiz), and colors but also because you can pick from more than one size (16:9, 4:3, or mobile-first).
Another thing that sets Canva apart is its app integrations. There are apps that allow you to create a QR code, use photos from Pixabay or Pexels, turn a photo into an anime-style graphic, and even translate text all within Canva. Beyond the typical photos and videos, Canva also lets you insert other fancy elements like AI-generated images, pre-made graphics, and charts into your presentation without needing to import them from your local storage. And yes, you can also run your presentation straight from the app. All of these neat features, however, are only accessible when you're connected to the internet. You can't use Canva offline.
Canva is free, but there's a Pro tier for those looking for other advanced features like image background remover, file resizer, and access to Pro templates.
Presentation Creator
Presentation Creator is similar to Canva in several ways, especially when it comes to user interface and features. Moving away from the familiar style of traditional presentation apps like PowerPoint or Google Slides, its UI leans more towards the feel of a photo editor. Its features also resemble that of photo editors, much like Canva. You'll find an element tab featuring dozens of graphics and line drawings, a text tab allowing you to add simple text, text within graphics, or AI-generated content, and a video tab letting you insert videos from YouTube, Google Photos, or your gallery. There's also an images tab providing you access not only to stock photos but also pictures from your storage and third-party sources like Facebook, Google Photos, and Google Drive.
Another nifty thing about Presentation Creator is that you can download your slides as JPG, PNG, or PDF, with options to use a transparent background if you prefer. Like other presentation apps, you can also present your slides within Presentation Creator. However, the presentation tools are pretty basic, with only the option to display the slides full screen and show or hide the next slides.
You only need to sign up for an account to use Presentation Creator, but to access more features like more stock images, background remover, AI content writer, and PDF editor, among many others, you need to upgrade to the Pro+.
Read the original article on SlashGear .

- PRO Courses Guides New Tech Help Pro Expert Videos About wikiHow Pro Upgrade Sign In
- EDIT Edit this Article
- EXPLORE Tech Help Pro About Us Random Article Quizzes Request a New Article Community Dashboard This Or That Game Popular Categories Arts and Entertainment Artwork Books Movies Computers and Electronics Computers Phone Skills Technology Hacks Health Men's Health Mental Health Women's Health Relationships Dating Love Relationship Issues Hobbies and Crafts Crafts Drawing Games Education & Communication Communication Skills Personal Development Studying Personal Care and Style Fashion Hair Care Personal Hygiene Youth Personal Care School Stuff Dating All Categories Arts and Entertainment Finance and Business Home and Garden Relationship Quizzes Cars & Other Vehicles Food and Entertaining Personal Care and Style Sports and Fitness Computers and Electronics Health Pets and Animals Travel Education & Communication Hobbies and Crafts Philosophy and Religion Work World Family Life Holidays and Traditions Relationships Youth
- RANDOM QUIZ
- Browse Articles
- Learn Something New
- Quizzes Hot
- This Or That Game New
- Train Your Brain
- Explore More
- Support wikiHow
- About wikiHow
- Log in / Sign up
- Computers and Electronics
- Presentation Software
- PowerPoint Presentations
6 Simple Parts for Beginners to Create a PowerPoint Presentation
Last Updated: December 19, 2022 Fact Checked
Creating a New PowerPoint
Creating the title slide, adding a new slide, adding content to slides, adding transitions, testing and saving your presentation.
This article was co-authored by wikiHow staff writer, Darlene Antonelli, MA . Darlene Antonelli is a Technology Writer and Editor for wikiHow. Darlene has experience teaching college courses, writing technology-related articles, and working hands-on in the technology field. She earned an MA in Writing from Rowan University in 2012 and wrote her thesis on online communities and the personalities curated in such communities. This article has been fact-checked, ensuring the accuracy of any cited facts and confirming the authority of its sources. This article has been viewed 4,317,226 times. Learn more...
Do you want to have your data in a slide show? If you have Microsoft 365, you can use PowerPoint! PowerPoint is a program that's part of the Microsoft Office suite (which you have to pay for) and is available for both Windows and Mac computers. This wikiHow teaches you how to create your own Microsoft PowerPoint presentation on a computer.
Things You Should Know
- Templates make it easy to create vibrant presentations no matter your skill level.
- When adding photos, you can adjust their sizes by clicking and dragging in or out from their corners.
- You can add animated transitions between slides or to individual elements like bullet points and blocks of text.

- If you don't have a Microsoft Office 365 subscription, you can use the website instead of the desktop app. Go to https://powerpoint.office.com/ to use the website version.
- You can also use the mobile app to make presentations, though it's easier to do this on a computer, which has a larger screen, a mouse, and a keyboard.

- If you don't want to use a template, just click the Blank option in the upper-left side of the page and skip to the next part.

- Skip this step if your selected template has no themes available.

- If you're creating a PowerPoint presentation for which an elaborate title slide has been requested, ignore this step.

- You can change the font and size of text used from the Home tab that's in the orange ribbon at the top of the window.

- You can also just leave this box blank if you like.

- You can also click and drag in or out one of a text box's corners to shrink or enlarge the text box.

- On a Mac, you'll click the Home tab instead. [1] X Research source

- Clicking the white slide-shaped box above this option will result in a new text slide being inserted.

- Title Slide
- Title and Content
- Section Header
- Two Content
- Content with Caption
- Picture with Caption

- Naturally, the title slide should be the first slide in your presentation, meaning that it should be the top slide in the left-hand column.

- Skip this step and the next two steps if your selected slide uses a template that doesn't have text boxes in it.

- Text boxes in PowerPoint will automatically format the bulk of your text for you (e.g., adding bullet points) based on the context of the content itself.
- You can add notes that the Presentation will not include (but you'll still be able to see them on your screen) by clicking Notes at the bottom of the slide.

- You can change the font of the selected text by clicking the current font's name and then clicking your preferred font.
- If you want to change the size of the text, click the numbered drop-down box and then click a larger or smaller number based on whether you want to enlarge or shrink the text.
- You can also change the color, bolding, italicization, underlining, and so on from here.

- Photos in particular can be enlarged or shrunk by clicking and dragging out or in one of their corners.

- Remember to keep slides uncluttered and relatively free of distractions. It's best to keep the amount of text per slide to around 33 words or less. [2] X Research source

- Slide content will animate in the order in which you assign transitions. For example, if you animate a photo on the slide and then animate the title, the photo will appear before the title.
- Make your slideshow progress automatically by setting the speed of every transition to align with your speech as well as setting each slide to Advance . [3] X Trustworthy Source Microsoft Support Technical support and product information from Microsoft. Go to source

- If you need to exit the presentation, press Esc .

- Windows - Click File , click Save , double-click This PC , select a save location, enter a name for your presentation, and click Save .
- Mac - Click File , click Save As... , enter the presentation's name in the "Save As" field, select a save location by clicking the "Where" box and clicking a folder, and click Save .
Community Q&A
- If you save your PowerPoint presentation in .pps format instead of the default .ppt format, double-clicking your PowerPoint presentation file will prompt the presentation to open directly into the slideshow view. Thanks Helpful 5 Not Helpful 0
- If you don't have Microsoft Office, you can still use Apple's Keynote program or Google Slides to create a PowerPoint presentation. Thanks Helpful 0 Not Helpful 0
- Your PowerPoint presentation (or some features in it) may not open in significantly older versions of PowerPoint. Thanks Helpful 1 Not Helpful 1
- Great PowerPoint presentations avoid placing too much text on one slide. Thanks Helpful 0 Not Helpful 0
You Might Also Like

- ↑ https://onedrive.live.com/view.aspx?resid=DBDCE00C929AA5D8!252&ithint=file%2cpptx&app=PowerPoint&authkey=!AH4O9NxcbehqzIg
- ↑ https://www.virtualsalt.com/powerpoint.htm
- ↑ https://support.microsoft.com/en-us/office/set-the-timing-and-speed-of-a-transition-c3c3c66f-4cca-4821-b8b9-7de0f3f6ead1#:~:text=To%20make%20the%20slide%20advance,effect%20on%20the%20slide%20finishes .
About This Article

- Send fan mail to authors
Reader Success Stories
Artis Holland
Sep 22, 2016
Is this article up to date?

Oct 18, 2016
Jul 23, 2016
Margery Niyi
Sep 25, 2017
Jul 21, 2016

Featured Articles

Trending Articles

Watch Articles

- Terms of Use
- Privacy Policy
- Do Not Sell or Share My Info
- Not Selling Info
wikiHow Tech Help Pro:
Level up your tech skills and stay ahead of the curve
Android Police
How to convert a powerpoint to google slides.
Work with a familiar interface by converting a PowerPoint to Google Slides
Microsoft PowerPoint and Google Slides are popular software solutions for creating presentations. While PowerPoint has more features, Google Slides offers seamless collaboration, cross-platform availability, and an easy-to-use interface without a subscription. When you receive a PowerPoint presentation, convert it to Google Slides to continue editing and collaborating on it.
Converting a PowerPoint presentation to the Google Slides format has advantages, but it isn't a smooth process. Formatting issues can occur. You can use Google Drive or Google Slides to convert a PowerPoint presentation. This trick is also helpful when using a PowerPoint template with Google Slides.
Although Google Slides has apps for iPhone and Android , we focus on the company's web version.
Convert a PowerPoint to Google Slides Using Google Drive
You can upload a PowerPoint presentation to Google Drive and open it in Slides. It's the easiest way to convert from PowerPoint to Google Slides.
- Visit Google Drive on the web and sign in with your Google account details.
- After uploading the file, Google Drive converts your PowerPoint file, making it compatible with Google Slides. Double-click it to open it in Google Slides.
Whether you use a .pptx or an older .ppt file, Google Drive automatically converts it to Slides. You can open it like a traditional Slides file and make changes.
How to add audio to your Google Slides presentation
Use google slides to convert a pptx file.
If you don't want to deal with Google Drive, you can import and use any PowerPoint file using Google Slides. Follow the steps below to make changes.
- Go to Google Slides on the web and create a blank presentation. Or, type slides.new in the address bar and press the Enter or Return key.
- The following menu shows your recent files and several online and offline locations where you can import a file. Move to the Upload menu.
- Google Slides converts and opens a PPT file in the Slides format.
There are times when you want to convert specific PowerPoint slides. Importing an entire presentation and deleting irrelevant slides isn't the most productive way. Instead, import selected slides using the steps below.
- Open a blank presentation in Google Slides (check the steps above).
Your PowerPoint slides are ready for editing in Google Slides.
Advantages of Converting a PowerPoint to Google Slides
Here are the benefits of converting a PowerPoint file to Google Slides.
Easy access
Google Slides is a web app. Whether you use Slides on Windows, Mac, Linux, or ChromeOS, you only need a web browser to access and edit your presentations. PowerPoint also has a web app, but it has limited features compared to its desktop app.
Real-time collaboration
Although Microsoft offers real-time collaboration on PowerPoint, the sharing experience isn't as good as Google Slides. One or more users can work on a presentation simultaneously, share comments, and check tweaks instantly.
Free to use
PowerPoint desktop apps require an active Microsoft 365 subscription. In contrast, Google Slides is free to use. If one of your team members or a colleague doesn't have a Microsoft 365 plan, convert the PowerPoint presentation to Google Slides and invite them for collaboration.
What's the difference between Google Slides templates and themes?
Convert a powerpoint to google slides: our observations, complete and collaborate your presentation in style.
Whether you use PowerPoint or Google Slides, your pitch requires interactive visuals and fancy animations to attract people's attention. A bland and static presentation won't impress your audience. Creating an engaging presentation from scratch can be time-consuming. Check the top Google Slides templates for personal and work use and finish your presentation quickly.
How to Record PowerPoint Presentation with Audio and Video
Sometimes it is necessary to record not only the sound of the speaker over presentation slides but also their face via a web camera. Learn how to easily do it!

How to record yourself presenting a PowerPoint
The more people work from home, the more online meetings happen. Teams discuss work on projects, put forward their ideas, and share presentations containing essential information. However, problems with the latter can sometimes arise – watching a presentation only might be pretty boring. But this is not the case when the user adds a video recording of them presenting as well.
If you were in such a situation, you may have wondered how to record yourself presenting a PowerPoint slideshow. Actually, with the help of our editing tool, it's not that hard at all! Using it, you can record a web camera video and PowerPoint presentation at the same time on Windows 10 and 11, as well as Mac.
For the rest of the process, follow the steps below:
Start the project
Open Clideo’s Online Video Editor and click "Get started".

To record a presentation and video of yourself at the same time, scroll down the navigation sidebar, click "Record", then "Screen & Camera". If prompted, allow your browser to access your camera and microphone.

You can select a specific camera and microphone and turn them on/off in the next pop-up window via the "Gear" icon at the bottom right.

Record the screen
Check that you look fine in the webcam, click the red circle to start a recording session, and select a window with your PPT in the pop-up screen. Then, click "Share" to start presenting.

Go to the tab with your presentation and do your best. If you return to the Clideo tab, you will see that you cannot move the video window from your camera now, but you can do that while editing your video later.

While recording your presentation, you can at any moment go to the Clideo tab and click the "Pause" button to pause the process, then click it again and go back to the presentation screen to continue the demonstration. To redo the recording and discard the current one, click the "Retake" button to the left.

When you are ready to stop and save the recordings, in the Clideo tab, click the "Stop" button or hit the "Stop sharing" button on your presentation screen.
In the next pop-up window, you can review, rename, redo, and add the files to your project timeline or "Uploads". Both cases will add the screen and camera recordings as separate files.

After every file is manually or automatically placed on the timeline, you can edit each one by one – just click them and adjust the available settings. Resize the camera recording if necessary, cut out the sections you do not need, or add captions.

When you finish editing, click "Export" at the top right and choose your preferred option.

Save the result
When the video is processed, watch the playback to see how it looks. If you like the result, click "Download" to save the screen recording to your device or cloud storage.

If you need more information about the latest state of video editor options and features, you can find details in our Help Center .
Interesting articles
Upgrade your account, get unlimited storage time and create projects without watermarks.
Home Blog Design How to Design a Winning Poster Presentation: Quick Guide with Examples & Templates
How to Design a Winning Poster Presentation: Quick Guide with Examples & Templates

How are research posters like High School science fair projects? Quite similar, in fact.
Both are visual representations of a research project shared with peers, colleagues and academic faculty. But there’s a big difference: it’s all in professionalism and attention to detail. You can be sure that the students that thrived in science fairs are now creating fantastic research posters, but what is that extra element most people miss when designing a poster presentation?
This guide will teach tips and tricks for creating poster presentations for conferences, symposia, and more. Learn in-depth poster structure and design techniques to help create academic posters that have a lasting impact.
Let’s get started.
Table of Contents
- What is a Research Poster?
Why are Poster Presentations important?
Overall dimensions and orientation, separation into columns and sections, scientific, academic, or something else, a handout with supplemental and contact information, cohesiveness, design and readability, storytelling.
- Font Characteristics
- Color Pairing
- Data Visualization Dimensions
- Alignment, Margins, and White Space
Scientific/Academic Conference Poster Presentation
Digital research poster presentations, slidemodel poster presentation templates, how to make a research poster presentation step-by-step, considerations for printing poster presentations, how to present a research poster presentation, final words, what is a research poster .
Research posters are visual overviews of the most relevant information extracted from a research paper or analysis. They are essential communication formats for sharing findings with peers and interested people in the field. Research posters can also effectively present material for other areas besides the sciences and STEM—for example, business and law.
You’ll be creating research posters regularly as an academic researcher, scientist, or grad student. You’ll have to present them at numerous functions and events. For example:
- Conference presentations
- Informational events
- Community centers
The research poster presentation is a comprehensive way to share data, information, and research results. Before the pandemic, the majority of research events were in person. During lockdown and beyond, virtual conferences and summits became the norm. Many researchers now create poster presentations that work in printed and digital formats.

Let’s look at why it’s crucial to spend time creating poster presentations for your research projects, research, analysis, and study papers.

Research posters represent you and your sponsor’s research
Research papers and accompanying poster presentations are potent tools for representation and communication in your field of study. Well-performing poster presentations help scientists, researchers, and analysts grow their careers through grants and sponsorships.
When presenting a poster presentation for a sponsored research project, you’re representing the company that sponsored you. Your professionalism, demeanor, and capacity for creating impactful poster presentations call attention to other interested sponsors, spreading your impact in the field.
Research posters demonstrate expertise and growth
Presenting research posters at conferences, summits, and graduate grading events shows your expertise and knowledge in your field of study. The way your poster presentation looks and delivers, plus your performance while presenting the work, is judged by your viewers regardless of whether it’s an officially judged panel.
Recurring visitors to research conferences and symposia will see you and your poster presentations evolve. Improve your impact by creating a great poster presentation every time by paying attention to detail in the poster design and in your oral presentation. Practice your public speaking skills alongside the design techniques for even more impact.
Poster presentations create and maintain collaborations
Every time you participate in a research poster conference, you create meaningful connections with people in your field, industry or community. Not only do research posters showcase information about current data in different areas, but they also bring people together with similar interests. Countless collaboration projects between different research teams started after discussing poster details during coffee breaks.
An effective research poster template deepens your peer’s understanding of a topic by highlighting research, data, and conclusions. This information can help other researchers and analysts with their work. As a research poster presenter, you’re given the opportunity for both teaching and learning while sharing ideas with peers and colleagues.
Anatomy of a Winning Poster Presentation
Do you want your research poster to perform well? Following the standard layout and adding a few personal touches will help attendees know how to read your poster and get the most out of your information.

The overall size of your research poster ultimately depends on the dimensions of the provided space at the conference or research poster gallery. The poster orientation can be horizontal or vertical, with horizontal being the most common. In general, research posters measure 48 x 36 inches or are an A0 paper size.
A virtual poster can be the same proportions as the printed research poster, but you have more leeway regarding the dimensions. Virtual research posters should fit on a screen with no need to scroll, with 1080p resolution as a standard these days. A horizontal presentation size is ideal for that.
A research poster presentation has a standard layout of 2–5 columns with 2–3 sections each. Typical structures say to separate the content into four sections; 1. A horizontal header 2. Introduction column, 3. Research/Work/Data column, and 4. Conclusion column. Each unit includes topics that relate to your poster’s objective. Here’s a generalized outline for a poster presentation:
- Condensed Abstract
- Objectives/Purpose
- Methodology
- Recommendations
- Implications
- Acknowledgments
- Contact Information
The overview content you include in the units depends on your poster presentations’ theme, topic, industry, or field of research. A scientific or academic poster will include sections like hypothesis, methodology, and materials. A marketing analysis poster will include performance metrics and competitor analysis results.
There’s no way a poster can hold all the information included in your research paper or analysis report. The poster is an overview that invites the audience to want to find out more. That’s where supplement material comes in. Create a printed PDF handout or card with a QR code (created using a QR code generator ). Send the audience to the best online location for reading or downloading the complete paper.
What Makes a Poster Presentation Good and Effective?
For your poster presentation to be effective and well-received, it needs to cover all the bases and be inviting to find out more. Stick to the standard layout suggestions and give it a unique look and feel. We’ve put together some of the most critical research poster-creation tips in the list below. Your poster presentation will perform as long as you check all the boxes.
The information you choose to include in the sections of your poster presentation needs to be cohesive. Train your editing eye and do a few revisions before presenting. The best way to look at it is to think of The Big Picture. Don’t get stuck on the details; your attendees won’t always know the background behind your research topic or why it’s important.
Be cohesive in how you word the titles, the length of the sections, the highlighting of the most important data, and how your oral presentation complements the printed—or virtual—poster.
The most important characteristic of your poster presentation is its readability and clarity. You need a poster presentation with a balanced design that’s easy to read at a distance of 1.5 meters or 4 feet. The font size and spacing must be clear and neat. All the content must suggest a visual flow for the viewer to follow.
That said, you don’t need to be a designer to add something special to your poster presentation. Once you have the standard—and recognized—columns and sections, add your special touch. These can be anything from colorful boxes for the section titles to an interesting but subtle background, images that catch the eye, and charts that inspire a more extended look.
Storytelling is a presenting technique involving writing techniques to make information flow. Firstly, storytelling helps give your poster presentation a great introduction and an impactful conclusion.
Think of storytelling as the invitation to listen or read more, as the glue that connects sections, making them flow from one to another. Storytelling is using stories in the oral presentation, for example, what your lab partner said when you discovered something interesting. If it makes your audience smile and nod, you’ve hit the mark. Storytelling is like giving a research presentation a dose of your personality, and it can help turning your data into opening stories .
Design Tips For Creating an Effective Research Poster Presentation
The section above briefly mentioned how important design is to your poster presentation’s effectiveness. We’ll look deeper into what you need to know when designing a poster presentation.
1. Font Characteristics
The typeface and size you choose are of great importance. Not only does the text need to be readable from two meters away, but it also needs to look and sit well on the poster. Stay away from calligraphic script typefaces, novelty typefaces, or typefaces with uniquely shaped letters.
Stick to the classics like a sans serif Helvetica, Lato, Open Sans, or Verdana. Avoid serif typefaces as they can be difficult to read from far away. Here are some standard text sizes to have on hand.
- Title: 85 pt
- Authors: 65 pt
- Headings: 36 pt
- Body Text: 24 pt
- Captions: 18 pt

If you feel too prone to use serif typefaces, work with a font pairing tool that helps you find a suitable solution – and intend those serif fonts for heading sections only. As a rule, never use more than 3 different typefaces in your design. To make it more dynamic, you can work with the same font using light, bold, and italic weights to put emphasis on the required areas.
2. Color Pairing
Using colors in your poster presentation design is a great way to grab the viewer’s attention. A color’s purpose is to help the viewer follow the data flow in your presentation, not distract. Don’t let the color take more importance than the information on your poster.

Choose one main color for the title and headlines and a similar color for the data visualizations. If you want to use more than one color, don’t create too much contrast between them. Try different tonalities of the same color and keep things balanced visually. Your color palette should have at most one main color and two accent colors.
Black text over a white background is standard practice for printed poster presentations, but for virtual presentations, try a very light gray instead of white and a very dark gray instead of black. Additionally, use variations of light color backgrounds and dark color text. Make sure it’s easy to read from two meters away or on a screen, depending on the context. We recommend ditching full white or full black tone usage as it hurts eyesight in the long term due to its intense contrast difference with the light ambiance.
3. Data Visualization Dimensions
Just like the text, your charts, graphs, and data visualizations must be easy to read and understand. Generally, if a person is interested in your research and has already read some of the text from two meters away, they’ll come closer to look at the charts and graphs.

Fit data visualizations inside columns or let them span over two columns. Remove any unnecessary borders, lines, or labels to make them easier to read at a glance. Use a flat design without shadows or 3D characteristics. The text in legends and captions should stay within the chart size and not overflow into the margins. Use a unified text size of 18px for all your data visualizations.
4. Alignment, Margins, and White Space
Finally, the last design tip for creating an impressive and memorable poster presentation is to be mindful of the layout’s alignment, margins, and white space. Create text boxes to help keep everything aligned. They allow you to resize, adapt, and align the content along a margin or grid.
Take advantage of the white space created by borders and margins between sections. Don’t crowd them with a busy background or unattractive color.

Calculate margins considering a print format. It is a good practice in case the poster presentation ends up becoming in physical format, as you won’t need to downscale your entire design (affecting text readability in the process) to preserve information.
There are different tools that you can use to make a poster presentation. Presenters who are familiar with Microsoft Office prefer to use PowerPoint. You can learn how to make a poster in PowerPoint here.
Poster Presentation Examples
Before you start creating a poster presentation, look at some examples of real research posters. Get inspired and get creative.
Research poster presentations printed and mounted on a board look like the one in the image below. The presenter stands to the side, ready to share the information with visitors as they walk up to the panels.

With more and more conferences staying virtual or hybrid, the digital poster presentation is here to stay. Take a look at examples from a poster session at the OHSU School of Medicine .
Use SlideModel templates to help you create a winning poster presentation with PowerPoint and Google Slides. These poster PPT templates will get you off on the right foot. Mix and match tables and data visualizations from other poster slide templates to create your ideal layout according to the standard guidelines.
If you need a quick method to create a presentation deck to talk about your research poster at conferences, check out our Slides AI presentation maker. A tool in which you add the topic, curate the outline, select a design, and let AI do the work for you.
1. One-pager Scientific Poster Template for PowerPoint

A PowerPoint template tailored to make your poster presentations an easy-to-craft process. Meet our One-Pager Scientific Poster Slide Template, entirely editable to your preferences and with ample room to accommodate graphs, data charts, and much more.
Use This Template
2. Eisenhower Matrix Slides Template for PowerPoint

An Eisenhower Matrix is a powerful tool to represent priorities, classifying work according to urgency and importance. Presenters can use this 2×2 matrix in poster presentations to expose the effort required for the research process, as it also helps to communicate strategy planning.
3. OSMG Framework PowerPoint Template

Finally, we recommend presenters check our OSMG Framework PowerPoint template, as it is an ideal tool for representing a business plan: its goals, strategies, and measures for success. Expose complex processes in a simplified manner by adding this template to your poster presentation.
Remember these three words when making your research poster presentation: develop, design, and present. These are the three main actions toward a successful poster presentation.

The section below will take you on a step-by-step journey to create your next poster presentation.
Step 1: Define the purpose and audience of your poster presentation
Before making a poster presentation design, you’ll need to plan first. Here are some questions to answer at this point:
- Are they in your field?
- Do they know about your research topic?
- What can they get from your research?
- Will you print it?
- Is it for a virtual conference?
Step 2: Make an outline
With a clear purpose and strategy, it’s time to collect the most important information from your research paper, analysis, or documentation. Make a content dump and then select the most interesting information. Use the content to draft an outline.
Outlines help formulate the overall structure better than going straight into designing the poster. Mimic the standard poster structure in your outline using section headlines as separators. Go further and separate the content into the columns they’ll be placed in.
Step 3: Write the content
Write or rewrite the content for the sections in your poster presentation. Use the text in your research paper as a base, but summarize it to be more succinct in what you share.
Don’t forget to write a catchy title that presents the problem and your findings in a clear way. Likewise, craft the headlines for the sections in a similar tone as the title, creating consistency in the message. Include subtle transitions between sections to help follow the flow of information in order.
Avoid copying/pasting entire sections of the research paper on which the poster is based. Opt for the storytelling approach, so the delivered message results are interesting for your audience.
Step 4: Put it all together visually
This entire guide on how to design a research poster presentation is the perfect resource to help you with this step. Follow all the tips and guidelines and have an unforgettable poster presentation.
Moving on, here’s how to design a research poster presentation with PowerPoint Templates . Open a new project and size it to the standard 48 x 36 inches. Using the outline, map out the sections on the empty canvas. Add a text box for each title, headline, and body text. Piece by piece, add the content into their corresponding text box.

Transform the text information visually, make bullet points, and place the content in tables and timelines. Make your text visual to avoid chunky text blocks that no one will have time to read. Make sure all text sizes are coherent for all headings, body texts, image captions, etc. Double-check for spacing and text box formatting.
Next, add or create data visualizations, images, or diagrams. Align everything into columns and sections, making sure there’s no overflow. Add captions and legends to the visualizations, and check the color contrast with colleagues and friends. Ask for feedback and progress to the last step.
Step 5: Last touches
Time to check the final touches on your poster presentation design. Here’s a checklist to help finalize your research poster before sending it to printers or the virtual summit rep.
- Check the resolution of all visual elements in your poster design. Zoom to 100 or 200% to see if the images pixelate. Avoid this problem by using vector design elements and high-resolution images.
- Ensure that charts and graphs are easy to read and don’t look crowded.
- Analyze the visual hierarchy. Is there a visual flow through the title, introduction, data, and conclusion?
- Take a step back and check if it’s legible from a distance. Is there enough white space for the content to breathe?
- Does the design look inviting and interesting?
An often neglected topic arises when we need to print our designs for any exhibition purpose. Since A0 is a hard-to-manage format for most printers, these poster presentations result in heftier charges for the user. Instead, you can opt to work your design in two A1 sheets, which also becomes more manageable for transportation. Create seamless borders for the section on which the poster sheets should meet, or work with a white background.
Paper weight options should be over 200 gsm to avoid unwanted damage during the printing process due to heavy ink usage. If possible, laminate your print or stick it to photographic paper – this shall protect your work from spills.
Finally, always run a test print. Gray tints may not be printed as clearly as you see them on screen (this is due to the RGB to CMYK conversion process). Other differences can be appreciated when working with ink jet plotters vs. laser printers. Give yourself enough room to maneuver last-minute design changes.
Presenting a research poster is a big step in the poster presentation cycle. Your poster presentation might or might not be judged by faculty or peers. But knowing what judges look for will help you prepare for the design and oral presentation, regardless of whether you receive a grade for your work or if it’s business related. Likewise, the same principles apply when presenting at an in-person or virtual summit.
The opening statement
Part of presenting a research poster is welcoming the viewer to your small personal area in the sea of poster presentations. You’ll need an opening statement to pitch your research poster and get the viewers’ attention.
Draft a 2 to 3-sentence pitch that covers the most important points:
- What the research is
- Why was it conducted
- What the results say
From that opening statement, you’re ready to continue with the oral presentation for the benefit of your attendees.
The oral presentation
During the oral presentation, share the information on the poster while conversing with the interested public. Practice many times before the event. Structure the oral presentation as conversation points, and use the poster’s visual flow as support. Make eye contact with your audience as you speak, but don’t make them uncomfortable.
Pro Tip: In a conference or summit, if people show up to your poster area after you’ve started presenting it to another group, finish and then address the new visitors.
QA Sessions
When you’ve finished the oral presentation, offer the audience a chance to ask questions. You can tell them before starting the presentation that you’ll be holding a QA session at the end. Doing so will prevent interruptions as you’re speaking.
If presenting to one or two people, be flexible and answer questions as you review all the sections on your poster.
Supplemental Material
If your audience is interested in learning more, you can offer another content type, further imprinting the information in their minds. Some ideas include; printed copies of your research paper, links to a website, a digital experience of your poster, a thesis PDF, or data spreadsheets.
Your audience will want to contact you for further conversations; include contact details in your supplemental material. If you don’t offer anything else, at least have business cards.
Even though conferences have changed, the research poster’s importance hasn’t diminished. Now, instead of simply creating a printed poster presentation, you can also make it for digital platforms. The final output will depend on the conference and its requirements.
This guide covered all the essential information you need to know for creating impactful poster presentations, from design, structure and layout tips to oral presentation techniques to engage your audience better .
Before your next poster session, bookmark and review this guide to help you design a winning poster presentation every time.

Like this article? Please share
Cool Presentation Ideas, Design, Design Inspiration Filed under Design
Related Articles

Filed under Design • January 11th, 2024
How to Use Figma for Presentations
The powerful UI/UX prototyping software can also help us to craft high-end presentation slides. Learn how to use Figma as a presentation software here!

Filed under Design • December 28th, 2023
Multimedia Presentation: Insights & Techniques to Maximize Engagement
Harnessing the power of multimedia presentation is vital for speakers nowadays. Join us to discover how you can utilize these strategies in your work.

Filed under Google Slides Tutorials • December 15th, 2023
How to Delete a Text Box in Google Slides
Discover how to delete a text box in Google Slides in just a couple of clicks. Step-by-step guide with images.
Leave a Reply
- Create a presentation Article
- Add and format Article
- Design a presentation Article
- Share and collaborate Article
- Give a presentation Article
- Set up your mobile apps Article
- Learn more Article

Create a presentation
Create a presentation in powerpoint for the web.

With PowerPoint for the web running in your web browser, you can:
Create presentations that include images, videos, transitions, and animations.
Get to your presentations from your computer, tablet, or phone.
Share and work with others, wherever they are.
If you're using the desktop version of PowerPoint on a Windows PC, see the PowerPoint Quick Start .
If you're using the desktop version of PowerPoint on a Mac, see Office for Mac Quick Start Guides and PowerPoint for Mac Help .
Create, open, and name a presentation
Go to powerpoint.office.com .

Select New blank presentation , open a Recent file, select one of the themes , or start with a presentation template .
To name the presentation, select the title at the top and type a name.
If you need to rename the presentation, select the title and retype the name.

Add a slide
Select the slide you want your new slide to follow.
Select Home > New Slide .
Select Layout and the you type want from the drop-down.

When working in PowerPoint for the web, your work is saved every few seconds. You can select File > Save a Copy to create a duplicate copy in another location.
Or choose File > Download As to save a copy to your device.

When you're online, AutoSave is always on and saves your changes as you work. If at any time you lose your Internet connection or turn it off, any pending changes will sync as soon as you’re back online.

Need more help?
Want more options.
Explore subscription benefits, browse training courses, learn how to secure your device, and more.

Microsoft 365 subscription benefits

Microsoft 365 training

Microsoft security

Accessibility center
Communities help you ask and answer questions, give feedback, and hear from experts with rich knowledge.

Ask the Microsoft Community

Microsoft Tech Community

Windows Insiders
Microsoft 365 Insiders
Was this information helpful?
Thank you for your feedback.
Contribute to the Microsoft 365 and Office forum! Click HERE to learn more 💡
March 14, 2024
Contribute to the Microsoft 365 and Office forum!
Click HERE to learn more 💡
Top Contributors in PowerPoint: Steve Rindsberg - Jim_ Gordon - John Korchok ✅
March 11, 2024
Top Contributors in PowerPoint:
Steve Rindsberg - Jim_ Gordon - John Korchok ✅
- Search the community and support articles
- Microsoft 365 and Office
- Search Community member
Ask a new question
Start Powerpoint with the last presentation open
How do I open PowerPoint with either no presentation open or the last presentation open. When I open PowerPoint, it always starts with a blank presentation. This is not what I want.
- Subscribe to RSS feed
Report abuse
Replies (2) .
- Volunteer Moderator
Here is Microsoft's page on startup switches that you can use to start customize the way PowerPoint starts. These are all the options that are currently available. You would create a shortcut to the PowerPoint program, add the command switches to that, then start PowerPoint by double-clicking on the shortcut.
If you write a custom macro, you can use the /M switch to run that macro when PowerPoint starts. You could have the macro delete the default blank presentation. With more programming work, you could capture the name of the file that is open when you close PowerPoint, then use a startup macro to reopen that file.
Was this reply helpful? Yes No
Sorry this didn't help.
Great! Thanks for your feedback.
How satisfied are you with this reply?
Thanks for your feedback, it helps us improve the site.
Thanks for your feedback.
I created the shortcut with the /C switch, but it doesn't do what I expected. PP still opens with a blank (New) presentation. It has been years since I wrote any VBA code, so without a macro recording ability this is not a solution for me.
Thanks for the help.
Question Info
- Norsk Bokmål
- Ελληνικά
- Русский
- עברית
- العربية
- ไทย
- 한국어
- 中文(简体)
- 中文(繁體)
- 日本語
IMAGES
VIDEO
COMMENTS
💻 Download Templates Here: https://www.patreon.com/tylerstanczak🔥 PowerPoint Course (Discount): https://rebrand.ly/PowerPointCourse💌 Help me keep doing wh...
To choose a format, tap the Export button in the upper right-hand corner of the app. Select the format you want and then tap Export. Your presentation will then be saved to your device in the format you selected. Once youve saved your presentation, you can easily share it with anyone who has a Microsoft account.
PowerPoint for Android phones. You can walk into a meeting room with just a smartphone and present a slide show on a large screen. Video: Issa wirelessly sends (or "casts") the slide show from his phone to the Surface Hub screen.
Start a slide show. Tap the From Current button, then swipe left to go forward, or swipe right to go in reverse. (It's just like turning pages in a book.) Tip: To start the show from the beginning, tap Show Ribbon > Home > Slide Show > From Beginning.
Here are the steps to follow: 1. Download and install Microsoft PowerPoint from the Google Play Store. It's free to download and use. 2. Open the app. You'll need a Microsoft account to sign in and access some features. 3. Tap the plus icon at the right corner to create a new presentation.
Hello every one, in this Tutorial w'll see how to create a presentation in Microsoft PowerPoint app. so in this video you will learn how to add and edit text...
2 Simplify your design. Mobile screens are smaller and have less resolution than larger screens, so you need to simplify your design to make it clear and readable. Use fewer slides, less text ...
1. Microsoft PowerPoint. The most popular program for creating slideshows, Microsoft PowerPoint, has an official app for iPhone. Like the desktop version, you can create a new PowerPoint and edit each slide. Add your pictures, text, and transitions to make it your own.
Whether we're sending a presentation through email (either before or after a meeting), holding an online meeting or giving a webinar, high chances that someone from the audience will view it on their mobile device. So here are some simple tips on how to create your own mobile-friendly presentation. 1. Larger Text Size.
This is to show how you can prepare a PowerPoint Presentation without laptop in your Android Phone.In this video you can see how to insert picture, how to gi...
Keep Charts Easy to Read. Perhaps the most difficult part of a presentation to view on a mobile device are charts that are complicated and filled with finite data. If you are looking to keep your presentation mobile friendly, be sure to keep your charts easy to read - more data does not always make your points clearer and easier to digest.
Present slideshows with confidence. With easy-to-use presenter view, speaker notes, and live captions, Slides makes presenting your ideas a breeze. You can even present to Google Meet video calls ...
First, open your presentation in the Google slide on your mobile phone. Next, click on the new slide option at the bottom right. Finally, click on the layout you wish to add to your slide. So, if you're looking to make Powerpoint presentations then, these websites will surely help you to make ppt on mobile.
Open the slide you want to put the picture on. On the floating ribbon, switch to Insert. Tap Video or Audio and follow the prompts. Tip: To record your own audio and add it to your slide use your favorite voice recorder app on your device to record an .mp3, .wav, or .mid/.midi and follow the steps above to insert it on your slide.
Open the PowerPoint app on your mobile device and select the presentation you want to edit. Go to the slide where you want to insert the video. Tap on the "Insert" tab in the toolbar and select "Video". Choose the source of your video, such as from your device's gallery, and insert it into the slide.
Download PowerPoint by Microsoft or Office360. Install the " PowerPoint App ". Open the "PowerPoint". In office360 click on the "Plus (+)" icon. Tap on the "Presentation". Follow the steps as shown below. You need a secondary mobile phone but if you don't have a secondary mobile follow the step on the same mobile, you are ...
Follow the following steps: Make sure your cell phone and the device are connected to the same network Wi-Fi access. On the projection device, open a web browser and visit the website indicated in the PowerPoint app on your phone. Enter the access code that appears on the screen on your cell phone and press "Connect."
Check out this and make better presentation: https://bit.ly/3IWaz29 PDFelement provides a fast, affordable, and easy way to edit, convert, and sign PDFs. It ...
To do that, simply go up to the Home tab and click on New Slide. This inserts a new slide in your presentation right after the one you were on. You can alternatively hit Ctrl+M on your keyboard to insert a new blank slide in PowerPoint. To learn more about this shortcut, see my guide on using Ctrl+M in PowerPoint.
Microsoft PowerPoint is most people's go-to presentation platform, and for good reason. The mobile app mirrors the look and functionality of its desktop and web counterparts, so you won't have a ...
Create a presentation. Open PowerPoint. In the left pane, select New. Select an option: To create a presentation from scratch, select Blank Presentation. To use a prepared design, select one of the templates. To see tips for using PowerPoint, select Take a Tour, and then select Create, .
1. Open PowerPoint. Click or double-click the PowerPoint app icon, which resembles an orange box with a white "P" on it. This will open the PowerPoint templates page. If you don't have a Microsoft Office 365 subscription, you can use the website instead of the desktop app.
Select New in the upper-left corner and select File upload . Find your PowerPoint file (.pptx) in Finder (Mac) or File Explorer (Windows) and click Open . After uploading the file, Google Drive ...
Start the project. Open Clideo's Online Video Editor and click "Get started". To record a presentation and video of yourself at the same time, scroll down the navigation sidebar, click "Record", then "Screen & Camera". If prompted, allow your browser to access your camera and microphone. You can select a specific camera and microphone and ...
Step 3: Write the content. Write or rewrite the content for the sections in your poster presentation. Use the text in your research paper as a base, but summarize it to be more succinct in what you share. Don't forget to write a catchy title that presents the problem and your findings in a clear way.
Wednesday, March 27, 2024. Create a basic PowerPoint presentation and practice your presentation skills. Learn how to format text, insert graphics, alter colors, and more.
Learn everything you need to know to get started using Microsoft PowerPoint! You'll learn all the basics plus more, including: how to choose a design theme...
Set up your mobile apps Article; Learn more Article; Next: Slides and layouts Create a presentation in PowerPoint for the web. With PowerPoint for the web running in your web browser, you can: Create presentations that include images, videos, transitions, and animations. Get to your presentations from your computer, tablet, or phone.
Dear 1Emily-H. Good day! Thank you for posting to Microsoft Community. We are glad to assist. We are looking into your situation and we will update the thread shortly. Appreciate your patience and understanding and thank for your time and cooperation. Sincerely, Tin. •Beware of Scammers posting fake Support Numbers here.
These are all the options that are currently available. You would create a shortcut to the PowerPoint program, add the command switches to that, then start PowerPoint by double-clicking on the shortcut. If you write a custom macro, you can use the /M switch to run that macro when PowerPoint starts. You could have the macro delete the default ...