- Memberships
- Institutional Members
- Teacher Members
RESOURCES: Reading / Writing / Listening / Speaking / Argument / SPSE / Reading Tests / Summary / Dictogloss / Grammar / Vocab / Critical Thinking / Instant Lessons / Medical English / Graphs / New 2024 /
Academic Presentations
Academic presentations are an integral part of university study and assessment. Academic presentations may be presented individually or as a group activity but both require the key skills of planning and structuring key information. The key difference between an academic presentation and a general presentation is that it is usually quite formal and includes academic research to evidence the ideas presented. The presentation will include references to credible sources and demonstrate clearly your knowledge and familiarity of the topic.


Presentation lessons / worksheets
Click on any link to be taken to the download
Presentation Information
Intro to presentations, academic presentations, presentation phrases , what is an academic presentation , presentation ppt slides, improve your ppt slides, create effective ppt slides, a basic ppt presentation , graphs & charts, presentation feedback, marking criteria, teacher feedback form, peer feedback form, peer-to-peer feedback form, terms & conditions of use, academic presentation information.
- Good Presentations
- Structure / organisation
- Signposting Language
Giving a good academic presentation
- Think about the aim of your presentation and what you want to achieve.
- Concentrate on your audience: who they are and what they (want to) know.
- Choose the topic that interests you: involvement and motivation are key to confidence.
- Give your presentation a clear and logical organization so that everyone can follow.
- Present information visually : this adds interest to your talk and makes it easier to follow.
- Practise giving your presentation until you are familiar with the key points; this way you may discover any potential problems and check the timing. Besides, practice will also make you feel more confident.
Basic outline / structure
- Introduction: introduce the topic, some basic background, thesis (your stance or argument).
- Outline: provide basic bullet points on the key parts of the presentation.
- Main body: divide the main body into sections.
- Evaluation: always include evaluation. This can be a separate section or part of the main body.
- Conclusion: summarise key points, restate the thesis and make a recommendation / suggestion / prediction.
- Reference list: create one slide with all your sources.
- Questions : be prepared to answer questions.
- Cope with nerves: breathe deeply; it calms you down and stops you from talking too quickly.
- Control your voice: speak clearly and try to sound interesting by changing intonation and rhythm.
- Watch your body language: try to give the impression that you are relaxed and confident.
- Maintain eye contact with your audience: it keeps them interested in what you are saying. For this reason, you should not read.
- Provide visual information, but do not give too many facts at a time. Give your audience enough time to take them in.
- Keep attention by asking rhetorical questions.
Advanced Signposting Language –
key language phrases for presentation
Presentation Speaking Criteria
This i s a basic criteria to assess presentation speaking skills. It has three key criteria: Language accuracy & language range, fluency & pronunciation, and presentation & engagement. Example / Level: ** *** [B1/B2/C1] TEACHER MEMBERSHIP
An Introduction to Academic Presentations
introduction to presentations (new 2023).
This lesson is designed to introduce students to academic presentations. It contains information on how to plan, structure, and deliver an academic presentation. It includes a listening worksheet, presentation signposting phrases and a mini-presentation activity. Example . Level: ** * ** [B1/B2/C1] TEACHER MEMBERSHIP / INSTITUTIONAL MEMBERSHIP
£4.50 – Add to cart Checkout Added to cart
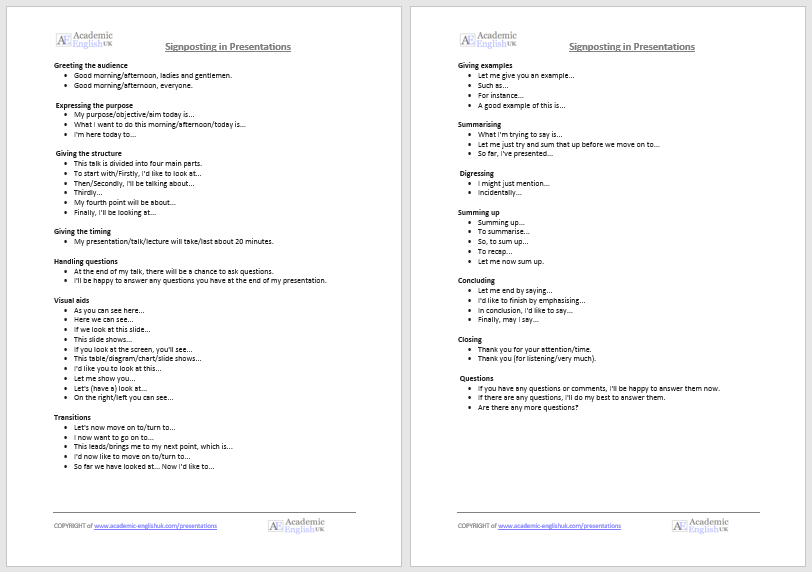
Presentation Phrases (Signposting Language)
presentation phrases sheet : a range of standard english phrases .
Suitable phrases to use for greeting, structuring, examples, transitions summarising and concluding .
Free Download
What is an Academic Presentation?
Presentation Worksheet
This lecture discusses the key ideas of giving an academic presentation including referencing, signposting, delivery and rehearsal. 2-page listening worksheet with answers. A great introduction to giving a presentation. Example. Level *** ** [ B1/B2/C1] Video [7:00] / MP3 / TEACHER MEMBERSHIP / INSTITUTIONAL MEMBERSHIP
Improve your PPT Slides
Improve your Presentation PowerPoint Slides
These are PPT slides from the above video or go here . It’s a great way to explain how to present effective slides by using the correct fonts, focusing on key points and using animation to help audience engagement. The slides can be adapted to sort your style and method of teaching. Video [12:00] Level *** ** [B1/B2/C1] / TEACHER MEMBERSHIP / INSTITUTIONAL MEMBERSHIP
£4.00 – Add to cart Checkout Added to cart
Create PPT slides people will remember – Duarte Inc [CEO]
Harvard Business Review: How to plan an informed presentation and what is needed to create really effective slides that keep an audience engaged. More HBR listening worksheets are Example Video [03:08] Level: ** * * * [B2/C1] / TEACHER MEMBERSHIP / INSTITUTIONAL MEMBERSHIP
A Basic PPT Presentation
This is a video example of a ‘basic’ presentation on Domestic Violence using signposting language and a basic structure
Memberships (Teacher / Institutional)
Full access to everything - £100 / £200 / £550
Join today * x
Academic Presentation Marking Criteria
A basic criteria that can be used to assess and grade a students’s presentation – full criteria in paid version (below).

online resources

Medical English

New for 2024

DropBox Files
Members only

Instant Lessons

Marking Criteria

OneDrive Files

Critical Thinking

Topic-lessons

Feedback Forms

6-Week Course

SPSE Essays

Free Resources

Charts and graphs

AEUK The Blog

12-Week Course
Advertisement:.

- Schools & departments

Presentations and posters
Guidance and tips for effective oral and visual presentations.
Academic presentations
Presenting your work allows you to demonstrate your knowledge and familiarity of your subject. Presentations can vary from being formal, like a mini lecture, to more informal, such as summarising a paper in a tutorial. You may have a specialist audience made up of your peers, lecturers or research practitioners or a wider audience at a conference or event. Sometimes you will be asked questions. Academic presentations maybe a talk with slides or a poster presentation, and they may be assessed. Presentations may be individual or collaborative group work.
A good presentation will communicate your main points to an audience clearly, concisely and logically. Your audience doesn’t know what it is you are trying to say, so you need to guide them through your argument.
There are a few key points that you should consider with any sort of presenting:
- What is the format? Is it a poster, a talk with visual material or a video?
- What is the purpose? Is it to summarise a topic; report the results of an experiment; justify your research approach?
- Who is your audience? Are they from your tutorial group, course or is it a wider audience?
- What content needs to be included? Do you need to cover everything, just one topic or a particular aspect? How much detail is expected?
- How should it be organised? This is often the trickiest part of designing a presentation and can take a few attempts.
Planning a presentation
Different people take different approaches to presentations. Some may start by doing some reading and research, others prefer to draft an outline structure first.
To make an effective start, check your course materials for the format you need to use (e.g. handbooks and Learn pages for style guidelines). If it is an oral presentation, how long do you have? If it will be assessed, have a look at the marking criteria so you know how you will be marked. (If you do not use the required formatting you may be penalised.) Do you need to allow time for questions?
One way to think about the content and draft a rough structure of your presentation is to divide it into a beginning, middle and end.
- The beginning: How are you going to set the scene for your audience and set out what they can expect to gain from your presentation? This section should highlight the key topic(s) and give any necessary background. How much background depends on your audience, for example your peers might need less of an introduction to a topic than other audiences. Is there a central question and is it clear? If using slides, can it be added as a header on subsequent slides so that it is always clear what you are discussing?
- The middle: How are you going tell the story of your work? This section should guide your audience through your argument, leading them to your key point(s). Remember to include any necessary evidence in support. You might also want to include or refer to relevant methods and materials.
- The end: What is your conclusion or summary? This section should briefly recap what has been covered in the presentation and give the audience the final take-home message(s). Think about the one thing you want someone to remember from your talk or poster. It is usually also good practice to include a reference or bibliography slide listing your sources.
Alternatively, you could start at the end and think about the one point you want your audience to take away from your presentation. Then you can work backwards to decide what needs to go in the other sections to build your argument.
Presentation planner worksheet (pdf)
Presentation planner worksheet (Word docx)
Presentation planner (Word rtf)
Using the right language can really help your audience follow your argument and also helps to manage their expectations.
Guiding your audience (pdf)
Guiding your audience (Word rtf)
Oral presentations – practise, practise, practise!
Giving a talk can be daunting. If you have a spoken presentation to give, with or without slides, make sure you have time to rehearse it several times.
Firstly, this is really good at helping you overcome any nerves as you’ll know exactly what you are going to say. It will build your confidence.
Secondly, saying something aloud is an effective way to check for sense, structure and flow. If it is difficult to say, or doesn’t sound right, then the audience may find it difficult to follow what you are trying to say.
Finally, practising helps you know how long your presentation will take. If your presentation is being assessed, you may be penalised for going over time as that would be unfair to other presenters (it is like going over your word count).
If you can, find out what resources and equipment you will have when you present. It is usually expected that presenters will wear or use a microphone so that everyone can hear. But you will still need to remember to project your voice and speak clearly. Also think about how you are going to use your visual material.
IS Creating accessible materials - PowerPoint presentations
IS LinkedIn Learning - online skills development
Making a video
There is no need to use expensive specialist equipment to make a recorded presentation. The Media Hopper Create platform allows film makers to create, store, share and publish their media content easily. You can create presentations using the Desktop Recorder on a PC or Mac.
All University of Edinburgh students are provided with an account on the Media Hopper service allowing you to record and upload media to your personal space and publish to channels.
You can also use your mobile phone or tablet to make a video presentation. The DIY Film School is an online course covering the basics of shooting video on a mobile device, filming outdoors and indoors and how to get the best audio. Some materials from LinkedIn Learning are relevant to the DIY Film School and include editing advice.
IS Media Hopper Create
IS DIY Film School online course
IS LinkedIn Learning and the DIY Film School
Poster presentations
A poster is a way of visually conveying information about your work. It is meant to be a taster or overview highlighting your key points or findings, not an in-depth explanation and discussion. Your poster should communicate your point(s) effectively without you being there to explain it.
The trickiest thing with poster presentations can be the limited space and words you have. You will need to think critically about what it is important to present.
If the poster is assessed, or is for an event such as a conference, there may be a size and format which you need to follow (e.g. A1 portrait or A0 landscape). Your title should be clear. Aim to make your poster as accessible as possible by considering the type size and font, colours and layout. It is usually good practice to include your name and email address so people know who you are and how to contact you.
Information Services (IS) have a range of resources including help on using software such as PowerPoint to make a poster and guides to printing one.
IS uCreate user guides and advice on poster printing
Standing up and talking can be intimidating; so can being filmed. Anxiety and stress can get in the way of performing effectively.
The Student Counselling Service offer advice and workshops on a variety of topics. They have produced a helpful e-booklet about stress, why we need it and how to manage our stress levels to strike the right balance.
Student Counselling service
Self-help online courses and workbooks on anxiety, stress and mental wellbeing
Stress: A short guide for students (pdf booklet)
Information Services (IS) provides access to a range of support and training for software provided by the University. This includes training and advice on LinkedIn Learning.
IS Digital skills and training
IS LinkedIn Learning
IS Microsoft Office 365 suite
Prezi is a popular alternative to PowerPoint but is often inaccessible to disabled people. Therefore, it is recommended that Prezi is not used for academic presentations. However, if you have to use Prezi, there are some steps you can take to improve your presentation.
IS PREZI and accessibility issues
If you are presenting at an external event, it may be appropriate to use University branding.
University brand guidelines and logos (Communications and Marketing)
This article was published on 2024-02-26
Ten smart ways to ace your next academic presentation
Using examples and practical tips, Dorsa Amir explains the techniques that ensure your presentation communicates its message effectively – from slide design to structuring your talk


You may also like

Popular resources
.css-1txxx8u{overflow:hidden;max-height:81px;text-indent:0px;} Rather than restrict the use of AI, embrace the challenge
Emotions and learning: what role do emotions play in how and why students learn, leveraging llms to assess soft skills in lifelong learning, how hard can it be testing ai detection tools, a diy guide to starting your own journal.
As a presenter, your main job is to guide the audience through your argument in the clearest, most engaging, most efficient way possible. You must respect the audience’s time and attention. This means being mindful of how long your presentation is, what you’re including in your slides, and importantly, how it is all packaged and presented.
A great presenter is one who is intentional: each element in the presentation serves a clear function and is intended to support the audience’s understanding of the content.
Here are 10 tips to keep in mind to ensure your presentation hits the mark
1. Any time you put something on your slides, its primary purpose is to help the audience, not you
Many presenters will add copious text or other elements to help themselves remember points they want to make. However, this is usually less helpful for the audience (most of this information belongs in presenter notes, and not on the slides). Think of yourself like a director of a movie. What do you want the audience to focus on at any given moment? What features on your slides will enhance the verbal point you are making and which will distract from it? Be intentional about what you include on your slides, and only include elements that serve a clear and helpful function for the audience.
2. Condense text to the main question or key points of the slide
It may be tempting to write out snippets of the script wholesale and add them to the slides, but this often results in PowerPoint karaoke, where the audience is simply watching you read the text out loud to them. While text is certainly useful for helping to concretise points or make slides more accessible, be judicious about what you include. Each slide should make one or two clear points. It’s better to have more slides with less content than fewer slides that are jam-packed. Of course, the amount of text you include will also be determined by the type of presentation you are giving. If students will be using your slides as a study aid, for example, you may want to include more information than if you are creating a research talk for a conference.

3. Avoid using too many colours, fonts or animations
Consider elements such as fonts, colours and animations as tools in your presentation toolkit. These elements should be used sparingly and only when they serve a clear purpose. I’m sure you’ve all attended a talk with colours bright enough to burn your retinas or crammed with “fun” fonts such as Comic Sans. Try to refrain from doing that. Animations that allow certain elements to appear or disappear along with your presentation — such as bullet points that appear as you say them — can help direct the attention of the audience. Colour contrasts are primarily helpful for visual segmentation or bringing attention to particular elements. Fonts, colours or flashy animations that are purely decorative are more distracting than helpful.

4. Avoid colour combinations that are hard to read
Be mindful of how colours interact with each other to either facilitate or inhibit comprehension. White text on black (or the reverse) is often a safe bet. Don’t overdecorate! (See above).
5. If you’re showing a graph, orient the audience to the axes before plotting the data and make sure they can actually see all of it
I typically show the axes and labels first, making sure to orient everyone to the variables and how they are going to be visualised, and then I reveal the data. This ensures that everyone understands how to interpret the visualisation they are about to see. It is also helpful to restate the key prediction and tell the audience what they should expect to see if the prediction is true, and then plot the data. Use large sizes and clear fonts. I’ve heard way too many people say things like: “You probably can’t read this but…” To that, I want to say: “But you’re the one making the slide! You did this to us!” Don’t be that person.

6. Use high-resolution images or videos
This is especially true for presentations that will be projected onto a larger surface. If it’s fuzzy on your computer screen, it will look even fuzzier when magnified and projected. Try to integrate high-resolution images and vector graphics to avoid this. When your images contain text, delete those portions and re-enter the text in text boxes that will scale up much more clearly when magnified.
7. When illustrating results, identify one or two key graphs to make your point
The temptation is often to show the audience every single result you found, but this dilutes the overall message you are trying to send. There’s no need to visualise everything: you should focus on the key graphs that tell most or all of the story. If you have built up the presentation in the right way, when the audience see your data visualisation, they will immediately understand what you found and whether it supports your hypothesis. That’s how clear and accessible the graph should be.

8. Don’t overload the audience with unnecessary complex jargon or acronyms
Every time you introduce a new term or a brand new acronym (BNA), you are asking the audience to do you a favour and commit this new item to working memory. The audience doesn’t know your presentation; they don’t know what’s going to be important later and what isn’t. They’re trusting that you are only presenting information to them that is relevant and they’re doing their best to follow along. Make this process as easy and enjoyable as possible for them. Be judicious with what you ask them to remember or commit to memory. If you can explain a concept without jargon, avoid the jargon!
9. Enhance accessibility
The Web Accessibility Initiative has a great set of guidelines that I will summarise here. Use easy-to-read fonts in large sizes. Make sure there is enough contrast between colours to make them discernible. When giving virtual talks, consider turning on automatic closed captioning. If it’s feasible, provide annotated slide handouts. During the presentation itself, speak clearly and loudly, avoiding unnecessarily complex vocabulary or culturally specific idioms. Where possible, use a microphone. You should also try to verbally describe pertinent parts of visual information on your slides, such as graphics or videos.
10. Use outline slides and marker slides to segment information
Research shows that we understand and remember information better when it comes in bite-size pieces; think of chapters in a book. To incorporate this structure into your talk, break apart the presentation into smaller pieces. Always incorporate an outline slide that previews the structure of the talk and gives the audience a sense of what to expect. Also, use marker slides to communicate that a new section is beginning. And make sure to wrap up each section with a summary slide.

Dorsa Amir is a postdoc in the department of psychology at the University of California, Berkeley.
If you would like advice and insight from academics and university staff delivered direct to your inbox each week, sign up for the Campus newsletter .
Rather than restrict the use of AI, embrace the challenge
Let’s think about assessments and ai in a different way, how students’ genai skills affect assignment instructions, how not to land a job in academia, contextual learning: linking learning to the real world, three steps to unearth the hidden curriculum of networking.
Register for free
and unlock a host of features on the THE site
Princeton Correspondents on Undergraduate Research
How to Make a Successful Research Presentation
Turning a research paper into a visual presentation is difficult; there are pitfalls, and navigating the path to a brief, informative presentation takes time and practice. As a TA for GEO/WRI 201: Methods in Data Analysis & Scientific Writing this past fall, I saw how this process works from an instructor’s standpoint. I’ve presented my own research before, but helping others present theirs taught me a bit more about the process. Here are some tips I learned that may help you with your next research presentation:
More is more
In general, your presentation will always benefit from more practice, more feedback, and more revision. By practicing in front of friends, you can get comfortable with presenting your work while receiving feedback. It is hard to know how to revise your presentation if you never practice. If you are presenting to a general audience, getting feedback from someone outside of your discipline is crucial. Terms and ideas that seem intuitive to you may be completely foreign to someone else, and your well-crafted presentation could fall flat.
Less is more
Limit the scope of your presentation, the number of slides, and the text on each slide. In my experience, text works well for organizing slides, orienting the audience to key terms, and annotating important figures–not for explaining complex ideas. Having fewer slides is usually better as well. In general, about one slide per minute of presentation is an appropriate budget. Too many slides is usually a sign that your topic is too broad.

Limit the scope of your presentation
Don’t present your paper. Presentations are usually around 10 min long. You will not have time to explain all of the research you did in a semester (or a year!) in such a short span of time. Instead, focus on the highlight(s). Identify a single compelling research question which your work addressed, and craft a succinct but complete narrative around it.
You will not have time to explain all of the research you did. Instead, focus on the highlights. Identify a single compelling research question which your work addressed, and craft a succinct but complete narrative around it.
Craft a compelling research narrative
After identifying the focused research question, walk your audience through your research as if it were a story. Presentations with strong narrative arcs are clear, captivating, and compelling.
- Introduction (exposition — rising action)
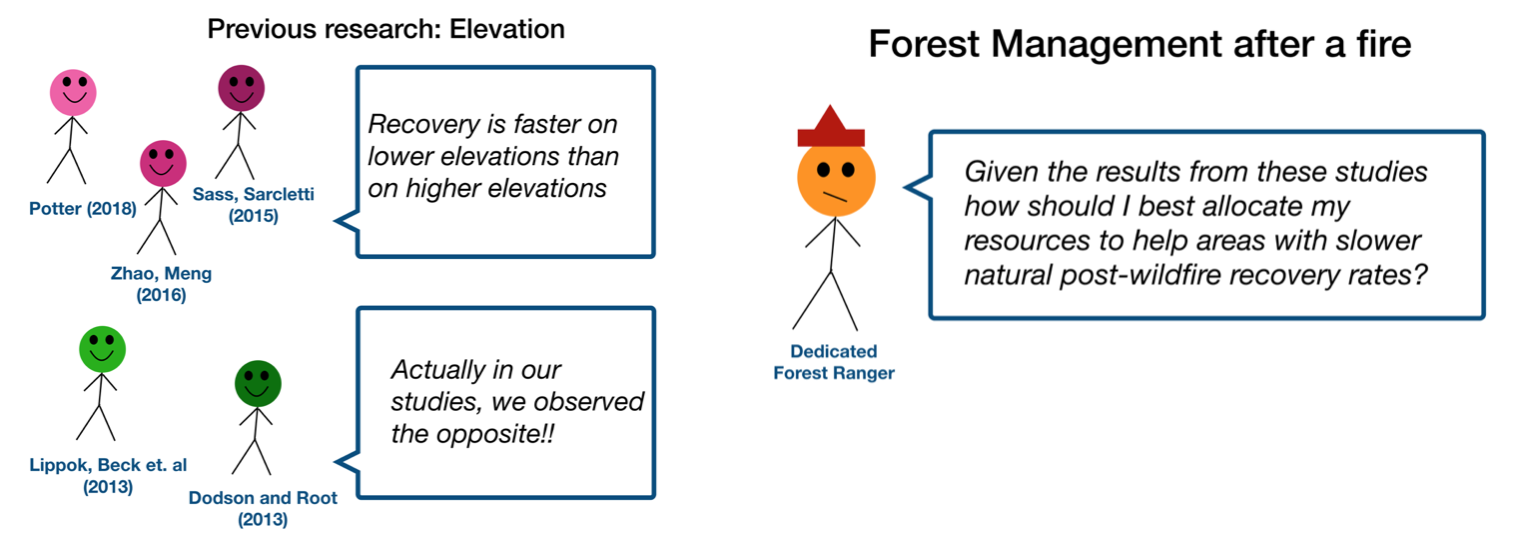
Orient the audience and draw them in by demonstrating the relevance and importance of your research story with strong global motive. Provide them with the necessary vocabulary and background knowledge to understand the plot of your story. Introduce the key studies (characters) relevant in your story and build tension and conflict with scholarly and data motive. By the end of your introduction, your audience should clearly understand your research question and be dying to know how you resolve the tension built through motive.
- Methods (rising action)
The methods section should transition smoothly and logically from the introduction. Beware of presenting your methods in a boring, arc-killing, ‘this is what I did.’ Focus on the details that set your story apart from the stories other people have already told. Keep the audience interested by clearly motivating your decisions based on your original research question or the tension built in your introduction.
- Results (climax)
Less is usually more here. Only present results which are clearly related to the focused research question you are presenting. Make sure you explain the results clearly so that your audience understands what your research found. This is the peak of tension in your narrative arc, so don’t undercut it by quickly clicking through to your discussion.
- Discussion (falling action)
By now your audience should be dying for a satisfying resolution. Here is where you contextualize your results and begin resolving the tension between past research. Be thorough. If you have too many conflicts left unresolved, or you don’t have enough time to present all of the resolutions, you probably need to further narrow the scope of your presentation.
- Conclusion (denouement)
Return back to your initial research question and motive, resolving any final conflicts and tying up loose ends. Leave the audience with a clear resolution of your focus research question, and use unresolved tension to set up potential sequels (i.e. further research).
Use your medium to enhance the narrative
Visual presentations should be dominated by clear, intentional graphics. Subtle animation in key moments (usually during the results or discussion) can add drama to the narrative arc and make conflict resolutions more satisfying. You are narrating a story written in images, videos, cartoons, and graphs. While your paper is mostly text, with graphics to highlight crucial points, your slides should be the opposite. Adapting to the new medium may require you to create or acquire far more graphics than you included in your paper, but it is necessary to create an engaging presentation.
The most important thing you can do for your presentation is to practice and revise. Bother your friends, your roommates, TAs–anybody who will sit down and listen to your work. Beyond that, think about presentations you have found compelling and try to incorporate some of those elements into your own. Remember you want your work to be comprehensible; you aren’t creating experts in 10 minutes. Above all, try to stay passionate about what you did and why. You put the time in, so show your audience that it’s worth it.
For more insight into research presentations, check out these past PCUR posts written by Emma and Ellie .
— Alec Getraer, Natural Sciences Correspondent
Share this:
- Share on Tumblr

- Log in
- Site search
6 steps to a successful presentation
If you feel nervous at the thought of having to stand up in front of your peers and deliver a presentation you're not alone, but you're unlikely to get through university without having to do it. Follow these six steps to ensure success
Your tutor or lecturer mentions the word 'presentation' and the first thing you do is panic but there's no need.
Depending on your subject, you might be expected to summarise your reading in a seminar, deliver the results of a scientific experiment, or provide feedback from a group task. Whatever the topic, you'll usually be presenting to your tutor and fellow students.
While getting up and making your case in front of an audience isn't easy, especially when you're not used to it, it really is good practice as many graduate employers use presentations as part of the recruitment process.
To help ensure that your presentation stands out for the right reasons, Graham Philpott, head of careers consultancy at the University of Reading provides some advice.
Prepare carefully
Give yourself plenty of time to prepare thoroughly, as a last-minute rush will leave you flustered when it comes to delivering your presentation.
'There are two important things to think about when preparing for a presentation,' says Graham. 'What do you want the audience to do once you have finished, and who are the audience? If you know these two things, preparation becomes so much easier.'
Plan out the structure and format of your presentation. 'A simple and successful way to structure your presentation is - agenda, message, summary - or to explain it a different way, tell them what you're going to tell them, tell them, then tell them what you've just told them,' advises Graham.
To help plan your content, Graham explains that 'there are only two purposes to a presentation, one is to inform, the other is to persuade. So, your content will either tell the audience what they need to know or convince them.' To make sure you stay on track ask yourself what you're hoping to achieve.
You can make detailed notes as part of your planning, but don't rely on these on the day, as reading from a prepared text sounds unnatural. If you want to take a memory aid with you use small index cards, as referring to A4 sheets of paper during your presentation can be distracting and highlight your nerves if your hands shake.
At the planning stage also consider the timings of your presentation. Time limits are set for a reason - falling short or going over this limit will likely result in a loss of marks, especially if it's part of an assessment or exam.
Don't forget to also devise answers to common questions you may be asked at the end of your presentation. You might think this adds to your workload, but it actually prevents you from being caught off guard on the day.
If you have to give a group presentation, discover three tips for successful group work .
Use visuals wisely
'A presentation doesn't necessarily need a visual aid,' says Graham. 'However, if you decide to use them, they can help the audience understand what you're saying, and give you a framework to talk around.'
Bear in mind that visual aids should complement your oral presentation, not repeat it, nor deliver the presentation for you. While your slides should offer a summary of points, or illustrate the concept you're discussing, you need to remember that you are the main focus.
When putting together your slides and visual aids:
- Keep them simple . Stick to one idea per slide to avoid cluttering them and use short phrases or sentences.
- Think about accessibility . Does the design of your presentation interfere with its readability? Will everyone in the audience be able to read your slides? To ensure your presentation is accessible minimise the number of slides, use high contrast colours and a large, clear font. If using graphics, make them as simple as possible and avoid over-complicated charts or graphs. If using videos, make sure they are captioned.
- Don't let them distract you . If you intend to provide hand-outs for your audience, distribute them at the beginning or end of your presentation. Doing it halfway through can disrupt your flow.
Don't fall into the trap of merely reading aloud what is written on your slides - instead use them as a starting point from which you can expand and develop your narrative.
It's also worth pointing out that a presentation is only as good as its content. Your presentation could look visually beautiful, but if it lacks knowledge or substance your audience is unlikely to be fooled.
Consider your audience
Speaking of your audience, it's essential that you keep them in mind at every stage - from the preparation of your presentation right through to the delivery.
To show that you have thought about the audience consider how much background information they will need. Do they already have some knowledge of the topic you're presenting?
Spending the first half of your presentation telling an audience what they already know will be frustrating for them. Equally, if you go straight into the detail, they may get lost. It's vital you get the balance right.
The tone of your presentation will also depend on your audience - if its purpose is to demonstrate to your seminar group that you've understood a certain topic you could strike a light-hearted tone. If it's an assessed piece of work on the other hand, you'll need to be more serious.
Practice with a friend
Before the main event you should run through your presentation in full more than once. 'It's also a good idea to practice the presentation out loud. This will give you a much better idea of how long it takes, and whether there are any parts that don't flow very well,' adds Graham.
'It might feel cringey, but practicing to an audience - friends, coursemates, family, your careers consultant if it's for a job - will really help too. Their feedback will be especially important when it comes to checking that your main point is getting through, loud and clear.'
Ask your practice audience to sit at a distance to check that everyone attending can hear you speaking and that they can see the slides. If possible, try to do this practice run in the room you'll be giving your presentation in.
This level of preparation will enable you to work out whether your presentation is the right length when spoken aloud and give you the chance to get used to expressing yourself in front of others.
While you practice make sure that you:
- Speak slowly - nerves can make you rush but try and moderate your speech. Take a breath at the end of every sentence or point you make.
- Face the audience - to give a confident impression regularly make eye contact with your audience. If using a screen stand at a 45-degree angle so you have a good view of both your audience and your slides. Don't turn your back on your audience.
- Leave time for questions - factor this into your overall time limit and be prepared to field any questions that come your way.
Another good tip is to record the practice run - you can do this on your phone or on Teams or Zoom. Play it back and reflect on it. Ask yourself if it's clear, concise, and if it makes sense. Pay particular attention to less obvious factors such as your facial expression and mannerisms. Do you come across well? Are you talking too fast or waffling? Are you smiling and personable?
Be positive
Leading up to the presentation try developing a positive attitude. This may seem easier said than done, especially if you're nervous but it will make a huge difference to how you perform.
Acknowledge your nervousness but don't let negative thoughts win. Instead of thinking about all the things that could go wrong visualise a positive outcome and focus on what you can do to ensure it runs smoothly.
On the day nerves can conspire to make you think that the room is against you, but this isn't the case. Remember that your tutor and your coursemates want you to succeed. To set your presentation up for success make sure your introduction is strong. Start with a confident attitude and a smile.
Don't rely on technology
We've all witnessed the agony of a presenter struggling with a faulty USB stick, failing to connect to the internet or not being able to get the projector to work. However, with a little bit of planning, you can minimise the risk of technology tripping you up.
If possible, test your presentation beforehand with the same equipment that you'll be using during the main event. Otherwise, arrive early on the day and have a run through. Make sure you know how to link your laptop to the projector and if your presentation includes links to web pages or video clips make sure these lead to the right places and are working beforehand. Bring back-ups of your documents and print out a few copies of the slides to share if things go wrong.
And if a piece of technology does fail, don't panic. It will happen to everyone in the room at some point. If you prove yourself prepared in the face of a disaster and handle it with grace it could impress your tutor more than if everything went according to plan.
Find out more
- Learn more about university life .
- Discover how to manage student stress .
- Find out how to get the most out of lectures and seminars .
How would you rate this page?
On a scale where 1 is dislike and 5 is like
- Dislike 1 unhappy-very
- Like 5 happy-very
Thank you for rating the page

How to give the perfect presentation
What makes a great presentation? There are lots of different ways to deliver a presentation, but there are five key factors that will make it a success.
Are you covering everything you have been asked to talk about? Does the information suit your audience? Make sure your content is simple, addresses the purpose of the presentation and is easy for the audience to follow.
If possible, try to avoid memorising a script, as it might throw you off when you realise you’ve tripped up. Instead, make the effort to understand your content and the topic you’re presenting. The more confident you are of your own knowledge, the easier it will be to speak about.
2. Delivery
Talk clearly and not too fast or too slow. Also make sure you’re talking to your audience, not your screen!
Don’t forget that your tone of voice can also affect your delivery. You can be formal or more casual when delivering a presentation but try not to be monotone. Putting emphasis and emotion into your words will show your passion for the subject and make it more interesting for others.
3. Body language
Good eye contact is key during a presentation. It will help your audience to engage with you. Plus, picking three or four people in the room to look at regularly helps deal with nerves, as it feels like you're talking just to them.
Use gestures to emphasise your points but watch out for nervous actions like touching your face or swaying from side to side. Most importantly, get comfortable before you start presenting and remember to smile!
4. Practise
Once you’re happy with your presentation, stand up in front of a room (even if it’s empty) and rehearse your slides. This will help you get used to the content and the pace of the presentation. It will also improve your confidence. Get someone to watch you or use your phone to film yourself. It’s not easy to watch yourself back but it will help you spot any nervous actions or places where you keep slipping up.
5. Be positive
Visualise the presentation being a success. Try to push all the negativity out of your brain and tell yourself the presentation will go well.
Your audience is probably looking forward to hearing from you and won’t be as critical as you are about your own presentation skills, so relax, you’ll do great!
Related Content
The perfect study set-up, what is a lecture, eight steps to designing the perfect presentation, what is a personal tutor.

Giving presentations
- Introduction
Thinking about your audience
Planning your presentation, notes, handouts and visual aids, good slide design.
- Delivering your presentation
- Poster presentations
Useful links for giving presentations
- Presentations (online) A Study Advice guide to giving online presentations
- Study Advice Helping students to achieve study success with guides, video tutorials, seminars and one-to-one advice sessions.
- Presentation skills A Prezi on what to consider when planning and delivering a presentation from the University of East Anglia.
- Group work LibGuide Expert guidance on successful group work at university.
- Presentation skills for quivering wrecks by Bob Etherington Ebook (available to University of Reading members only). Aimed at business presenters, but good advice for all.
Good preparation is key to a good presentation. If you have considered your audience, know what messages you want to communicate, and have thought about the clearest way of communicating these messages, you can go into your presentation with confidence. Keeping things simple and not including too much in either your presentation itself, or your visual aids, means you will be able to pace your presentation well and your audience will appreciate the information you wish to communicate. The advice on this page shows you how to prepare a practically perfect presentation!

- Who will be in the audience? Students, lecturers, fellow researchers, experts in the field, business people, general public, a mixture?
- Consider your purpose – to inform, show progress, persuade, sell, disseminate results, teach, or introduce a new idea?
- Will your presentation be an overview, basic introduction, develop an existing idea, go over old ground from a new perspective, summarise information, challenge beliefs, or show something new?
It is difficult to take in a lot of detailed information when listening. Therefore, it is very important that your presentation has a clear structure so your audience can follow it.
In a 10-15 min presentation you will only have time to make 3 or 4 main points. You will have more impact if your points are clear, simple, relevant, and direct.
Beginning : Introduce yourself. Outline the aims of your talk and what you will cover in the presentation. Start with an attention grabber, such as a picture, an everyday example, or a rhetorical question.
Middle : Your points should lead logically from each other. What does the audience need to know first in order to understand your subject? Then what do they need to know? What evidence will you use to support these points and convince the audience? Have clear sections or headings to structure the middle section and lead from one point to another.
End : Avoid introducing new information at this point. Summarise the main things you want the audience to remember. End positively with a strong concluding sentence, not an apology. Leave time for questions. If you are presenting to an external audience, have your contact details available for people.
When preparing your material, think about what you will be comfortable saying – don't include anything that you aren't happy with or don't have confidence in. Do your research and check your facts so that you can feel secure in your knowledge. Steer clear of jokes and humour if it doesn't come naturally to you.
Planning a group presentation can take longer than you think, as you have to arrange times to meet and coordinate everyone's contributions. Use the links below to help you work out what you need to do to make your group presentation succeed.
- Group work LibGuide Expert guidance for successful group work at university.
Many people are tempted to write their presentation out fully and read it aloud, but this isn't enjoyable for the speaker or the audience; it is hard to get vocal expression and connection with the audience when reading aloud, and a written script is often more stilted and formal than natural speech. A better idea is to speak normally and use notes to guide you.
- It may be better to use a few file cards for your notes rather than a sheet of A4 paper – less flimsy and less tempting to hide behind!
- Use headings and key words to remind you of the main points and their order
- Less is more – you want to be able to read them quickly at a glance
- If you are using visual aids, note cues showing when you want to change slide
- You can write reminders to yourself – like "slow down" if you tend to talk fast
- Note down things you definitely don't want to get wrong: names, dates, statistics
- Number your cards in case they get mixed up or dropped.
If you have been asked to prepare a handout , don't try to include too much information or your audience will spend more time reading it than listening to you. Include:
- a brief outline of your talk
- a summary of data
- references and further reading on your topic
- contact details
There are also various visual aids you may use. The most commonly used include PowerPoint slides, Prezi, video clips and posters. You might also use a flipchart or whiteboard, or have some physical materials you want to show.
If you use visual aids, keep them simple and make sure that they support and add emphasis to your argument – not distract the audience from what you are saying. Whatever you use, make sure you know how to find and use any necessary technology or equipment.
Visual aids can give you confidence, help you to remember the structure of your talk and ensure that the audience does not look at you all the time. They should enhance and illustrate what you say, making it easier for the audience to understand and remember. They are not supposed to dominate or distract from your talk.
Here are some common options and issues you may need to consider:
PowerPoint slides
These are common and easy to use, but may take a few minutes to set up, so plan this into your timing. Ensure you have a backup plan in case the technology doesn't work on the day, such as having the slides on a memory stick as well as on the network drive, or having handouts of the slides to give out. Check you know how to change between slides using the mouse or a remote control. Beware of sound effects on animations!
Prezi (link below) is a non-linear alternative to PowerPoint. It provides templates that are often similar to mind-maps, and you are able to zoom in and out, and navigate round them in different ways. Be careful not to overdo the zooming and movement as it can be very disorientating for the audience. It is easy to get carried away with exploring the features of Prezi, meaning it can take far longer to prepare your presentation. However, if used well, Prezi can be a powerful presentation tool. Be aware that the free version of the software provides access to your presentations online, so there needs to be a reliable internet connection in the presentation venue.
Video clips
It can be effective to break a presentation up with a short video clip to illustrate a key point. There are many educational videos available on YouTube and via TED Talks (link below). However, make sure any videos are professional, appropriate, and relevant. Always ask yourself why you are using it and if you haven't got a good reason, leave it out. Check the sound, projection, and internet facilities in the presentation venue beforehand, and have an alternative plan in case the video won't play on the day.
Flip charts / white board
These are more suitable for small group discussions, as they simply can't be seen at the back of a large hall. Make sure you have non-permanent pens to write on the whiteboard. Also practice writing in large, clear letters so that it is easy to see.
Handouts can mean the audience doesn't have to copy down all the slides - but they can also be distracting, as people read them instead of listening. If you are presenting to a large audience (for instance at a conference) it can be expensive to provide handouts. Consider whether they can be sent via email or put on a website instead. If you're going to share them (or PowerPoint slides) electronically, it may be better to save them as PDFs.
Showing an object may be useful as a focus for discussion with a small group. It will work better as a replacement for part of your discussion (e.g. leave out some explanation) rather than reinforcing your message.
- Prezi Presentation software.
- TED talks Inspiring short educational talks.
Keep your slides simple, uncluttered, and easy to read. Just because you can have music, moving graphics, and bullet points whizzing in and out doesn't mean you have to! But if you're confident about your technical ability, some simple animation can be very effective.
30pt font and above is best for large audiences. Avoid distracting backgrounds, and keep lots of white space between lines/sections. Choose a writing colour that shows up clearly on the background (avoid green & red), and for a professional presentation, stick to simple fonts and avoid cartoons. Keep unnecessary punctuation to a minimum. If you're going to use images, make sure they are there for a reason - to illustrate your point or make it memorable.
For sources of copyright-cleared images, see the Library's list of image databases (link below).
It's a good idea to include a slide at the beginning of your presentation with your name and title, and follow this with a slide outlining your talk. End with a slide giving your contact details.
- Image and sound resources
- << Previous: Home
- Next: Delivering your presentation >>
- Last Updated: Sep 25, 2023 10:01 AM
- URL: https://libguides.reading.ac.uk/presentations
Academic presentations: Structure
- Presentation Design
- Slide design
- Conferences
- Group presentations
Jump to content on this page:
“A solid structure is the foundation of a coherent presentation, and shows the relationship between the parts and whole.” Nancy Duarte, Resonate
A presentation that has a strong, clear structure is a presentation that is easy to follow. Without structure, a presentation can be confusing to an audience. How do they know if you are going to cover what they need to know? How can they tell which slides contain the most important points? This page considers some ways that you can organise your slides to give shape to your presentation as a whole.
Basic presentation structure
Every presentation should flow like a good story. It should involve the audience directly.
- The beginning section is where you hook them. Start with the general picture then explain the specific problem and how by listening to your presentation you can solve it for them.
- The middle section should contain the main detail of your presentation, and can be organised in a number of ways (two good ones are explained below).
- Finally your end section should summarise the presentation and lead the audience to the next step.
Design your slides so that these sections look distinctive and any key points stand out.
Beginning section
This section is all about drawing the audience in; giving them a reason to want to listen to the main part of your presentation.
You can include any or all of the following:
- A really well designed title slide that grabs the attention
- A slide that gives the audience the big picture
- A slide that shows what you will be focusing on
- A slide that uses the word 'you' or 'your' in the title to connect with the audience
- A slide that tells the audience what is to come in your presentation (its structure)

After your title slide, you need slides covering these areas
Middle section structure option 1 - key points
Several authors suggest using a structure that involves an introduction followed by a middle section containing key point slides (usually 3).
The ideas is that there is a hierarchy of slides so that after each key point you have other slides that explain or add detail to that key point.
Cliff Atkinson (writer of the book Beyond Bullet Points ) suggested using a table in MSWord (similar to the one in the template that is available to download at the bottom of this page) to help you structure and plan your presentation before you even open PowerPoint. This means you can concentrate on your story before getting distracted by design and content issues. We have copy of the book in our library: Beyond Bullet Points: Beyond Bullet Points .
Middle section option 2 - sparkline
For her book Resonate Nancy Duarte looked in detail at the structure of successful presentations throughout history (even back to Lincoln's Gettysburg Address). She discovered that many have the same structural form which she calls a 'sparkline'.

This structure makes a clear distinction between what is (the position before the presentation is seen and acted upon) and what could be (the position after the presentation is seen and acted upon). The audience is introduced to the what is state at the beginning of the presentation and then switched back and forth between what could be and what is several times before ending in the what could be condition, which she calls Reward:New Bliss .
Nancy explains this better here: Sparkline Overview .
In terms of academic work the what is is the current level of knowledge or previous thinking on a subject and the what could be is the new knowledge or new thinking. The new bliss is what the audience could do or learn next now that they are aware of the change.
End section
The end of your presentation is a very powerful part because it contains your final words, the ones that the audience will take away with them. After you have finished your middle section, have at least one slide that summarises your main points and one slide that leaves the audience with the most important point of your presentation - the one you would like them to remember even if they forget everything else.

Include slides that show these in your end section
DO NOT finish with a slide that says Any Questions? or Thanks for Listening as this a waste of your final slide and does not need a visual image to help the audience understand your words. This slide could potentially be viewed longer than any other slide (whilst you answer your questions or receive feedback) and so you want to make sure it contains something that is important to both you and the audience.

These slides are a waste of your last slide - use the final slide for your most important point not a throwaway.
Template for structuring an academic presentation

This MSWord document is a template for structuring a typical academic presentation, it can be adapted and changed if necessary depending on how long the presentation you need to give is. Try to fill it in using full sentences as these will become your slide titles .
The blue sections are optional. The NEED and TASK sections are most suited to research presentations.
This is designed for a presentation between 20-30 minutes long. Shorter presentations will have no explanatory points and longer presentations will need more explanatory points.
This is adapted from Cliff Atkinson's Beyond Bullet Points template. See the link to the book above.
- << Previous: Home
- Next: Presentation Design >>
- Last Updated: Nov 29, 2023 11:42 AM
- URL: https://libguides.hull.ac.uk/present
- Login to LibApps
- Library websites Privacy Policy
- University of Hull privacy policy & cookies
- Website terms and conditions
- Accessibility
- Report a problem
- 301 Academic Skills Centre
- Study skills online
Presentation skills
Techniques to develop your skills and confidence as a presenter.

Overcoming presentation worries
Standing up in front of other people and sharing your ideas can be a stressful experience, but also extremely rewarding intellectually.
In formal presentations, you make both the strength of your knowledge and any gaps in it immediately and publicly visible.
This is risky and rewarding because it means you are both teaching others and learning from them. That is, you are doing what education is all about.
In addition, the way you communicate and how you present yourself will influence the response of the audience, and that can make you feel self-conscious.
But, by learning more about the best strategies and techniques for formal presentations in academic settings, you can make the most of this valuable learning environment.
301 Recommends:
Our workshop on Planning and Delivering Presentations examines what makes a presentation effective, and what things to consider when preparing for delivery. You will learn a planning technique which will lead to clear and concise delivery, so you can go into your presentations feeling confident and well-prepared. The workshop will also provide you with tips on getting your message across.
This short Study Skills Hacks video offers tips and suggestions on preparing for a presentation and getting it right on the day.
Planning your presentation
Three main focus points.
The more you plan your presentation, the more confidence you will have in the information you are delivering. You need to consider three things throughout this process: topic, time limit, and audience.
1. Your topic
Your topic is what your presentation should be about.
This seems obvious, but unless you keep a clear idea of the message you are trying to convey, it's easy to go off on a tangent. You will then lose the clarity of your presentation.
2. Your time limit
Again, this seems obvious, but you will be kept to time and you need to prepare for this.
If you're asked to deliver a short presentation, keep this in mind as you do your background research, to avoid doing unnecessary amounts of reading. You only have a certain amount of time you can spend on your preparation, so make sure you use your time wisely.
3. Your audience
Your audience is key to how you deliver your presentation.
You need to consider what they already know, what they need to know, and the type of language that is appropriate for your delivery.
Unlike a written piece of work, an audience only gets one chance to engage with the content of a presentation.
With this in mind, your presentation should follow a very simple structure of reinforcement:
- Tell your audience what you are going to tell them.
- Tell them again what you told them.
This may sound repetitive, but that's exactly what you want: to repeat the key points so that they are clear to your audience and provide a take-home message.
Having a clear structure not only helps your audience to follow your presentation but helps you to keep track of what it is you are trying to explain.
301 Recommends: Horizontal Planning
Use the Horizontal Planning Template (google doc) to organise your presentation. Start from the middle with roughly three main points, before moving out to complete a plan for your introduction and conclusion.
Starting in the middle is essential as it will allow you to pin down the main areas of your message, before moving on to identify how to introduce these main points to your audience and summarise them again at the end.
Individual presentations
Spoken reports detailing your work can take place in a range of settings: the small group classroom, in a one-to-one tutorial, in the workplace or at an academic conference.
Presentations take different forms, from a read-out mini-lecture to an improvised explanation or elaboration of a series of key points, a question-and-answer session, an audience-activity workshop, or a blend of all of these.
An individual presentation can feel intense as you take centre stage. However, the advantage of this is that you have complete control over your preparation (see below), content and timing.
If you are finding the prospect of a solo presentation in front of an audience stressful, there are a number of strategies you can use to build confidence and overcome the nerves:
- Think about how to organise your presentation. Are you planning to present using the slides as a prompt (in which case be sure to look up from the screen to engage your audience)? Or are you planning to use notes or flash cards? Flash cards can be a great way to give yourself some key prompts and something to do with your hands.
- If you are finding it difficult to engage with your audience directly, try focusing on a point at the back of the room. This will encourage you to look up and present to the room, while avoiding the pressure of direct eye contact.
- Think about your physical presence. There is evidence that standing tall can help to increase confidence and can make the audience perceive the speaker as more confident.
Group presentations
Group presentations share many of the demands of the individual format, but collaboration brings its own benefits and challenges. Strength in numbers can provide a sense of comradeship and relieve individual pressure. But working together means you need to find ways to share the burden of work equally and incorporate the efforts and skills of each group member.
The additional pressures of a group presentation can be particularly significant when a presentation forms part of university coursework.
Like any form of group work, group presentations rely on sharing responsibility and developing strategies to manage group disagreements or imbalances. Remember to take time to understand one another's strengths and areas of confidence so that tasks and responsibilities can be divided up in a way that makes the most of individual skills and abilities.
And just like an individual presentation, making sure you find the time to practice and rehearse the presentation together as a group can be decisive to its success on the day. Consider the following points and build them into your rehearsal time:
- What order are you presenting in?
- Who is taking over from whom? Can you stand in a logical order to cut down on transition times?
- Who is advancing the slides, or are you taking it in turns?
- Who is managing time and how are you going to warn group members to speed up?
- Don't forget to build in time for transitions between presenters!
Read more about group work and collaboration here .
Presenting online
Whilst the fundamentals of good in-person presenting remain true when presenting online, there are some important considerations that are unique to presenting remotely. Read tips on online presentations here.
Preparation
Most importantly, for all kinds of presentations, allow time to practice! Make sure you think about how you are going to deliver your presentation and make it engaging.
This is especially important if you are presenting in a group, as transitions can be costly time-wise if unrehearsed. Make sure you have time to revise and edit your presentation, with enough time to rehearse the final edit too.
Make sure you have your ending prepared! Do not simply stop, think about how you will signal to your audience that you are done and ready for questions (if appropriate).
Finally, make sure that you are as comfortable as possible on the day. Plan out what you are going to wear the night before, arrive early to check equipment, and have a bottle of water with you.
The majority of your confidence will come from having a well-researched, structured and practised presentation, so don't worry, take a deep breath, and you will now be ready to go!
Once you have delivered your presentation, seek feedback from your peers or tutors, to help you develop your skills further. Think reflectively about the whole presentation process, as you continue to build this skill.
Learn more about how to use feedback here.
- Preparation is key! You need to consider your topic, time limit, and audience. If you are working as a group, be organised in allocating how this preparation will be done.
- A strong structure will help your presentation to flow. Signpost and wrap up for your audience, make it easy for them to follow, and easy for yourself too.
- Practise! Think about what you are going to say, time how long it takes you to say it. Make sure you are fully comfortable and confident before you need to present. If you are presenting as a group, decide who will say what, and practice transitions.
- Think about yourself as the presenter: plan what you'll wear, take some water with you
- Build-in contingency plans: know where you can cut things out or add bits in to keep to time, and plan how you will deal with difficult questions.
Library- Group work vs collusion
Student Services Information Desk (SSiD)- Public Speaking and Communicating with Impact
Counselling Service- Communicating with Impact Workshop
Counselling Service- Public Speaking Workshops
Creative Media Team- Production Resources
English Language Teaching Centre (ELTC)- Language Resources
Digital Learning- Guidance for creating accessible content .
Digital Learning- Creating accessible PowerPoint presentations
University of Manchester- Working in Groups
University of Reading- Effective Group Work
Learn Higher- Group work
BBC BiteSize- Speaking Skills
Related information
Poster presentations
Online group work

Be the first to hear about our new and upcoming workshops!
The 301 Academic Skills Centre newsletter is a fortnightly email for study skills, mathematics and statistics.
Be the first to find out about our:
- new and upcoming workshops,
- special events and programmes, and
- new and relevant online materials and resources.
Sheffield is a research university with a global reputation for excellence. We're a member of the Russell Group: one of the 24 leading UK universities for research and teaching.
- Current Students
- News & Press
- Exam Technique for In-Person Exams
- Revising for 24 Hour Take Home Exams
- Introduction to 24 Hour Take Home Exams
- Before the 24 Hour Take Home Exam
- Exam Technique for 24 Hour Take Home Exams
- Structuring a Literature Review
- Writing Coursework under Time Constraints
- Reflective Writing
- Writing a Synopsis
- Structuring a Science Report
- Presentations
- How the University works out your degree award
- Personal Extenuating Circumstances (PEC)
- Accessing your assignment feedback via Canvas
- Inspera Digital Exams
- Writing Introductions and Conclusions
- Paragraphing
- Reporting Verbs
- Signposting
- Proofreading
- Working with a Proofreader
- Writing Concisely
- The 1-Hour Writing Challenge
- Editing strategies
- Apostrophes
- Semi-colons
- Run-on sentences
- How to Improve your Grammar (native English)
- How to Improve your Grammar (non-native English)
- Independent Learning for Online Study
- Reflective Practice
- Academic Reading
- Strategic Reading Framework
- Note-taking Strategies
- Note-taking in Lectures
- Making Notes from Reading
- Using Evidence to Support your Argument
- Integrating Scholarship
- Managing Time and Motivation
- Dealing with Procrastination
- How to Paraphrase
- Quote or Paraphrase?
- How to Quote
- Referencing
- Artificial Intelligence and Academic Integrity
- Use and limitations of generative AI
- Acknowledging use of AI
- Numeracy, Maths & Statistics
- Library Search
- Search Techniques
- Keeping up to date
- Evaluating Information
- Managing Information
- Thinking Critically about AI
- Using Information generated by AI
- Digital Capabilities
- SensusAccess
- Develop Your Digital Skills
- Digital Tools to Help You Study

Enhance your presentation skills to communicate your ideas clearly through an impactful presentation.
- Newcastle University
- Academic Skills Kit
Presentations are a common form of assessment at University, as an individual or group activity, and can be challenging as they require a combination of different skills. Amongst other skills you may need to draw on the ability to:
- speak confidently in front of an audience
- plan and organise how you will communicate complex ideas
- be creative to present your ideas visually or concisely in text form
- use some technical know-how to create presentation aids such as slides or poster.
However, developing your presentation skills is not only important for achieving success in your assessments but also as you begin to think about your hopes beyond university. Presentations are a common part of the recruitment process, and you may be asked to deliver a presentation as part of the interview process. Practising and honing your skills at university will provide you with the opportunity to develop effective communication skills. Planning and structuring the content of your presentation will enhance your critical ability as you select what to include and how, as well as your ability to be creative.
10 Top Tips for Academic Presentations
It’s normal to feel nervous before giving a presentation and you may not be able to get rid of your nerves entirely, but that isn’t necessarily a bad thing. The adrenaline produced by a nervous response can also help you stay sharp and responsive during the presentation. If you think your nerves are getting in the way of presenting effectively, though, try practising in a controlled environment where you feel more comfortable and gradually building up from there.
So, you might start by just presenting aloud to yourself, then try in front of a few friends, then try recording yourself etc. Practice doesn’t necessarily make perfect, but it can make you more comfortable with the experience and help you channel that nervous energy.
Be realistic about how much ground you can cover in your allotted time and limit your scope accordingly. It’s easy to overestimate how much you can talk about in a presentation and whilst presenting on something for even 10-minutes might feel like a lot, it’s roughly the equivalent of 1500 words including ‘housekeeping language’ like introductions and signposting. Focus your presentation by writing down the key message/s that you want your audience to take away and check that everything you say contributes to that message.
One of the biggest complaints of audiences is when presentations go over time, so do a timed readthrough beforehand to make sure you’re not trying to fit too much in. If you do find yourself overrunning due to an unexpected issue it’s better to skip your final point and jump straight to the conclusion than to start speaking faster or stop speaking abruptly. The audience may not notice a small piece of missing content, but they will notice if you don’t conclude the presentation.
If your presentation is followed by a Q&A, you can’t always know what questions will be asked, but there are some common question types that you can prepare for. Two common question types are: ‘tell me again’ questions (asking you to clarify something from the presentation) and ‘tell me more’ questions (asking you to give more detail on something you only mentioned briefly in the presentation).
To prepare for ‘tell me again’ questions, try and identify the most complicated parts of the presentation and come up with a few different ways to explain them. And to prepare for ‘tell me more’ questions, identify which areas you only get to touch on briefly and remind yourself of other relevant information (any points you cut out due to time constraints might be a good start).
If you’re using PowerPoint, Prezi, handouts or other presentation aids, avoid filling them up with all your ideas. This unnecessarily duplicates information and can be distracting for the audience. Instead try to keep things simple, noting down only the main ideas in a clearly visible size (at least 24 point), font (sans serifs) and colour (high contrast is best). You don’t need to write in full sentences either, just the key phrases are usually enough. Remember, you are the presentation, everything else is just a visual aid.
Not all presentations are the same and an academic presentation is different to a TED talk, a business pitch, or public speaking. When used for assessment, academic presentations often require you to demonstrate your knowledge on a topic and the ability to do something with that knowledge, as well as your presentation delivery skills. Check the assignment brief and marking criteria to find out what skills you need to demonstrate and when preparing your presentation ask yourself if, where, and how you’re demonstrating them.
It can be quite difficult to process complex information just by listening. You might need to use technical vocabulary, but you can make it easier for your audience to follow your presentation by using simple sentence structures and repeating the key messages several times throughout. Spoken language is also less formal than written language, so although it might feel out of place to use contractions (e.g. don’t) or the first person ‘I’ in a written assessment, it can make your presentation sound and feel more natural.
If you’re feeling nervous or just want to get the presentation over with, then you might naturally find yourself speaking faster than normal, but this can make it difficult for the reader to follow what you’re saying (especially if you’re delivering a presentation online and not using a webcam). There’s no perfect pace, but as a rule of thumb try to speak about one third (33%) slower than you usually would. This might feel a bit unnatural at first, so practise saying the presentation out loud at this reduced pace to get used to how it feels. You might also want to record yourself and listen back to find out how it sounds to the audience.
Whether you’re presenting in person or online, eye contact (or webcam contact!) is a good way of keeping the audience engaged with the presentation, but it can be hard to remember to do this when you’re focused on all the other things involved in delivering a presentation. As a reminder, try adding occasional prompts to look at the audience throughout your notes. And if you’re finding looking at the webcam off-putting, placing a picture of a friend or family member next to it can make it feel a bit more comfortable.
You can script your presentation and read it aloud if that makes you feel comfortable, but you don’t have to. You might decide that you’d rather jot down a few notes, use your visual aids as a memory prompt or even memorise/ improvise the whole thing. There’s no one right approach and each has its own strengths and weaknesses (writing out a script can feel more stable, but might lead to a flat delivery, whereas memorising can seem more natural, but makes it easier to overrun or miss out important points). You might want to practice with different types of notes until you find one that works for you, but if in doubt choose whatever makes you feel most comfortable.
Download this guide as a PDF
Presentation tips.
10 top tips for preparing for and delivering your presentation.
Enhancing your presentation skills
There are lots of useful strategies that you can employ to increase your confidence when giving a presentation. Utilising these strategies can help reduce the anxiety you may feel about delivering a presentation at any level and to different audiences. You can learn more about overcoming these challenges in our Your Skills session focusing on presentations. Visit the booking calendar and sign up to calendar notifications so that you can registrater when booking opens.
Create visual impact

Audio-visual Resource Guide
Explore resources and advice from the Library about finding and reusing images, video and other audio-visual materials in presentations.

PowerPoint Learning Pathways
Advice and tips from the Office 365 Learning Pathways to help you design and deliver engaging presentations.

PowerPoint Presenter Coach
Practice your presentation skills and rehearse using the speaker coach tool.
Recommended books and e-books
For further reading related to presentations, browse our specially curated list of resources.
- Program Design
- Peer Mentors
- Excelling in Graduate School
- Oral Communication
- Written communication
- About Climb
Creating a 10-15 Minute Scientific Presentation
In the course of your career as a scientist, you will be asked to give brief presentations -- to colleagues, lab groups, and in other venues. We have put together a series of short videos to help you organize and deliver a crisp 10-15 minute scientific presentation.
First is a two part set of videos that walks you through organizing a presentation.
Part 1 - Creating an Introduction for a 10-15 Minute Scientfic Presentation
Part 2 - Creating the Body of a 10-15 Minute Presentation: Design/Methods; Data Results, Conclusions
Two additional videos should prove useful:
Designing PowerPoint Slides for a Scientific Presentation walks you through the key principles in designing powerful, easy to read slides.
Delivering a Presentation provides tips and approaches to help you put your best foot forward when you stand up in front of a group.
Other resources include:
Quick Links
Northwestern bioscience programs.
- Biomedical Engineering (BME)
- Chemical and Biological Engineering (ChBE)
- Driskill Graduate Program in the Life Sciences (DGP)
- Interdepartmental Biological Sciences (IBiS)
- Northwestern University Interdepartmental Neuroscience (NUIN)
- Campus Emergency Information
- Contact Northwestern University
- Report an Accessibility Issue
- University Policies
- Northwestern Home
- Northwestern Calendar: PlanIt Purple
- Northwestern Search
Chicago: 420 East Superior Street, Rubloff 6-644, Chicago, IL 60611 312-503-8286
- PRO Courses Guides New Tech Help Pro Expert Videos About wikiHow Pro Upgrade Sign In
- EDIT Edit this Article
- EXPLORE Tech Help Pro About Us Random Article Quizzes Request a New Article Community Dashboard This Or That Game Popular Categories Arts and Entertainment Artwork Books Movies Computers and Electronics Computers Phone Skills Technology Hacks Health Men's Health Mental Health Women's Health Relationships Dating Love Relationship Issues Hobbies and Crafts Crafts Drawing Games Education & Communication Communication Skills Personal Development Studying Personal Care and Style Fashion Hair Care Personal Hygiene Youth Personal Care School Stuff Dating All Categories Arts and Entertainment Finance and Business Home and Garden Relationship Quizzes Cars & Other Vehicles Food and Entertaining Personal Care and Style Sports and Fitness Computers and Electronics Health Pets and Animals Travel Education & Communication Hobbies and Crafts Philosophy and Religion Work World Family Life Holidays and Traditions Relationships Youth
- Browse Articles
- Learn Something New
- Quizzes Hot
- This Or That Game
- Train Your Brain
- Explore More
- Support wikiHow
- About wikiHow
- Log in / Sign up
- Education and Communications
- Presentations
How to Give a Presentation
Last Updated: October 4, 2023 Fact Checked
This article was co-authored by Patrick Muñoz . Patrick is an internationally recognized Voice & Speech Coach, focusing on public speaking, vocal power, accent and dialects, accent reduction, voiceover, acting and speech therapy. He has worked with clients such as Penelope Cruz, Eva Longoria, and Roselyn Sanchez. He was voted LA's Favorite Voice and Dialect Coach by BACKSTAGE, is the voice and speech coach for Disney and Turner Classic Movies, and is a member of Voice and Speech Trainers Association. There are 10 references cited in this article, which can be found at the bottom of the page. This article has been fact-checked, ensuring the accuracy of any cited facts and confirming the authority of its sources. This article has been viewed 527,465 times.
Giving a presentation terrifies most of us, especially when talking before a crowd of people about an unfamiliar topic. Never fear! There are ways to make a good presentation. The more presentations you do, the easier they will become!
Preparing For the Presentation

- It's best to have 1 main thesis statement or overarching theme and 3 main points that back-up or flesh-out your main theme. Any more than that and your audience is going to start losing interest. This means that any facts and information that are a part of your presentation should back up these 3 main points and overarching theme.
- For example: If you're giving a presentation about 17th century alchemy, bringing up the history of alchemy is fine (and probably necessary), but don't mire your audience in its history instead of focusing alchemy in the 17th century. Your 3 points could be something like "alchemy in public opinion," "famous 17th century alchemists," and "the legacy of 17th century alchemy."

- Pick your very best supporting facts, information, or quotes for your presentation. Don't bury your audience in information.

- Make sure you're using media to enhance your presentation and not to drown it out. The presentation is key. Anything else is just accessorizing.
- For example: to get back to 17th century alchemy, to back up your information about alchemy in the public opinion, you might want to show images from public pamphlets about the dangers of alchemy and see what people of the time period had to say about it and see what the more famous alchemists had to say about it.
- Also, you want to make sure that you pick a medium that you are comfortable in and thorough in knowledge. If you don't know a thing about PowerPoint, maybe consider writing your main points on a white board, or passing out handouts with your main points and evidence on them. [3] X Research source

- A good tip is to film yourself or audiotape of yourself giving your practice presentation so you can see what distracting verbal and physical tics you have, so that you can work on eliminating them before the presentation itself. (Verbs tics would be things like "um..." and "uh..." and using "like" inappropriately; physical tics are things like shifting your weight from foot to foot or messing with your hair.) To stop yourself from saying "um" or other unwanted tics, be aware you're doing it first, then speak more slowly and deliberately. Breathe deeply and feel free to pause and appreciate the silence. These will all help you to have mastery over your tics.
- Just remember that rehearsals usually run about 20% shorter than your actual presentation, so take that into account if you're running on a time limit.

- For example, if you aren't comfortable wearing heels, don't wear them just for the presentation. You'll be distracted by your discomfort and that will come across in the presentation. There are plenty of good shoe choices that have no or a low heel.
- Clean, nice slacks or a skirt and nice, button-down shirt in neutral colors are always good choices for presentation wear. You also don't particularly want your clothing choice to distract from the presentation, so perhaps avoid that brilliant hot pink shirt.
Giving the Presentation

- Before the presentation, clench and unclench your hands several times to deal with the adrenaline and then take 3 deep, slow breaths.
- Call up a smile, even if you feel like hurling. You can trick your brain into thinking that you're less anxious than you actually are and you'll also be able to hide your nervousness from your audience.

- Make eye contact with your audience. Don't stare at one particular person, but section up the room and make eye contact with someone in each section on a rotational basis.
- Have a big, welcoming smile on your face, with lots of energy, so you start out from a strong and engaging place.
- Ask questions of your audience and take questions during your presentation. This will make it more of a conversation and therefore more interesting.
- Tell an amusing anecdote to illustrate your point. From the above examples about 17th century alchemy, you could find an amusing alchemical anecdote from the time period, or you could talk about your own forays into alchemy.

- Move around, but make your movements deliberate. Don't nervously shift your feet (in fact, it's a good idea to imagine that your feet are nailed to the floor except for those times you deliberately choose to move).
- Use your vocal inflections to create a more dynamic presentation. Vary your voice as you're talking. Nobody ( ever ) wants to sit there and listen to someone drone on and on in dull monotone, no matter how interesting the material (think Professor Binns from Harry Potter; that's what you don't want).
- Try to create a balance between rehearsed and spontaneous. Spontaneous, on the spot, movement and asides can be great as long as you are really comfortable, otherwise they can sidetrack your presentation and make it rambling. Mess around with spontaneous and rehearsed when you're practicing and you'll get a feel for it.

- Quickly introduce your topic and don't assume that your audience is familiar with all the terms, especially if your topic is one that isn't widely known.
- Figuring out why you want (or have to) give this presentation will help you work with an overarching story/theme. Maybe you want to pass the class. Maybe you're convincing people to give you money or join you in a philanthropic endeavor or act for a social or political reason. Channel that desire into your presentation. You're answering the question of why they would want to pass you or why they would want to fund you. That's the story you're telling.

- Make use of pauses, and learn to be comfortable with silences. Silence can be a powerful presentation tool and gives you a chance to take a moment to recompose. By taking pauses, you can slow down your breathing and be more deliberate in your speech, avoiding speaking too quickly.
- Have water with you and take a sip when you feel you're going too fast.
- If you have a friend in the class or meeting, arrange with them beforehand that they will let you know with a signal whether you're talking too quickly. Look over their way occasionally and check your progress.
- If you find that you're running out of time and you haven't finished, simply drop or summarize your leftover material. Acknowledge the leftover material as something that can be discussed later or in the Q&A.

- Make it clear what the listeners now know and why it is important that they have this new information.
- Conclude with examples or stories about your main point and take home message. You might want a slide which summarizes your presentation. For example, you might conclude with a story about the nature of alchemy in the modern era (perhaps in a film) to show its malleable nature.
What Is The Best Way To Start a Presentation?
Community Q&A
- Have a short Q&A session at the end of each subtopic. Q&A sessions will improve audience engagement. It also acts as a welcome break for audience in case of long presentation. For this though, you will need to know the subject you choose well. Make sure you understand and have more than just the basic knowledge about the topic you choose. Thanks Helpful 1 Not Helpful 0
- Use pictures or visuals. Pictures and visuals show that you know what you're talking about, and it gives the audience a picture of what you're talking about. Thanks Helpful 0 Not Helpful 0
- Try to have a "leave behind" message, something that your audience can take away that reminds them about your presentation, like a flyer or a book, for example. Thanks Helpful 0 Not Helpful 0
Tips from our Readers
- Use pictures! A good way to use pictures is through PowerPoint. If you don't have PowerPoint, you can print the pictures onto a board (paper, card board, or larger paper).
- Don't be nervous. Practice and do just like you did in practice. If you are nervous, the audience will know.
- Try to do some hand jesters. Speak loud and clear. Make eye contact with them. Be confident.
- Let the audience have an opportunity to interact with you.

- Don't make your speech too long, unless it is really good, and you have to have done speeches for a long time to have them be that good and long. Stick to short and sweet. Thanks Helpful 50 Not Helpful 11
- Don't put off work to the last minute. Then your work will be most likely sloppy. If you do well under pressure, do your project a bit at a time and maybe it will get done. Or, try doing it all at the beginning, so then you have the whole rest of the time to play or check your assignment. Thanks Helpful 36 Not Helpful 16
- Jokes are usually not okay, especially in a professional setting. A light hearted comment is fine, but don't make it seem like a comedy show. Thanks Helpful 12 Not Helpful 3
- If you speak in a too fast/slow or monotone voice, people will not want to hear you! Aim for a conversation voice (but slightly louder) with natural pauses (commas and periods). Develop a tone depending on what you're talking about. It's more interesting and engaging to hear someone speak in a serious tone rather than a monotone when speaking about world hunger. Thanks Helpful 9 Not Helpful 2
- If you suffer from twitchy fingers, be mindful to move your hands during your presentation only when necessary, or the audience may notice and feel you are unprepared. Thanks Helpful 8 Not Helpful 3
You Might Also Like

- ↑ http://www.huffingtonpost.com/young-entrepreneur-council/13-tips-for-giving-a-kill_b_3728093.html
- ↑ https://www.niu.edu/presentations/prepare/index.shtml
- ↑ https://algonquincollege.libguides.com/studyskills/creating-presentations
- ↑ https://www.indeed.com/career-advice/career-development/how-to-prepare-the-presentation
- ↑ http://www.washington.edu/doit/TeamN/present_tips.html
- ↑ https://counseling.uiowa.edu/self-help/30-ways-to-manage-speaking-anxiety/
- ↑ https://www.hamilton.edu/academics/centers/oralcommunication/guides/how-to-engage-your-audience-and-keep-them-with-you
- ↑ http://hbr.org/2013/06/how-to-give-a-killer-presentation/ar/1
- ↑ https://www.linkedin.com/pulse/how-slow-down-your-speech-when-presenting-sharon-maree-jurd-cfe/
- ↑ https://www.indeed.com/career-advice/career-development/how-to-conclude-a-presentation
About This Article

Before you give a presentation, spend some time crafting what you will say. Most presentations should center on a thesis, or main idea, and contain about 3 supporting points. Cutting unnecessary content will ensure your presentation is impactful. Once your presentation is done, practice delivering it in front of a mirror or while recording yourself so you can identify and correct any issues. To calm your nerves before you present, try clenching your fists a few times and taking several deep breaths. For more advice about giving presentations, like whether to use visual aides, keep reading! Did this summary help you? Yes No
- Send fan mail to authors
Reader Success Stories
Nkosinathi Mathebula
Jun 14, 2017
Did this article help you?
Prashant Mahasagar Sangson
Aug 8, 2017
Dharmender Mangla
Apr 26, 2016
Hedika Amani
Jan 14, 2019
May 5, 2016

Featured Articles

Trending Articles

Watch Articles

- Terms of Use
- Privacy Policy
- Do Not Sell or Share My Info
- Not Selling Info
Don’t miss out! Sign up for
wikiHow’s newsletter
How to Create a Research Poster
- Poster Basics
- Design Tips
- Logos & Images
What is a Research Poster?
Posters are widely used in the academic community, and most conferences include poster presentations in their program. Research posters summarize information or research concisely and attractively to help publicize it and generate discussion.
The poster is usually a mixture of a brief text mixed with tables, graphs, pictures, and other presentation formats. At a conference, the researcher stands by the poster display while other participants can come and view the presentation and interact with the author.
What Makes a Good Poster?
- Important information should be readable from about 10 feet away
- Title is short and draws interest
- Word count of about 300 to 800 words
- Text is clear and to the point
- Use of bullets, numbering, and headlines make it easy to read
- Effective use of graphics, color and fonts
- Consistent and clean layout
- Includes acknowledgments, your name and institutional affiliation
A Sample of a Well Designed Poster
View this poster example in a web browser .

Image credit: Poster Session Tips by [email protected], via Penn State
Where do I begin?
Answer these three questions:.
- What is the most important/interesting/astounding finding from my research project?
- How can I visually share my research with conference attendees? Should I use charts, graphs, photos, images?
- What kind of information can I convey during my talk that will complement my poster?
What software can I use to make a poster?
A popular, easy-to-use option. It is part of Microsoft Office package and is available on the library computers in rooms LC337 and LC336. ( Advice for creating a poster with PowerPoint ).
Adobe Illustrator, Photoshop, and InDesign
Feature-rich professional software that is good for posters including lots of high-resolution images, but they are more complex and expensive. NYU Faculty, Staff, and Students can access and download the Adobe Creative Suite .
Open Source Alternatives
- OpenOffice is the free alternative to MS Office (Impress is its PowerPoint alternative).
- Inkscape and Gimp are alternatives to Adobe products.
- For charts and diagrams try Gliffy or Lovely Charts .
- A complete list of free graphics software .
A Sample of a Poorly Designed Poster
View this bad poster example in a browser.

Image Credit: Critique by Better Posters
- Next: Design Tips >>
- Last Updated: Jul 11, 2023 5:09 PM
- URL: https://guides.nyu.edu/posters
30 Examples: How to Conclude a Presentation (Effective Closing Techniques)
By Status.net Editorial Team on March 4, 2024 — 9 minutes to read
Ending a presentation on a high note is a skill that can set you apart from the rest. It’s the final chance to leave an impact on your audience, ensuring they walk away with the key messages embedded in their minds. This moment is about driving your points home and making sure they resonate. Crafting a memorable closing isn’t just about summarizing key points, though that’s part of it, but also about providing value that sticks with your listeners long after they’ve left the room.
Crafting Your Core Message
To leave a lasting impression, your presentation’s conclusion should clearly reflect your core message. This is your chance to reinforce the takeaways and leave the audience thinking about your presentation long after it ends.
Identifying Key Points
Start by recognizing what you want your audience to remember. Think about the main ideas that shaped your talk. Make a list like this:
- The problem your presentation addresses.
- The evidence that supports your argument.
- The solution you propose or the action you want the audience to take.
These key points become the pillars of your core message.
Contextualizing the Presentation
Provide context by briefly relating back to the content of the whole presentation. For example:
- Reference a statistic you shared in the opening, and how it ties into the conclusion.
- Mention a case study that underlines the importance of your message.
Connecting these elements gives your message cohesion and makes your conclusion resonate with the framework of your presentation.
30 Example Phrases: How to Conclude a Presentation
- 1. “In summary, let’s revisit the key takeaways from today’s presentation.”
- 2. “Thank you for your attention. Let’s move forward together.”
- 3. “That brings us to the end. I’m open to any questions you may have.”
- 4. “I’ll leave you with this final thought to ponder as we conclude.”
- 5. “Let’s recap the main points before we wrap up.”
- 6. “I appreciate your engagement. Now, let’s turn these ideas into action.”
- 7. “We’ve covered a lot today. To conclude, remember these crucial points.”
- 8. “As we reach the end, I’d like to emphasize our call to action.”
- 9. “Before we close, let’s quickly review what we’ve learned.”
- 10. “Thank you for joining me on this journey. I look forward to our next steps.”
- 11. “In closing, I’d like to thank everyone for their participation.”
- 12. “Let’s conclude with a reminder of the impact we can make together.”
- 13. “To wrap up our session, here’s a brief summary of our discussion.”
- 14. “I’m grateful for the opportunity to present to you. Any final thoughts?”
- 15. “And that’s a wrap. I welcome any final questions or comments.”
- 16. “As we conclude, let’s remember the objectives we’ve set today.”
- 17. “Thank you for your time. Let’s apply these insights to achieve success.”
- 18. “In conclusion, your feedback is valuable, and I’m here to listen.”
- 19. “Before we part, let’s take a moment to reflect on our key messages.”
- 20. “I’ll end with an invitation for all of us to take the next step.”
- 21. “As we close, let’s commit to the goals we’ve outlined today.”
- 22. “Thank you for your attention. Let’s keep the conversation going.”
- 23. “In conclusion, let’s make a difference, starting now.”
- 24. “I’ll leave you with these final words to consider as we end our time together.”
- 25. “Before we conclude, remember that change starts with our actions today.”
- 26. “Thank you for the lively discussion. Let’s continue to build on these ideas.”
- 27. “As we wrap up, I encourage you to reach out with any further questions.”
- 28. “In closing, I’d like to express my gratitude for your valuable input.”
- 29. “Let’s conclude on a high note and take these learnings forward.”
- 30. “Thank you for your time today. Let’s end with a commitment to progress.”
Summarizing the Main Points
When you reach the end of your presentation, summarizing the main points helps your audience retain the important information you’ve shared. Crafting a memorable summary enables your listeners to walk away with a clear understanding of your message.
Effective Methods of Summarization
To effectively summarize your presentation, you need to distill complex information into concise, digestible pieces. Start by revisiting the overarching theme of your talk and then narrow down to the core messages. Use plain language and imagery to make the enduring ideas stick. Here are some examples of how to do this:
- Use analogies that relate to common experiences to recap complex concepts.
- Incorporate visuals or gestures that reinforce your main arguments.
The Rule of Three
The Rule of Three is a classic writing and communication principle. It means presenting ideas in a trio, which is a pattern that’s easy for people to understand and remember. For instance, you might say, “Our plan will save time, cut costs, and improve quality.” This structure has a pleasing rhythm and makes the content more memorable. Some examples include:
- “This software is fast, user-friendly, and secure.”
- Pointing out a product’s “durability, affordability, and eco-friendliness.”
Reiterating the Main Points
Finally, you want to circle back to the key takeaways of your presentation. Rephrase your main points without introducing new information. This reinforcement supports your audience’s memory and understanding of the material. You might summarize key takeaways like this:
- Mention the problem you addressed, the solution you propose, and the benefits of this solution.
- Highlighting the outcomes of adopting your strategy: higher efficiency, greater satisfaction, and increased revenue.
Creating a Strong Conclusion
The final moments of your presentation are your chance to leave your audience with a powerful lasting impression. A strong conclusion is more than just summarizing—it’s your opportunity to invoke thought, inspire action, and make your message memorable.
Incorporating a Call to Action
A call to action is your parting request to your audience. You want to inspire them to take a specific action or think differently as a result of what they’ve heard. To do this effectively:
- Be clear about what you’re asking.
- Explain why their action is needed.
- Make it as simple as possible for them to take the next steps.
Example Phrases:
- “Start making a difference today by…”
- “Join us in this effort by…”
- “Take the leap and commit to…”
Leaving a Lasting Impression
End your presentation with something memorable. This can be a powerful quote, an inspirational statement, or a compelling story that underscores your main points. The goal here is to resonate with your audience on an emotional level so that your message sticks with them long after they leave.
- “In the words of [Influential Person], ‘…'”
- “Imagine a world where…”
- “This is more than just [Topic]; it’s about…”
Enhancing Audience Engagement
To hold your audience’s attention and ensure they leave with a lasting impression of your presentation, fostering interaction is key.
Q&A Sessions
It’s important to integrate a Q&A session because it allows for direct communication between you and your audience. This interactive segment helps clarify any uncertainties and encourages active participation. Plan for this by designating a time slot towards the end of your presentation and invite questions that promote discussion.
- “I’d love to hear your thoughts; what questions do you have?”
- “Let’s dive into any questions you might have. Who would like to start?”
- “Feel free to ask any questions, whether they’re clarifications or deeper inquiries about the topic.”
Encouraging Audience Participation
Getting your audience involved can transform a good presentation into a great one. Use open-ended questions that provoke thought and allow audience members to reflect on how your content relates to them. Additionally, inviting volunteers to participate in a demonstration or share their experiences keeps everyone engaged and adds a personal touch to your talk.
- “Could someone give me an example of how you’ve encountered this in your work?”
- “I’d appreciate a volunteer to help demonstrate this concept. Who’s interested?”
- “How do you see this information impacting your daily tasks? Let’s discuss!”
Delivering a Persuasive Ending
At the end of your presentation, you have the power to leave a lasting impact on your audience. A persuasive ending can drive home your key message and encourage action.
Sales and Persuasion Tactics
When you’re concluding a presentation with the goal of selling a product or idea, employ carefully chosen sales and persuasion tactics. One method is to summarize the key benefits of your offering, reminding your audience why it’s important to act. For example, if you’ve just presented a new software tool, recap how it will save time and increase productivity. Another tactic is the ‘call to action’, which should be clear and direct, such as “Start your free trial today to experience the benefits first-hand!” Furthermore, using a touch of urgency, like “Offer expires soon!”, can nudge your audience to act promptly.
Final Impressions and Professionalism
Your closing statement is a chance to solidify your professional image and leave a positive impression. It’s important to display confidence and poise. Consider thanking your audience for their time and offering to answer any questions. Make sure to end on a high note by summarizing your message in a concise and memorable way. If your topic was on renewable energy, you might conclude by saying, “Let’s take a leap towards a greener future by adopting these solutions today.” This reinforces your main points and encourages your listeners to think or act differently when they leave.
Frequently Asked Questions
What are some creative strategies for ending a presentation memorably.
To end your presentation in a memorable way, consider incorporating a call to action that engages your audience to take the next step. Another strategy is to finish with a thought-provoking question or a surprising fact that resonates with your listeners.
Can you suggest some powerful quotes suitable for concluding a presentation?
Yes, using a quote can be very effective. For example, Maya Angelou’s “People will forget what you said, people will forget what you did, but people will never forget how you made them feel,” can reinforce the emotional impact of your presentation.
What is an effective way to write a conclusion that summarizes a presentation?
An effective conclusion should recap the main points succinctly, highlighting what you want your audience to remember. A good way to conclude is by restating your thesis and then briefly summarizing the supporting points you made.
As a student, how can I leave a strong impression with my presentation’s closing remarks?
To leave a strong impression, consider sharing a personal anecdote related to your topic that demonstrates passion and conviction. This helps humanize your content and makes the message more relatable to your audience.
How can I appropriately thank my audience at the close of my presentation?
A simple and sincere expression of gratitude is always appropriate. You might say, “Thank you for your attention and engagement today,” to convey appreciation while also acknowledging their participation.
What are some examples of a compelling closing sentence in a presentation?
A compelling closing sentence could be something like, “Together, let’s take the leap towards a greener future,” if you’re presenting on sustainability. This sentence is impactful, calls for united action, and leaves your audience with a clear message.
- How to Build Rapport: Effective Techniques
- Active Listening (Techniques, Examples, Tips)
- Effective Nonverbal Communication in the Workplace (Examples)
- What is Problem Solving? (Steps, Techniques, Examples)
- 2 Examples of an Effective and Warm Letter of Welcome
- 8 Examples of Effective Interview Confirmation Emails
Home Blog Design How to Design a Winning Poster Presentation: Quick Guide with Examples & Templates
How to Design a Winning Poster Presentation: Quick Guide with Examples & Templates

How are research posters like High School science fair projects? Quite similar, in fact.
Both are visual representations of a research project shared with peers, colleagues and academic faculty. But there’s a big difference: it’s all in professionalism and attention to detail. You can be sure that the students that thrived in science fairs are now creating fantastic research posters, but what is that extra element most people miss when designing a poster presentation?
This guide will teach tips and tricks for creating poster presentations for conferences, symposia, and more. Learn in-depth poster structure and design techniques to help create academic posters that have a lasting impact.
Let’s get started.
Table of Contents
- What is a Research Poster?
Why are Poster Presentations important?
Overall dimensions and orientation, separation into columns and sections, scientific, academic, or something else, a handout with supplemental and contact information, cohesiveness, design and readability, storytelling.
- Font Characteristics
- Color Pairing
- Data Visualization Dimensions
- Alignment, Margins, and White Space
Scientific/Academic Conference Poster Presentation
Digital research poster presentations, slidemodel poster presentation templates, how to make a research poster presentation step-by-step, considerations for printing poster presentations, how to present a research poster presentation, final words, what is a research poster .
Research posters are visual overviews of the most relevant information extracted from a research paper or analysis. They are essential communication formats for sharing findings with peers and interested people in the field. Research posters can also effectively present material for other areas besides the sciences and STEM—for example, business and law.
You’ll be creating research posters regularly as an academic researcher, scientist, or grad student. You’ll have to present them at numerous functions and events. For example:
- Conference presentations
- Informational events
- Community centers
The research poster presentation is a comprehensive way to share data, information, and research results. Before the pandemic, the majority of research events were in person. During lockdown and beyond, virtual conferences and summits became the norm. Many researchers now create poster presentations that work in printed and digital formats.

Let’s look at why it’s crucial to spend time creating poster presentations for your research projects, research, analysis, and study papers.

Research posters represent you and your sponsor’s research
Research papers and accompanying poster presentations are potent tools for representation and communication in your field of study. Well-performing poster presentations help scientists, researchers, and analysts grow their careers through grants and sponsorships.
When presenting a poster presentation for a sponsored research project, you’re representing the company that sponsored you. Your professionalism, demeanor, and capacity for creating impactful poster presentations call attention to other interested sponsors, spreading your impact in the field.
Research posters demonstrate expertise and growth
Presenting research posters at conferences, summits, and graduate grading events shows your expertise and knowledge in your field of study. The way your poster presentation looks and delivers, plus your performance while presenting the work, is judged by your viewers regardless of whether it’s an officially judged panel.
Recurring visitors to research conferences and symposia will see you and your poster presentations evolve. Improve your impact by creating a great poster presentation every time by paying attention to detail in the poster design and in your oral presentation. Practice your public speaking skills alongside the design techniques for even more impact.
Poster presentations create and maintain collaborations
Every time you participate in a research poster conference, you create meaningful connections with people in your field, industry or community. Not only do research posters showcase information about current data in different areas, but they also bring people together with similar interests. Countless collaboration projects between different research teams started after discussing poster details during coffee breaks.
An effective research poster template deepens your peer’s understanding of a topic by highlighting research, data, and conclusions. This information can help other researchers and analysts with their work. As a research poster presenter, you’re given the opportunity for both teaching and learning while sharing ideas with peers and colleagues.
Anatomy of a Winning Poster Presentation
Do you want your research poster to perform well? Following the standard layout and adding a few personal touches will help attendees know how to read your poster and get the most out of your information.

The overall size of your research poster ultimately depends on the dimensions of the provided space at the conference or research poster gallery. The poster orientation can be horizontal or vertical, with horizontal being the most common. In general, research posters measure 48 x 36 inches or are an A0 paper size.
A virtual poster can be the same proportions as the printed research poster, but you have more leeway regarding the dimensions. Virtual research posters should fit on a screen with no need to scroll, with 1080p resolution as a standard these days. A horizontal presentation size is ideal for that.
A research poster presentation has a standard layout of 2–5 columns with 2–3 sections each. Typical structures say to separate the content into four sections; 1. A horizontal header 2. Introduction column, 3. Research/Work/Data column, and 4. Conclusion column. Each unit includes topics that relate to your poster’s objective. Here’s a generalized outline for a poster presentation:
- Condensed Abstract
- Objectives/Purpose
- Methodology
- Recommendations
- Implications
- Acknowledgments
- Contact Information
The overview content you include in the units depends on your poster presentations’ theme, topic, industry, or field of research. A scientific or academic poster will include sections like hypothesis, methodology, and materials. A marketing analysis poster will include performance metrics and competitor analysis results.
There’s no way a poster can hold all the information included in your research paper or analysis report. The poster is an overview that invites the audience to want to find out more. That’s where supplement material comes in. Create a printed PDF handout or card with a QR code (created using a QR code generator ). Send the audience to the best online location for reading or downloading the complete paper.
What Makes a Poster Presentation Good and Effective?
For your poster presentation to be effective and well-received, it needs to cover all the bases and be inviting to find out more. Stick to the standard layout suggestions and give it a unique look and feel. We’ve put together some of the most critical research poster-creation tips in the list below. Your poster presentation will perform as long as you check all the boxes.
The information you choose to include in the sections of your poster presentation needs to be cohesive. Train your editing eye and do a few revisions before presenting. The best way to look at it is to think of The Big Picture. Don’t get stuck on the details; your attendees won’t always know the background behind your research topic or why it’s important.
Be cohesive in how you word the titles, the length of the sections, the highlighting of the most important data, and how your oral presentation complements the printed—or virtual—poster.
The most important characteristic of your poster presentation is its readability and clarity. You need a poster presentation with a balanced design that’s easy to read at a distance of 1.5 meters or 4 feet. The font size and spacing must be clear and neat. All the content must suggest a visual flow for the viewer to follow.
That said, you don’t need to be a designer to add something special to your poster presentation. Once you have the standard—and recognized—columns and sections, add your special touch. These can be anything from colorful boxes for the section titles to an interesting but subtle background, images that catch the eye, and charts that inspire a more extended look.
Storytelling is a presenting technique involving writing techniques to make information flow. Firstly, storytelling helps give your poster presentation a great introduction and an impactful conclusion.
Think of storytelling as the invitation to listen or read more, as the glue that connects sections, making them flow from one to another. Storytelling is using stories in the oral presentation, for example, what your lab partner said when you discovered something interesting. If it makes your audience smile and nod, you’ve hit the mark. Storytelling is like giving a research presentation a dose of your personality, and it can help turning your data into opening stories .
Design Tips For Creating an Effective Research Poster Presentation
The section above briefly mentioned how important design is to your poster presentation’s effectiveness. We’ll look deeper into what you need to know when designing a poster presentation.
1. Font Characteristics
The typeface and size you choose are of great importance. Not only does the text need to be readable from two meters away, but it also needs to look and sit well on the poster. Stay away from calligraphic script typefaces, novelty typefaces, or typefaces with uniquely shaped letters.
Stick to the classics like a sans serif Helvetica, Lato, Open Sans, or Verdana. Avoid serif typefaces as they can be difficult to read from far away. Here are some standard text sizes to have on hand.
- Title: 85 pt
- Authors: 65 pt
- Headings: 36 pt
- Body Text: 24 pt
- Captions: 18 pt

If you feel too prone to use serif typefaces, work with a font pairing tool that helps you find a suitable solution – and intend those serif fonts for heading sections only. As a rule, never use more than 3 different typefaces in your design. To make it more dynamic, you can work with the same font using light, bold, and italic weights to put emphasis on the required areas.
2. Color Pairing
Using colors in your poster presentation design is a great way to grab the viewer’s attention. A color’s purpose is to help the viewer follow the data flow in your presentation, not distract. Don’t let the color take more importance than the information on your poster.

Choose one main color for the title and headlines and a similar color for the data visualizations. If you want to use more than one color, don’t create too much contrast between them. Try different tonalities of the same color and keep things balanced visually. Your color palette should have at most one main color and two accent colors.
Black text over a white background is standard practice for printed poster presentations, but for virtual presentations, try a very light gray instead of white and a very dark gray instead of black. Additionally, use variations of light color backgrounds and dark color text. Make sure it’s easy to read from two meters away or on a screen, depending on the context. We recommend ditching full white or full black tone usage as it hurts eyesight in the long term due to its intense contrast difference with the light ambiance.
3. Data Visualization Dimensions
Just like the text, your charts, graphs, and data visualizations must be easy to read and understand. Generally, if a person is interested in your research and has already read some of the text from two meters away, they’ll come closer to look at the charts and graphs.

Fit data visualizations inside columns or let them span over two columns. Remove any unnecessary borders, lines, or labels to make them easier to read at a glance. Use a flat design without shadows or 3D characteristics. The text in legends and captions should stay within the chart size and not overflow into the margins. Use a unified text size of 18px for all your data visualizations.
4. Alignment, Margins, and White Space
Finally, the last design tip for creating an impressive and memorable poster presentation is to be mindful of the layout’s alignment, margins, and white space. Create text boxes to help keep everything aligned. They allow you to resize, adapt, and align the content along a margin or grid.
Take advantage of the white space created by borders and margins between sections. Don’t crowd them with a busy background or unattractive color.

Calculate margins considering a print format. It is a good practice in case the poster presentation ends up becoming in physical format, as you won’t need to downscale your entire design (affecting text readability in the process) to preserve information.
There are different tools that you can use to make a poster presentation. Presenters who are familiar with Microsoft Office prefer to use PowerPoint. You can learn how to make a poster in PowerPoint here.
Poster Presentation Examples
Before you start creating a poster presentation, look at some examples of real research posters. Get inspired and get creative.
Research poster presentations printed and mounted on a board look like the one in the image below. The presenter stands to the side, ready to share the information with visitors as they walk up to the panels.

With more and more conferences staying virtual or hybrid, the digital poster presentation is here to stay. Take a look at examples from a poster session at the OHSU School of Medicine .
Use SlideModel templates to help you create a winning poster presentation with PowerPoint and Google Slides. These poster PPT templates will get you off on the right foot. Mix and match tables and data visualizations from other poster slide templates to create your ideal layout according to the standard guidelines.
If you need a quick method to create a presentation deck to talk about your research poster at conferences, check out our Slides AI presentation maker. A tool in which you add the topic, curate the outline, select a design, and let AI do the work for you.
1. One-pager Scientific Poster Template for PowerPoint
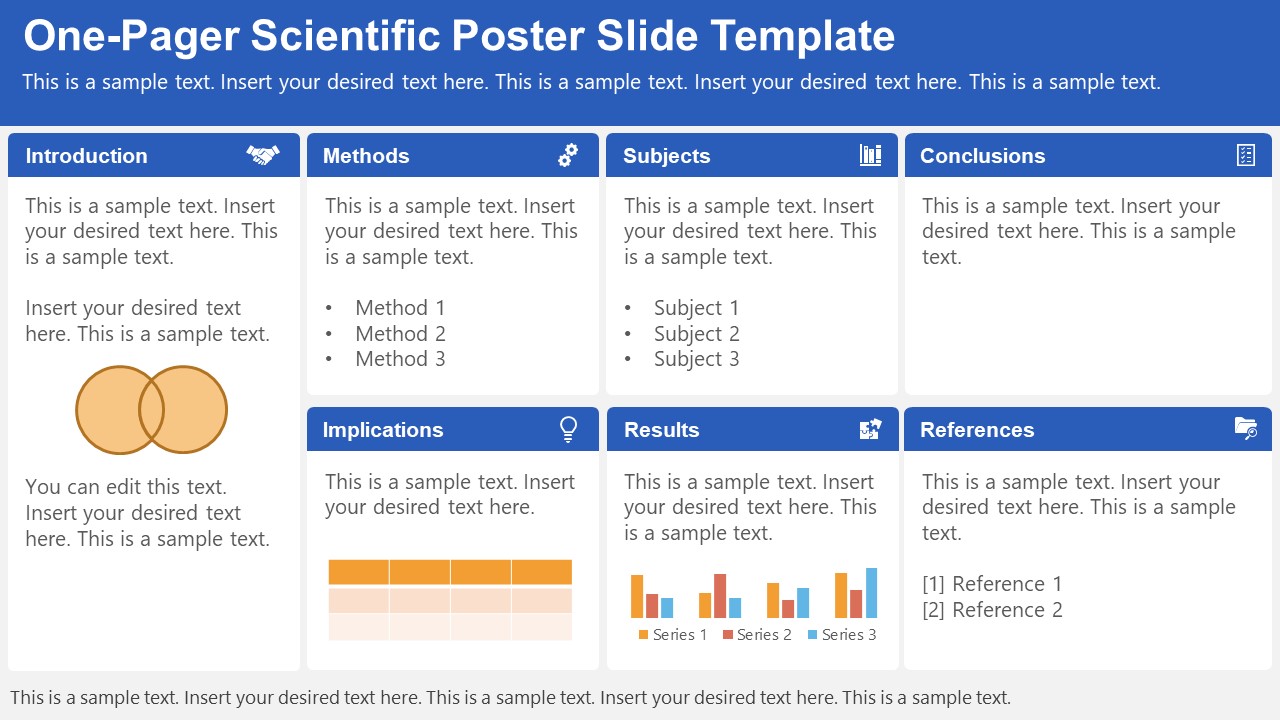
A PowerPoint template tailored to make your poster presentations an easy-to-craft process. Meet our One-Pager Scientific Poster Slide Template, entirely editable to your preferences and with ample room to accommodate graphs, data charts, and much more.
Use This Template
2. Eisenhower Matrix Slides Template for PowerPoint
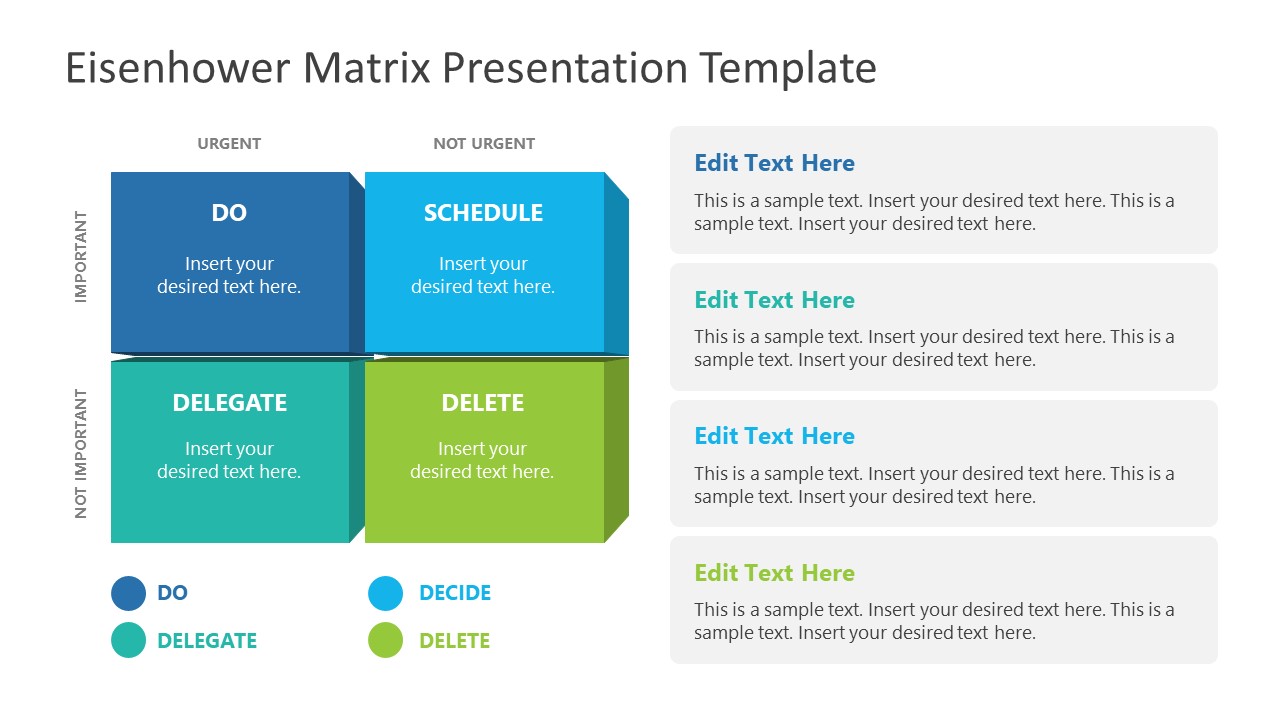
An Eisenhower Matrix is a powerful tool to represent priorities, classifying work according to urgency and importance. Presenters can use this 2×2 matrix in poster presentations to expose the effort required for the research process, as it also helps to communicate strategy planning.
3. OSMG Framework PowerPoint Template

Finally, we recommend presenters check our OSMG Framework PowerPoint template, as it is an ideal tool for representing a business plan: its goals, strategies, and measures for success. Expose complex processes in a simplified manner by adding this template to your poster presentation.
Remember these three words when making your research poster presentation: develop, design, and present. These are the three main actions toward a successful poster presentation.

The section below will take you on a step-by-step journey to create your next poster presentation.
Step 1: Define the purpose and audience of your poster presentation
Before making a poster presentation design, you’ll need to plan first. Here are some questions to answer at this point:
- Are they in your field?
- Do they know about your research topic?
- What can they get from your research?
- Will you print it?
- Is it for a virtual conference?
Step 2: Make an outline
With a clear purpose and strategy, it’s time to collect the most important information from your research paper, analysis, or documentation. Make a content dump and then select the most interesting information. Use the content to draft an outline.
Outlines help formulate the overall structure better than going straight into designing the poster. Mimic the standard poster structure in your outline using section headlines as separators. Go further and separate the content into the columns they’ll be placed in.
Step 3: Write the content
Write or rewrite the content for the sections in your poster presentation. Use the text in your research paper as a base, but summarize it to be more succinct in what you share.
Don’t forget to write a catchy title that presents the problem and your findings in a clear way. Likewise, craft the headlines for the sections in a similar tone as the title, creating consistency in the message. Include subtle transitions between sections to help follow the flow of information in order.
Avoid copying/pasting entire sections of the research paper on which the poster is based. Opt for the storytelling approach, so the delivered message results are interesting for your audience.
Step 4: Put it all together visually
This entire guide on how to design a research poster presentation is the perfect resource to help you with this step. Follow all the tips and guidelines and have an unforgettable poster presentation.
Moving on, here’s how to design a research poster presentation with PowerPoint Templates . Open a new project and size it to the standard 48 x 36 inches. Using the outline, map out the sections on the empty canvas. Add a text box for each title, headline, and body text. Piece by piece, add the content into their corresponding text box.

Transform the text information visually, make bullet points, and place the content in tables and timelines. Make your text visual to avoid chunky text blocks that no one will have time to read. Make sure all text sizes are coherent for all headings, body texts, image captions, etc. Double-check for spacing and text box formatting.
Next, add or create data visualizations, images, or diagrams. Align everything into columns and sections, making sure there’s no overflow. Add captions and legends to the visualizations, and check the color contrast with colleagues and friends. Ask for feedback and progress to the last step.
Step 5: Last touches
Time to check the final touches on your poster presentation design. Here’s a checklist to help finalize your research poster before sending it to printers or the virtual summit rep.
- Check the resolution of all visual elements in your poster design. Zoom to 100 or 200% to see if the images pixelate. Avoid this problem by using vector design elements and high-resolution images.
- Ensure that charts and graphs are easy to read and don’t look crowded.
- Analyze the visual hierarchy. Is there a visual flow through the title, introduction, data, and conclusion?
- Take a step back and check if it’s legible from a distance. Is there enough white space for the content to breathe?
- Does the design look inviting and interesting?
An often neglected topic arises when we need to print our designs for any exhibition purpose. Since A0 is a hard-to-manage format for most printers, these poster presentations result in heftier charges for the user. Instead, you can opt to work your design in two A1 sheets, which also becomes more manageable for transportation. Create seamless borders for the section on which the poster sheets should meet, or work with a white background.
Paper weight options should be over 200 gsm to avoid unwanted damage during the printing process due to heavy ink usage. If possible, laminate your print or stick it to photographic paper – this shall protect your work from spills.
Finally, always run a test print. Gray tints may not be printed as clearly as you see them on screen (this is due to the RGB to CMYK conversion process). Other differences can be appreciated when working with ink jet plotters vs. laser printers. Give yourself enough room to maneuver last-minute design changes.
Presenting a research poster is a big step in the poster presentation cycle. Your poster presentation might or might not be judged by faculty or peers. But knowing what judges look for will help you prepare for the design and oral presentation, regardless of whether you receive a grade for your work or if it’s business related. Likewise, the same principles apply when presenting at an in-person or virtual summit.
The opening statement
Part of presenting a research poster is welcoming the viewer to your small personal area in the sea of poster presentations. You’ll need an opening statement to pitch your research poster and get the viewers’ attention.
Draft a 2 to 3-sentence pitch that covers the most important points:
- What the research is
- Why was it conducted
- What the results say
From that opening statement, you’re ready to continue with the oral presentation for the benefit of your attendees.
The oral presentation
During the oral presentation, share the information on the poster while conversing with the interested public. Practice many times before the event. Structure the oral presentation as conversation points, and use the poster’s visual flow as support. Make eye contact with your audience as you speak, but don’t make them uncomfortable.
Pro Tip: In a conference or summit, if people show up to your poster area after you’ve started presenting it to another group, finish and then address the new visitors.
QA Sessions
When you’ve finished the oral presentation, offer the audience a chance to ask questions. You can tell them before starting the presentation that you’ll be holding a QA session at the end. Doing so will prevent interruptions as you’re speaking.
If presenting to one or two people, be flexible and answer questions as you review all the sections on your poster.
Supplemental Material
If your audience is interested in learning more, you can offer another content type, further imprinting the information in their minds. Some ideas include; printed copies of your research paper, links to a website, a digital experience of your poster, a thesis PDF, or data spreadsheets.
Your audience will want to contact you for further conversations; include contact details in your supplemental material. If you don’t offer anything else, at least have business cards.
Even though conferences have changed, the research poster’s importance hasn’t diminished. Now, instead of simply creating a printed poster presentation, you can also make it for digital platforms. The final output will depend on the conference and its requirements.
This guide covered all the essential information you need to know for creating impactful poster presentations, from design, structure and layout tips to oral presentation techniques to engage your audience better .
Before your next poster session, bookmark and review this guide to help you design a winning poster presentation every time.

Like this article? Please share
Cool Presentation Ideas, Design, Design Inspiration Filed under Design
Related Articles

Filed under Google Slides Tutorials • April 23rd, 2024
How to Align Objects in Google Slides
Optimize your layouts by learning how to align objects in Google Slides presentations. Step-by-step guide with screenshots.

Filed under Design • January 11th, 2024
How to Use Figma for Presentations
The powerful UI/UX prototyping software can also help us to craft high-end presentation slides. Learn how to use Figma as a presentation software here!

Filed under Design • December 28th, 2023
Multimedia Presentation: Insights & Techniques to Maximize Engagement
Harnessing the power of multimedia presentation is vital for speakers nowadays. Join us to discover how you can utilize these strategies in your work.
Leave a Reply
- SUGGESTED TOPICS
- The Magazine
- Newsletters
- Managing Yourself
- Managing Teams
- Work-life Balance
- The Big Idea
- Data & Visuals
- Reading Lists
- Case Selections
- HBR Learning
- Topic Feeds
- Account Settings
- Email Preferences
Create an Effective Slide Deck
A great presentation depends on more than the high-quality information you’re sharing. Here are some essential principles to help you create a memorable slide deck. Choose the right fonts. Use sans serif fonts like Helvetica or Arial for a minimal look and better readability. Stick to two font styles throughout your presentation—one for headings and another […]
A great presentation depends on more than the high-quality information you’re sharing. Here are some essential principles to help you create a memorable slide deck.
Source: This tip is adapted from “How to Make a ‘Good’ Presentation ‘Great’” by Guy Kawasaki
Partner Center
Trans health group fought study analyzing 'gender affirming care' for children, docs show
by JACKSON WALKER | The National Desk

BALTIMORE (TND) — A transgender health group tried to prevent researchers from publishing a study showing little evidence supporting gender transition procedures for children, according to documents acquired by Do No Harm (DNH).
In 2020, the World Professional Association for Transgender Health (WPATH) commissioned researchers from Johns Hopkins University in Maryland to execute “systematic reviews on the evidence supporting ‘gender affirming’ care,” DNH wrote via X. Those researchers allegedly found “little to no evidence about children and adolescents.”
Emails acquired by DNH show a Johns Hopkins researcher say WPATH later fought the release of the study, which contradicted its Standards of Care Version 8.
“I have been distracted and I am not sure what we will end up publishing in a timely manner as we have been having issues with this sponsor trying to restrict our ability to publish,” the researcher wrote. “This is not because the review questions were different but we found little to no evidence about children and adolescents.”
“Oh wow, sorry to hear about the issues with the sponsor,” another replied. “Knowing there is little/no evidence about adolescents is helpful.”
Johns Hopkins did not respond to repeated requests for comment from The National Desk (TND) on the matter. TND also reached out to WPATH for comment, but has not received a response. This story will be updated if responses from either are received.
READ MORE | Transgender health group supported 'unethical' operations on minors, report claims
"This is an outrageous rejection of good science and good medicine," Do No Harm board chairman Stanley Goldfarb said . "The case for so-called gender affirming care grows weaker by the day."
Gender transition procedures for minors have become a major topic of debate in the U.S. A 14-year-old staying in Wyoming for gender transitioning treatment in February was allegedly relocated to Canada without their parents’ consent.
“Our public defenders have just kind of told us to ‘be quiet, keep your head down, play nice and let your daughter finish this program,’” the child’s parents told TND at the time. “When it started to become clear that wasn’t what was happening and we spoke out, custody of our daughter was taken from us at that point.”
Follow Jackson Walker on X at @_jlwalker_ for the latest trending national news. Have a news tip? Send it to [email protected].
IMAGES
VIDEO
COMMENTS
Tip #4: Practice. Practice. Practice. You should always practice your presentation in full before you deliver it. You might feel silly delivering your presentation to your cat or your toddler, but you need to do it and do it again. You need to practice to ensure that your presentation fits within the time parameters.
Be neat. 2. Avoid trying to cram too much into one slide. y Don't be a slave to your slides. 3. Be brief. y use keywords rather than long sentences. 4. Avoid covering up slides.
How to improve your PPT slides for an academic presentation at university. It discusses design, fonts, structure, animation, pictures, graphs, and referencin...
Giving a good academic presentation. Think about the aim of your presentation and what you want to achieve. Concentrate on your audience: who they are and what they (want to) know. Choose the topic that interests you: involvement and motivation are key to confidence. Give your presentation a clear and logical organization so that everyone can ...
University of Southampton | Getting your point across. An academic guide to giving presentations 6 TO DO DOING NOW DONE In the weeks or days before the talk 3 Refine and narrow the topic so that you have a few main points or headings (usually between three and seven, depending on the length of the talk - a common structure is 3 x
Poster presentations. A poster is a way of visually conveying information about your work. It is meant to be a taster or overview highlighting your key points or findings, not an in-depth explanation and discussion. Your poster should communicate your point (s) effectively without you being there to explain it.
Here are 10 tips to keep in mind to ensure your presentation hits the mark. 1. Any time you put something on your slides, its primary purpose is to help the audience, not you. Many presenters will add copious text or other elements to help themselves remember points they want to make. However, this is usually less helpful for the audience (most ...
Check out our 10 top student tips for presenting at university. Further help available on our website: http://libguides.hull.ac.uk/present___________This vid...
Presentations with strong narrative arcs are clear, captivating, and compelling. Orient the audience and draw them in by demonstrating the relevance and importance of your research story with strong global motive. Provide them with the necessary vocabulary and background knowledge to understand the plot of your story.
The overall design of your presentation can either help or hinder your audience's understanding. Unnecessary and distracting elements can draw their attention away from what is important. Poor colour and font choices can make text unreadable. Here we give our 5 top tips for ensuring your design works for you and your audience.
Take a breath at the end of every sentence or point you make. Face the audience - to give a confident impression regularly make eye contact with your audience. If using a screen stand at a 45-degree angle so you have a good view of both your audience and your slides. Don't turn your back on your audience.
5. Be positive. Visualise the presentation being a success. Try to push all the negativity out of your brain and tell yourself the presentation will go well. Your audience is probably looking forward to hearing from you and won't be as critical as you are about your own presentation skills, so relax, you'll do great!
You will have more impact if your points are clear, simple, relevant, and direct. Beginning : Introduce yourself. Outline the aims of your talk and what you will cover in the presentation. Start with an attention grabber, such as a picture, an everyday example, or a rhetorical question. Middle : Your points should lead logically from each other.
Template for structuring an academic presentation. This MSWord document is a template for structuring a typical academic presentation, it can be adapted and changed if necessary depending on how long the presentation you need to give is. Try to fill it in using full sentences as these will become your slide titles.
Here are a few tips for business professionals who want to move from being good speakers to great ones: be concise (the fewer words, the better); never use bullet points (photos and images paired ...
Tip 4: Make use of charts and graphs. We all love a good stat. Charts and graphs are a great way to present quantitative evidence and confirm the legitimacy of your claims. They make your presentation more visually appealing and make your data more memorable too. But don't delve too deep into the details.
Three main focus points. The more you plan your presentation, the more confidence you will have in the information you are delivering. You need to consider three things throughout this process: topic, time limit, and audience. 1. Your topic. Your topic is what your presentation should be about.
Presentations. Presentations are a common form of assessment at University, as an individual or group activity, and can be challenging as they require a combination of different skills. Amongst other skills you may need to draw on the ability to: speak confidently in front of an audience. plan and organise how you will communicate complex ideas.
First is a two part set of videos that walks you through organizing a presentation. Part 1 - Creating an Introduction for a 10-15 Minute Scientfic Presentation. Part 2 - Creating the Body of a 10-15 Minute Presentation: Design/Methods; Data Results, Conclusions. Two additional videos should prove useful: Designing PowerPoint Slides for a ...
Move around, but make your movements deliberate. Don't nervously shift your feet (in fact, it's a good idea to imagine that your feet are nailed to the floor except for those times you deliberately choose to move). Use your vocal inflections to create a more dynamic presentation. Vary your voice as you're talking.
Research posters summarize information or research concisely and attractively to help publicize it and generate discussion. The poster is usually a mixture of a brief text mixed with tables, graphs, pictures, and other presentation formats. At a conference, the researcher stands by the poster display while other participants can come and view ...
26. "Thank you for the lively discussion. Let's continue to build on these ideas.". 27. "As we wrap up, I encourage you to reach out with any further questions.". 28. "In closing, I'd like to express my gratitude for your valuable input.". 29. "Let's conclude on a high note and take these learnings forward.".
Step 3: Write the content. Write or rewrite the content for the sections in your poster presentation. Use the text in your research paper as a base, but summarize it to be more succinct in what you share. Don't forget to write a catchy title that presents the problem and your findings in a clear way.
Here are some essential principles to help you create a memorable slide deck. Choose the right fonts. Use sans serif fonts like Helvetica or Arial for a minimal look and better readability. Stick ...
5Interact More. Sometimes, slides are just a backdrop to a more interactive session. If you sense disinterest, step away from the podium and interact with your audience. This could mean walking ...
Step 8: Determine Follow-Up Questions and Provide Answers. At the end of your product presentation, prospects or investors are likely to have a handful of questions about your product. Typically prospective customers ask questions to know if the product is a right fit for their organization.
BALTIMORE (TND) — A transgender health group tried to prevent researchers from publishing a study showing little evidence supporting gender transition procedures for children, according to documents acquired by Do No Harm (DNH). In 2020, the World Professional Association for Transgender Health (WPATH) commissioned researchers from Johns Hopkins University in Maryland to execute ...