Navigation Menu
Search code, repositories, users, issues, pull requests..., provide feedback.
We read every piece of feedback, and take your input very seriously.

Saved searches
Use saved searches to filter your results more quickly.
To see all available qualifiers, see our documentation .
- Notifications
Introduction to Deep Learning & Neural Networks with Keras on Coursera
Asceken/Week-5-Peer-graded-Assignment-Build-a-Regression-Model-in-Keras
Folders and files, repository files navigation, week-5-peer-graded-assignment-build-a-regression-model-in-keras.
- Jupyter Notebook 100.0%
- Español – América Latina
- Português – Brasil
- Tiếng Việt
- TensorFlow Core
Basic regression: Predict fuel efficiency
In a regression problem, the aim is to predict the output of a continuous value, like a price or a probability. Contrast this with a classification problem, where the aim is to select a class from a list of classes (for example, where a picture contains an apple or an orange, recognizing which fruit is in the picture).
This tutorial uses the classic Auto MPG dataset and demonstrates how to build models to predict the fuel efficiency of the late-1970s and early 1980s automobiles. To do this, you will provide the models with a description of many automobiles from that time period. This description includes attributes like cylinders, displacement, horsepower, and weight.
This example uses the Keras API. (Visit the Keras tutorials and guides to learn more.)
The Auto MPG dataset
The dataset is available from the UCI Machine Learning Repository .
Get the data
First download and import the dataset using pandas:
Clean the data
The dataset contains a few unknown values:
Drop those rows to keep this initial tutorial simple:
The "Origin" column is categorical, not numeric. So the next step is to one-hot encode the values in the column with pd.get_dummies .
Split the data into training and test sets
Now, split the dataset into a training set and a test set. You will use the test set in the final evaluation of your models.
Inspect the data
Review the joint distribution of a few pairs of columns from the training set.
The top row suggests that the fuel efficiency (MPG) is a function of all the other parameters. The other rows indicate they are functions of each other.

Let's also check the overall statistics. Note how each feature covers a very different range:
Split features from labels
Separate the target value—the "label"—from the features. This label is the value that you will train the model to predict.
Normalization
In the table of statistics it's easy to see how different the ranges of each feature are:
It is good practice to normalize features that use different scales and ranges.
One reason this is important is because the features are multiplied by the model weights. So, the scale of the outputs and the scale of the gradients are affected by the scale of the inputs.
Although a model might converge without feature normalization, normalization makes training much more stable.
The Normalization layer
The tf.keras.layers.Normalization is a clean and simple way to add feature normalization into your model.
The first step is to create the layer:
Then, fit the state of the preprocessing layer to the data by calling Normalization.adapt :
Calculate the mean and variance, and store them in the layer:
When the layer is called, it returns the input data, with each feature independently normalized:
Linear regression
Before building a deep neural network model, start with linear regression using one and several variables.
Linear regression with one variable
Begin with a single-variable linear regression to predict 'MPG' from 'Horsepower' .
Training a model with tf.keras typically starts by defining the model architecture. Use a tf.keras.Sequential model, which represents a sequence of steps .
There are two steps in your single-variable linear regression model:
- Normalize the 'Horsepower' input features using the tf.keras.layers.Normalization preprocessing layer.
- Apply a linear transformation (\(y = mx+b\)) to produce 1 output using a linear layer ( tf.keras.layers.Dense ).
The number of inputs can either be set by the input_shape argument, or automatically when the model is run for the first time.
First, create a NumPy array made of the 'Horsepower' features. Then, instantiate the tf.keras.layers.Normalization and fit its state to the horsepower data:
Build the Keras Sequential model:
This model will predict 'MPG' from 'Horsepower' .
Run the untrained model on the first 10 'Horsepower' values. The output won't be good, but notice that it has the expected shape of (10, 1) :
Once the model is built, configure the training procedure using the Keras Model.compile method. The most important arguments to compile are the loss and the optimizer , since these define what will be optimized ( mean_absolute_error ) and how (using the tf.keras.optimizers.Adam ).
Use Keras Model.fit to execute the training for 100 epochs:
Visualize the model's training progress using the stats stored in the history object:

Collect the results on the test set for later:
Since this is a single variable regression, it's easy to view the model's predictions as a function of the input:

Linear regression with multiple inputs
You can use an almost identical setup to make predictions based on multiple inputs. This model still does the same \(y = mx+b\) except that \(m\) is a matrix and \(x\) is a vector.
Create a two-step Keras Sequential model again with the first layer being normalizer ( tf.keras.layers.Normalization(axis=-1) ) you defined earlier and adapted to the whole dataset:
When you call Model.predict on a batch of inputs, it produces units=1 outputs for each example:
When you call the model, its weight matrices will be built—check that the kernel weights (the \(m\) in \(y=mx+b\)) have a shape of (9, 1) :
Configure the model with Keras Model.compile and train with Model.fit for 100 epochs:
Using all the inputs in this regression model achieves a much lower training and validation error than the horsepower_model , which had one input:

Regression with a deep neural network (DNN)
In the previous section, you implemented two linear models for single and multiple inputs.
Here, you will implement single-input and multiple-input DNN models.
The code is basically the same except the model is expanded to include some "hidden" non-linear layers. The name "hidden" here just means not directly connected to the inputs or outputs.
These models will contain a few more layers than the linear model:
- The normalization layer, as before (with horsepower_normalizer for a single-input model and normalizer for a multiple-input model).
- Two hidden, non-linear, Dense layers with the ReLU ( relu ) activation function nonlinearity.
- A linear Dense single-output layer.
Both models will use the same training procedure, so the compile method is included in the build_and_compile_model function below.
Regression using a DNN and a single input
Create a DNN model with only 'Horsepower' as input and horsepower_normalizer (defined earlier) as the normalization layer:
This model has quite a few more trainable parameters than the linear models:
Train the model with Keras Model.fit :
This model does slightly better than the linear single-input horsepower_model :

If you plot the predictions as a function of 'Horsepower' , you should notice how this model takes advantage of the nonlinearity provided by the hidden layers:

Regression using a DNN and multiple inputs
Repeat the previous process using all the inputs. The model's performance slightly improves on the validation dataset.

Collect the results on the test set:
Performance
Since all models have been trained, you can review their test set performance:
These results match the validation error observed during training.
Make predictions
You can now make predictions with the dnn_model on the test set using Keras Model.predict and review the loss:

It appears that the model predicts reasonably well.
Now, check the error distribution:

If you're happy with the model, save it for later use with Model.save :
If you reload the model, it gives identical output:
This notebook introduced a few techniques to handle a regression problem. Here are a few more tips that may help:
- Mean squared error (MSE) ( tf.keras.losses.MeanSquaredError ) and mean absolute error (MAE) ( tf.keras.losses.MeanAbsoluteError ) are common loss functions used for regression problems. MAE is less sensitive to outliers. Different loss functions are used for classification problems.
- Similarly, evaluation metrics used for regression differ from classification.
- When numeric input data features have values with different ranges, each feature should be scaled independently to the same range.
- Overfitting is a common problem for DNN models, though it wasn't a problem for this tutorial. Visit the Overfit and underfit tutorial for more help with this.
Except as otherwise noted, the content of this page is licensed under the Creative Commons Attribution 4.0 License , and code samples are licensed under the Apache 2.0 License . For details, see the Google Developers Site Policies . Java is a registered trademark of Oracle and/or its affiliates.
Last updated 2024-03-23 UTC.
Linear Regression using Keras and Python
Introduction
Are you looking for fast deep learning modeling? If so, Keras is going to be your natural choice. But there are so many deep learning frameworks available today, and the list is growing very fast—why choose Keras?
Keras has the capability and resources to run on top of popular deep learning libraries like TensorFlow, Theano, or CNTK. It also offers a relatively simple API that manages to also offer a lot of flexibility. This makes Keras easy to learn and easy to use. Isn’t that enough reason to start using Keras?
To demonstrate this, let’s work through a quick implementation of linear regression using Keras and Python.
Linear regression is a foundational algorithm in machine learning, which is great for getting started, because it’s based on simple mathematics. It works on the equation of a straight line, which is mathematically denoted as y = mx + c, where m is slope of the line and c is the intercept. x is the independent variable and y is the dependent variable.
Get the data:
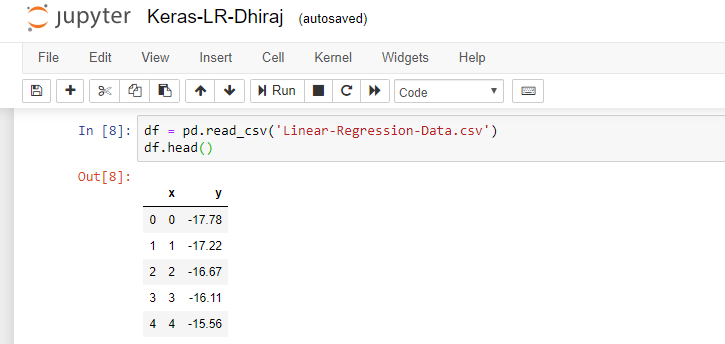
So let’s arrange our data first. For the purposes of this tutorial, we have a .csv file that has two variables (x and y), and we need to implement linear regression on this data. First, we load the data using Pandas in a data frame and check the head as shown below:
After that, we import the required libraries and create a sequential model using Keras. We need to implement NumPy, Pandas, Keras, keras.backend and TensorFlow. Note that we’re using TensorFlow as a Keras backend here.
We’re going to use the below high-level steps to work with Keras models:
- Define the model
Compile the model
- Fit the model
Predict using the model
Verify the outcome.
Keras is a high-level library that provides model-level components for building deep learning models. Keras is not designed to handle operations like tensor products, convolutions, etc. Hence, Keras depends on other specialized and optimized tensor manipulation libraries like TensorFlow, Theano or CNTK, which serve as the backend for a given Keras model.
Define the Model
Keras has a class called Sequential , which represents a linear grouping of layers. This class helps us create models layer-by-layer. Thus, using Sequential, we cannot create models that share layers. Also, Sequential does not support creating models that have multiple inputs or outputs. We can use the below import to get Sequential:
As seen below, we have created four dense layers. A dense layer is a layer in neural network that’s fully connected. In other words, all the neurons in one layer are connected to all other neurons in the next layer.
In the first layer, we need to provide the input shape, which is 1 in our case. The activation function we have chosen is ReLU, which stands for rectified linear unit.
ReLU is defined mathematically as F(x) = max(0,x) . In other words, the output is x, if x is greater than 0, and the output is 0 if x is 0 or negative.
After choosing our activation function, we still need to define the optimizer, compile the model, and fit the model. A machine learning algorithm should decide how to utilize the difference between the predicted value and actual value to adjust the weights so that the model converges. An optimizer is the algorithm which helps in deciding that action.
We’re using RMSprop as our optimizer here. RMSprop stands for Root Mean Square Propagation. It’s one of the most popular gradient descent optimization algorithms for deep learning networks. RMSprop is an optimizer that’s reliable and fast.
We’re compiling the mode using the model.compile function. The loss function used here is mean squared error . After the compilation of the model, we’ll use the fit method with 500 epochs.
I started with epochs value of 100 and then tested the model after training. The prediction was not that good. Then I modified the number of epochs to 200 and tested the model again. Accuracy had improved slightly, but figured I’d give it one more try. Finally, at 500 epochs I found acceptable prediction accuracy.
Fit the model:
The fit method takes three parameters; namely, x, y, and number of epochs. During model training, if all the batches of data are seen by the model once, we say that one epoch has been completed. Below is the output snapshot for model training. As you can see, we’re running 500 epochs in this example. After every epoch, we print the loss value. You can clearly see how the loss changes after each epochs.
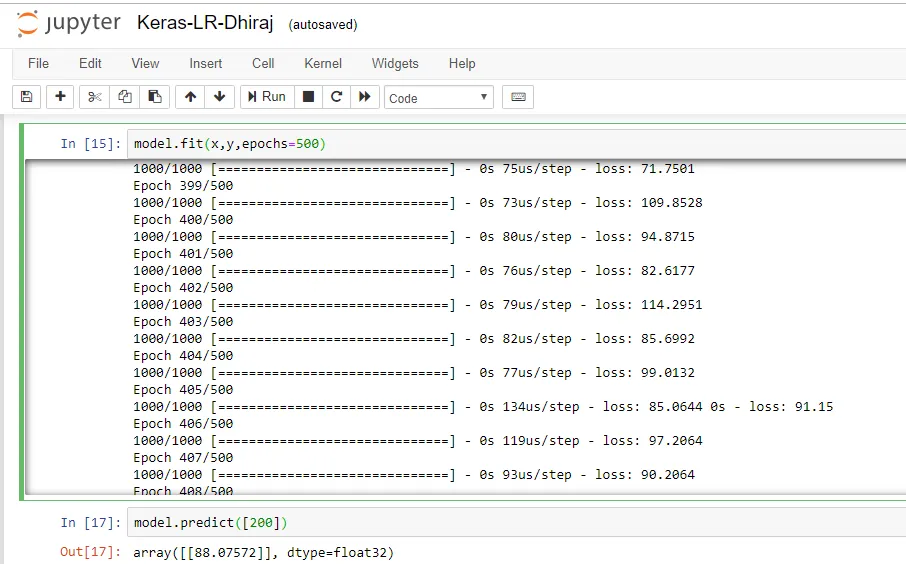
After training is completed, the next step is to predict the output using the trained model. We’re passing a random input of 200 and getting the predicted output as 88.07, as shown above.
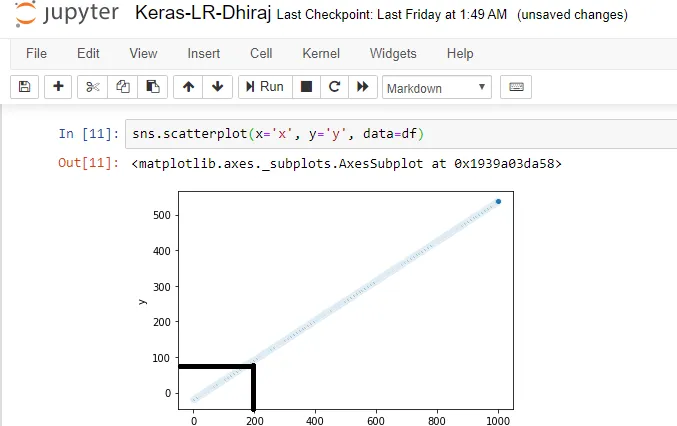
Let’s verify that our prediction is giving an accurate result. For this, we’ll plot the linear regression line for the data. In the graph below, for x = 200 we can easily see that the value of y should be around 90. And our prediction is y = 88. Hence, we can consider our prediction to be pretty highly accurate.
We have come to the end of this post. In this article, we learned how to create a linear regression model using Keras’s Sequential class and predict the values using the trained model. We also verified the accuracy of our model. You can find the code and the data for this article here .
I hope you liked the concepts related to Keras and also understood the code used to train a Keras model. There are many possibilities with hyper-parameter tuning and training to improve your model. Feel free to modify and play with the code.
Happy Machine Learning! 🙂

Our team has been at the forefront of Artificial Intelligence and Machine Learning research for more than 15 years and we're using our collective intelligence to help others learn, understand and grow using these new technologies in ethical and sustainable ways.
Comments 0 Responses
Leave a reply cancel reply.
Your email address will not be published. Required fields are marked *
Save my name, email, and website in this browser for the next time I comment.
Post Comment

Mohamad Syazwan
A Chemical Engineer, Machine Learning Enthusiast, Excel Maniac and A Coffee Lover!
- Kuala Lumpur
- Custom Social Profile Link
Building Regression Model using Keras: Part 1
5 minute read
In part 1 of this notebook, a regression model will be built using Keras deep learning framework to predict the compressive strength of concrete, based on its ingredients. The model will be trained several times with different network properties such as the number of epochs and hidden layers, to increase the model accuracy.
Credit: IBM Cognitive Class
Building a Concrete Compressive Strength Model using Keras Framework

Concrete Ingredients:
- Blast Furnace Slag
- Superplasticizer
- Coarse Aggregate
- Fine Aggregate
1. OBTAIN - Obtain Data from its Source.
First lets download the data and stored in pandas dataframe.
Let’s check the shape of the dataframe:
It has 1030 rows and 9 columns.
2. SCRUB - Clean / Preprocess Data to Format that Machine Understand.
The data looks very clean; no missing data and all data is in numerical form.
Nothing much here, lets move to our next step!
3. EXPLORE - Find Significant Patterns and Trends using Statistical Method.

As our objective is mainly to build the model, we will just touch a few in this EDA (exploratory data analysis) section.
4. MODEL - Construct Model to Predict and Forecast.
The part where the magic happens.
Split Data to Predictors and Target
Save number of feature columns, n_cols to use later in model development.
Importing SKLEARN and KERAS Libraries
Building the model.
A. BASELINE MODEL
Network Properties:
- Hidden Layer: 1
- Activation Function: ReLU
- Optimizer: Adam
- Loss Function: Mean Squared Error
B. MODEL WITH NORMALIZED DATA
Model is retrain with normalized data.
C. MODEL WITH 100 EPOCHS
- Epochs: 100
Model is retrained with 100 epochs.
D. MODEL WITH 3 HIDDEN LAYERS
- Hidden Layers: 3
Model is retrained with 3 hidden layers.
5. iNTERPRET - Analyze and Interpret Model
Comparing all evaluation metrics.
From the results above, we can clearly see that by applying:
- Data Normalization,
- Increasing Epochs,
- and Increasing Hidden Layers
the mean of MSE has gone down, while the mean of R^2 has gone up indicating that the model accuracy is getting better.
You may also enjoy
Work automation: python + excel + html.
less than 1 minute read
If you have a boring task to fill in a lot of data from Excel to website form, you can automate that process using python + openpyxl + selenium module.
Finding the Best Classification Algorithm for Predicting Loan Payment
12 minute read
This project will be focussing on finding the best classifier to predict whether a loan case will be paid off or not. We will use machine learning packages f...
Building Regression Model using Keras: Part 2
3 minute read
In part 2, the network properties will again be increased to achieve a higher model accuracy. Later, the model will be saved, load and predict new concrete s...
How to perform basic regression using keras model?
This recipe helps you perform basic regression using keras model Last Updated: 22 Dec 2022
Recipe Objective
In machine learning, our main motive is to create a model that can relate the dependent variable(i.e target) with the independent variable(i.e. data). The most common model to do this is regression analysis. Regression fits the best possible curve on the training data set so that it can predict the target using the same curve.
So this recipe is a short example of How to perform basic regression using keras model ?
Table of Contents
Step 1 - import the library, step 2 - loading the dataset, step 3 - creating regression model, step 4 - compiling the model, step 5 - fitting the model, step 6 - evaluating the model, step 7 - predicting the output.
import pandas as pd import numpy as np from keras.datasets import mnist from sklearn.model_selection import train_test_split from keras.models import Sequential from keras.layers import Dense from keras.layers import Dropout
We have imported pandas, numpy, mnist(which is the dataset), train_test_split, Sequential, Dense and Dropout. We will use these later in the recipe.
Here we have used the inbuilt mnist dataset and stored the train data in X_train and y_train. We have used X_test and y_test to store the test data. (X_train, y_train), (X_test, y_test) = mnist.load_data()
We have created an object model for sequential model. We can use two args i.e layers and name. model = Sequential() Now, We are adding the layers by using 'add'. We can specify the type of layer, activation function to be used and many other things while adding the layer. Here we are making regression model so we are making the linear stack of layers. We are using the activation function as 'relu' that is rectified linear unit, it has a advantage of being non linear also. model.add(Dense(512, activation='relu')) model.add(Dropout(0.5)) model.add(Dense(256, activation='relu')) model.add(Dropout(0.25)) model.add(Dense(10))
We can compile a model by using compile attribute. Let us first look at its parameters before using it.
- optimizer : In this, we can pass the optimizer we want to use. There is various optimizer like SGD, Adam etc.
- loss : In this, we can pass a loss function which we want for the model
- metrics : In this, we can pass the metric on which we want the model to be scored
model.compile(optimizer='Adam', loss='categorical_crossentropy', metrics=['accuracy'])
We can fit a model on the data we have and can use the model after that. Here we are using the data which we have splitted i.e the training data for fitting the model. While fitting we can pass various parameters like batch_size, epochs, verbose, validation_data and so on. model.fit(X_train, y_train, batch_size=128, epochs=2, verbose=1, validation_data=(X_test, y_test) model.summary()
After fitting a model we want to evaluate the model. Here we are using model.evaluate to evaluate the model and it will give us the loss and the accuracy. Here we have also printed the score. score = model.evaluate(X_test, y_test, verbose=0) print('Test loss:', score[0]) print('Test accuracy:', score[1])
Finally we are predicting the output for this we are using another part of the data that we get from test_train_split i.e. test data. We will use it and predict the output. y_pred = model.predict(X_test) print(y_pred) As an output we get:

What Users are saying..

Ameeruddin Mohammed
I come from a background in Marketing and Analytics and when I developed an interest in Machine Learning algorithms, I did multiple in-class courses from reputed institutions though I got good... Read More
Relevant Projects
Machine learning projects, data science projects, python projects for data science, data science projects in r, machine learning projects for beginners, deep learning projects, neural network projects, tensorflow projects, nlp projects, kaggle projects, iot projects, big data projects, hadoop real-time projects examples, spark projects, data analytics projects for students, you might also like, data science tutorial, data scientist salary, how to become a data scientist, data analyst vs data scientist, data scientist resume, data science projects for beginners, machine learning engineer, pandas dataframe, machine learning algorithms, regression analysis, mnist dataset, data science interview questions, python data science interview questions, spark interview questions, hadoop interview questions, data analyst interview questions, machine learning interview questions, aws vs azure, hadoop architecture, spark architecture.

Time Series Project to Build a Multiple Linear Regression Model

Build Deep Autoencoders Model for Anomaly Detection in Python

Multi-Class Text Classification with Deep Learning using BERT

Machine Learning Project to Forecast Rossmann Store Sales

Build CNN Image Classification Models for Real Time Prediction

Build Customer Propensity to Purchase Model in Python

Azure Deep Learning-Deploy RNN CNN models for TimeSeries

Deploying Machine Learning Models with Flask for Beginners

Hands-On Approach to Master PyTorch Tensors with Examples

Medical Image Segmentation Deep Learning Project
Subscribe to recipes, sign up to view recipe.
- Peer-graded Assignment: Regression Models Course Project
- by Carlos Chunga
- Last updated over 3 years ago
- Hide Comments (–) Share Hide Toolbars
Twitter Facebook Google+
Or copy & paste this link into an email or IM:
COMMENTS
Introduction to Deep Learning & Neural Networks with Keras on Coursera - Asceken/Week-5-Peer-graded-Assignment-Build-a-Regression-Model-in-Keras. ... Asceken/Week-5-Peer-graded-Assignment-Build-a-Regression-Model-in-Keras. This commit does not belong to any branch on this repository, and may belong to a fork outside of the repository. ...
Keras is a deep learning library that wraps the efficient numerical libraries Theano and TensorFlow. In this post, you will discover how to develop and evaluate neural network models using Keras for a regression problem. After completing this step-by-step tutorial, you will know: How to load a CSV dataset and make it available to Keras How to create a neural network model
Build a Regression Model in Keras - Coursera AI Course.ipynb_ File . Edit . View . Insert . Runtime . Tools . Help . link Share Share notebook. settings. ... # build the model model = regression_model() Start coding or generate with AI. [ ] # fit the model n_epochs = range (100, 1000, 100) mae = keras.losses.MeanAbsoluteError()
Training a model with tf.keras typically starts by defining the model architecture. Use a tf.keras.Sequential model, which represents a sequence of steps. There are two steps in your single-variable linear regression model: Normalize the 'Horsepower' input features using the tf.keras.layers.Normalization preprocessing layer.
There are two steps in your single-variable linear regression model: Normalize the 'Horsepower' input features using the tf.keras.layers.Normalization preprocessing layer. Apply a linear transformation (y = mx + b) to produce 1 output using a linear layer ( tf.keras.layers.Dense ).
In this tutorial I will be building a regression model by exploring a numerical house dataset to predict prices of houses in King County area. I use TensorFlow and Keras for building and evaluating the model. You can see a brief Exploratory Data Analysis (EDA) process too. First, we will start by importing necessary libraries.
You will learn about the different deep learning models and build your first deep learning model using the Keras library. After completing this course, learners will be able to: • Describe what a neural network is, what a deep learning model is, and the difference between them. • Demonstrate an understanding of unsupervised deep learning ...
Lakshmi Narain College of Technology. Academic year:2022/2023. Uploaded by: Anonymous Student. This document has been uploaded by a student, just like you, who decided to remain anonymous. Lakshmi Narain College of Technology.
For the purposes of this tutorial, we have a .csv file that has two variables (x and y), and we need to implement linear regression on this data. First, we load the data using Pandas in a data frame and check the head as shown below: After that, we import the required libraries and create a sequential model using Keras.
prediction = model.predict(X) Please note that the shuffle argument of fit () function for both kerasRegressor and model needs to be False. Moreover, for having the fixed initial state and obtain reproducible results, you need to add these lines of code at the beginning of your script: session = K.get_session()
5 minute read. In part 1 of this notebook, a regression model will be built using Keras deep learning framework to predict the compressive strength of concrete, based on its ingredients. The model will be trained several times with different network properties such as the number of epochs and hidden layers, to increase the model accuracy.
Peer-graded assignment: Coursera Regression Models Course Project
Course Intro: Build Regression, Classification, and Clustering Models • 2 minutes • Preview module; Build Linear Regression Models Using Linear Algebra Module Introduction • 1 minute; Linear Regression • 1 minute; Linear Equation • 2 minutes; Straight Line Fit to Data Example • 1 minute; Linear Regression in Machine Learning • 3 ...
University: Lakshmi Narain College of Technology. Info. AI Quiz. Download. this rsera explore what do you want to learn? nabeel hussain syed ye introduction to deep learning neural networks witl week build regression model in keras.
Step 3 - Creating Regression Model. We have created an object model for sequential model. We can use two args i.e layers and name. model = Sequential() Now, We are adding the layers by using 'add'. We can specify the type of layer, activation function to be used and many other things while adding the layer.
everything you need to complete coursera assignments is covered in this video.. i hope you all like it.!Also check out this : https://youtu.be/A9dfQSv-zQ4any...
Peer-graded Assignment: Regression Models Course Project; by Carlos Chunga; Last updated over 3 years ago Hide Comments (-) Share Hide Toolbars