
How to present Tables and Figures: An Ultimate Guide
by Peter Ebasone | Jul 10, 2020 | Writing

Introduction
Tables and figures are a great way to communicate your data in an easy and visually appealing way. In this article, you will learn how to present tables and figures that clearly communicate your message, based on recommendations by most Journals and Universities. This article focuses on the practical issues and is suitable both for writing a manuscript for publication and for a thesis/dissertation.
Every Table or Figure MUST be a stand-alone as a sequel to the preceding text. The reader must be able to understand it without further reference. It should be clear, labelled, abbreviations defined, and have a caption and legends which describe it clearly with the aim of making it as simple as possible.
Tables and figures are numbered chronologically in the order in which they appear in the text (for example, Figure 1 is referenced in the text before Figure 2 and so forth). The order of numbering for figures is independent of that for tables (e.g. Table 1., Table 2. AND Figure 1., Figure 2.).
Every table and figure included in your work MUST be referred to in a preceding text, preferably using parenthesis. For example: “We found no association between smoking and coronary artery disease (Table 1).”, “As shown in Table 1,…” or “Results are shown in Table 1.”
In the text, the word Figure can be abbreviated as “Fig.”, but “Table” should not be abbreviated.
Place each Table or Figure as close as possible to the sentence where you first referred to it in the text. This can be after the paragraph, on the next page or before the next heading.
Reference the author(s) or authority if the table or figure is from or adapted from someone else’s work. Include the words “Adapted from” or “Adapted with permission from” followed by the author’s name and a citation or link at the end of the caption.
The structure of an effective Table
Typically, a table is made up of a caption or title, column titles and a table body (which contains quantitative or qualitative data), it may also include footnotes (Table 1).
1. Caption (Title):
The Caption, also called Legend should clearly inform the reader of what the Table is all about and how it’s organized. Tables are read from top to bottom, so titles are placed above the body of the table and are left-aligned.
2. Column titles:
Column titles are short, descriptive and include the units of analysis.
3. Table body:
Information on tables is usually presented in columns (from top to bottom). When using numerical data with decimals, try to make the decimal points line up whenever possible.
4. Footnote:
You can use them to further explain the data presented in the table. You can use symbols or abbreviations in the table and provide their full meaning in the footnotes.

The structure of an effective Figure
Figures may be graphs, diagrams, photos, drawings, or maps. Pick the simplest Figure which can convey your message most effectively. They should not repeat the information found in the Tables. Like Tables, Figures should be centred horizontally on the page.
1. Figure captions
The Figure caption should be descriptive, concise and comprehensive. Unlike Tables, Figures are read from bottom to up, so captions are placed below the figure and are left-justified (Figure 1).
2. The Body of the Figure or Image:
The reader must be able to read details without straining the eyes, so the Figure should be large enough and have a good image resolution. When using graphs, include axes labels, scale and units.

Formatting of Tables and Figures:
- Generally, Table gridlines should be invisible and only horizontal lines separating the caption, column titles and footnotes from each other should be left visible. Some journals may have a custom design for all Tables and Figures. When you submit your manuscript, these journals can modify it to fit their design in the published version.
- When you have multiple Tables and Figures, be consistent with the design.
- Keep Tables simple, preferably in black and white. Avoid using shouting colours, if you must use colours select a gentle colour like blue. Pick complementary colours that visually match. The bottom line, stick to black and white whenever you can.
- Use the same font for the entire table.
- Keep tables and Figures centred-justified.
The video below shows how to format a table in Microsoft Word.
Tables should be :
- Centred horizontally on the page.
- Numbered chronologically as they appear in the text.
- Referenced in the order they appear in the text.
- Labelled with the table number and descriptive title above the table.
- Labelled with column and/or row labels that describe the data, including units of measurement.
- Set apart from the text itself; the text does not flow around the table.
Figures should be:
- Centred on the page.
- Titled (beneath the figure) with the figure number (“Figure” can be spelt out [“Figure 1.”] or abbreviated [“Fig. 1.”] as long as you are consistent).
- Numbered in the order in which they appear in the text.
- Referenced in the order in which they appear in the text
- Set apart from the text; text should not flow around figures.
Bibliography
- Almost Everything You Wanted to Know About Making Tables and Figures
http://abacus.bates.edu/~ganderso/biology/resources/writing/HTWtablefigs.html
- Figures and Charts by The University of North Carolina at Chapel Hill
https://writingcenter.unc.edu/tips-and-tools/figures-and-charts/
- Figures, Tables and References
http://www.bris.ac.uk/Depts/DeafStudiesTeaching/dissert/Figures,%20Tables%20&%20References.htm

Dr Ebasone is a physician and PhD Candidate at the University of Cape Town. He is the Director of Research Operations at CRENC. He is charged with coordinating the International Epidemiology Databases to Evaluate AIDS (IeDEA) in Cameroon.
Post Navigation
16 comments.

This is a very nice guide. Dr Ebasone explains the presentation of data in very simple and clear terms. Following this can definitely make your data easy to visualise and understand

Thank you Doctor.

Thanks a lot for the great and straight to the point lecture doctor Ebasone! This will go a long way to contribute in my career development.

Thanks Dr ebadone for the clear orientations
You are welcome. Hope this can help you improve your tables and figures in your dissertation.

Thanks Dr for this explicit guide.
You are welcome Sonia.

Straight to the point and gives you most,if not all of what’s needed at the same time ….huge fan

Well-done doc Ebasone. I think it’s an extremely helpful piece.

Concise, precise, easy to read, just Excellent!!!

Thanks Doctor. Straight forward. Great job!

Très instructif Dr , Merci

Merci docteur

Just on point. Thank you Dr.

Kudos Dr. Vanes, Always get chills when I discover African, especially Cameroonians contributing the the world of research.

Very explicit. Thanks Doctor!
Submit a Comment Cancel Reply
Your email address will not be published. Required fields are marked *
Notify me of follow-up comments by email.
Notify me of new posts by email.
Submit Comment
Receive updates on new courses and blog posts

Never Miss a Thing!
Subscribe to our mailing list to receive the latest news and updates on our webinars, articles and courses.
You have Successfully Subscribed!
- Research Process
- Manuscript Preparation
- Manuscript Review
- Publication Process
- Publication Recognition
- Language Editing Services
- Translation Services

How to Use Tables and Figures effectively in Research Papers
- 3 minute read
- 62.2K views
Table of Contents
Data is the most important component of any research. It needs to be presented effectively in a paper to ensure that readers understand the key message in the paper. Figures and tables act as concise tools for clear presentation . Tables display information arranged in rows and columns in a grid-like format, while figures convey information visually, and take the form of a graph, diagram, chart, or image. Be it to compare the rise and fall of GDPs among countries over the years or to understand how COVID-19 has impacted incomes all over the world, tables and figures are imperative to convey vital findings accurately.
So, what are some of the best practices to follow when creating meaningful and attractive tables and figures? Here are some tips on how best to present tables and figures in a research paper.
Guidelines for including tables and figures meaningfully in a paper:
- Self-explanatory display items: Sometimes, readers, reviewers and journal editors directly go to the tables and figures before reading the entire text. So, the tables need to be well organized and self-explanatory.
- Avoidance of repetition: Tables and figures add clarity to the research. They complement the research text and draw attention to key points. They can be used to highlight the main points of the paper, but values should not be repeated as it defeats the very purpose of these elements.
- Consistency: There should be consistency in the values and figures in the tables and figures and the main text of the research paper.
- Informative titles: Titles should be concise and describe the purpose and content of the table. It should draw the reader’s attention towards the key findings of the research. Column heads, axis labels, figure labels, etc., should also be appropriately labelled.
- Adherence to journal guidelines: It is important to follow the instructions given in the target journal regarding the preparation and presentation of figures and tables, style of numbering, titles, image resolution, file formats, etc.
Now that we know how to go about including tables and figures in the manuscript, let’s take a look at what makes tables and figures stand out and create impact.
How to present data in a table?
For effective and concise presentation of data in a table, make sure to:
- Combine repetitive tables: If the tables have similar content, they should be organized into one.
- Divide the data: If there are large amounts of information, the data should be divided into categories for more clarity and better presentation. It is necessary to clearly demarcate the categories into well-structured columns and sub-columns.
- Keep only relevant data: The tables should not look cluttered. Ensure enough spacing.
Example of table presentation in a research paper

For comprehensible and engaging presentation of figures:
- Ensure clarity: All the parts of the figure should be clear. Ensure the use of a standard font, legible labels, and sharp images.
- Use appropriate legends: They make figures effective and draw attention towards the key message.
- Make it precise: There should be correct use of scale bars in images and maps, appropriate units wherever required, and adequate labels and legends.
It is important to get tables and figures correct and precise for your research paper to convey your findings accurately and clearly. If you are confused about how to suitably present your data through tables and figures, do not worry. Elsevier Author Services are well-equipped to guide you through every step to ensure that your manuscript is of top-notch quality.

How to Write an Effective Problem Statement for Your Research Paper

How to Write Research Background: Key Points and Case Studies
You may also like.

Submission 101: What format should be used for academic papers?

Page-Turner Articles are More Than Just Good Arguments: Be Mindful of Tone and Structure!

A Must-see for Researchers! How to Ensure Inclusivity in Your Scientific Writing

Make Hook, Line, and Sinker: The Art of Crafting Engaging Introductions

Can Describing Study Limitations Improve the Quality of Your Paper?

A Guide to Crafting Shorter, Impactful Sentences in Academic Writing

6 Steps to Write an Excellent Discussion in Your Manuscript

How to Write Clear and Crisp Civil Engineering Papers? Here are 5 Key Tips to Consider
Input your search keywords and press Enter.
Princeton Correspondents on Undergraduate Research
How to Make a Successful Research Presentation
Turning a research paper into a visual presentation is difficult; there are pitfalls, and navigating the path to a brief, informative presentation takes time and practice. As a TA for GEO/WRI 201: Methods in Data Analysis & Scientific Writing this past fall, I saw how this process works from an instructor’s standpoint. I’ve presented my own research before, but helping others present theirs taught me a bit more about the process. Here are some tips I learned that may help you with your next research presentation:
More is more
In general, your presentation will always benefit from more practice, more feedback, and more revision. By practicing in front of friends, you can get comfortable with presenting your work while receiving feedback. It is hard to know how to revise your presentation if you never practice. If you are presenting to a general audience, getting feedback from someone outside of your discipline is crucial. Terms and ideas that seem intuitive to you may be completely foreign to someone else, and your well-crafted presentation could fall flat.
Less is more
Limit the scope of your presentation, the number of slides, and the text on each slide. In my experience, text works well for organizing slides, orienting the audience to key terms, and annotating important figures–not for explaining complex ideas. Having fewer slides is usually better as well. In general, about one slide per minute of presentation is an appropriate budget. Too many slides is usually a sign that your topic is too broad.

Limit the scope of your presentation
Don’t present your paper. Presentations are usually around 10 min long. You will not have time to explain all of the research you did in a semester (or a year!) in such a short span of time. Instead, focus on the highlight(s). Identify a single compelling research question which your work addressed, and craft a succinct but complete narrative around it.
You will not have time to explain all of the research you did. Instead, focus on the highlights. Identify a single compelling research question which your work addressed, and craft a succinct but complete narrative around it.
Craft a compelling research narrative
After identifying the focused research question, walk your audience through your research as if it were a story. Presentations with strong narrative arcs are clear, captivating, and compelling.
- Introduction (exposition — rising action)
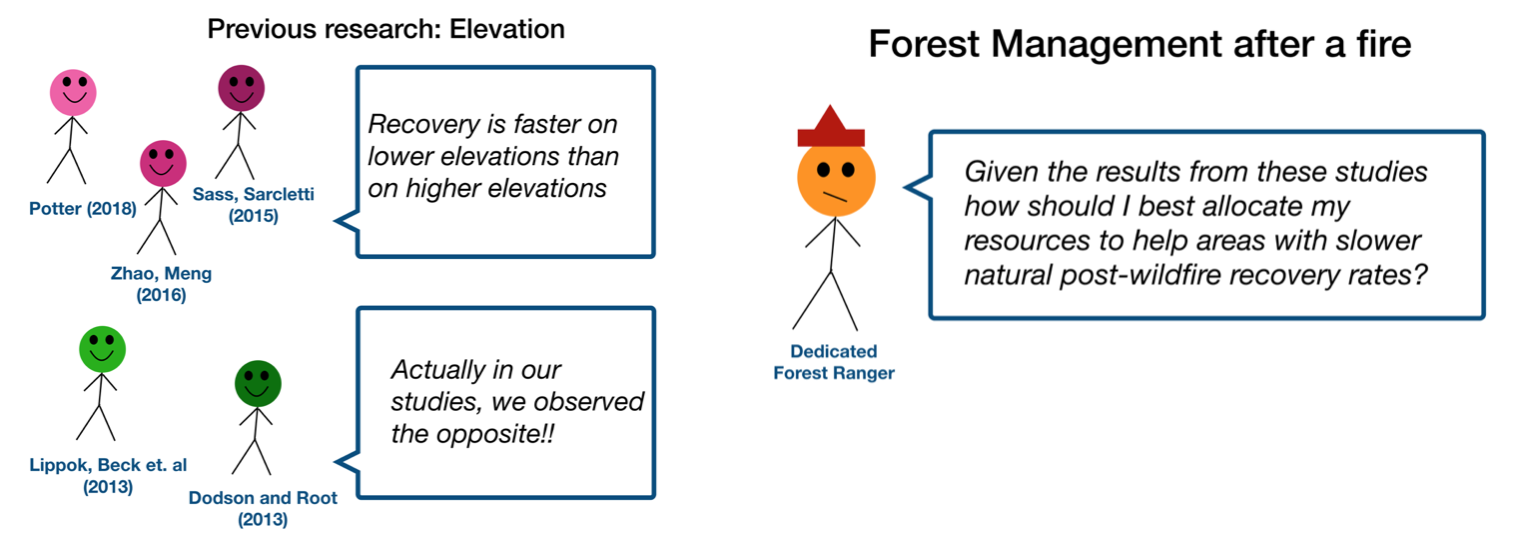
Orient the audience and draw them in by demonstrating the relevance and importance of your research story with strong global motive. Provide them with the necessary vocabulary and background knowledge to understand the plot of your story. Introduce the key studies (characters) relevant in your story and build tension and conflict with scholarly and data motive. By the end of your introduction, your audience should clearly understand your research question and be dying to know how you resolve the tension built through motive.
- Methods (rising action)
The methods section should transition smoothly and logically from the introduction. Beware of presenting your methods in a boring, arc-killing, ‘this is what I did.’ Focus on the details that set your story apart from the stories other people have already told. Keep the audience interested by clearly motivating your decisions based on your original research question or the tension built in your introduction.
- Results (climax)
Less is usually more here. Only present results which are clearly related to the focused research question you are presenting. Make sure you explain the results clearly so that your audience understands what your research found. This is the peak of tension in your narrative arc, so don’t undercut it by quickly clicking through to your discussion.
- Discussion (falling action)
By now your audience should be dying for a satisfying resolution. Here is where you contextualize your results and begin resolving the tension between past research. Be thorough. If you have too many conflicts left unresolved, or you don’t have enough time to present all of the resolutions, you probably need to further narrow the scope of your presentation.
- Conclusion (denouement)
Return back to your initial research question and motive, resolving any final conflicts and tying up loose ends. Leave the audience with a clear resolution of your focus research question, and use unresolved tension to set up potential sequels (i.e. further research).
Use your medium to enhance the narrative
Visual presentations should be dominated by clear, intentional graphics. Subtle animation in key moments (usually during the results or discussion) can add drama to the narrative arc and make conflict resolutions more satisfying. You are narrating a story written in images, videos, cartoons, and graphs. While your paper is mostly text, with graphics to highlight crucial points, your slides should be the opposite. Adapting to the new medium may require you to create or acquire far more graphics than you included in your paper, but it is necessary to create an engaging presentation.
The most important thing you can do for your presentation is to practice and revise. Bother your friends, your roommates, TAs–anybody who will sit down and listen to your work. Beyond that, think about presentations you have found compelling and try to incorporate some of those elements into your own. Remember you want your work to be comprehensible; you aren’t creating experts in 10 minutes. Above all, try to stay passionate about what you did and why. You put the time in, so show your audience that it’s worth it.
For more insight into research presentations, check out these past PCUR posts written by Emma and Ellie .
— Alec Getraer, Natural Sciences Correspondent
Share this:
- Share on Tumblr

Loading metrics
Open Access
Ten simple rules for effective presentation slides
* E-mail: [email protected]
Affiliation Biomedical Engineering and the Center for Public Health Genomics, University of Virginia, Charlottesville, Virginia, United States of America
- Kristen M. Naegle
Published: December 2, 2021
- https://doi.org/10.1371/journal.pcbi.1009554
- Reader Comments
Citation: Naegle KM (2021) Ten simple rules for effective presentation slides. PLoS Comput Biol 17(12): e1009554. https://doi.org/10.1371/journal.pcbi.1009554
Copyright: © 2021 Kristen M. Naegle. This is an open access article distributed under the terms of the Creative Commons Attribution License , which permits unrestricted use, distribution, and reproduction in any medium, provided the original author and source are credited.
Funding: The author received no specific funding for this work.
Competing interests: The author has declared no competing interests exist.
Introduction
The “presentation slide” is the building block of all academic presentations, whether they are journal clubs, thesis committee meetings, short conference talks, or hour-long seminars. A slide is a single page projected on a screen, usually built on the premise of a title, body, and figures or tables and includes both what is shown and what is spoken about that slide. Multiple slides are strung together to tell the larger story of the presentation. While there have been excellent 10 simple rules on giving entire presentations [ 1 , 2 ], there was an absence in the fine details of how to design a slide for optimal effect—such as the design elements that allow slides to convey meaningful information, to keep the audience engaged and informed, and to deliver the information intended and in the time frame allowed. As all research presentations seek to teach, effective slide design borrows from the same principles as effective teaching, including the consideration of cognitive processing your audience is relying on to organize, process, and retain information. This is written for anyone who needs to prepare slides from any length scale and for most purposes of conveying research to broad audiences. The rules are broken into 3 primary areas. Rules 1 to 5 are about optimizing the scope of each slide. Rules 6 to 8 are about principles around designing elements of the slide. Rules 9 to 10 are about preparing for your presentation, with the slides as the central focus of that preparation.
Rule 1: Include only one idea per slide
Each slide should have one central objective to deliver—the main idea or question [ 3 – 5 ]. Often, this means breaking complex ideas down into manageable pieces (see Fig 1 , where “background” information has been split into 2 key concepts). In another example, if you are presenting a complex computational approach in a large flow diagram, introduce it in smaller units, building it up until you finish with the entire diagram. The progressive buildup of complex information means that audiences are prepared to understand the whole picture, once you have dedicated time to each of the parts. You can accomplish the buildup of components in several ways—for example, using presentation software to cover/uncover information. Personally, I choose to create separate slides for each piece of information content I introduce—where the final slide has the entire diagram, and I use cropping or a cover on duplicated slides that come before to hide what I’m not yet ready to include. I use this method in order to ensure that each slide in my deck truly presents one specific idea (the new content) and the amount of the new information on that slide can be described in 1 minute (Rule 2), but it comes with the trade-off—a change to the format of one of the slides in the series often means changes to all slides.
- PPT PowerPoint slide
- PNG larger image
- TIFF original image
Top left: A background slide that describes the background material on a project from my lab. The slide was created using a PowerPoint Design Template, which had to be modified to increase default text sizes for this figure (i.e., the default text sizes are even worse than shown here). Bottom row: The 2 new slides that break up the content into 2 explicit ideas about the background, using a central graphic. In the first slide, the graphic is an explicit example of the SH2 domain of PI3-kinase interacting with a phosphorylation site (Y754) on the PDGFR to describe the important details of what an SH2 domain and phosphotyrosine ligand are and how they interact. I use that same graphic in the second slide to generalize all binding events and include redundant text to drive home the central message (a lot of possible interactions might occur in the human proteome, more than we can currently measure). Top right highlights which rules were used to move from the original slide to the new slide. Specific changes as highlighted by Rule 7 include increasing contrast by changing the background color, increasing font size, changing to sans serif fonts, and removing all capital text and underlining (using bold to draw attention). PDGFR, platelet-derived growth factor receptor.
https://doi.org/10.1371/journal.pcbi.1009554.g001
Rule 2: Spend only 1 minute per slide
When you present your slide in the talk, it should take 1 minute or less to discuss. This rule is really helpful for planning purposes—a 20-minute presentation should have somewhere around 20 slides. Also, frequently giving your audience new information to feast on helps keep them engaged. During practice, if you find yourself spending more than a minute on a slide, there’s too much for that one slide—it’s time to break up the content into multiple slides or even remove information that is not wholly central to the story you are trying to tell. Reduce, reduce, reduce, until you get to a single message, clearly described, which takes less than 1 minute to present.
Rule 3: Make use of your heading
When each slide conveys only one message, use the heading of that slide to write exactly the message you are trying to deliver. Instead of titling the slide “Results,” try “CTNND1 is central to metastasis” or “False-positive rates are highly sample specific.” Use this landmark signpost to ensure that all the content on that slide is related exactly to the heading and only the heading. Think of the slide heading as the introductory or concluding sentence of a paragraph and the slide content the rest of the paragraph that supports the main point of the paragraph. An audience member should be able to follow along with you in the “paragraph” and come to the same conclusion sentence as your header at the end of the slide.
Rule 4: Include only essential points
While you are speaking, audience members’ eyes and minds will be wandering over your slide. If you have a comment, detail, or figure on a slide, have a plan to explicitly identify and talk about it. If you don’t think it’s important enough to spend time on, then don’t have it on your slide. This is especially important when faculty are present. I often tell students that thesis committee members are like cats: If you put a shiny bauble in front of them, they’ll go after it. Be sure to only put the shiny baubles on slides that you want them to focus on. Putting together a thesis meeting for only faculty is really an exercise in herding cats (if you have cats, you know this is no easy feat). Clear and concise slide design will go a long way in helping you corral those easily distracted faculty members.
Rule 5: Give credit, where credit is due
An exception to Rule 4 is to include proper citations or references to work on your slide. When adding citations, names of other researchers, or other types of credit, use a consistent style and method for adding this information to your slides. Your audience will then be able to easily partition this information from the other content. A common mistake people make is to think “I’ll add that reference later,” but I highly recommend you put the proper reference on the slide at the time you make it, before you forget where it came from. Finally, in certain kinds of presentations, credits can make it clear who did the work. For the faculty members heading labs, it is an effective way to connect your audience with the personnel in the lab who did the work, which is a great career booster for that person. For graduate students, it is an effective way to delineate your contribution to the work, especially in meetings where the goal is to establish your credentials for meeting the rigors of a PhD checkpoint.
Rule 6: Use graphics effectively
As a rule, you should almost never have slides that only contain text. Build your slides around good visualizations. It is a visual presentation after all, and as they say, a picture is worth a thousand words. However, on the flip side, don’t muddy the point of the slide by putting too many complex graphics on a single slide. A multipanel figure that you might include in a manuscript should often be broken into 1 panel per slide (see Rule 1 ). One way to ensure that you use the graphics effectively is to make a point to introduce the figure and its elements to the audience verbally, especially for data figures. For example, you might say the following: “This graph here shows the measured false-positive rate for an experiment and each point is a replicate of the experiment, the graph demonstrates …” If you have put too much on one slide to present in 1 minute (see Rule 2 ), then the complexity or number of the visualizations is too much for just one slide.
Rule 7: Design to avoid cognitive overload
The type of slide elements, the number of them, and how you present them all impact the ability for the audience to intake, organize, and remember the content. For example, a frequent mistake in slide design is to include full sentences, but reading and verbal processing use the same cognitive channels—therefore, an audience member can either read the slide, listen to you, or do some part of both (each poorly), as a result of cognitive overload [ 4 ]. The visual channel is separate, allowing images/videos to be processed with auditory information without cognitive overload [ 6 ] (Rule 6). As presentations are an exercise in listening, and not reading, do what you can to optimize the ability of the audience to listen. Use words sparingly as “guide posts” to you and the audience about major points of the slide. In fact, you can add short text fragments, redundant with the verbal component of the presentation, which has been shown to improve retention [ 7 ] (see Fig 1 for an example of redundant text that avoids cognitive overload). Be careful in the selection of a slide template to minimize accidentally adding elements that the audience must process, but are unimportant. David JP Phillips argues (and effectively demonstrates in his TEDx talk [ 5 ]) that the human brain can easily interpret 6 elements and more than that requires a 500% increase in human cognition load—so keep the total number of elements on the slide to 6 or less. Finally, in addition to the use of short text, white space, and the effective use of graphics/images, you can improve ease of cognitive processing further by considering color choices and font type and size. Here are a few suggestions for improving the experience for your audience, highlighting the importance of these elements for some specific groups:
- Use high contrast colors and simple backgrounds with low to no color—for persons with dyslexia or visual impairment.
- Use sans serif fonts and large font sizes (including figure legends), avoid italics, underlining (use bold font instead for emphasis), and all capital letters—for persons with dyslexia or visual impairment [ 8 ].
- Use color combinations and palettes that can be understood by those with different forms of color blindness [ 9 ]. There are excellent tools available to identify colors to use and ways to simulate your presentation or figures as they might be seen by a person with color blindness (easily found by a web search).
- In this increasing world of virtual presentation tools, consider practicing your talk with a closed captioning system capture your words. Use this to identify how to improve your speaking pace, volume, and annunciation to improve understanding by all members of your audience, but especially those with a hearing impairment.
Rule 8: Design the slide so that a distracted person gets the main takeaway
It is very difficult to stay focused on a presentation, especially if it is long or if it is part of a longer series of talks at a conference. Audience members may get distracted by an important email, or they may start dreaming of lunch. So, it’s important to look at your slide and ask “If they heard nothing I said, will they understand the key concept of this slide?” The other rules are set up to help with this, including clarity of the single point of the slide (Rule 1), titling it with a major conclusion (Rule 3), and the use of figures (Rule 6) and short text redundant to your verbal description (Rule 7). However, with each slide, step back and ask whether its main conclusion is conveyed, even if someone didn’t hear your accompanying dialog. Importantly, ask if the information on the slide is at the right level of abstraction. For example, do you have too many details about the experiment, which hides the conclusion of the experiment (i.e., breaking Rule 1)? If you are worried about not having enough details, keep a slide at the end of your slide deck (after your conclusions and acknowledgments) with the more detailed information that you can refer to during a question and answer period.
Rule 9: Iteratively improve slide design through practice
Well-designed slides that follow the first 8 rules are intended to help you deliver the message you intend and in the amount of time you intend to deliver it in. The best way to ensure that you nailed slide design for your presentation is to practice, typically a lot. The most important aspects of practicing a new presentation, with an eye toward slide design, are the following 2 key points: (1) practice to ensure that you hit, each time through, the most important points (for example, the text guide posts you left yourself and the title of the slide); and (2) practice to ensure that as you conclude the end of one slide, it leads directly to the next slide. Slide transitions, what you say as you end one slide and begin the next, are important to keeping the flow of the “story.” Practice is when I discover that the order of my presentation is poor or that I left myself too few guideposts to remember what was coming next. Additionally, during practice, the most frequent things I have to improve relate to Rule 2 (the slide takes too long to present, usually because I broke Rule 1, and I’m delivering too much information for one slide), Rule 4 (I have a nonessential detail on the slide), and Rule 5 (I forgot to give a key reference). The very best type of practice is in front of an audience (for example, your lab or peers), where, with fresh perspectives, they can help you identify places for improving slide content, design, and connections across the entirety of your talk.
Rule 10: Design to mitigate the impact of technical disasters
The real presentation almost never goes as we planned in our heads or during our practice. Maybe the speaker before you went over time and now you need to adjust. Maybe the computer the organizer is having you use won’t show your video. Maybe your internet is poor on the day you are giving a virtual presentation at a conference. Technical problems are routinely part of the practice of sharing your work through presentations. Hence, you can design your slides to limit the impact certain kinds of technical disasters create and also prepare alternate approaches. Here are just a few examples of the preparation you can do that will take you a long way toward avoiding a complete fiasco:
- Save your presentation as a PDF—if the version of Keynote or PowerPoint on a host computer cause issues, you still have a functional copy that has a higher guarantee of compatibility.
- In using videos, create a backup slide with screen shots of key results. For example, if I have a video of cell migration, I’ll be sure to have a copy of the start and end of the video, in case the video doesn’t play. Even if the video worked, you can pause on this backup slide and take the time to highlight the key results in words if someone could not see or understand the video.
- Avoid animations, such as figures or text that flash/fly-in/etc. Surveys suggest that no one likes movement in presentations [ 3 , 4 ]. There is likely a cognitive underpinning to the almost universal distaste of pointless animations that relates to the idea proposed by Kosslyn and colleagues that animations are salient perceptual units that captures direct attention [ 4 ]. Although perceptual salience can be used to draw attention to and improve retention of specific points, if you use this approach for unnecessary/unimportant things (like animation of your bullet point text, fly-ins of figures, etc.), then you will distract your audience from the important content. Finally, animations cause additional processing burdens for people with visual impairments [ 10 ] and create opportunities for technical disasters if the software on the host system is not compatible with your planned animation.
Conclusions
These rules are just a start in creating more engaging presentations that increase audience retention of your material. However, there are wonderful resources on continuing on the journey of becoming an amazing public speaker, which includes understanding the psychology and neuroscience behind human perception and learning. For example, as highlighted in Rule 7, David JP Phillips has a wonderful TEDx talk on the subject [ 5 ], and “PowerPoint presentation flaws and failures: A psychological analysis,” by Kosslyn and colleagues is deeply detailed about a number of aspects of human cognition and presentation style [ 4 ]. There are many books on the topic, including the popular “Presentation Zen” by Garr Reynolds [ 11 ]. Finally, although briefly touched on here, the visualization of data is an entire topic of its own that is worth perfecting for both written and oral presentations of work, with fantastic resources like Edward Tufte’s “The Visual Display of Quantitative Information” [ 12 ] or the article “Visualization of Biomedical Data” by O’Donoghue and colleagues [ 13 ].
Acknowledgments
I would like to thank the countless presenters, colleagues, students, and mentors from which I have learned a great deal from on effective presentations. Also, a thank you to the wonderful resources published by organizations on how to increase inclusivity. A special thanks to Dr. Jason Papin and Dr. Michael Guertin on early feedback of this editorial.
- View Article
- PubMed/NCBI
- Google Scholar
- 3. Teaching VUC for Making Better PowerPoint Presentations. n.d. Available from: https://cft.vanderbilt.edu/guides-sub-pages/making-better-powerpoint-presentations/#baddeley .
- 8. Creating a dyslexia friendly workplace. Dyslexia friendly style guide. nd. Available from: https://www.bdadyslexia.org.uk/advice/employers/creating-a-dyslexia-friendly-workplace/dyslexia-friendly-style-guide .
- 9. Cravit R. How to Use Color Blind Friendly Palettes to Make Your Charts Accessible. 2019. Available from: https://venngage.com/blog/color-blind-friendly-palette/ .
- 10. Making your conference presentation more accessible to blind and partially sighted people. n.d. Available from: https://vocaleyes.co.uk/services/resources/guidelines-for-making-your-conference-presentation-more-accessible-to-blind-and-partially-sighted-people/ .
- 11. Reynolds G. Presentation Zen: Simple Ideas on Presentation Design and Delivery. 2nd ed. New Riders Pub; 2011.
- 12. Tufte ER. The Visual Display of Quantitative Information. 2nd ed. Graphics Press; 2001.
Presenting Research Data Effectively Through Tables and Figures

Presenting research data and key findings in an organized, visually attractive, and meaningful manner is a key part of a good research paper. This is particularly important in instances where complex data and information, which cannot be easily communicated through text alone, need to be presented engagingly. The best way to do this is through the use of tables and figures. They help to organize and summarize large amounts of data and present it in an easy-to-understand way.
Tables are used to present numerical data, while figures are used to display non-numerical data, such as graphs, charts, and diagrams. There are different types of tables and figures, and choosing the appropriate format is essential to present the data effectively. This article provides some insights on how to present research data and findings using tables and figures.
How to present research data in tables?
When complex data and statistical findings are too unwieldy or difficult to present either in text form or as figures, they can be presented through tables. Tables are best used where exact numerical values need to be analyzed and shared. It also aids in the comparison and contrast of various features or values among the different units. This allows swift and easy identification of patterns in the datasets. While presenting tables in a research paper, it is essential to incorporate certain core elements to ensure that readers are able to draw inferences and conclusions easily and quickly.
- Title of the table : The title should be concise and clear and communicate the purpose of the table. Tables must be referenced in the text through table numbers. Both the table number and the title are ideally mentioned just above the table.
- Body of the table: A crucial element in preparing the body of a table is to ensure uniformity in terms of units of measurement and the accurate use of decimal places. It is also important to format the table and ensure equal spacing between rows and columns.
- Keep it simple and accurate: It is important to ensure that only relevant information is presented in the table. One needs to be cautious not to populate tables with unnecessary information or design elements. Using plain fonts, in italics or bold, and the use of color or border styles help make the table visually appealing. Rows and columns must be labeled clearly and accurately to ensure that there is no ambiguity in analyzing the data presented.
How to present research data in figures?
Figures are a powerful tool for visually presenting research data and key study findings. Figures are usually used to communicate trends or relationships and general patterns emerging from datasets. They are also used to present research data and complex information in a simpler form. Figures can take various forms like graphs, pie charts, scatter plots, line diagrams, drawings, maps, and photos. Early career researchers need to know how best to present figures in their research papers. The following are some core elements that should be incorporated.
- Title: Every figure must have a title that is clear and concise and must summarize the main point of the data being presented. It should be placed just below the figure. The numbering of the figures should be sequential and must correspond to the reference provided in the text.
- Type of figure: The type of figure to be used is usually dictated by the kind of information to be conveyed. Researchers need to decide which type of figure will enable readers to understand the information being shared easily. For example, scatter plots can be used to show relationships between two variables, pie charts can be used to illustrate relative proportions, and graphs can be used for the quantitative relationship between variables.
- Use of Images: When using figures, care should be taken to ensure that images are of a high resolution – sharp and clear.
- Labeling: Ensuring that all parts of the figures and the axes are labeled accurately is crucial if readers are to glean important details quickly. Use standard font sizes and styles. Experts also suggest the inclusion of scale bars in maps.
Tips for Effectively Presenting Research Data through Tables and Figures
When presenting research data through tables or figures, it’s important to ensure that it is adding value to the text and not merely repeating values. This means taking care of certain vital aspects to ensure that the presentation is uniform, clear, and easy to read. Here are some tips to help you achieve that:
- Make sure that tables or figures add value to the text
- Ensure uniformity in numbering of tables, figures, and values both in the text and in the visual presentation
- Cite the source if tables and figures are used from a different source
- Use appropriate scales when creating tables and figures
- Use logarithmic scales if the data covers a wide range
- Use linear scales if the data is relatively small
- Check publication or style guide instructions of the target journal regarding the presentation of research data and findings, image resolution, presentation style, formatting, and so on
- Remember, tables and figures are only tools to convey information – using too many of them can overwhelm readers
In summary, presenting research data through tables and figures can be an effective way to convey information. However, it’s important to follow these tips to ensure that the presentation is clear and easy to read. By taking care of these vital aspects, researchers can effectively communicate their findings to their intended audience.
Paperpal is an AI writing assistant that help academics write better, faster with real-time suggestions for in-depth language and grammar correction. Trained on millions of research manuscripts enhanced by professional academic editors, Paperpal delivers human precision at machine speed.
Try it for free or upgrade to Paperpal Prime , which unlocks unlimited access to premium features like academic translation, paraphrasing, contextual synonyms, consistency checks and more. It’s like always having a professional academic editor by your side! Go beyond limitations and experience the future of academic writing. Get Paperpal Prime now at just US$19 a month!
Related Reads:
- 6 Tips for Post-Doc Researchers to Take Their Career to the Next Level
- 5 Reasons for Rejection After Peer Review
- Ethical Research Practices For Research with Human Subjects
- Ethics in Science: Importance, Principles & Guidelines
Empirical Research: A Comprehensive Guide for Academics
How to write a scientific paper in 10 steps , you may also like, how to write a case study in research..., what are research skills definition, importance, and examples , what is phd dissertation defense and how to..., machine translation vs human translation: which is reliable..., what is academic integrity, and why is it..., how to make a graphical abstract, how to cite in apa format (7th edition):..., academic integrity vs academic dishonesty: types & examples, the ai revolution: authors’ role in upholding academic..., the future of academia: how ai tools are....
Effective use of tables and figures in abstracts, presentations, and papers
Affiliation.
- 1 Department of Anesthesiology, University of Virginia Health Science Center, PO Box 800710, Charlottesville, VA 22908-0170, USA. [email protected]
- PMID: 15447809
In some situations, tables, graphs, and figures can present certain types of information (including complicated relationships and sequences of events) more clearly and in less space than the same information would require in sentence form. However, do not use tables, graphs, and figures for small amounts of data that could be conveyed clearly and succinctly in a sentence. Also, do not reiterate in sentences the data that are shown in a table, graph, or figure: the point of creating a table or graph or figure is to eliminate that type of sentence from your manuscript. In building a data table you must balance the necessity that the table be complete with the equally important necessity that it not be too complex. Sometimes it is helpful to break a large table into several smaller ones to allow the reader to identify important information easily, but, conversely, it is a common mistake of novice authors to split up into several tables data that belong in one table. In almost all cases, only one table or graph or figure should be included in an abstract, and then only if it can convey essential information in less space and in a more easily interpretable way than the sentence form. For a poster, in almost all instances you should use only one typeface and one font in a table, graph, or figure. In general, do not use bold, italics, or color unless you are presenting a great deal of data and you need to highlight certain data values and you are certain that using bold, italics, or color will improve readability, which is rare. Do not include identical information in a table and a graph/figure. In reporting a clinical trial you will need to include a patient flow chart that identifies the number of patients initially screened for the study, the number of patients who were excluded (and why) after initial screening or in the final analysis, and how many patients entered, exited early, and completed each arm of the study. A treatment protocol should also be described with a flow chart. In preparing a graph the most common error is to include a line that suggests an unsubstantiated extrapolation between or beyond the data points. In selecting the graph's axes, avoid truncating, enlarging, or compressing the axes in ways that might make the graph confusing or misleading. To prepare clear, accurate, easily interpretable tables, graphs, and figures, rely on the rules described in authoritative guides such as the Council of Science Editors' Scientific Style and Format and the American Medical Association's Manual of Style.
- Abstracting and Indexing*
- Biomedical Research
- Clinical Protocols
- Clinical Trials as Topic
- Congresses as Topic*
- Medical Illustration
- Writing* / standards

Presenting Figures and Their Importance in Research Papers
The old adage that a picture tells a thousand words can be very true in research articles. Used correctly, figures provide efficient visual presentations of your qualitative or quantitative findings. Used incorrectly, figures and tables can be confusing or even misleading for the reader. It is, therefore, crucial to consider how this data will be presented in your articles carefully during the manuscript preparation process.
Using Figures in Articles
One useful approach to writing research articles is to list each of your key findings in a logical order. Then, create figures or tables illustrating the data that you intend to report. This, in turn, provides the skeletal content and structure of your Methods section, which should match the order in which the figures are provided. At this early stage, identifying the journal to which you will submit the article is important because each journal has specific formatting instructions relating to figures and tables, which can be found in the ‘Instructions to Authors’ section. These may be very detailed, such as those provided by the Journal of Clinical Investigation . If the formatting instructions are not very specific, consider using the following standard approaches.
Conciseness and Consistency
Depending on the journal guidelines, figures and tables are usually placed within the text or on separate pages after the end-list references. Always ensure that the legends and abbreviations have exactly the same format as that used in the text. Finally, ensure that every figure provides a clear and brief explanation of the results that have been obtained. Also, it may be necessary to provide important background information regarding the images that have been used as journals are employing tools and processes to detect data and image manipulation.
Using Figures or Tables
Table footnotes are usually provided below each table to explain the data provided within them such as the abbreviations and symbols that have been used. Similarly, for each figure a good caption, which should be as short as possible, is critical to help the reader understand the content that has been presented. Depending on the nature of the results that have been obtained, some types of information clearly need to be presented as images, whereas tables are helpful for providing detailed data analysis (for example, lists of target gene names, codes, and primer sequences). For any research paper , balancing the usage of figures or tables helps the reader understand the content easily and determine the relevance of your study for his research. For example, when presenting changes in the expression of a number of genes under various conditions, or temporal changes in soil bacteria levels at a range of locations, it is sensible to choose the form that best conveys your key message relating to the specific research finding. Often, the best way to make this decision is to create multiple alternative Figures and/or Tables and consult your co-authors or colleagues to determine which of them fit the requirements of the article. It is always good to effectively convey information through figures and tables as readers and journals prefer having articles that are visually appealing.
Rate this article Cancel Reply
Your email address will not be published.

Enago Academy's Most Popular Articles

- Figures & Tables
- Reporting Research
Practical Tips on Figure and Table Legends for Manuscripts
Manuscript writing is an integral part of sharing research outcomes. Authors write and publish manuscripts…

Preparing Scientific Figures for Your Manuscript: RBG vs. CMYK Spectrum Format
When you open Photoshop, you are prompted to choose between RBG and CMYK. At first…

Choosing the Best Format to Present Your Data
There are many useful ways to present your research data to editors, referees, and readers.…
Enhancing Research Articles With Tables and Figures
Tables and figures undoubtedly play a critical role in enhancing manuscript quality. Scientific tables and…
Improving Clarity and Color in Scientific Images
For a scientific image to be effective, its meaning must be readily understood. There are…

Sign-up to read more
Subscribe for free to get unrestricted access to all our resources on research writing and academic publishing including:
- 2000+ blog articles
- 50+ Webinars
- 10+ Expert podcasts
- 50+ Infographics
- 10+ Checklists
- Research Guides
We hate spam too. We promise to protect your privacy and never spam you.
- Industry News
- Publishing Research
- AI in Academia
- Promoting Research
- Career Corner
- Diversity and Inclusion
- Infographics
- Expert Video Library
- Other Resources
- Enago Learn
- Upcoming & On-Demand Webinars
- Open Access Week 2024
- Peer Review Week 2024
- Conference Videos
- Enago Report
- Journal Finder
- Enago Plagiarism & AI Grammar Check
- Editing Services
- Publication Support Services
- Research Impact
- Translation Services
- Publication solutions
- AI-Based Solutions
- Thought Leadership
- Call for Articles
- Call for Speakers
- Author Training
- Edit Profile
I am looking for Editing/ Proofreading services for my manuscript Tentative date of next journal submission:

What factors would influence the future of open access (OA) publishing?
IMAGES
VIDEO
COMMENTS
Tables and figures are a great way to communicate your data in an easy and visually appealing way. In this article, you will learn how to present tables and figures that clearly communicate your message, based on …
Tables and figures are used in research papers to effectively present detailed results and complex relationships, reduce the length of the manuscript, and enhance readers’ …
Figures and tables act as concise tools for clear presentation. Tables display information arranged in rows and columns in a grid-like format, while figures convey information visually, and take the form of a graph, diagram, chart, or …
Craft a compelling research narrative. After identifying the focused research question, walk your audience through your research as if it were a story. Presentations with strong narrative arcs are clear, captivating, and compelling. …
The rules are broken into 3 primary areas. Rules 1 to 5 are about optimizing the scope of each slide. Rules 6 to 8 are about principles around designing elements of the slide. Rules 9 to 10 are about preparing for your …
Presenting research data and key findings in an organized, visually attractive, and meaningful manner is a key part of a good research paper. Learn how to effectively present research data using tables and figures …
To prepare clear, accurate, easily interpretable tables, graphs, and figures, rely on the rules described in authoritative guides such as the Council of Science Editors' Scientific Style and …
The old adage that a picture tells a thousand words can be very true in research articles. Used correctly, figures provide efficient visual presentations of your qualitative or …