PowerPoint 101: The Ultimate Guide for Beginners

Are you struggling with PowerPoint? You need a quick design in PowerPoint but don't know where to start? Don't worry, you have nothing to be ashamed of.
In this article, we're going to refresh the most important PowerPoint basics so you can take advantage of this Microsoft software and create high-impact presentations at any time!
Millions of users worldwide use Microsoft 365 services , making PowerPoint the presentation design software with the highest market share. And with good reason! PowerPoint's features stand out for its usability and originality . We can tell you that PowerPoint is pretty intuitive software, and it's a great option to choose when working with presentations on a daily basis. So, are you ready for a quick PowerPoint 101 class?
Let ' s see what you ' re going to learn today with this PowerPoint Guide :

What is PowerPoint?
What are the best uses of powerpoint, powerpoint basics: what are the components of powerpoint workspace, mastering powerpoint: what are the main features of powerpoint, what are powerpoint templates and where to find them, time to practice how to make a presentation in powerpoint.

Microsoft PowerPoint is a presentation design software that is part of Microsoft 365 . This software allows you to design presentations by combining text, images, graphics, video, and animation on slides in a simple and intuitive way.
Over time, PowerPoint has evolved and improved its accessibility to users. For this reason, it has been adapted to the main operating systems and modalities:
- PowerPoint Online
Additionally, you can use Word and Excel in this online version. That way, you'll be able to make real-time changes in the cloud without fearing losing your files. Sounds great, right?
PowerPoint has a versatile range of uses. Here's a list of the different tasks you can complete with this presentation design software:
- Business presentations or Pitch decks.
- Marketing, Sales and HR plans.
- Project briefs and timelines.
- Inductions to new employees.
- Seminars and educational classes.
- Professional portfolio of photos or designs.
- Presentations of a research summary.
- Presentations for special occasions.
These are just a few examples of the multiple possibilities this Microsoft software offers. Your imagination is the only limit!
Stay tuned as we continue with this PowerPoint 101 Guide...

In order to deeply understand this presentation design software, you need to recognize its main components. Now it's time to learn about the PowerPoint basics!
A quick note before going any further: when opening PowerPoint, some of the commands in the ribbons will look grayish and won't be highlighted when you hover the mouse over them.
This happens since some commands need to be selected in order to function. For example, if you want to change the color of a text, you first need to select it.
That being said, let's start with this Guide for PowerPoint beginners:
PowerPoint Main Window
The first aspect to learn is PowerPoint Main Window. To facilitate the explanation, we've organized its main elements with numbers from 1 to 10:

Based on that, the main components of PowerPoint window are the following:
1. Quick Access Toolbar: allows you to customize commands to have them at hand. You only have to select it and go to "More commands."
2. Title Bar: shows you the name of your file and other "Suggested options" like Slide Master View . These options will vary depending on the use you give to the commands.
3. File Tab: you will see the Home Menu (PowerPoint backstage) by selecting it. There, you can create a new presentation, save it, print it, export it, and many other options.
4. The Ribbon: it's where PowerPoint tabs and tools are. These tools can also be called "commands" or “features.”
5. More Button or Down Arrow: these arrows allow you to view more tools or layout options in PowerPoint.
6. Slides Pane: shows your slides in thumbnail size. By right-clicking, you can access additional options for customizing each slide. Perfect for PowerPoint beginners!
7. Slide: PowerPoint's blank canvas and the frame to be seen when presenting the file.
8. Placeholders: they are dotted boxes that will store your content.
9. Status Bar: allows you to view the slide number, grammatical errors, speaker notes, and the comments on your file.
10. Zoom: allows you to enlarge or minimize your PowerPoint workspace. The range goes from 10 to 400%.
PowerPoint Tabs
The PowerPoint tabs are the control desk of your presentation . Since PowerPoint's features are too many, they're organized in tabs.
You can come and go between tabs as you need. Once you click on a tab, it will open its ribbon, and there, you'll be able to see all the tools related to that particular category.
This PowerPoint tutorial for beginners will give you an overview of all PowerPoint tabs . Pay attention to the following list:
- Transitions Tab
- Animations Tab
- Slide Show Tab
- Recording Tab
1. Home Tab
The Home tab is the most common tab of PowerPoint. This is the tab you'll probably use the most if you're designing a presentation deck from scratch.

It allows you to add new slides and change the text characteristics : font, size, boldness, underlining, alignment, etc. If you've ever used Microsoft Word, these features will be familiar to you.
Also, you will find commands to edit the characteristics of the geometric shapes you insert. This includes: fill color, line color, sharpe effects, among others.
2. Insert Tab
The Insert tab is exactly what its name says it is. In this ribbon, you'll find all the options concerning adding a new element to your PowerPoint presentation .

You can insert a picture, some geometric shapes, icons, WordArt graphics, among others. We can tell you that this tab is really helpful for PowerPoint beginners!
For example, if you have a lot of data in PowerPoint , you could add a chart or diagram to show your information in a more visual way. Also, you can embed videos or music into PowerPoint really easily.
- PowerPoint tip for beginners: To be able to write text on your slides, you need a text box. So, if you're designing your presentation from scratch, remember to go first to the Insert tab and add a text box to start writing.
3. Design Tab
If you are one of those people who enjoy choosing the design of a PowerPoint presentation, this tab will be your favorite.

The Design tab offers a wide range of premade designs , allowing you to get more polished slides. Even better, if you explore its ribbon, you can adjust the color palette and change the overall style of your PowerPoint deck.
The PowerPoint interface, as this basic PowerPoint Tutorial, is really intuitive. We believe that you won't have any problem with this tab!
4. Transitions Tab
Using transitions in PowerPoint is a dynamic way to move from one slide to the next during a presentation. This feature is PowerPoint's stamp, so don ' t miss it!

Some PowerPoint transitions are really classic, like wiping the old slide to present the new one. Others are somewhat over the top, like the “Vortex” or the “Airplane” effect.
If you click on each kind of transition, you'll see a preview on how it would look when presenting. Really cool, right?
5. Animations Tab
In case you want to add special effects for certain elements in your slides , the Animations tab in PowerPoint will interest you.

Like the Transitions tab, you will find various animation effects in this ribbon. It's a matter of trying and choosing the best one according to your needs!
6. Slide Show Tab
As its name says, the Slide Show tab is about presenting your slides . We really like that it gives you several options to show up your presentation!

Considering that you're a PowerPoint beginner, you're not likely to use the Slide Show tab very much.
But if you're curious about this command, you must read our article: How to Make a PowerPoint Slideshow that Runs Automatically?
7. Review Tab
The Review tab is not often used by PowerPoint beginners either.
However, if your job is related to writing or if you work at an international company, this tool can be extremely useful!

With this tab, you can check the slide's spelling, translate the text in real-time, and add comments to your slides . This last function can be helpful to give feedback to a colleague.
8. View Tab
This View tab allows you to change the view of your PowerPoint slides and make handouts from them, among other things.

As you can see, the majority of its commands are really specific. So you won't have any issues while designing, test and see!
In this section, our favorite command for PowerPoint beginners is Slide Master . Explore more about this tool in our guide!
9. Recording Tab
In the last versions of this design presentation software, PowerPoint added the Recording tab. As its name says, it allows you to record all your presentation slides .

This ribbon has advanced commands, so the most common action for a PowerPoint beginner is to take a screenshot or record the screen sequentially .
10. Help Tab
Finally, there is the Help tab. If you have any problem or question concerning how to use PowerPoint, you may go here to look for a solution.
In the latest versions, Windows has added a “Show Training” option. You can click this command to practice the PowerPoint basics since it will download training templates.

As a beginner in PowerPoint, you must recognize the objective of each PowerPoint tab to be able to master the software . But, in order to conduct an outstanding presentation deck, you also need to dominate its most important features. Let's see some of them in the next section!
If you feel ready to delve deeper into PowerPoint's tools, this section is for you.
As you may know , 24Slides specializes in creating outstanding presentations for any Design Project . So, we asked one of our experts about her favorite PowerPoint features, and we want to share them all with you!
Carmen Navarrete , Graphic Designer at 24Slides, highlighted the following features that will make your presentations stand out from the crowd:
PowerPoint Feature #1: Crop to Shape
This first PowerPoint feature is simple but effective!
Let's see how to use it:
- First, choose an image you want to cut and insert it into your workspace.
- Once inserted, select it with the mouse.
- Go to the "Picture Format" tab.
- Press the arrow of the "Crop" button (right side of the screen).
- Select "Crop to Shape."
- Choose your favorite shape and customize your PowerPoint presentation!

PowerPoint Feature #2: Merge Shapes
If you don't like any figure enough, you can create one from scratch!
This is possible thanks to the "Merge Shapes" option. Follow these steps to unleash your creativity:
- First choose an image you want to cut.
- Check the list of PowerPoint shapes (Insert tab > Shapes).
- Choose two or three figures you want to merge (they can be the same figure).
- Select the figures you are going to merge (see the image).
- Once selected, go to the "Shape Format" tab.
- Press the "Merge Shapes" option and the type of merge you want (test and choose!).

- A new figure will appear, and you must fill it with the image from the first step.
- Stay on the Shape Format tab and go to "Shape Fill" (button in the middle of the ribbon).
- Select "Picture Fill" and browse for your image.
- Select the image to fill your new figure, and that's it!

- PowerPoint tip for beginners: When your merged figure is ready, paste the image to the background of your slide to achieve a better result. This way, you can use your image as a canvas and see if both elements fit well.
PowerPoint Feature #3: Insert Icons
This PowerPoint feature is quite easy to follow for PowerPoint beginners!
Just follow these steps:
- Go to the Insert tab.
- Select the "Icons" option.
- A Microsoft 365 library will open, where you can search for the required icon.
- Now, you must insert it into your presentation and adapt it to your design.
- If you have an active Microsoft 365 subscription, you'll have access to a larger number of icons in PowerPoint.
- PowerPoint tip for beginners: If you want to learn more about icons in PowerPoint, read our article on How to Use Icons to Make Amazing PowerPoint Presentations .
PowerPoint Feature #4: Insert SmartArt
PowerPoint's SmartArt is one of the most popular and accessible tools to dominate while learning about PowerPoint basics.
To use it in your slide deck, you must:
- Select SmartArt.
- See all SmartArt categories and choose your favorite based on your needs.
- Add the text you have prepared and adapt it to your presentation.

We want to give you some ideas to master this SmartArt tool in PowerPoint: you can make timelines , flowcharts , and even a Venn diagram in just a few seconds. Try and see!
PowerPoint Feature #5: Remove Background
If you don't know how to use Photoshop and want to remove the background from an image, in this PowerPoint 101 Guide, we show you how:
- First choose the image you want to remove the background from.
- Insert the image in the PowerPoint workspace.
- Select the image and go to the "Picture Format" tab.
- Select "Remove Background" (first option on the left).
- You can keep and remove parts of the image with the first two tools of the ribbon (see image).
- Keep in mind that all the sections highlighted in purple will be deleted.

- We recommend zooming in to keep or remove parts of the image with more detail.
- Once you're done, press the "Keep Changes" button.
- Finally, adapt the new image to your PowerPoint presentation.

- PowerPoint tip for beginners: Choose a high-contrast photo or image for best results. In other words, the outline of the person or object you want to cut out must have clear edges and cannot blend with the image's background color.
PowerPoint Feature #6: Add Speaker Notes
The latest PowerPoint feature is a command you can use to prepare your speech before presenting to an audience.
Learning how to add speaker notes in PowerPoint is simple:
- Select the slide that needs some notes.
- Usually, there is a footer below the slide, but if not, you will have to activate it.
- Go to the View tab and select "Notes."
- The Speaker Notes section will appear, and you can add whatever you want!

- PowerPoint tip for beginners: In case you want to practice your entire presentation and have a lot of notes, go to the View tab and select "Notes Page" (fourth command). You'll be able to see all your Speaker Notes faster!
PowerPoint Feature #7: PowerPoint Translator
If you've ever wondered how to translate your PowerPoint Slides, we'll explain the step by step here:
- Go to the Review tab.
- Select the text you want to translate.
- Press the “Translate” button.
- A panel will open on the right side of the screen.
- Choose the language you need and you'll see the translation in real-time.
- If you press Insert, the text will change to the new translation!
PowerPoint Feature #8: Screen Recording
The process of recording your screen in PowerPoint is straightforward and intuitive. Let's see:
- Go to the “Record” or “Recording” tab.
- Press the "Record Slide Show" button or the “From Beginning” button (depending on your PPT version).
- A new window will open.
- Select the red record button and start recording!
- When you're done, select “Export.”
- By default, the video will be 1080p. If you want to lower the video quality, go to "Customize export."
- Name the video, save it to a folder and that's it!
As you may have noticed, this software has endless PowerPoint design options for beginners. We encourage you to try and test each functionality!
However, we're clear that PowerPoint has different features, so it can be hard to know where to start. That's why understanding PowerPoint basics is crucial if you truly want to master this software!
Our PowerPoint 101 Guide continues; stay tuned to discover more great stuff about this Microsoft software. Keep reading!
A PowerPoint template is a pre-made design that you can use for your own means, and that will save you a lot of time!
Templates in PowerPoint are a great resource for designing since all the structure is already done, and you only have to update the content . We can tell you they're the perfect resource for PowerPoint beginners!
They can be incredibly specific. For example, there are templates for a SWOT analysis or a complete Marketing report. Otherwise, templates can also be very general, with several slides with a similar design.
If you struggle with the artistic part of designing presentations, downloading PowerPoint templates will be a life changer!

How to download PowerPoint templates for free?
If you didn't know, 24Slides has an extensive repository of PowerPoint templates. But how to obtain them? It's really simple:
- First, create an account on our Free Templates Website with the button “Register” (that way, you can download everything without problems!).
- Think about the graphics you need and the ideal structure for your presentation deck (you can also change the color palette later!).
- Download it in PowerPoint format (if you prefer it in Google Slides format, you'll also find this type in our repository).
- Edit and change everything you need for your PowerPoint presentation!
24Slides Designers specialize in business and corporate PowerPoints, but you'll also find other types of templates on our website: Data templates, Timelines, Roadmaps, Matrixes, Diagrams, and more.
Keep in mind that a well-designed PowerPoint deck helps you communicate stronger messages to your audience . Don't waste this opportunity to make your presentation shine!

If you want to learn more about how to master PowerPoint, do not miss the last section. We'll show you some PowerPoint basics from the software itself!
A PowerPoint 101 Guide wouldn't be that useful with no examples. So, if you enjoy the step-by-step guides, this section is for you.
Below, we'll show you how to make a simple PowerPoint presentation. But first, here are some tips to be more efficient in the process:
- Be clear about what type of presentation you're going to create (is it corporate, playful, or more creative?).
- Make a draft with the most important information you need to add and, thus, generate a good structure in your presentation .
- Get inspired by examples on the internet , but adapt them to your needs and audience.
- If you will create a business presentation, keep in mind your brand identity .
- Make sure your PowerPoint works , you may need to update to the latest version or pay for the subscription.
Step 1: Make a draft to structure your presentation
As we said before, writing a draft or script of your content will be vital to start on the right foot as a PowerPoint beginner.
This advice is so important that we choose it as the first step to learning how to make a PowerPoint presentation. Remember: Planning is key!

Regarding the process of planning, we share some good practices:
- If your presentation will be very long , write down all subtitles and content in a Word document. This will help you organize your ideas and give a correct sequence to your narrative. In addition to avoiding redundancies in the message you want to communicate.
- If your presentation will use many visual resources , we recommend choosing high-quality images. This will help you have a starting graphic base. Some good free image repositories are Freepick , Unsplash , and Adobe Stock .
- If your presentation is based on data , have all your results summarized or your most relevant conclusions at hand. The idea of making a PowerPoint presentation is to show your information in the simplest way possible for your audience.
Step 2: Create a new document in PowerPoint
Once you check that all the functions are working fine with the software, please open it and go to the File tab. If you've ever used Word or Excel, you'll probably find this Home Menu familiar.
In short, this is the main page of PowerPoint, where you can create a new presentation or open an older one. Let's see:

In order to follow this part of our PowerPoint Tutorial correctly, take into consideration the following points:
- On the lower side of the screen, you'll find your recently opened PowerPoint files. This option is great for saving some time.
- If you don't find the presentation you're looking for, click on the “Open” option at the left bar and find older files.
- Don't forget to save your presentation with a relatable name so you won't lose sight of it!
Step 3: Choose the perfect design for your presentation
With your information ready in a draft, it's time to choose the design of your PowerPoint slide deck. You must imagine that the available design options are endless!
For practical reasons, you have three options regarding the design:
- Start a design from scratch (very difficult for a PowerPoint beginner).
- Choose an established PowerPoint design or layout.
- Download a PowerPoint template and modify some details.
Don't worry if you don't know how to continue! In this PowerPoint 101 class, we're going to explain step by step the second option:
How do you set a default design in PowerPoint?
- First, go to the Design tab.
- Open the list of options by clicking on the third arrow.
- Choose the design you like the most for your PowerPoint presentation.

If you want to explore more PowerPoint designs, there is a way to research online. For that, you only need to:
- Go to the File tab (first tab, next to the Home tab).
- Select "More themes" (see image).

- Use the search engine and write the keyword you want (it can be related to your business or it can be a color).
- Check the list of PowerPoint themes and choose your favorite.
- Wait a few minutes while it loads and keep designing in PowerPoint!

How do you change the layout of one slide in PowerPoint?
In this PowerPoint 101 Guide, you will also learn how to configure the layout of each slide.
Keep in mind that to have a high-impact presentation, you must adapt your slides' design to the type of content you'll add. And using layouts is perfect for this purpose.
To change the layout type in PowerPoint, follow these steps:
- Right-click on the slide you want to change.
- Select the "Layout" option.
- You will find more than ten layout models.
- Choose the one that best suits your content.
- Repeat these steps for each slide (if you wish or require).

How do you customize your slides in PowerPoint?
The design process in this PowerPoint 101 Guide doesn't stop there.
You also can customize your presentation's color palette , font style, background format , and graphics effects .
Just go to:
- Design tab > Variants.
- Select Colors, Fonts, Effects or Background Styles (as you need).
- If you're inspired and want to create your own background in PowerPoint, select Background Styles > Format Background.
- Finally, custom your slides as you want!

Step 4: Add all your information to your presentation
Now, it's time to add all your information to your slides. If your script is long, take your time to copy each part of it.
In this PowerPoint Tutorial, we're going to show how our design is going so far. We design at your side!

Step 5: Add transitions or animations to your presentation
The stamp of PowerPoint is its transitions and animations! Naturally, our PowerPoint 101 has considered these essential commands.
If you want to add them to your presentation and make your speech more fluid, follow these steps:
- Go to the tabs section of PowerPoint.
- Select "Transitions" or "Animations" and try your favorite effects.
- Remember that if you select Transitions, these will modify the entire slide, while Animations can be added to each element individually.
When choosing one Animation, you can eliminate it if you aren't 100% convinced. You only need to:
- Select the Animation number that appears on the corner.
- Press the "Delete" or "Backspace" button on your keyboard.
- Choose another Animation in PowerPoint if you want!

This “PowerPoint for dummies” is full of tips and tricks! So here is one more: Don't overuse transitions or animations in PowerPoint ; they can make your presentation slower and unprofessional . Use this tool in a subtle way!
Step 6: Refine the final details
As always, every final product must be reviewed. Especially if you're learning the PowerPoint fundamentals with us.
We recommend reviewing each slide of your PowerPoint presentation one final time. In this process, you will be able to:
- Add icons if your presentation requires it.
- Change any image or illustration if they don't convince you.
- Change transitions or animations.
- Customize your presentation's color palette .
- Proofread your slides' text or add more information.
- Add speaker notes to your presentation.

Step 7: Slideshow your presentation
When your presentation is finished, it's essential to know how to make a PowerPoint slideshow. This way, you can see your slides from the exact same perspective your audience will see them.
To slideshow your presentation in PowerPoint, follow these simple steps for PowerPoint beginners:
- Position yourself on your first slide.
- Go to the bottom right of the software.
- Select the "Slide Show" button (see image).
- Have a look of your presentation by clicking on each slide or pressing the right arrow on your keyboard.
- To go out from the Slide Show mode, you have to press the ESC key.

Now you can present your slides like an expert!
When you master this presentation design software, you'll be able to create amazing things in PowerPoint : infographics, diagrams, charts, pitch decks, business cards, calendars, you name it!
This was our PowerPoint Guide for beginners. We hope that our compilation today will be useful for conducting more professional presentations in the future and, why not, achieve all your goals!
Don't forget to share this PowerPoint 101 Guide with your co-workers or whoever you want!

Want to boost your beginner PowerPoint skills? Check out this content:
- How to Work with Multiple Images in PowerPoint
- How to Add a Timer to Your Powerpoint Presentations
- PowerPoint Charts, Graphs, & Tables Made Easy | Tips & Tricks
- How To Use PowerPoint Design Ideas - All Questions Answered!
- 36 Fun Icebreakers for Your Next Presentation
- The Cost of PowerPoint Presentations: Discover the hidden expenses you might overlook!
Create professional presentations online
Other people also read

Tutorial: Save your PowerPoint as a Video
How To Convert Google Slides To PowerPoint and Vice Versa

How To Add Animations To PowerPoint
Critical PowerPoint Shortcuts – Claim Your FREE Training Module and Get Your Time Back!
How to Make a PowerPoint Presentation (Step-by-Step)
- PowerPoint Tutorials
- Presentation Design
- January 22, 2024
In this beginner’s guide, you will learn step-by-step how to make a PowerPoint presentation from scratch.
While PowerPoint is designed to be intuitive and accessible, it can be overwhelming if you’ve never gotten any training on it before. As you progress through this guide, you’ll will learn how to move from blank slides to PowerPoint slides that look like these.

Table of Contents
Additionally, as you create your presentation, you’ll also learn tricks for working more efficiently in PowerPoint, including how to:
- Change the slide order
- Reset your layout
- Change the slide dimensions
- Use PowerPoint Designer
- Format text
- Format objects
- Play a presentation (slide show)
With this knowledge under your belt, you’ll be ready to start creating PowerPoint presentations. Moreover, you’ll have taken your skills from beginner to proficient in no time at all. I will also include links to more advanced PowerPoint topics.
Ready to start learning how to make a PowerPoint presentation?
Take your PPT skills to the next level
Start with a blank presentation.
Note: Before you open PowerPoint and start creating your presentation, make sure you’ve collected your thoughts. If you’re going to make your slides compelling, you need to spend some time brainstorming.
For help with this, see our article with tips for nailing your business presentation here .
The first thing you’ll need to do is to open PowerPoint. When you do, you are shown the Start Menu , with the Home tab open.
This is where you can choose either a blank theme (1) or a pre-built theme (2). You can also choose to open an existing presentation (3).
For now, go ahead and click on the Blank Presentation (1) thumbnail.

Doing so launches a brand new and blank presentation for you to work with. Before you start adding content to your presentation, let’s first familiarize ourselves with the PowerPoint interface.
The PowerPoint interface

Here is how the program is laid out:
- The Application Header
- The Ribbon (including the Ribbon tabs)
- The Quick Access Toolbar (either above or below the Ribbon)
- The Slides Pane (slide thumbnails)
The Slide Area
The notes pane.
- The Status Bar (including the View Buttons)
Each one of these areas has options for viewing certain parts of the PowerPoint environment and formatting your presentation.
Below are the important things to know about certain elements of the PowerPoint interface.
The PowerPoint Ribbon

The Ribbon is contextual. That means that it will adapt to what you’re doing in the program.
For example, the Font, Paragraph and Drawing options are greyed out until you select something that has text in it, as in the example below (A).

Furthermore, if you start manipulating certain objects, the Ribbon will display additional tabs, as seen above (B), with more commands and features to help you work with those objects. The following objects have their own additional tabs in the Ribbon which are hidden until you select them:
- Online Pictures
- Screenshots
- Screen Recording
The Slides Pane

This is where you can preview and rearrange all the slides in your presentation.
Right-clicking on a slide in the pane gives you additional options on the slide level that you won’t find on the Ribbon, such as Duplicate Slide , Delete Slide , and Hide Slide .

In addition, you can add sections to your presentation by right-clicking anywhere in this Pane and selecting Add Section . Sections are extremely helpful in large presentations, as they allow you to organize your slides into chunks that you can then rearrange, print or display differently from other slides.

The Slide Area (A) is where you will build out your slides. Anything within the bounds of this area will be visible when you present or print your presentation.
Anything outside of this area (B) will be hidden from view. This means that you can place things here, such as instructions for each slide, without worrying about them being shown to your audience.

The Notes Pane is the space beneath the Slide Area where you can type in the speaker notes for each slide. It’s designed as a fast way to add and edit your slides’ talking points.
To expand your knowledge and learn more about adding, printing, and exporting your PowerPoint speaker notes, read our guide here .
Your speaker notes are visible when you print your slides using the Notes Pages option and when you use the Presenter View . To expand your knowledge and learn the ins and outs of using the Presenter View , read our guide here .

You can resize the Notes Pane by clicking on its edge and dragging it up or down (A). You can also minimize or reopen it by clicking on the Notes button in the Status Bar (B).
Note: Not all text formatting displays in the Notes Pane, even though it will show up when printing your speaker notes. To learn more about printing PowerPoint with notes, read our guide here .
Now that you have a basic grasp of the PowerPoint interface at your disposal, it’s time to make your presentation.
Adding Content to Your PowerPoint Presentation
Notice that in the Slide Area , there are two rectangles with dotted outlines. These are called Placeholders and they’re set on the template in the Slide Master View .
To expand your knowledge and learn how to create a PowerPoint template of your own (which is no small task), read our guide here .

As the prompt text suggests, you can click into each placeholder and start typing text. These types of placeholder prompts are customizable too. That means that if you are using a company template, it might say something different, but the functionality is the same.

Note: For the purposes of this example, I will create a presentation based on the content in the Starbucks 2018 Global Social Impact Report, which is available to the public on their website.
If you type in more text than there is room for, PowerPoint will automatically reduce its font size. You can stop this behavior by clicking on the Autofit Options icon to the left of the placeholder and selecting Stop Fitting Text to this Placeholder .
Next, you can make formatting adjustments to your text by selecting the commands in the Font area and the Paragraph area of the Home tab of the Ribbon.

The Reset Command: If you make any changes to your title and decide you want to go back to how it was originally, you can use the Reset button up in the Home tab .

Insert More Slides into Your Presentation
Now that you have your title slide filled in, it’s time to add more slides. To do that, simply go up to the Home tab and click on New Slide . This inserts a new slide in your presentation right after the one you were on.

You can alternatively hit Ctrl+M on your keyboard to insert a new blank slide in PowerPoint. To learn more about this shortcut, see my guide on using Ctrl+M in PowerPoint .
Instead of clicking the New Slide command, you can also open the New Slide dropdown to see all the slide layouts in your PowerPoint template. Depending on who created your template, your layouts in this dropdown can be radically different.

If you insert a layout and later want to change it to a different layout, you can use the Layout dropdown instead of the New Slide dropdown.
After inserting a few different slide layouts, your presentation might look like the following picture. Don’t worry that it looks blank, next we will start adding content to your presentation.

If you want to follow along exactly with me, your five slides should be as follows:
- Title Slide
- Title and Content
- Section Header
- Two Content
- Picture with Caption
Adding Content to Your Slides
Now let’s go into each slide and start adding our content. You’ll notice some new types of placeholders.

On slide 2 we have a Content Placeholder , which allows you to add any kind of content. That includes:
- A SmartArt graphic,
- A 3D object,
- A picture from the web,
- Or an icon.
To insert text, simply type it in or hit Ctrl+C to Copy and Ctrl+V to Paste from elsewhere. To insert any of the other objects, click on the appropriate icon and follow the steps to insert it.
For my example, I’ll simply type in some text as you can see in the picture below.

Slides 3 and 4 only have text placeholders, so I’ll go ahead and add in my text into each one.

On slide 5 we have a Picture Placeholder . That means that the only elements that can go into it are:
- A picture from the web

To insert a picture into the picture placeholder, simply:
- Click on the Picture icon
- Find a picture on your computer and select it
- Click on Insert
Alternatively, if you already have a picture open somewhere else, you can select the placeholder and paste in (shortcut: Ctrl+V ) the picture. You can also drag the picture in from a file explorer window.

If you do not like the background of the picture you inserted onto your slide, you can remove the background here in PowerPoint. To see how to do this, read my guide here .
Placeholders aren’t the only way to add content to your slides. At any point, you can use the Insert tab to add elements to your slides.
You can use either the Title Only or the Blank slide layout to create slides for content that’s different. For example, a three-layout content slide, or a single picture divider slide, as shown below.

In the first example above, I’ve inserted 6 text boxes, 3 icons, and 3 circles to create this layout. In the second example, I’ve inserted a full-sized picture and then 2 shapes and 2 text boxes.
The Reset Command: Because these slides are built with shapes and text boxes (and not placeholders), hitting the Reset button up in the Home tab won’t do anything.
That is a good thing if you don’t want your layouts to adjust. However, it does mean that it falls on you to make sure everything is aligned and positioned correctly.
For more on how to add and manipulate the different objects in PowerPoint, check out our step-by-step articles here:
- Using graphics in PowerPoint
- Inserting icons onto slides
- Adding pictures to your PowerPoint
- How to embed a video in PowerPoint
- How to add music to your presentation
Using Designer to generate more layouts ideas
If you have Office 365, your version of PowerPoint comes with a new feature called Designer (or Design Ideas). This is a feature that generates slide layout ideas for you. The coolest thing about this feature is that it uses the content you already have.
To use Designer , simply navigate to the Design tab in your Ribbon, and click on Design Ideas .

NOTE: If the PowerPoint Designer is not working for you (it is grey out), see my troubleshooting guide for Designer .
Change the Overall Design (optional)
When you make a PowerPoint presentation, you’ll want to think about the overall design. Now that you have some content in your presentation, you can use the Design tab to change the look and feel of your slides.
For additional help thinking through the design of your presentation, read my guide here .
A. Picking your PowerPoint slide size
If you have PowerPoint 2013 or later, when you create a blank document in PowerPoint, you automatically start with a widescreen layout with a 16:9 ratio. These dimensions are suitable for most presentations as they match the screens of most computers and projectors.
However, you do have the option to change the dimensions.
For example, your presentation might not be presented, but instead converted into a PDF or printed and distributed. In that case, you can easily switch to the standard dimensions with a 4:3 ratio by selecting from the dropdown (A).
You can also choose a custom slide size or change the slide orientation from landscape to portrait in the Custom Slide Size dialog box (B).

To learn all about the different PowerPoint slide sizes, and some of the issues you will face when changing the slide size of a non-blank presentation, read my guide here .
B. Selecting a PowerPoint theme
The next thing you can do is change the theme of your presentation to a pre-built one. For a detailed explanation of what a PowerPoint theme is, and how to best use it, read my article here .
In the beginning of this tutorial, we started with a blank presentation, which uses the default Office theme as you can see in the picture below.

That gives you the most flexibility because it has a blank background and quite simple layouts that work for most presentations. However, it also means that it’s your responsibility to enhance the design.
If you’re comfortable with this, you can stay with the default theme or create your own custom theme ( read my guide here ). But if you would rather not have to think about design, then you can choose a pre-designed theme.
Microsoft provides 46 other pre-built themes, which include slide layouts, color variants and palettes, and fonts. Each one varies quite significantly, so make sure you look through them carefully.
To select a different theme, go to the Design tab in the Ribbon, and click on the dropdown arrow in the Themes section .

For this tutorial, let’s select the Frame theme and then choose the third Variant in the theme. Doing so changes the layout, colors, and fonts of your presentation.

Note: The theme dropdown area is also where you can import or save custom themes. To see my favorite places to find professional PowerPoint templates and themes (and recommendations for why I like them), read my guide here .
C. How to change a slide background in PowerPoint
The next thing to decide is how you want your background to look for the entire presentation. In the Variants area, you can see four background options.

For this example, we want our presentation to have a dark background, so let’s select Style 3. When you do so, you’ll notice that:
- The background color automatically changes across all slides
- The color of the text on most of the slides automatically changes to white so that it’s visible on the dark background
- The colors of the objects on slides #6 and #7 also adjust, in a way we may not want (we’ll likely have to make some manual adjustments to these slides)

Note: If you want to change the slide background for just that one slide, don’t left-click the style. Instead, right-click it and select Apply to Selected Slides .
After you change the background for your entire presentation, you can easily adjust the background for an individual slide.

Inside the Format Background pane, you can see you have the following options:
- Gradient fill
- Picture or texture fill
- Pattern fill
- Hide background
You can explore these options to find the PowerPoint background that best fits your presentation.
D. How to change your color palette in PowerPoint
Another thing you may want to adjust in your presentation, is the color scheme. In the picture below you can see the Theme Colors we are currently using for this presentation.

Each PowerPoint theme comes with its own color palette. By default, the Office theme includes the Office color palette. This affects the colors you are presented with when you format any element within your presentation (text, shapes, SmartArt, etc.).

The good news is that the colors here are easy to change. To switch color palettes, simply:
- Go to the Design tab in the Ribbon
- In the Variants area, click on the dropdown arrow and select Colors
- Select the color palette (or theme colors) you want
You can choose among the pre-built color palettes from Office, or you can customize them to create your own.
As you build your presentation, make sure you use the colors from your theme to format objects. That way, changing the color palette adjusts all the colors in your presentation automatically.
E. How to change your fonts in PowerPoint
Just as we changed the color palette, you can do the same for the fonts.

Each PowerPoint theme comes with its own font combination. By default, the Office theme includes the Office font pairing. This affects the fonts that are automatically assigned to all text in your presentation.

The good news is that the font pairings are easy to change. To switch your Theme Fonts, simply:
- Go to the Design tab in the Ribbon
- Click on the dropdown arrow in the Variants area
- Select Fonts
- Select the font pairing you want
You can choose among the pre-built fonts from Office, or you can customize them to create your own.
If you are working with PowerPoint presentations on both Mac and PC computers, make sure you choose a safe PowerPoint font. To see a list of the safest PowerPoint fonts, read our guide here .
If you receive a PowerPoint presentation and the wrong fonts were used, you can use the Replace Fonts dialog box to change the fonts across your entire presentation. For details, read our guide here .
Adding Animations & Transitions (optional)
The final step to make a PowerPoint presentation compelling, is to consider using animations and transitions. These are by no means necessary to a good presentation, but they may be helpful in your situation.
A. Adding PowerPoint animations
PowerPoint has an incredibly robust animations engine designed to power your creativity. That being said, it’s also easy to get started with basic animations.
Animations are movements that you can apply to individual objects on your slide.

To add a PowerPoint animation to an element of your slide, simply:
- Select the element
- Go to the Animations tab in the Ribbon
- Click on the dropdown arrow to view your options
- Select the animation you want
You can add animations to multiple objects at one time by selecting them all first and then applying the animation.
B. How to preview a PowerPoint animation

There are three ways to preview a PowerPoint animation:
- Click on the Preview button in the Animations tab
- Click on the little star next to the slide
- Play the slide in Slide Show Mode
To learn other ways to run your slide show, see our guide on presenting a PowerPoint slide show with shortcuts .
To adjust the settings of your animations, explore the options in the Effect Options , Advanced Animation and the Timing areas of the Animation tab .

Note: To see how to make objects appear and disappear in your slides by clicking a button, read our guide here .
C. How to manage your animations in PowerPoint

The best way to manage lots of animations on your slide is with the Animation Pane . To open it, simply:
- Navigate to the Animations tab
- Select the Animation Pane
Inside the Animation Pane, you’ll see all of the different animations that have been applied to objects on your slide, with their numbers marked as pictured above.
Note: To see examples of PowerPoint animations that can use in PowerPoint, see our list of PowerPoint animation tutorials here .
D. How to add transitions to your PowerPoint presentation
PowerPoint has an incredibly robust transition engine so that you can dictate how your slides change from one to the other. It is also extremely easy to add transitions to your slides.
In PowerPoint, transitions are the movements (or effects) you see as you move between two slides.

To add a transition to a PowerPoint slide, simply:
- Select the slide
- Go to the Transitions tab in the Ribbon
- In the Transitions to This Slide area, click on the dropdown arrow to view your options
- Select the transition you want
To adjust the settings of the transition, explore the options in the Timing area of the Transitions tab.
You can also add the same transition to multiple slides. To do that, select them in the Slides Pane and apply the transition.
E. How to preview a transition in PowerPoint

There are three ways to preview your PowerPoint transitions (just like your animations):
- Click on the Preview button in the Transitions tab
- Click on the little star beneath the slide number in the thumbnail view
Note: In 2016, PowerPoint added a cool new transition, called Morph. It operates a bit differently from other transitions. For a detailed tutorial on how to use the cool Morph transition, see our step-by-step article here .
Save Your PowerPoint Presentation
After you’ve built your presentation and made all the adjustments to your slides, you’ll want to save your presentation. YOu can do this several different ways.

To save a PowerPoint presentation using your Ribbon, simply:
- Navigate to the File tab
- Select Save As on the left
- Choose where you want to save your presentation
- Name your presentation and/or adjust your file type settings
- Click Save
You can alternatively use the Ctrl+S keyboard shortcut to save your presentation. I recommend using this shortcut frequently as you build your presentation to make sure you don’t lose any of your work.

This is the standard way to save a presentation. However, there may be a situation where you want to save your presentation as a different file type.
To learn how to save your presentation as a PDF, see our guide on converting PowerPoint to a PDF .
How to save your PowerPoint presentation as a template
Once you’ve created a presentation that you like, you may want to turn it into a template. The easiest – but not technically correct – way, is to simply create a copy of your current presentation and then change the content.
But be careful! A PowerPoint template is a special type of document and it has its own parameters and behaviors.
If you’re interested in learning about how to create your own PowerPoint template from scratch, see our guide on how to create a PowerPoint template .
Printing Your PowerPoint Presentation
After finishing your PowerPoint presentation, you may want to print it out on paper. Printing your slides is relatively easy.

To open the Print dialog box, you can either:
- Hit Ctrl+P on your keyboard
- Or go to the Ribbon and click on File and then Print

Inside the Print dialog box, you can choose from the various printing settings:
- Printer: Select a printer to use (or print to PDF or OneNote)
- Slides: Choose which slides you want to print
- Layout: Determine how many slides you want per page (this is where you can print the notes, outline, and handouts)
- Collated or uncollated (learn what collated printing means here )
- Color: Choose to print in color, grayscale or black & white
There are many more options for printing your PowerPoint presentations. Here are links to more in-depth articles:
- How to print multiple slides per page
- How to print your speaker notes in PowerPoint
- How to save PowerPoint as a picture presentation
So that’s how to create a PowerPoint presentation if you are brand new to it. We’ve also included a ton of links to helpful resources to boost your PowerPoint skills further.
When you are creating your presentation, it is critical to first focus on the content (what you are trying to say) before getting lost inserting and playing with elements. The clearer you are on what you want to present, the easier it will be to build it out in PowerPoint.
If you enjoyed this article, you can learn more about our PowerPoint training courses and other presentation resources by visiting us here .
🔒 Unlock the PowerPoint Shortcuts Trusted by Industry Leaders KKR, American Express, HSBC, and More!
Join over 114,880 professionals from diverse fields including consulting, investment banking, advertising, marketing, sales, and business development who have supercharged their PowerPoint game with our proven methods.
✅ Customize compelling presentations effortlessly.
✅ Master time-saving techniques for faster deck creation.
✅ Boost your career prospects with top-notch PowerPoint skills.
Get FREE access to the Critical PowerPoint Shortcuts module of our premium training course by entering your name and email below.
DISCLAIMER: PC Users Only!
We respect your privacy and will keep your info safe and confidential.
About The Author

Popular Tutorials
- How to Strikethrough Text (l̶i̶k̶e̶ ̶t̶h̶i̶s̶) in Word, Excel & PowerPoint
- How to Make Animated Fireworks in PowerPoint (Step-by-Step)
- Strikethrough Shortcut (l̶i̶k̶e̶ ̶t̶h̶i̶s̶) for Word, Excel & PowerPoint
- How to Create a Flash Card Memory Game in PowerPoint (Like Jeopardy)
- Keyboard Shortcuts Not Working: Solved
PowerPoint Tutorial Categories
- Strategies & Opinions
- Shortcuts & Hacks
- Pictures, Icons, Videos, Etc.
- New Features
- Miscellaneous
- Charts & Data Viz
We help busy professionals save hours and gain peace of mind, with corporate workshops, self-paced courses and tutorials for PowerPoint and Word.
Work With Us
- Corporate Training
- Presentation & Template Design
- Courses & Downloads
- PowerPoint Articles
- Word Articles
- Productivity Resources
Find a Tutorial
- Free Training
- For Businesses
We help busy office workers save hours and gain peace of mind, with tips, training and tutorials for Microsoft PowerPoint and Word.
Master Critical PowerPoint Shortcuts – Secure Your FREE Training Module and Save Valuable Time!
⌛ Master time-saving expert techniques.
🔥 Create powerful presentations.
🚀 Propel your career to new heights.
We value your privacy – we keep your info safe.
Discover PowerPoint Hacks Loved by Industry Giants - KKR, AmEx, HSBC!
Over 114,880 professionals in finance, marketing and sales have revolutionized their PPT skills with our proven methods.
Gain FREE access to a full module of our premium PowerPoint training program – Get started today!
We hate spam too and promise to keep your information safe.
You are currently viewing a placeholder content from Facebook . To access the actual content, click the button below. Please note that doing so will share data with third-party providers.
17 PowerPoint Presentation Tips From Pro Presenters [+ Templates]
Published: April 26, 2024
PowerPoint presentations can be professional, attractive, and really help your audience remember your message.

If you don’t have much experience, that’s okay — I’m going to arm you with PowerPoint design tips from pro presenters, the steps you need to build an engaging deck, and templates to help you nail great slide design.
![→ Free Download: 10 PowerPoint Presentation Templates [Access Now]](https://no-cache.hubspot.com/cta/default/53/2d0b5298-2daa-4812-b2d4-fa65cd354a8e.png "how to do a powerpoint presentation file")
Download Now
Buckle up for a variety of step-by-step explanations as well as tips and tricks to help you start mastering this program. There are additional resources woven in, and you’ll find expert perspectives from other HubSpotters along the way.
Table of Contents
How to Make a PowerPoint Presentation
Powerpoint presentation tips.
Microsoft PowerPoint is like a test of basic professional skills, and each PowerPoint is basically a presentation made of multiple slides.
Successful PowerPoints depend on three main factors: your command of PowerPoint's design tools, your attention to presentation processes, and being consistent with your style.
Keep those in mind as we jump into PowerPoint's capabilities.
Getting Started
1. open powerpoint and click ‘new.’.
A page with templates will usually open automatically, but if not, go to the top left pane of your screen and click New . If you’ve already created a presentation, select Open and then double-click the icon to open the existing file.

10 Free PowerPoint Templates
Download ten free PowerPoint templates for a better presentation.
- Creative templates.
- Data-driven templates.
- Professional templates.
Download Free
All fields are required.
You're all set!
Click this link to access this resource at any time.
Creating PowerPoint Slides
3. insert a slide..
Insert a new slide by clicking on the Home tab and then the New Slide button. Consider what content you want to put on the slide, including heading, text, and imagery.

- Finally, PowerPoint Live is a new tool that enables you to do more seamless presentations during video calls and may be a better overall match for doing presentations remotely. Check out this video:
11. Try Using GIFs.

12 Free Customizable Resume Templates
Fill out this form to access your free professionally-designed templates, available on:
- Microsoft Word
- Google Docs
- Microsoft PowerPoint
- Google Slides
15. Embed multimedia.
PowerPoint allows you to either link to video/audio files externally or to embed the media directly in your presentation. For PCs, two great reasons for embedding are:
- Embedding allows you to play media directly in your presentation. It will look much more professional than switching between windows.
- Embedding also means that the file stays within the PowerPoint presentation, so it should play normally without extra work (except on a Mac).
If you use PowerPoint for Mac it gets a bit complicated, but it can be done:
- Always bring the video and/or audio file with you in the same folder as the PowerPoint presentation.
- Only insert video or audio files once the presentation and the containing folder have been saved on a portable drive in their permanent folder.
- If the presentation will be played on a Windows computer, then Mac users need to make sure their multimedia files are in WMV format.
- Consider using the same operating system for designing and presenting, no matter what.
16. Bring your own hardware.
Between operating systems, PowerPoint is still a bit jumpy. Even between differing PPT versions, things can change. The easiest fix? Just bring along your own laptop when you're presenting.
The next easiest fix is to upload your PowerPoint presentation into Google Slides as a backup option — just make sure there is a good internet connection and a browser available where you plan to present.
Google Slides is a cloud-based presentation software that will show up the same way on all operating systems.
To import your PowerPoint presentation into Google Slides:
- Navigate to slides.google.com . Make sure you’re signed in to a Google account (preferably your own).
- Under Start a new presentation , click the empty box with a plus sign. This will open up a blank presentation.
- Go to File , then Import slides .
- A dialog box will come up. Tap Upload.
- Click Select a file from your device .
- Select your presentation and click Open .
- Select the slides you’d like to import. If you want to import all of them, click All in the upper right-hand corner of the dialog box.
- Click Import slides.
When I tested this out, Google Slides imported everything perfectly, including a shape whose points I had manipulated. This is a good backup option to have if you’ll be presenting across different operating systems.
17. Use Presenter View.
In most presentation situations, there will be both a presenter’s screen and the main projected display for your presentation.
PowerPoint has a great tool called Presenter View, which can be found in the Slide Show tab of PowerPoint. Included in the Presenter View is an area for notes, a timer/clock, and a presentation display.
For many presenters, this tool can help unify their spoken presentation and their visual aid. You never want to make the PowerPoint seem like a stack of notes that you’re reading off of.
Use the Presenter View option to help create a more natural presentation.
Pro Tip: At the start of the presentation, you should also hit CTRL + H to make the cursor disappear. Hitting the “A” key will bring it back if you need it.
Your Next Great PowerPoint Presentation Starts Here
Now that you have these style, design, and presentation tips under your belt, you should feel confident to create your PowerPoint presentation.
But if you can explore other resources to make sure your content hits the mark. After all, you need a strong presentation to land your point and make an impression.
With several templates to choose from — both in PowerPoint and available for free download — you can swiftly be on your way to creating presentations that wow your audiences.
Editor's note: This post was originally published in September 2013 and has been updated for comprehensiveness.
Don't forget to share this post!
Related articles.
![20 Great Examples of PowerPoint Presentation Design [+ Templates]](https://www.hubspot.com/hubfs/powerpoint-presentation-examples.webp "how to do a powerpoint presentation file")
20 Great Examples of PowerPoint Presentation Design [+ Templates]
![How to Create the Best PowerPoint Presentations [Examples & Templates]](https://knowledge.hubspot.com/hubfs/powerpoint.webp "how to do a powerpoint presentation file")
How to Create the Best PowerPoint Presentations [Examples & Templates]
![How to Write an Ecommerce Business Plan [Examples & Template]](https://www.hubspot.com/hubfs/ecommerce%20business%20plan.png "how to do a powerpoint presentation file")
How to Write an Ecommerce Business Plan [Examples & Template]
![How to Create an Infographic in Under an Hour — the 2024 Guide [+ Free Templates]](https://www.hubspot.com/hubfs/Make-infographic-hero%20%28598%20%C3%97%20398%20px%29.jpg "how to do a powerpoint presentation file")
How to Create an Infographic in Under an Hour — the 2024 Guide [+ Free Templates]

Get Buyers to Do What You Want: The Power of Temptation Bundling in Sales

How to Create an Engaging 5-Minute Presentation
![How to Start a Presentation [+ Examples]](https://www.hubspot.com/hubfs/how-to-start-presenting.webp "how to do a powerpoint presentation file")
How to Start a Presentation [+ Examples]

120 Presentation Topic Ideas Help You Hook Your Audience

The Presenter's Guide to Nailing Your Next PowerPoint
![How to Create a Stunning Presentation Cover Page [+ Examples]](https://www.hubspot.com/hubfs/presentation-cover-page_3.webp "how to do a powerpoint presentation file")
How to Create a Stunning Presentation Cover Page [+ Examples]
Marketing software that helps you drive revenue, save time and resources, and measure and optimize your investments — all on one easy-to-use platform
Your current User-Agent string appears to be from an automated process, if this is incorrect, please click this link:
- Your Back-to-School Tech Guide
- All About Google's New TV Streamer
What Is a PPT File?
This is an older PowerPoint presentation format, but you can still edit one in Microsoft's program or other free slideshow creators
:max_bytes(150000):strip_icc():format(webp)/tim-fisher-5820c8345f9b581c0b5a63cf.jpg "how to do a powerpoint presentation file")
- Emporia State University
- Google Drive
- Backup & Utilities
- Cryptocurrency
What to Know
- A PPT file is a PowerPoint presentation.
- All versions of PowerPoint can open one, as well as WPS Office Presentation and Google Slides .
- Convert from PPT to PDF, MP4, and other formats with those same programs.
This article explains what a PPT file is and how to open one or convert one to a different format.
A file with the PPT file extension is a Microsoft PowerPoint 97-2003 presentation file. Newer versions of PowerPoint have replaced this format with PPTX .
PPT files are often used for educational purposes and office use alike, for everything from studying to presenting information in front of an audience.
It's common for these files to contain various slides of text, sounds, photos, and videos.
PPT is also short for a number of technology terms that have nothing to do with presentations, like propagation prediction tool, program processing table, program planning team , and Precision Pad Technology .
How to Open a PPT File
PPT files can be opened with any version of Microsoft PowerPoint .
If it was created with versions of PowerPoint older than v8.0 (PowerPoint 97, released in 1997), it's not reliably supported in newer versions of the program. If you have an older PPT file, try one of the conversion services listed in the next section.
Several free programs can also open and edit one, such as WPS Office Presentation , OpenOffice Impress, Google Slides , and SoftMaker Presentations .
Another way to open PPT files without PowerPoint is to use one of Microsoft's free PowerPoint viewer programs .
If you want to extract the media files out of one, you can do so with a file extraction tool like 7-Zip . First, convert it to PPTX either through PowerPoint or a PPTX conversion tool (these are usually the same as PPT converters, like the ones mentioned below). Then, use 7-Zip to open the file, and navigate to the ppt > media folder to see all the media files.
How to Convert a PPT File
Using one of the PPT viewers/editors from above is the best way to convert the file to a different format. In PowerPoint, for example, File > Save As lets you save to PDF , MP4 , JPG , PPTX, WMV , and lots of other formats.
PowerPoint's File > Export menu provides some additional options that are useful when converting PPT to a video.
In the Export menu is also a Create Handouts option that will translate the slides into pages in Microsoft Word. You'd use this option if you want an audience to be able to follow along with you as you make a presentation.
Another option is to use a free file converter to convert the file. FileZigZag and Zamzar are two free online PPT converters that can save one to MS Word's DOCX format as well as PDF, HTML , EPS , POT, SWF , SXI, RTF , KEY, ODP, and other similar formats.
If you upload the file to Google Drive , you can convert it to the Google Slides format by simply opening it. See How to Convert PowerPoint to Google Slides if you need help.
If you're using Google Slides to open and edit the PPT file, it can also be used to convert the file again, from the File > Download menu. PPTX, ODP, PDF, TXT , JPG, PNG , and SVG are the supported conversion formats.
Still Can't Open It?
Files that aren't opening with the programs mentioned above might not actually be related to a slideshow. Check the extension again to make sure it's not really a file that's spelled with similar file extension letters
PSTs , for example, are used with email programs like Outlook. Another is PTP, a preferences file used by Pro Tools.
There are others that are used in PowerPoint, though, and so are also similar looking to PPT. PPTM is one example—it does work with the slideshow programs linked above.
Get the Latest Tech News Delivered Every Day
- What Is a PPTM File?
- What Is an EXR File?
- What Is a PPS File?
- What Is an HTACCESS File?
- What Is a POTX File?
- What Is a PPSX File?
- What Is a PPTX File?
- What Is a PPSM File?
- What Is a CPGZ File?
- What Is a GRD File?
- What Is an XBIN File?
- What Is an ALP File?
- What Is an IFC File?
- What Is a TEX File?
- What Is an FB2 File?
- What Is an XNB File?
- PRO Courses Guides New Tech Help Pro Expert Videos About wikiHow Pro Upgrade Sign In
- EDIT Edit this Article
- EXPLORE Tech Help Pro About Us Random Article Quizzes Request a New Article Community Dashboard This Or That Game Happiness Hub Popular Categories Arts and Entertainment Artwork Books Movies Computers and Electronics Computers Phone Skills Technology Hacks Health Men's Health Mental Health Women's Health Relationships Dating Love Relationship Issues Hobbies and Crafts Crafts Drawing Games Education & Communication Communication Skills Personal Development Studying Personal Care and Style Fashion Hair Care Personal Hygiene Youth Personal Care School Stuff Dating All Categories Arts and Entertainment Finance and Business Home and Garden Relationship Quizzes Cars & Other Vehicles Food and Entertaining Personal Care and Style Sports and Fitness Computers and Electronics Health Pets and Animals Travel Education & Communication Hobbies and Crafts Philosophy and Religion Work World Family Life Holidays and Traditions Relationships Youth
- Browse Articles
- Learn Something New
- Quizzes Hot
- Happiness Hub
- This Or That Game
- Train Your Brain
- Explore More
- Support wikiHow
- About wikiHow
- Log in / Sign up
- Computers and Electronics
- Presentation Software
- PowerPoint Presentations
How to Open a PPT File on PC or Mac
Last Updated: September 1, 2022 Tested
Using PowerPoint
Using google slides, using powerpoint online.
This article was co-authored by wikiHow Staff . Our trained team of editors and researchers validate articles for accuracy and comprehensiveness. wikiHow's Content Management Team carefully monitors the work from our editorial staff to ensure that each article is backed by trusted research and meets our high quality standards. The wikiHow Tech Team also followed the article's instructions and verified that they work. This article has been viewed 88,056 times. Learn more...
This wikiHow teaches you how to open and view the contents of a PPT (PowerPoint presentation) file in Windows and macOS. PPT is the native presentation format in Microsoft PowerPoint's earlier versions and is supported by all versions of the software. If you don't have PowerPoint, you can open the file in Google Slides or PowerPoint Online (a free version of PowerPoint accessible on the web).

- If you don't have PowerPoint installed on your computer, make sure to check out this article for detailed instructions on how to download it.
- Alternatively, you can download and use Apache OpenOffice ( https://www.openoffice.org/download ), or Apple Numbers ( https://itunes.apple.com/tr/app/numbers/id409203825 ).
- To open the PPT with a different program, just select the program you want to use on the "Open with" menu.

- If you're prompted, sign in with your Google account.

- Alternatively, you can drag and drop your PPT file here.

- If you're prompted, sign in with your Microsoft account.

Expert Q&A
You might also like.

About This Article

1. Right-click the PPT file. 2. Hover over Open with . 3. Select Microsoft PowerPoint . Did this summary help you? Yes No
- Send fan mail to authors
Is this article up to date?

Featured Articles

Trending Articles

Watch Articles

- Terms of Use
- Privacy Policy
- Do Not Sell or Share My Info
- Not Selling Info
wikiHow Tech Help Pro:
Level up your tech skills and stay ahead of the curve
How to Open a PowerPoint Presentation? [Complete Guide!]
By: Author Shrot Katewa
![How to Open a PowerPoint Presentation? [Complete Guide!]](https://artofpresentations.com/wp-content/uploads/2021/05/Featured-Image-how-to-Open-a-PowerPoint-Presentation-File.jpg "how to do a powerpoint presentation file")
Knowing how to master the PowerPoint application starts with the basics. If you are just starting out with Microsoft PowerPoint, the first thing you need to know is really how to open a PowerPoint presentation!
To open or view an existing PowerPoint file, double-click on the file from the folder. Alternatively, open the PowerPoint application. Then, click on “File>Open>Browse”, and locate the file on your computer to open it. To open a new presentation file, simply click on “File>New>Blank Presentation”.
The process of opening a PowerPoint presentation is actually quite simple and it only takes a few seconds. So, in this article, first we will take you through the process of opening a presentation step-by-step in a visual manner. Then, I will provide answers to all questions related to opening a PowerPoint presentation!
So, let’s get started!
[A Quick Note Before We Begin – for this article, I will be using one of the presentation templates from Envato Elements . With Envato Elements, you get access to thousands of presentation designs with unlimited downloads so you never run out of options again. Plus, you get free previews so you know exactly what you’re getting before buying! It is also very affordable. Check out their pricing here ]
1. How to Open a PowerPoint Presentation?
There are a couple of different methods in which you can open a PowerPoint file. Both the methods are actually quite easy.
The first method requires the least number of steps. To open or view a PowerPoint presentation simply locate the PowerPoint file on your computer, and double-click on it. You can also right-click on the file, and from the dropdown menu, click on “Open”.
The second method requires you to start the PowerPoint application first.
If you do not see the PowerPoint icon on your desktop or taskbar, just go to the search bar and type ‘PowerPoint’ using your keyboard to find it. After opening the PowerPoint application, all you have to do is select your presentation file to open it. Just follow the steps below:
1a. How to Open a New PowerPoint Presentation?
Follow the steps below to open/create a new PowerPoint Presentation:
Step-1: Click on the “File” Menu button
At the top left side of your Microsoft PowerPoint application, you will find the ‘File’ menu option. The first step is to click on it.
Step-2: Click on “New”, and select the “Blank Presentation” button
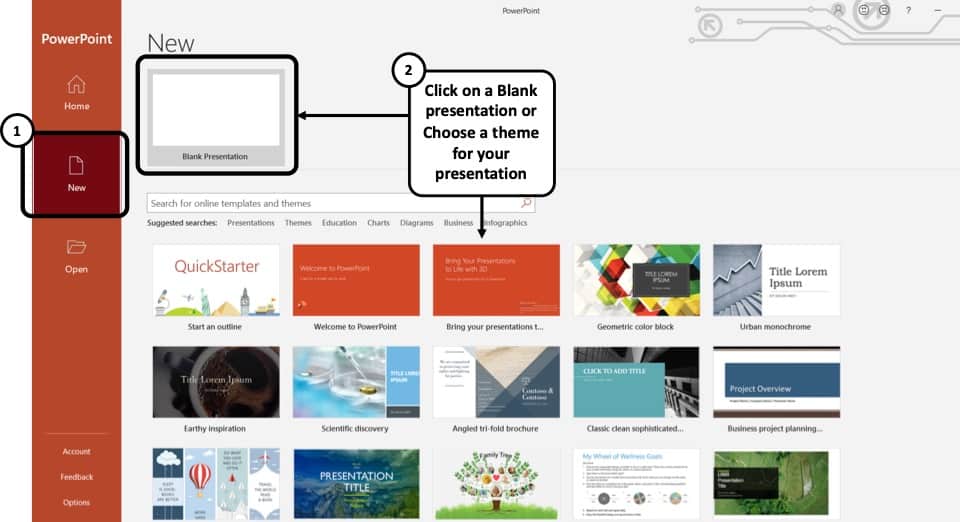
Then, from the PowerPoint Backend view, you need to click on “ New “.
Now on your screen, you will find an option that says ‘Blank Presentation’ for you to click on. A new PowerPoint presentation with a blank slide will be created once you click on it.
You can also choose to click on any of the templates below to go with a pre-made design theme.
1b. How to Open an Existing PowerPoint Presentation?
It is common to have PowerPoint presentation files saved in different folders of your computer. There are two very easy ways to open these existing PowerPoint presentation files.
You can either open an existing PowerPoint file by browsing to the folder it is stored in and double-clicking on the file. Or you can open it from the Microsoft PowerPoint application itself. I’ll discuss both of the ways below:
Opening an existing PowerPoint Presentation file from the file location
Step:-1: Go to the folder your PowerPoint Presentation file is stored in

Open the folder where you had saved your PowerPoint presentation file. It could be on any of your local drives, or if you have recently downloaded the file, it could be on the ‘Downloads’ folder.
Step-2: Double-click on the PowerPoint Presentation file.
‘ Left click’ on the file twice using your mouse to open it. You can also ‘Right click’ on the file once and from the dropdown menu click on the ‘Open’ option to open the file on your Microsoft PowerPoint application.
Opening an existing PowerPoint Presentation from the Microsoft PowerPoint Application
Step-1: Open the Microsoft PowerPoint application and go to the “File” menu
The first thing you have to do is open the Microsoft PowerPoint application and click on the “ File ” menu option on the top-left corner of the screen.
Step-2: Click on ‘Open’, and then ‘Browse’
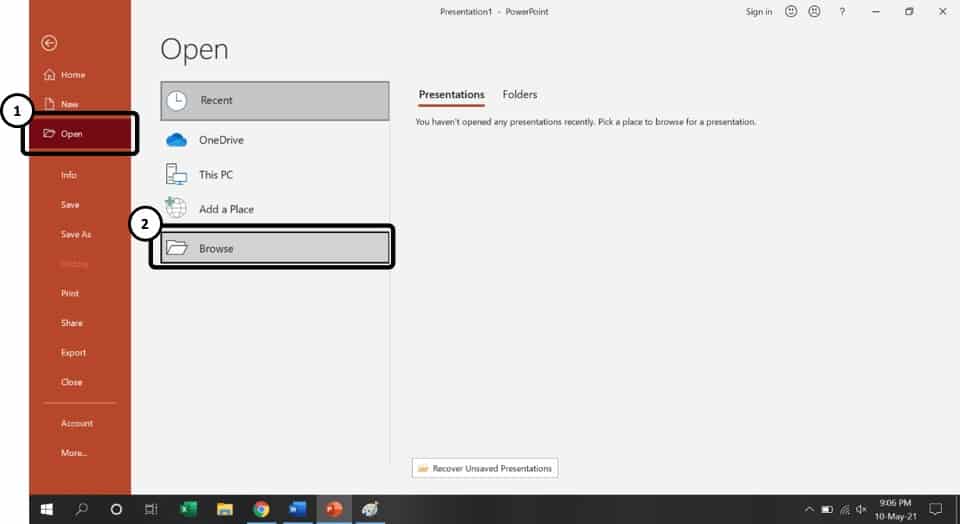
Clicking on the File option will open the background view of PowerPoint. Then, click on “ Open “
In the ‘Open’ tab, you will find all the Presentation files you have used/viewed recently under the ‘Recent’ section. If the file you want to open is not present here, simply click on ‘Browse.’
Step-3: Go to the file location click on it to select it.

After that, a window will pop up using which you can use to choose the file you want to open. Go to the folder containing the PowerPoint presentation file and select it by ‘Left-clicking’ on its name.
Step-4: Click on ‘Open.’
After selecting the file, click on ‘Open’ to get the job done. You can also edit the slides by clicking on ‘Enable Editing.’
You can follow any of the two methods mentioned above to open an existing PowerPoint Presentation file.
1c. Shortcut Key to Open a Presentation in PowerPoint
You can open both a new PowerPoint Presentation as well as an existing PowerPoint file using shortcut keys.
Here are the shortcut keys to open a PowerPoint presentation –
- To open a new PowerPoint presentation – Press “Ctrl+N” (Cmd+N on Mac)
- To open an existing PowerPoint presentation – Press “Ctrl+O” (Cmd+O on Mac)
Remember, in order to use the above shortcut keys, you need to open the PowerPoint application first on your computer.
2. How to Open a PowerPoint Online? (Using OneDrive)
Microsoft PowerPoint can also be saved online. Microsoft actually has integration with its own cloud service called OneDrive. In fact, if you are using Microsoft Office 365 , you also get free cloud storage of up to 1 TB with your account!
When you try to open an online version of a PowerPoint file, you will need to do so using OneDrive. In the following steps, I will show you how to open a PowerPoint Presentation file online using OneDrive:
Step-1: Click on the “File” menu
The first step, as usual, is to click on the “ File ” menu option. This will open the backend view of PowerPoint.
Step-2: Click on “Open” and choose “OneDrive”
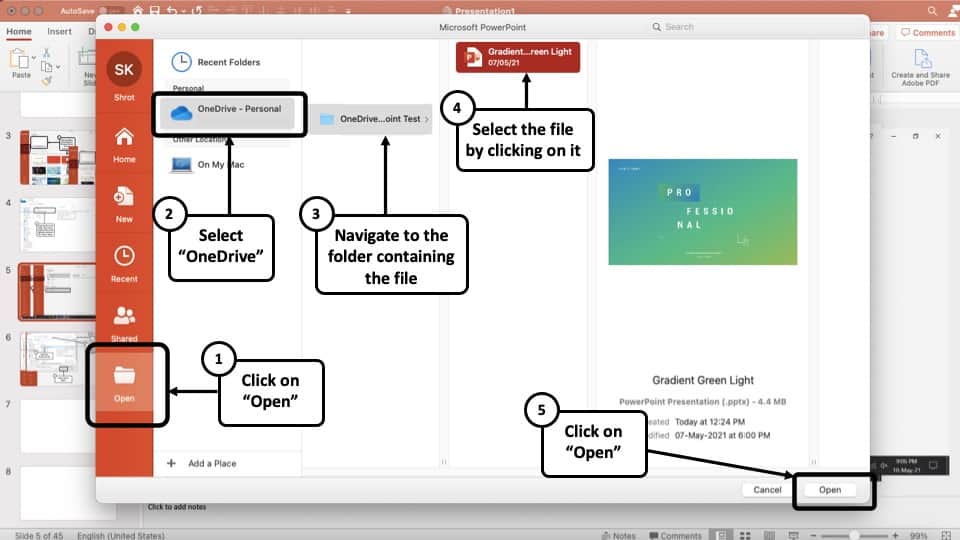
From the backend view, click on the “ Open ” option. Then, click on “ OneDrive “. You may need to login into your OneDrive account. Then, navigate to the respective folder containing the PowerPoint file.
Step-3: Select the File and Click “Open”
Navigate to the designated folder on OneDrive that contains the PowerPoint file. Select it and then click “Open”.
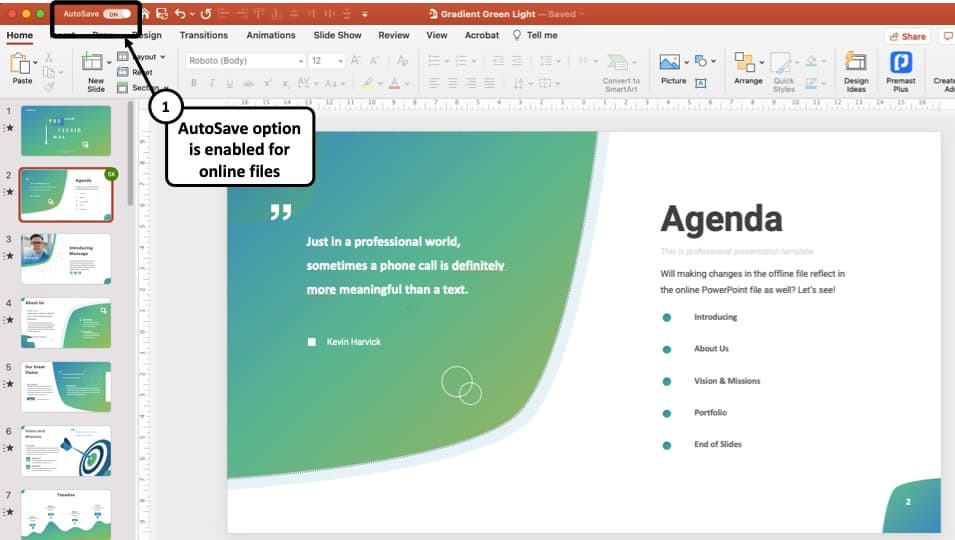
PowerPoint will then download the file for you. Once it opens the online file, you will notice that the “ Autosave ” feature in PowerPoint will be turned on.
This basically means, every time you make a change to the file, it will automatically reflect in the file saved online in OneDrive!
How to Open and View a PowerPoint file in OneDrive?
You can also view the same PowerPoint file using your internet browser. All you need to do open the OneDrive login page and log in to your OneDrive account using your email address and password.
Once you are logged in into your OneDrive account, follow the below mentioned steps –
Step-1: Locate your PowerPoint file and Click on it
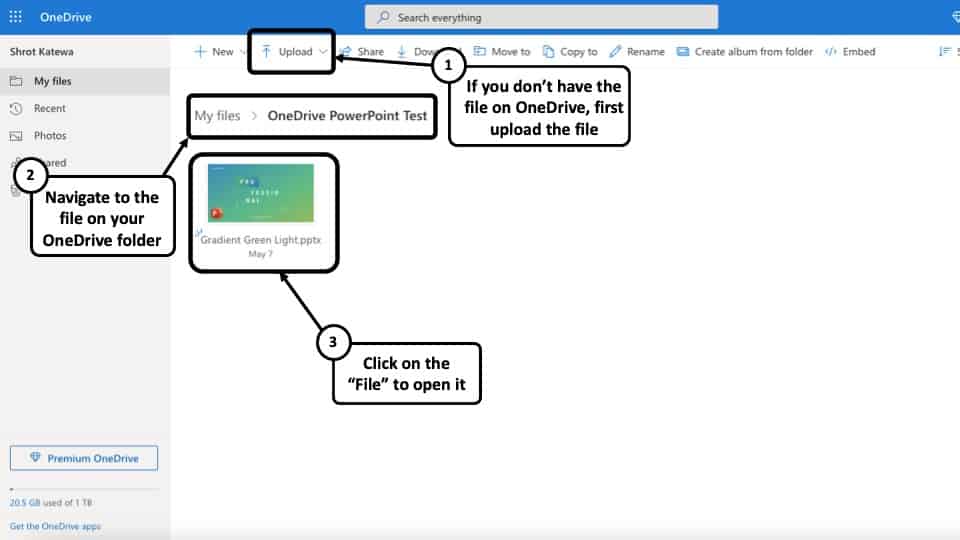
If you already have the file uploaded, then simply navigate to the respective folder, locate the file and click on it.
Step-2: Start Editing the File
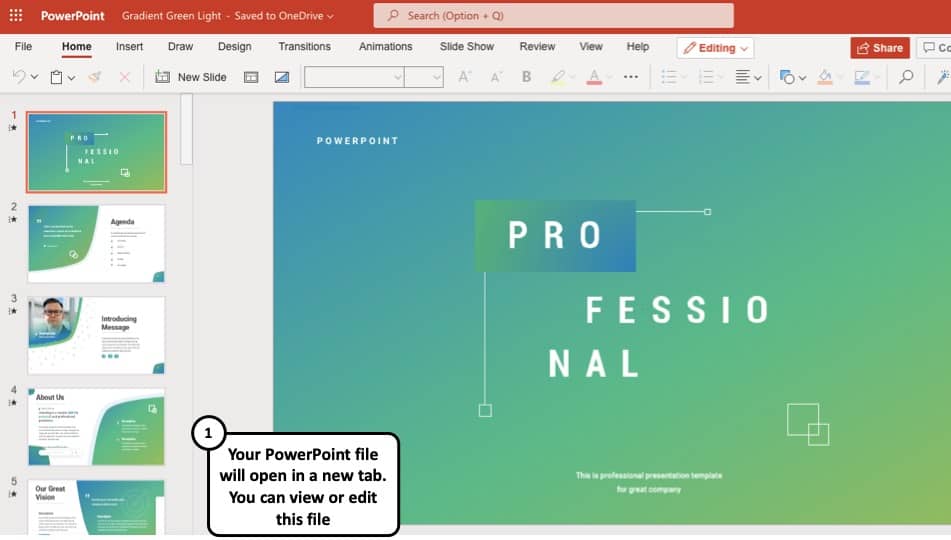
Your file will be opened in a new tab on your browser. You can directly start editing the PowerPoint file online!
The best part is, you don’t even need to have the PowerPoint application installed to edit, open or view a PowerPoint presentation online file!
3. How to Open a PowerPoint Presentation in Google Slides?
Google Slides in one of the most popular online tools out there for creating and opening presentations. You can also use Google Slides to open you PowerPoint Presentation file with just a few clicks. Follow the steps below:
Step-1: Go to Google Slides and click on ‘Open File Picker’ option
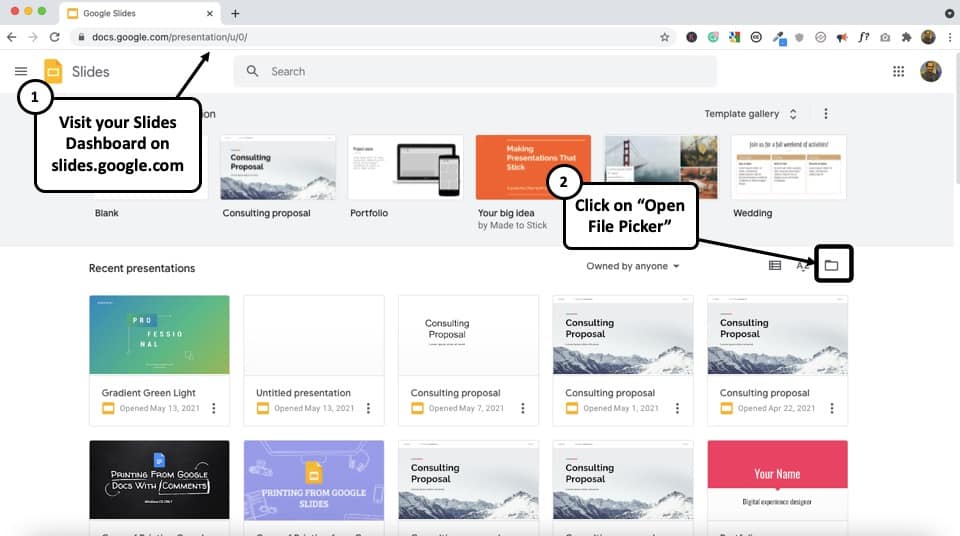
To open a PowerPoint Presentation in Google Slides, the first step is to log in to your Google account and go to Google Slides. Then, click on the “ Open File Picker ” option – the icon that looks like a file folder (see the image above).
Step-2: Go to the ‘upload’ section for uploading the presentation file
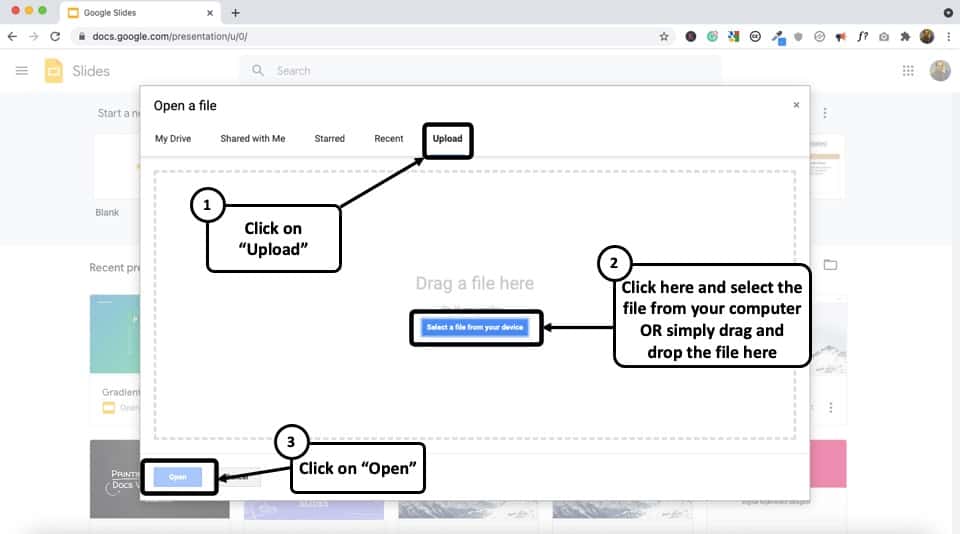
Since Google Slides is cloud-based, the next step is to upload the Presentation file. To do that, from the pop-up window, go to the ‘Upload’ section. Now click on ‘Select a file from your device.’
Step-3: Locate your PowerPoint Presentation file and click on ‘Open.’
From the pop-up window, go to the folder containing the Presentation file and select it. Then click on ‘Open’ to upload the file from your computer. It might take a few seconds to upload and load the Presentation file on Google Slides. That’s it!
4. How to Open a PowerPoint Presentation in Keynote on Mac?
To open a Microsoft PowerPoint Presentation on Apple’s Keynote application, just follow the steps below:
Step-1: Open ‘Keynote’ and locate your PowerPoint Presentation file
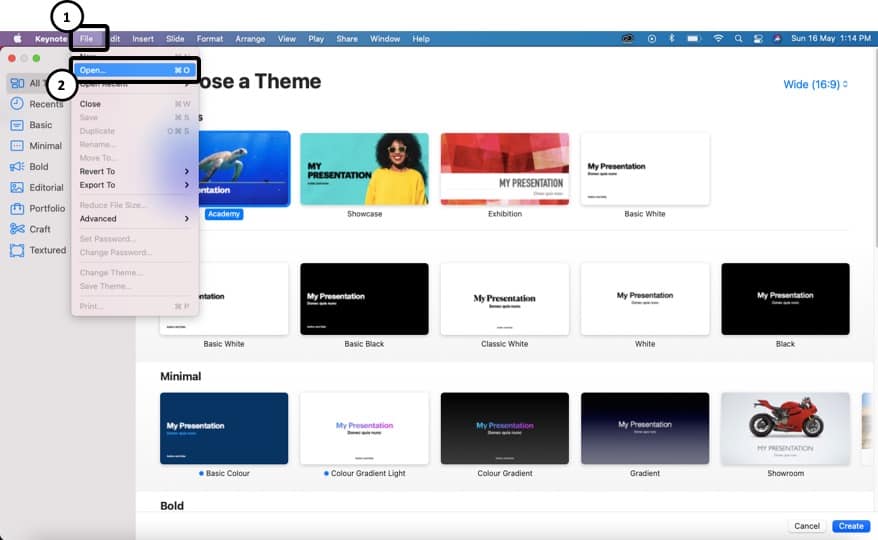
On your Mac Computer open the ‘Keynote’ application. From the window, navigate to the folder containing the PowerPoint Presentation file.
Step-2: Select your Presentation file and click on ‘Open.’
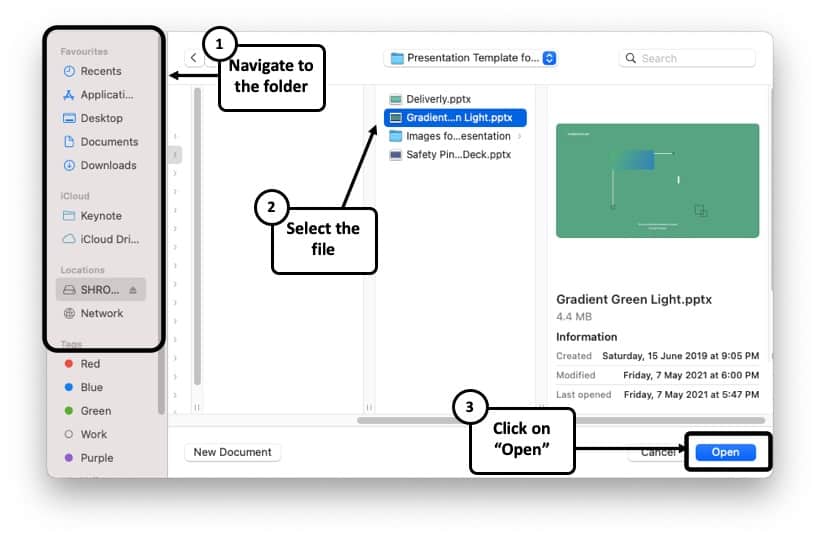
After locating your PowerPoint Presentation file on Keynote, simply click on it to select it. Then click on ‘Open’ to access it. A window might appear stating that some changes were made while importing the file, which is quite normal for highly customized PowerPoint files.
Step-3: View or Edit the PowerPoint file in Keynote

Once the file is opened in Keynote, you can now view or edit the file directly in Keynote just as you would on any other presentation design application!
5. How to Open a PowerPoint Presentation Without PowerPoint?
Incase you do not have PowerPoint installed on your computer or do not have access to PowerPoint, you can still open a PowerPoint presentation file through various means. I’ll be discussing some of the ways to open a PowerPoint Presentation without PowerPoint below:
Method 1 – Using Online Tools
If you don’t have PowerPoint installed on your computer, you can still view a PPT or PPTX file. One of the best ways to view it is using online tools.
Two of the most commonly used FREE online tools are ‘Google Slides’ and ‘One-Drive’ . Both these methods have been discussed previously in this article. Thus, I would recommend going through them once again if you need some help on that.
Method 2 – Using Aspose Slides Viewer
Another method is using the “Aspose Slides Viewer”. Using this online tool, you can open your Presentation files. It supports PPT, PPTX, PPS, and ODT files that are amongst the most common PowerPoint Presentation formats.
Here’s how to use Aspose Slides Viewer tool to open PowerPoint Presentations –
Step-1: Go to Aspose Slides Viewer using an Internet Browser
The first step is to open your Internet Brower and go to: https://products.aspose.app/slides/viewer
Step-2: Click on ‘Drop or upload your file’
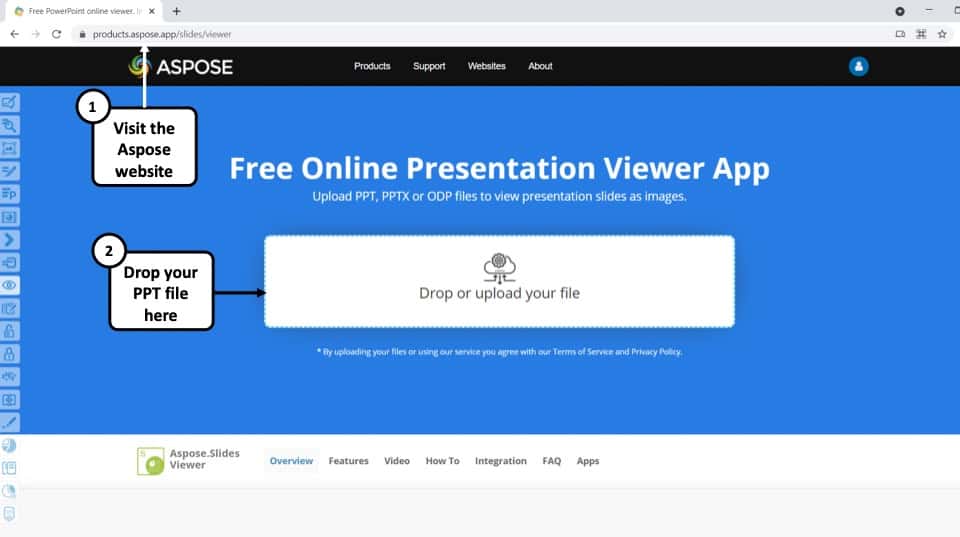
Once the webpage is done loading on your browser, click on ‘ Drop or upload your file.’
Step-3: Locate your file and click on ‘Open’
From the pop-up window, go to the folder containing the PowerPoint Presentation file and select it. Then click on ‘Open’ to upload the file from your computer to Aspose Slides Viewer. Once the upload is finished, you will be able to view the PowerPoint Presentation on your screen.
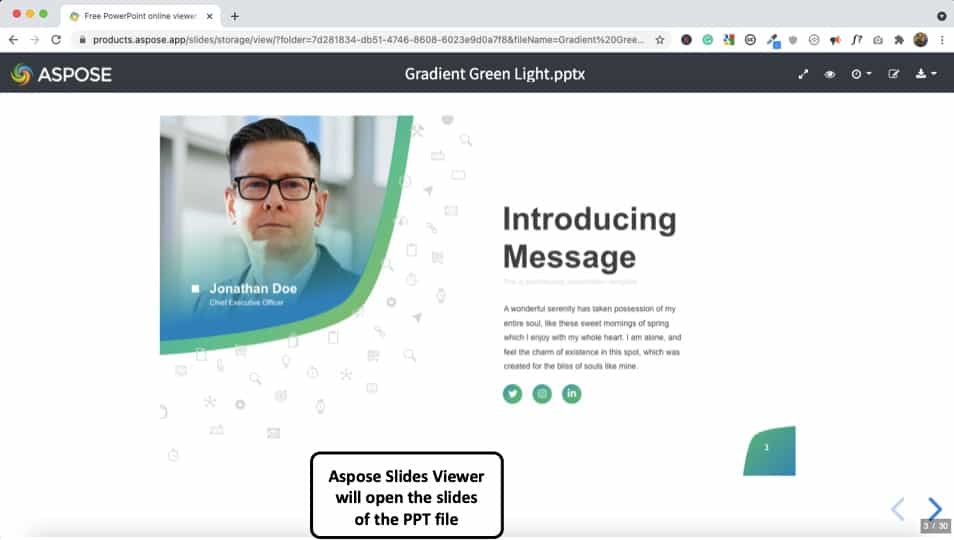
The good part about Aspose Slides Viewer is that it is completely FREE. When viewing the ppt file, it shows a surprisingly accurate representation of the presentation. You can also edit the PPT file. However, the options are quite limited. So, it can be used for basic text editing at the very best!
Method 3 – Using Third-Party Applications
There are a few Third-Party Applications out there, which you can use to Open PowerPoint Presentation files. Two of the most common among them are ‘LibreOffice Impress’ and ‘Kingsoft Presentation Professional.’
LibreOffice supports almost all types of PowerPoint files including PPT, PPTXS, PPTX, PPTS. It allows you to not only open PowerPoint presentations but also make necessary customizations. You can download it for free from here .
Kingsoft Presentation Professional is another standard presentation tool with lots of in-built features. It is quite similar to Microsoft PowerPoint and supports PPT and PPTX files. Download Kingsoft Presentation Professional from here .
6. How to Open PowerPoint in Presentation Mode?
You can directly open your PowerPoint Presentation file in Presentation Mode, instead of having to normally opening it first and then changing the view mode. This might be time saving for some, as you will be able to start your presentation with just a few clicks. Follow the step-by-step guide below to find out the process:
Step-1: Go to the folder which contains your PowerPoint Presentation file
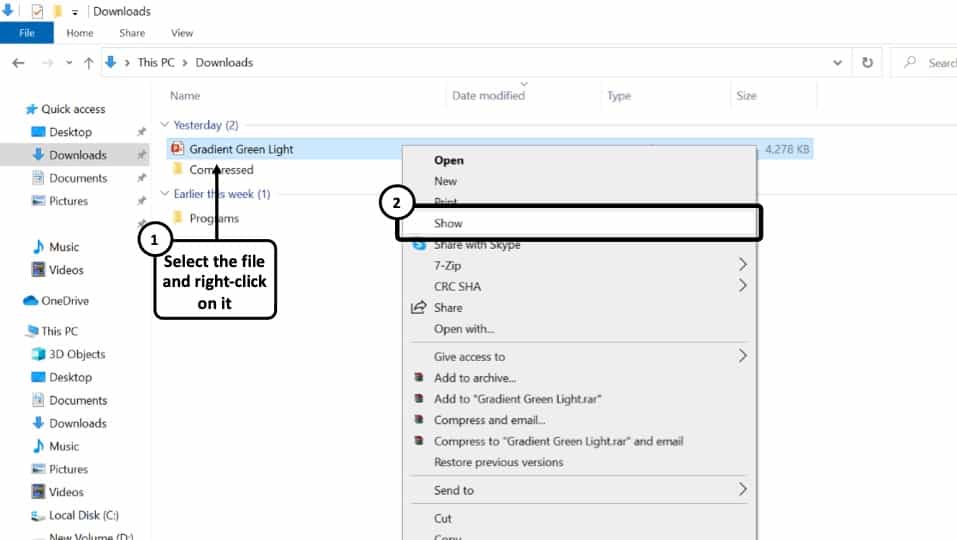
Go to the folder on your computer where you have saved your PowerPoint Presentation file. ‘Right Click’ on the file to open a dropdown menu.
Step-2: Click on ‘Show’
From the dropdown menu, click on the fourth option that says ‘Show.’ This will directly open the PowerPoint file in Presentation Mode.
If you have a “.pps” or “.ppsx” file, you don’t need to right-click on it. These files are designed to be directly open as slideshow!
7. How to Open PowerPoint in Safe Mode?
Opening Microsoft PowerPoint in Safe Mode means opening the application without any add-ons, extensions, or other forms of customizations you might’ve made.
AutoCorrect and a few other features will also not work while in Safe Mode. You can both open the Microsoft PowerPoint application in safe mode or a particular PowerPoint Presentation file.
I’ll be discussing both of them below:
Opening the Microsoft PowerPoint Application in Safe Mode
Step-1: Press ‘Ctrl’ while opening the Microsoft PowerPoint Application
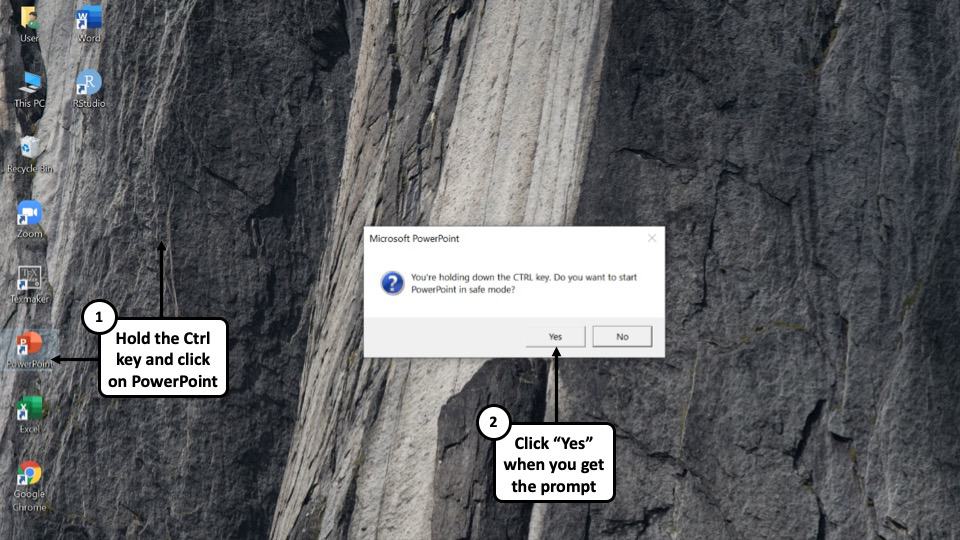
To open the Microsoft PowerPoint application in Safe Mode, hold the ‘Ctrl’ button of your keyboard and ‘Left Click’ on the Microsoft PowerPoint Icon on your taskbar, start-menu, or desktop.
Step-2: Click on ‘Yes’ to enable Safe Mode.
A dialogue box will appear where you will be asked if you want to start Microsoft PowerPoint in Safe Mode or not. Click on ‘Yes’ to open the PowerPoint in Safe Mode.
Opening a specific PowerPoint Presentation on Safe Mode:
To open a specific PowerPoint Presentation file on Safe Mode, follow the steps below:
Step-1: Hold the ‘Ctrl’ Key and click on the PowerPoint file
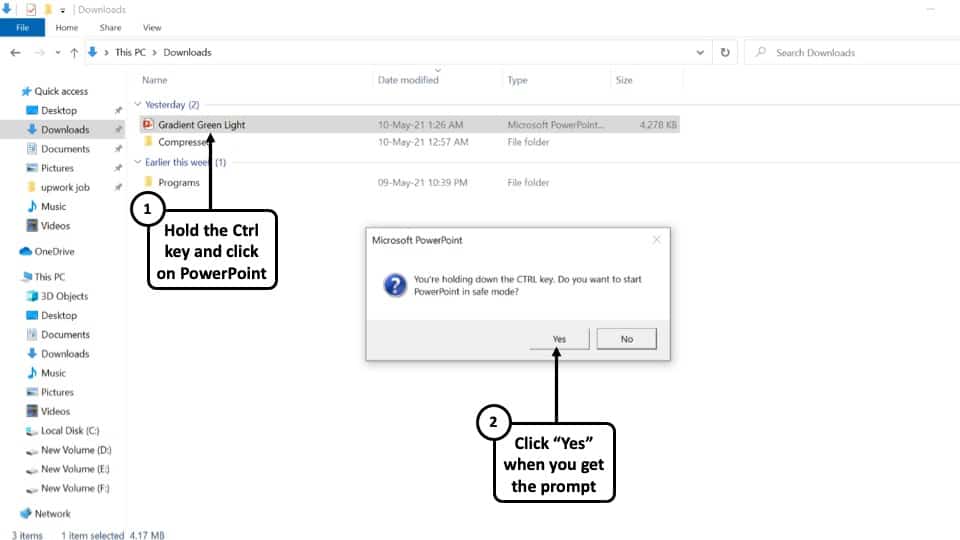
Browse to the folder on your computer where you have you have saved your presentation file. Now, while holding the ‘Ctrl’ button on your keyboard, ‘Left-click’ on the file to open it on Safe Mode. A dialogue box will appear on your screen.
Step-2: Click on ‘Yes’ in the Prompt that opens up
You will now be asked if you want to open this PowerPoint file in Safe Mode. Click on ‘Yes’ to get the job done!
8. How to Open a PowerPoint Presentation on Zoom?
Zoom meetings has now become an integral part of our lives, both in terms of work and education. The global pandemic has forcefully replaced on-stage presentations with virtual ones and Zoom is one of the most popular choices for it.
Related Article – How to Give a Presentation on Zoom? [A Complete Step-by-Step Guide!]
If you want to open a PowerPoint presentation on Zoom, follow the steps mentioned below –
Step-1: Open the PowerPoint presentation on your device
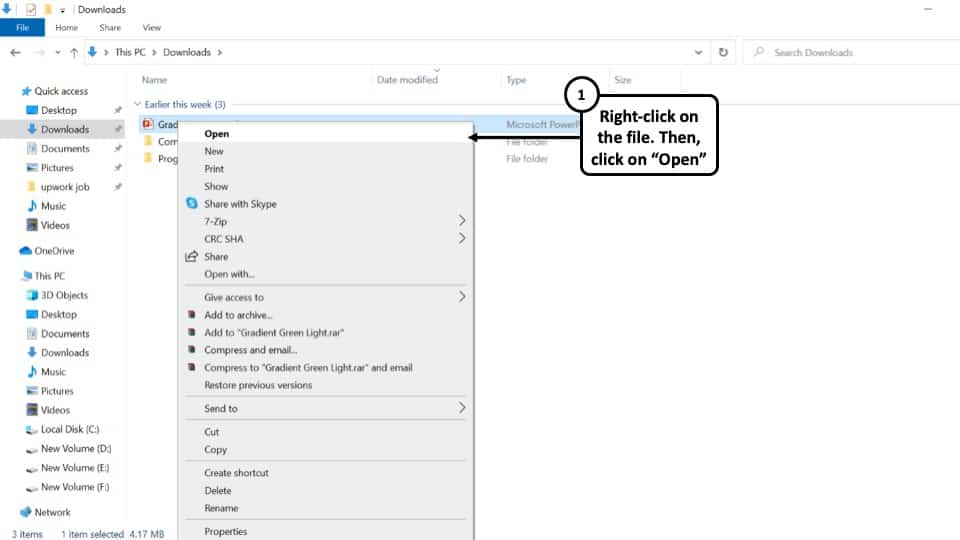
The first step is to open the PowerPoint Presentation file on your computer using Microsoft PowerPoint. You can do that by either ‘ Left-Clicking’ on the file from its location or going to the ‘Open’ tab on Microsoft PowerPoint and selecting the file from the ‘Browse’ option.
I have discussed this in detail on the points above.
Step-2: Open Zoom meeting and click on ‘Share Screen’.
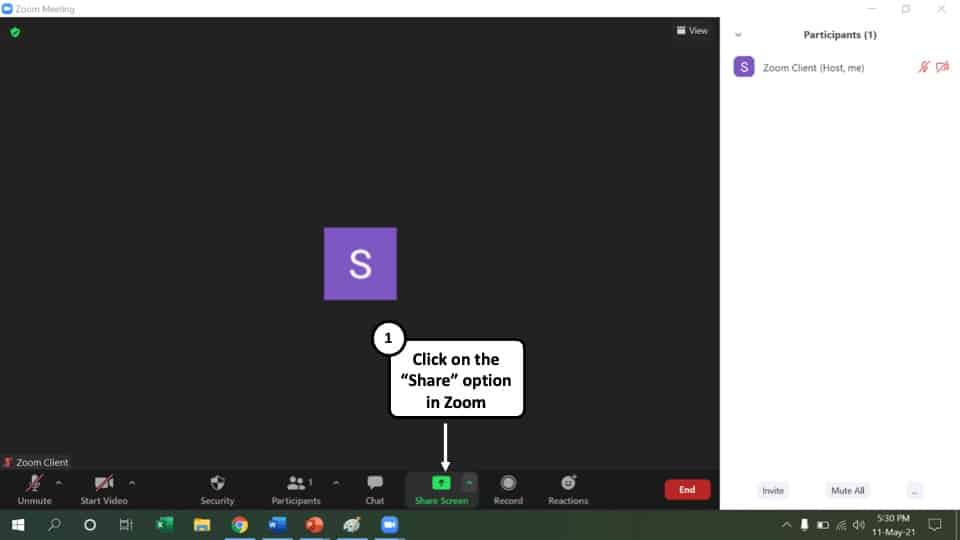
Join or launch a Zoom meeting where you will be sharing your PowerPoint presentation. Click on the option that says ‘Share Screen’ at the bottom.
Step-3: Click on ‘Share’ option
A new window will pop-up where you will find all the applications opened on your computer. Hover your cursor over the ‘ PowerPoint Slide Show’ window and click on it. Now click on the option that says ‘Share’ at the bottom right corner of your screen.
Step-4: Open the PowerPoint presentation in Zoom
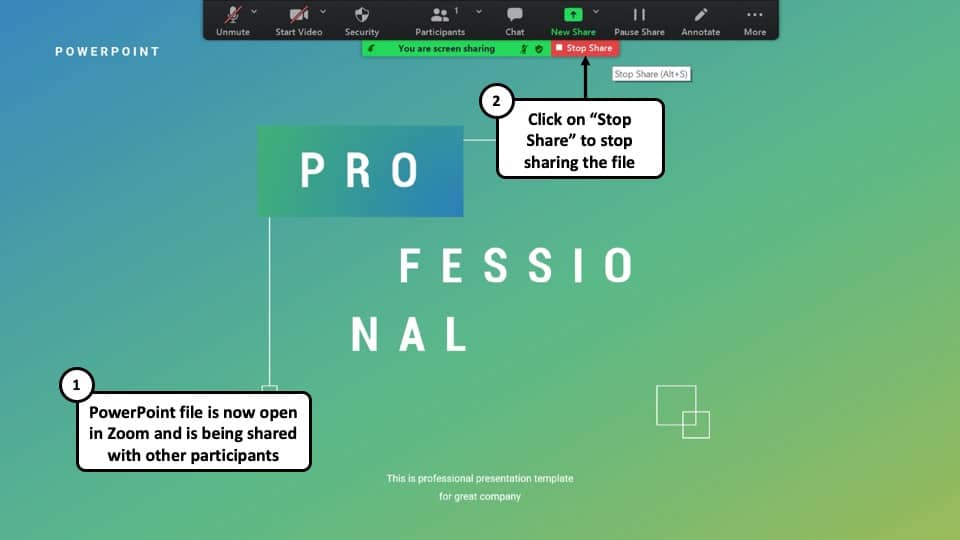
Once you click on ‘Share’ , the PowerPoint presentation file will be opened in Zoom and all the participants in the meeting will be able to view your screen. You can stop sharing your screen by clicking on the option that says ‘Stop Share.’
More PowerPoint Related Topics
- How to Crop a Picture in PowerPoint? [Complete Step-by-Step Tutorial!]
- What is a Presentation Clicker? [And How to Use it!]
- How to Convert a PowerPoint to PDF? [A Simple Guide!]
- PowerPoint vs Google Slides: Which is Better? [ULTIMATE Test!]
- How to Change Bullet Style in PowerPoint? A Complete Guide
Credit to drobotdean (via Freepik) for the featured image of this article
6 Ways to Open PPT and PPTX Files for Free

Your changes have been saved
Email is sent
Email has already been sent
Please verify your email address.
You’ve reached your account maximum for followed topics.
Did you just receive a Microsoft PowerPoint file and don't have PowerPoint installed on your PC? Or maybe you want to open an old file, but your Microsoft 365 subscription has already lapsed?
Regardless of why, there are plenty of reasons why you might need to open, edit, or present from a PPT or PPTX file. Sure, you could purchase the whole Microsoft Office suite, but that's an expensive endeavor, especially for a small project.
Luckily, a wide variety of alternatives will let you open up your PPT or PPTX files entirely for free. Here are six of the best.
1. Office Editing for Docs, Sheets & Slides

First up on this list is the Chrome extension Office Editing for Docs, Sheets & Slides. This extension is heading off this list because it is probably the easiest way to quickly and easily open and edit Microsoft PowerPoint files for free.
For most installations of Google Chrome, the Office Editing for Docs, Sheets & Slides extensions comes installed by default. This means that you're already ready to use it.
All you have to do is open up your Chrome browser window and then drag and drop any PPT or PPTX file into the window. You can see the file if you already have the extensions installed.
If not, all you have to do is download and install the extension. Learning how to find, install, and manage extensions in Chrome couldn't be easier, so this is a pretty straightforward method, even if you don't have the extension pre-installed.
The functionality of this extension is pretty impressive. You can easily open, view, edit, and even present your PowerPoint presentations with ease. There's support for animations and even internal links, so while you won't be able to do everything you could with Microsoft PowerPoint, you can get a pretty far way with just the extension.
2. Google Slides

Next up, we have Google Slides. Google Slides is like Google Docs or Google Sheets, but for PowerPoint presentations instead of Word or Excel.
If you've never heard of Google Slides, it's a cloud-based online alternative to Microsoft PowerPoint. It lets you create slideshows online and then present or share them with others entirely from your browser.
It can also open up PPT and PPTX files. All you have to do is go to Google Slides and navigate to the header that reads File . From there, just click on Import slides , then Upload , and select your file.
You'll need to pick which slides you want to import from here. Since you're trying to open a PPT or PPTX, you probably want to select all of them, but that's up to you. From there, just hit Import slides, and you're done.
From there, you have all of the best Google Slides presentation tools you would get if you had made your presentation there from scratch, and you can save, present, and edit to your heart's desire.
3. LibreOffice Impress

Next, we have LibreOffice. LibreOffice is an open-source and entirely free program that has been in development for over ten years. It acts as a free alternative to the Microsoft Office suite and does a pretty good job of it.
LibreOffice Impress is the equivalent of Microsoft PowerPoint and functions more or less identically to how PowerPoint does—from presentation creation, editing, and of course, opening up PPT and PPTX files.
If you're aiming to create a PPT or PPTX file from scratch, this is a great option to do just that. It behaves much the same as PowerPoint does without the price tag. The interface also looks quite good, though a little dated compared to Microsoft's more modern designs.
4. Apache OpenOffice

If you want an alternative to LibreOffice, there's Apache OpenOffice. Both programs are free and open-source because they're forks of a previous project. This much is evident even in the naming conventions, with OpenOffice's equivalent to PowerPoint also being called Impress.
OpenOffice Impress does a pretty good job as an alternative to Microsoft PowerPoint, especially considering that the project is entirely free.
There are plenty of tools to work with, and a lot of the functionality you would expect from Microsoft PowerPoint is here. For opening and making tweaks to a PPT or PPTX file, you'll be more than fine, and for larger projects, you probably won't have much to worry about either.
Even the interface is pretty good. It's maybe not as sleek as PowerPoint, but it doesn't look bad.
5. Aspose Online PowerPoint Viewer

If you don't want to install anything on your computer, an online solution is a good place to go. Aspose's online PowerPoint viewer is a web service that allows you to upload your files to the internet to view them.
All you have to do to get going with Aspose's online PowerPoint viewer is to upload your file to the site. To do this, just drag and drop the file into your browser, or click the center of the screen to upload it using folder navigation.
From there, you're pretty much good to go. Aspose will automatically open up your PowerPoint file for viewing.
The result is pretty good and gives you a solid idea of what the file looks like, though there can be problems with some fonts not being supported. The presentation will still open but will substitute them with default fonts, which can be problematic if they are critical to your presentation.
6. Online Document Viewer

Finally, we have Online Document Viewer. This online web service allows you to upload and view documents, including PPT and PPTX files.
Online Document Viewer has some decent viewing options, such as navigation menus, rotation options, and more. There's no ability to edit your files once you've uploaded them, though, so if you were hoping to make any changes, then you're unlikely to have much success with Online Document Viewer.
Make Opening PowerPoint Files Easy
As you can see, a wide variety of different methods are available to let you open and even edit your PPT and PPTX files without spending any money on the Microsoft Office suite.
If you're trying to make an engaging presentation, there are a few better ways to do it. As long as you know how to captivate your audience and have the right tools for the job, you shouldn't have any problems.
- Productivity
- Microsoft PowerPoint
Google Slides
How To Convert PowerPoint to Google Slides: Step-by-Step Tutorial

Table of Contents
Often, it has happened that you want to open an old PowerPoint file, unfortunately, it is no longer supported on your computer. You can make your slide presentation more accessible from any device if you have access to your Google Account. You can easily achieve this by knowing how to convert PowerPoint to Google Slides.
People prefer Google Slides over Microsoft PowerPoint for group projects. The unique feature that sets it apart is collaboration. Multiple people can edit and keep track of each other’s edits on the same presentation on Google Slides.
Learning to convert Microsoft PowerPoint to Google Slides opens new avenues for seamless information sharing and collaboration. Ready to dazzle and dominate? Learn how to convert a PowerPoint to Google Slides format effortlessly here.
Method 1: Converting PowerPoint to Google Slides Through Google Drive.
Google Slides effectively supports various presentation formats including PPTX, PPT, POTM, POTX, and more. The latest version of MS PowerPoint uses the PPTX extension and fortunately, Google Slides supports this extension as well.
Step 1: Open ‘Google Drive’ and hover over the location where you want to save the PowerPoint presentation.
Step 2: Click on the + New option in the top left corner of the screen and select ‘File Upload’. Select the desired PowerPoint presentation from your device. Your file will be uploaded on Google Drive.

Luckily, Google Slides does not require you to make any changes in your PowerPoint presentation to be uploaded on your device.
Step 3: After uploading on Google Drive, right-click on the ‘Open with’ option and select Google Slides. Just like any Google Slides presentation you can edit it.

Step 4: Select the ‘File’ option on the leftmost corner of Google Slides.
Step 5: From the dropdown box, select ‘Save as Google Slides’ and your presentation is ready to edit.

Retaining original formatting is often a top priority when transitioning your presentations from one platform to another. Hence, you must learn how to convert PowerPoint files to Google Slides using Google Drive, all while ensuring that your meticulously crafted formatting remains intact.
Create presentation slides with AI in Seconds in Google Slides
10M+ Installs
Works with Google Slides

Method 2: Importing Your PowerPoint Presentation Into Google Slides
Importing PowerPoint slides into Google Slides provides a convenient way to work collaboratively and utilize Google’s features while maintaining your original content. It can also help you access your presentations online.
Here is how you can import from PowerPoint to Google Slides:-
Step 1: Open Google Drive

Sign in to your Google account and move to Google Drive.
Step 2: Generate Fresh Google Slides

Tap the “+ New” button and pick “Google Slides” from the options.
Step 3: Start the Import Process

Inside Google Slides, access the “File” menu and opt for “Import slides.”
Step 4: Upload PowerPoint File

Switch to the “Upload” tab in the dialogue box. Drag and drop your PowerPoint file or use “Select a file from your device.”
Step 5: Preview and Select Slides

After uploading, a preview of your PowerPoint slides will be shown. You can select individual slides or all of them for import. Decide whether you want to import the slides as they are or as images. This can help preserve formatting.
Step 6: Initiate Import

Click the “Import” button to begin the transfer process.
Step 7: Review and Edit

Once imported, your PowerPoint slides will appear in Google Slides. Review and adjust formatting if necessary.
Step 9: Collaborate and Share

Google Slides’ collaborative features allow you to work with others in real-time. Click the “Share” button to invite collaborators via email.
Step 10: Automatic Saving
Google Slides automatically saves your changes, minimizing the risk of data loss.
Step 11: Access Anywhere
Since your presentation is now online, you can access it from any device with internet connectivity.
Step 12: Version History

Google Slides keeps track of changes, allowing you to revert to previous versions if needed.
Step 13: Present with Ease

Use Google Slides’ presentation mode to deliver your content seamlessly.
- No design skills required
- 3 presentations/month free
- Don’t need to learn a new software

Benefits of Converting a PowerPoint to Google Slides
1. Online Access:
When you use Google Slides to make documents, you can get to them from anywhere with the internet. This means you can switch between computers or devices and still see the same document you were working on before. If you’re using lots of devices for a project, this is handy because it’s easy to use and doesn’t take long to get to.
2. Easier to Use
Google Slides is easy to use because it works online and you can get it for free with Google Drive. Even if someone doesn’t have PowerPoint, they can still see your presentations. Just make sure they have a Google account before you share the Google Slides with them. You can also decide if they can edit the presentation or just look at it.
3. Work Together in Real Time
With Google Slides, collaborating with others is simple because it’s online. Multiple people can work on the document at the same time, and everyone sees changes instantly. This is much faster than constantly sending updated files back and forth.
4. Never Lose Your Work
Google Drive automatically saves any changes you make to a Google Slides document. Even if your computer shuts down or the internet goes out, your work is safe. Google Slides keeps a record of all changes, and you can even go back to previous versions if needed.
5. Embedded Media
Using Google Slides offers a great way to include videos, pictures, maps, and more in your presentations. It’s especially easy to embed videos, which can be a hassle with other presentation software.
6. Integration with AI Tools
Google Slides works with various extensions that use AI features. These tools help you improve your presentations by suggesting text, offering different design options, and more. They make your job faster and simpler.
Bridge Platform Gaps with Ease! Dive into Our Expert Tips for Converting PowerPoint to Google Slides . Find out more here !
Wrapping Up
It is a no-brainer when we say that accessibility and teamwork are your secret weapons in today’s digitally-driven world. Imagine having your content effortlessly accessible across any device, while your team collaborates seamlessly. That’s the power of converting PPT to Google Slides.
Learning how to convert PPT to Google Slides ensures your content is accessible across multiple devices and streamlines teamwork.
But hold on, we’ve got an ace up our sleeve. Enter SlidesAI, your ultimate convenience booster! It’s not just a tool; it’s your ticket to efficiency. With this powerful AI-driven extension that transforms simple texts into slides , you have the ability to create stunning presentations and impress your audience.
Elevate your content, captivate your audience, and conquer the virtual world with ease. Unlock your pathway to presentation greatness with SlidesAI !
Frequently Asked Questions
1. can i convert only specific slides from a powerpoint presentation.
Absolutely! When you’re converting slides in Google Slides, you can choose specific ones you want to convert. Look for options like “Range” or “Select slides” as you go through the conversion steps. Also, check out the section titled “Importing Slides from PowerPoint into Google Slides” for a detailed guide.
2. What happens if my original PowerPoint file is very large?
If your file is big, it might take longer to convert and could cause problems. To avoid this, try:
- Compressing it: Make the file smaller by compressing images and multimedia.
- Converting in batches: Split your presentation into smaller parts and convert them one by one.
3. How do I share my Google Slides presentations with others?
Here’s how to share your Google Slides with others:
- Open your presentation in Google Slides.
- Click the “Share” button at the top right. Enter the email addresses of the people you want to share with.
- Choose their access level (View, Comment, or Edit).
- Click “Send.”
4. Can I download my Google Slides presentations as PowerPoint files?
Yes! Follow these steps:
- Go to “File” > “Download”.
- Choose “Microsoft PowerPoint (.pptx)” from the options
- Your presentation will download in PowerPoint format.
5. What if I encounter problems during the conversion process?
If you run into issues, try these steps:
- Upload your file again: Sometimes, trying again can fix things.
- Check the file format: Make sure your PowerPoint file is in a compatible format (like .pptx or .ppt).
- Explore other options.
- Look for specific error messages: If you see an error, search online for solutions related to that problem.
6. Is Google Slides free?
Yes! Google Slides is free when you use it with your personal Google account.
7. What if my fonts look weird after converting?
Font issues happen sometimes. Here’s what you can try:• Use popular fonts that work in both PowerPoint and Google Slides.• Embed fonts into your presentation to keep them consistent.• Change fonts manually if they don’t show up right.
8. What if my images disappear after converting?
Missing images may happen if they’re linked instead of embedded. Try these fixes:
- Make sure all images are embedded in the original PowerPoint.
- Re-upload your presentation with embedded images.
- Check if your images are in formats that both platforms support.
9. How can I fix animations that don’t work in Google Slides?
Not all animations transfer smoothly. You might need to:
- Use simpler animations that Google Slides supports.
- Adjust timings and effects manually in Google Slides.
- Explore add-ons for more animation options.
10. Are there any issues when moving from PowerPoint to Google Slides?
Yes, when you are moving from PowerPoint to Google Slides, there are some things you must keep in mind:
- Fancy designs and animations may not look the same.
- Some fonts and colors might not be available.
- Special features like macros won’t work.
11. How do I keep formatting when converting from PowerPoint to Google Slides?
You have two options:
- Use Google’s “convert” feature for various file formats.
- Choose “Keep Source Formatting” when saving as Google Slides.
Save Time and Effortlessly Create Presentations with SlidesAI

How-To Geek
Everything you need to know about animations and transitions in powerpoint.

Your changes have been saved
Email is sent
Email has already been sent
Please verify your email address.
You’ve reached your account maximum for followed topics.
Mail Merge Is More Useful Than You Think: 4 Practical Uses
If your pc won't run windows 11, here are 5 great linux operating systems to try instead, microsoft office apps provide a new path for hackers, quick links, what are animations, what are transitions, things to note before you begin, how to add, amend, and remove an animation, how to add, amend, and remove a transition, using the morph transition.
PowerPoint's animations and transitions can help you grab your audience's attention, present information in bite-sized chunks, and—when used sparingly—deliver a more professional presentation. In this article, we'll run through the nuts and bolts of these useful PowerPoint tools.

Animations are effects you can add to your slides' text, pictures, shapes, graphics, tables, and other elements. There are four different types of animations:
- Entrance animations—These are the effects you can add to make an object appear on your slide in different ways.
- Emphasis animations—You can add an emphasis animation to an object already visible on your slide, such as changing its size or color.
- Exit animations—The opposite to entrance animations, exit animations make objects disappear from your slide through different effects.
- Motion paths animations —You can make an element on your slide move to a different place, with your audience seeing this movement from where it started to where it ends up.
You can use more than one animation on a single object. For example, you can apply an entrance animation to some text, followed by an emphasis animation.

A transition effect dictates how your presentation progresses from one slide to the next, and you can choose from three different levels of complexity:
- Subtle—These are the most basic types of transitions in PowerPoint, aiding speed and slickness as you jump from one slide to the next.
- Exciting—You can make your transitions more visually entertaining.
- Dynamic—A dynamic transition applies to all parts of a slide, except for the background, giving the illusion that the content is rolling through on a single page.
Only one transition effect can be added to each slide, and it's important that you apply the transition to the slide that will be visible once the transition is complete. For example, if you have two slides and want to create a transition effect as you move from slide 1 to slide 2, you will need to apply the transition to slide 2.
Before you add animation and transition effects to your PowerPoint presentation, bear in mind the following tips:
- Don't add too many animations and transitions . Overusing these features can distract your audiences in ways you didn't intend to, and they can also look tacky and unprofessional. Ask yourself, "Does this make my presentation better?" If the answer is no, don't add it.
- Another issue with using too many animations and transitions is that it could significantly slow down your PowerPoint file's processing speed , as it adds volume to your file size.
- Keep things professional in the right contexts. For example, if you're presenting a formal business plan, you don't want to add funky transitions that take ten seconds to complete. Try sticking to slick effects that last less than a second.
- Use the same transition effect for each slide and, if you can, the same animation for each item.
It's a widely shared opinion that Microsoft 365's desktop apps offer more flexibility and functionality than their web-based counterparts. However, the exact opposite can be said for adding animations, which is significantly easier to do on PowerPoint for the web than via the subscription-only app. So, to create the animations for screenshots in this section, we have used PowerPoint online, rather than the desktop app, and we recommend that you do the same.
Before you add any animations, click "Animation Pane" in the Animations tab on the ribbon. This will open a pane on the right side of your window, which will make seeing and managing your animations much easier.

Now, select the item you want to animate. If you want several items on a slide to animate in the same way at the same time, hold Ctrl while clicking them all. Then, click the down arrow in the Animations tab, and choose the appropriate effect.

You will then see an animation card in the Animation Pane for the effect you just added. Here, you can change the animation type, how it is activated (whether via a click, with the previous animation, or after the previous animation), and the duration and delay.

If you have more than one animation on a slide and want to reorder them, click and drag the six dots next to the relevant animation card upwards or downwards.

Finally, to remove an animation, click the trash icon on the appropriate animation card.
You can also animate paragraphs of text within a text box. To do so, select the relevant text, and follow the same process.
Whether you're using PowerPoint's desktop app or the online version of the program, adding transitions involves a very similar process.
First, select the slide you want to transition to (for example, you'll select slide 2 if you want to create a transition from slide 1 to slide 2) in the slide thumbnail pane, and then click the "Transitions" tab on the ribbon.

To see more transitions, click the down arrow on the right-hand side of the Transition To This Slide group.
Clicking any of the transition effects on display will do two things—first, it will show you a preview of what that transition will look like, and second, it will apply that transition to that slide.
You can then amend the options (such as the direction of the transition) and timing of the transition using the settings on the right side of the Transitions tab. This is where you can also add a sound effect to the transition, or decide whether the transition effect occurs when you click your mouse or automatically after a given length of time.

If you want to apply the same transition effect and options to all slides, click "Apply To All" in the Timing group of the Transition tab when you have finished setting up your transition's parameters. You can then select individual slides to make further adjustments if needed.
To remove a transition, select the slide in the slide thumbnail pane, and click "None" in the Transitions tab.

PowerPoint's Morph is a transition effect that recognizes differences between the same items on two slides, and smoothly transitions between them when you proceed from one slide to the next. For example, you might have an image on slide 1, and the same image in a different position on slide 2. The morph transition gives your audience the impression that you're still on the same slide, but the objects are merely moving and resizing.
This is different to the motion path animation, which you can set for different items and activate at different times on your slide. The morph transition, however, moves all items together as you move from one slide to the next, saving you from having to apply motion path animations to individual objects. Any objects on the first slide but not the second will simply fade away during the morph transition. Similarly, any new items on the second slide will appear gradually.
In this example, we have a title and an image on slide 1, and the same objects on slide 2 but in different places and different sizes. We created this scenario by copying and pasting the whole of slide 1, and then changing the text and image on slide 2. However, you can also create a blank slide, and then copy and paste the different elements you want to morph.

Then, we need to select slide 2, and click "Morph" in the Transitions tab on the ribbon.

Then, press F5 to see your presentation, and witness the smooth morph transition from one slide to the next. You can also use this transition effect to zoom into an image or fade an image into the background. Just ensure that you copy and paste from one slide to the next before you create the transition, so that PowerPoint recognizes them as the same.
If animations and transitions are new to you, check out these other tips that you should also know before you design your next presentation.
- Microsoft PowerPoint
- Microsoft 365
- How to Login
- Use Teams on the web
- Join a meeting in Teams
- Join without a Teams account
- Join on a second device
- Join as a view-only attendee
- Join a breakout room
- Join from Google
- Schedule a meeting in Teams
- Schedule from Outlook
- Schedule from Google
- Instant meeting
- Add a dial-in number
- See all your meetings
- Invite people
- Meeting roles
- Add co-organizers
- Hide attendee names
- Tips for large Teams meeting
- Lock a meeting
- End a meeting
- Manage your calendar
- Meeting controls
- Prepare in a green room
- Present content
- Share slides
Share sound
- Apply video filters
- Mute and unmute
- Spotlight a video
- Multitasking
- Raise your hand
- Live reactions
- Take meeting notes
- Customize your view
- Laser pointer
- Cast from a desktop
- Use a green screen
- Join as an avatar
- Customize your avatar
- Use emotes, gestures, and more
- Get started with immersive spaces
- Use in-meeting controls
- Spatial audio
- Overview of Microsoft Teams Premium
- Intelligent productivity
- Advanced meeting protection
- Engaging event experiences
- Change your background
- Meeting themes
- Audio settings
- Manage attendee audio and video
- Reduce background noise
- Voice isolation in Teams
- Mute notifications
- Use breakout rooms
- Live transcription
- Language interpretation
- Live captions
- End-to-end encryption
- Presenter modes
- Call and meeting quality
- Meeting attendance reports
- Using the lobby
- Meeting options
- Record a meeting
- Meeting recap
- Play and share a meeting recording
- Delete a recording
- Edit or delete a transcript
- Customize access to recordings or transcripts
- Switch to town halls
- Get started
- Schedule a live event
- Invite attendees
- organizer checklist
- For tier 1 events
- Produce a live event
- Produce a live event with Teams Encoder
- Best practices
- Moderate a Q&A
- Allow anonymous presenters
- Attendee engagement report
- Recording and reports
- Attend a live event in Teams
- Participate in a Q&A
- Use live captions
- Schedule a webinar
- Customize a webinar
- Publicize a webinar
- Manage webinar registration
- Manage what attendees see
- Change webinar details
- Manage webinar emails
- Cancel a webinar
- Manage webinar recordings
- Webinar attendance report
- Get started with town hall
- Attend a town hall
- Schedule a town hall
- Customize a town hall
- Host a town hall
- Use RTMP-In
- Town hall insights
- Manage town hall recordings
- Cancel a town hall
- Can't join a meeting
- Camera isn't working
- Microphone isn't working
- My speaker isn’t working
- Breakout rooms issues
- Immersive spaces issues
- Meetings keep dropping

Present content in Microsoft Teams meetings
When working remotely in Microsoft Teams, you can present content by sharing your screen, your entire desktop, a PowerPoint file, and more.
Start presenting content

Note: If you're using Teams on the web, you'll be able to share your screen only if you're using Google Chrome or the latest version of Microsoft Edge. Screen sharing isn't available for Linux users.
|
|
|
|
|---|---|---|
| Desktop | Show your entire screen, including notifications and other desktop activity. | You need to seamlessly share multiple windows. |
| Window | Show just one window, and no notifications or other desktop activity. | You only need to show one thing and want to keep the rest of your screen to yourself. |
| PowerPoint Live | Present a PowerPoint file others can interact with. | You need to share a presentation and want others to be able to move through it at their own pace. For info on PowerPoint sharing, see . |
| Whiteboard | Collaborate with others in real time. | You want to sketch with others and have your notes attached to the meeting. |
When you're done sharing, select Stop sharing in your meeting controls.
To turn off screensharing if your screen locks:

Turn the Turn off my camera and mic when my screen locks toggle on.
Restart Teams to activate this setting.
Presenter controls
While you're sharing content, use the controls in the presenter toolbar to keep your presentation engaging and running smoothly. The presenter toolbar is only visible to the person presenting.
To bring the presenter toolbar onscreen:

The toolbar will stay in place for a few seconds until you're done adjusting the controls. Then, it'll disappear from view.

Move the presenter toolbar
To keep the presenter toolbar from blocking important content on your screen, move it to any area on the screen you're sharing.
To move the presenter toolbar:

Drag it anywhere on your screen.
Release the drag handle when you've placed it in the right area.
Tip: You can also move the toolbar by clicking and holding any area on the toolbar that isn't interactive (e.g., in between presenter controls) and dragging it.
Control your camera and mic

Give and take control of shared content
Give control.
If you want another meeting participant to change a file, help you present, or demonstrate something, you can give control to that person. While someone has control, they can make selections, edits, and other modifications to the shared screen.
You'll both be in control of the sharing, and you can take back control anytime.
Caution: When you’re sharing an app, only give control to people you trust . People you give control can send commands that could affect your system or other apps. We've taken steps to prevent this but haven't tested every possible system customization.
Start sharing your screen.

Select the person you want to give control to. Teams will notify them that you’re sharing control.
Select Take back to take back control.
Take control
To take control while another person is sharing:
Select Request control . The person sharing can approve or deny your request.
Make selections, edits, and other modifications to the shared screen while you have control.
Select Release control to stop sharing control.
Sharing computer sound lets you stream audio from your computer to meeting participants through Teams. You can use it to play a video or audio clip as part of a presentation.

To learn more, see Share sound from your computer in a Teams meeting or live event .
All sound from your computer, including notifications, will be audible in the meeting.
Optimize for video
Prevent choppiness or lag when you're sharing high-motion content by optimizing video.
To optimize video, select Optimize in your presenter toolbar.

Change your layout
When you're sharing content, you can choose from several different layouts to help make your presentation more engaging.
To change your layout while you're sharing your screen:
Turn your camera on.

Select the layout you want to use:
Content only : Participants will see the content you're sharing in the main Teams window. They'll still be able to see your video feed next to the content.
Standout : This produces an effect on your background that blocks it and helps you stand out in your video feed.
Side-by-side : This view will place you and another participant side-by-side in the meeting window. This helps draw focus to you and other participants who are speaking during the meeting.
Reporter : This layout isolates you from your video feed and places you in front of the content you're sharing, just like a reporter in front of a scene.
Annotate content

To learn more, see Use annotation while sharing your screen in Microsoft Teams .
View participants
After you start presenting, a minimized view of the meeting window will appear next to your shared content.

Stop sharing
Select Stop sharing in the presenter toolbar to stop sharing your screen and return to the main Teams meeting window.
Share content on a Mac
If you're using a Mac, you'll need to grant permission to Teams to record your computer's screen before you can share.
You'll be prompted to grant permission the first time you try to share your screen. Select Open System Preferences from the prompt. If you miss the prompt, you can do this anytime by going to Apple Menu > System Settings > Privacy & Security .
Under Screen & System Audio Recording , make sure the toggle next to Microsoft Teams is turned on.
Go back to your meeting and try sharing your screen again.
Note: If you're using Teams on the web, make sure you've also granted screen recording permission to your browser.
Zoom in to shared content
To get a better look at shared content, click and drag it to see different areas. To zoom into or out of content someone's sharing during a meeting or call, use the buttons at the lower left of your meeting window: [+] to zoom in and [-] to zoom out. You can also try the following:
Pinch in or out on your trackpad.
Use Teams keyboard shortcuts .
Hold the Ctrl key and scroll with your mouse.
Note: Mac trackpads don't support zoom in meetings. If you're on a Mac, use one of the other options. If you're using Linux, giving and taking control of shared content isn't available at this time.
Open shared content in new window
Expand your view by opening shared content in a separate window during your Teams meetings.
To open shared content:
Join your meeting from Teams for desktop .

To minimize content, select X to close the window.
Share content
To share content from your mobile device:

| Choose... | If you want to... |
|---|---|
|
| Present a PowerPoint file others can interact with. Choose the PowerPoint you want to share; when you select one, sharing will start automatically. |
|
| Take a photo to share or choose one from your gallery. Choose the photo you want to share and select when you're ready to share. |
|
| Share live video from your camera. Tap when you're ready to share. |
|
| Show your entire screen, including notifications and other activity. You'll be prompted to tap when you're ready to share. Turn on the toggle to share audio from the content on your screen. |
|
| . Whiteboard content will share automatically. |
Tap Stop presenting or Stop sharing when you're done.
Tip: To go forward and back in a PowerPoint presentation, swipe in the direction you'd like to go, or tap the forward and back buttons on the bottom of your screen.
Note: If your role changes from presenter to attendee during a meeting and you're presenting, screensharing will stop.
Zoom in to shared content
Want to get a better look at shared content?
Pinch in or out to zoom, and tap and drag to see different areas.
Note: Zoom isn't currently supported when you're sharing photos and videos.
Minimize shared content
You may want to minimize the content someone is sharing in order to better see the people in the meeting on your mobile device. Here's how:

Tap Minimize content from the menu
This will give you a better look at more of the people in the meeting. You'll still see the shared content on the lower portion of your screen.

Use your phone as a companion device in a meeting
Join a meeting on more than one device for more collaboration and content-sharing options.
If you're already in a meeting on your laptop, for example, you can add your phone as a companion device to present files, share live video, and much more. Any device with the Teams mobile app can be added as a companion device—just make sure the devices you're using are signed in to the same Teams account.
There's a lot you can do when you add a companion device to your meeting experience:
Use mobile video to show things that are out of view for remote participants.
Take a photo to share with everyone or pick one from your camera roll.
Use your phone to control a presentation.
Share your mobile screen.
If you can see it on your phone, you can share it in the meeting!
Tip: For more details, see Join a Teams meeting on a second device .
Add a companion device to a meeting
Open Teams on your mobile phone when you're already in a meeting on another device.
You'll see a message near the top of your screen informing you that you're currently in a meeting on another device, and asking if you want to join it on this one, too. Tap Join .

You'll then see two options: Add this device , and Transfer to this device . Tap Add this device .

If you join this way, we'll mute your companion device's mic and speaker to avoid causing an echo effect.
When you're ready to share something from the companion device, tap Start presenting at the bottom of the screen. On your other device, you'll be able to see what you're sharing, just like everyone else in the meeting.
When you're finished, tap Stop presenting , or simply hang up. Your other device will still be connected to the meeting.

Need more help?
Want more options.
Explore subscription benefits, browse training courses, learn how to secure your device, and more.

Microsoft 365 subscription benefits

Microsoft 365 training

Microsoft security

Accessibility center
Communities help you ask and answer questions, give feedback, and hear from experts with rich knowledge.

Ask the Microsoft Community

Microsoft Tech Community

Windows Insiders
Microsoft 365 Insiders
Was this information helpful?
Thank you for your feedback.
IMAGES
COMMENTS
Open the PowerPoint app, select a template and theme, then like "Create.". Click the text box to add your title and subtitle to create your title slide. Click the "Insert" tab, then "New Slide" to add another slide. Choose the type of slide you want to add, then add text and pictures. Rearrange slides by dragging them up or down in ...
Open PowerPoint. In the left pane, select New. Select an option: To create a presentation from scratch, select Blank Presentation. To use a prepared design, select one of the templates. To see tips for using PowerPoint, select Take a Tour, and then select Create, . Add a slide.
Microsoft PowerPoint is a presentation design software that is part of Microsoft 365. This software allows you to design presentations by combining text, images, graphics, video, and animation on slides in a simple and intuitive way. Over time, PowerPoint has evolved and improved its accessibility to users.
To do that, simply go up to the Home tab and click on New Slide. This inserts a new slide in your presentation right after the one you were on. You can alternatively hit Ctrl+M on your keyboard to insert a new blank slide in PowerPoint. To learn more about this shortcut, see my guide on using Ctrl+M in PowerPoint.
Create a new presentation. Open PowerPoint. Select Blank presentation, or select one of the themes. Select More themes to view the gallery and search for more. Add a slide. Select the slide you want your new slide to follow. Select Home > New Slide. Select Layout and the you type want from the drop-down.
In PowerPoint, you can create a presentation from scratch, or from a theme with built-in graphics, fonts, and placeholders for your text, images, and content...
Learn how to create a presentation in PowerPoint. You can use PowerPoint to create a presentation from scratch or from a theme. ... Create a presentation from a theme. Select File > New. Double-click a theme in the gallery to create a presentation in that theme. Or search for more templates. Want more? Apply or change a slide layout. Apply a ...
Get started with PowerPoint for Beginners. Follow this 20-Minute step by step PowerPoint tutorial to start creating presentations smoothly.Contents of this v...
Click the "Browse" button to locate the PowerPoint presentation file that you want to merge into your open file. Locate your second PowerPoint file and then click the "Open" button to insert it. A list of slides from your second presentation will appear in the "Reuse Slides" menu on the right. First, you'll need to decide on the formatting for ...
Getting Started. 1. Open PowerPoint and click 'New.'. A page with templates will usually open automatically, but if not, go to the top left pane of your screen and click New. If you've already created a presentation, select Open and then double-click the icon to open the existing file. Image Source.
Six steps for creating a slide show. 1. Plan your slide show. Before getting too deep into your slide show project, it's a good idea to select and save the photos and videos you want to use. This helps you create a slide show more efficiently and purposefully, ensuring a better outcome. 4.
On the PowerPoint window, in the left sidebar, click the slide in which you want to add a video. At the top of the PowerPoint window, click the "Insert" tab. In the "Insert" tab, under the "Media" section (which is to the extreme right side of the interface), click "Video." You'll now see an "Insert Video From" menu.
If you want to extract the media files out of one, you can do so with a file extraction tool like 7-Zip. First, convert it to PPTX either through PowerPoint or a PPTX conversion tool (these are usually the same as PPT converters, like the ones mentioned below). Then, use 7-Zip to open the file, and navigate to the ppt > media folder to see all ...
PPTX files are used in Microsoft PowerPoint, a presentation program used to display content in a slideshow format. Each slide can contain graphics, formatted text, videos, music, animations, and more. Related: How to Black (or White) Out a PowerPoint Presentation. First introduced with Microsoft Office 2007 in the Office Open XML standard, PPTX ...
Download Article. 1. Find the PPT file you want to open on your computer. Open the folder that contains your presentation, and locate your PPT file. 2. Right-click on the PPT file. This will open your file options on a drop-down menu. 3. Hover over Open with on the menu.
Save your presentation in an earlier version of PowerPoint. In newer versions, you can save files to an earlier version of PowerPoint by selecting the version from the Save as type list in the Save As box. For example, you can save your PowerPoint presentation in the newest PowerPoint Presentation format (.pptx), or as a PowerPoint 97-2003 Presentation (.ppt).
1. Click on Insert > Object. Open your Microsoft PowerPoint Presentation. Go to the slide where you want to embed the file. Click on Insert from the top menu and locate 'object' on the banner options to insert any file into the presentation. You can add a Microsoft Excel Workbook, a Microsoft Word Document, a pdf, or any other file type if it ...
To save the PowerPoint presentation as a PDF file, follow the 4 easy steps. Step-1: Click on the "File" Tab. First, click on the " File " tab in PowerPoint to open the back stage view of PowerPoint. Step 2 - Click on the "Save As" option. In the menu ribbon located at the top of the screen, click on the "File" tab.
Follow the step-by-step guide below to find out the process: Step-1: Go to the folder which contains your PowerPoint Presentation file. Go to the folder on your computer where you have saved your PowerPoint Presentation file. 'Right Click' on the file to open a dropdown menu. Step-2: Click on 'Show'.
Open your presentation, head over to the "File" tab, select the "Check for Issues" option, then select "Inspect Document." The "Document Inspector" window will appear. Make sure the "Document Properties and Personal Information" box is checked, and then click "Inspect." In the next window, select "Remove All.".
Luckily, a wide variety of alternatives will let you open up your PPT or PPTX files entirely for free. Here are six of the best. 1. Office Editing for Docs, Sheets & Slides. First up on this list is the Chrome extension Office Editing for Docs, Sheets & Slides. This extension is heading off this list because it is probably the easiest way to ...
Go to File > Options > Advanced. Under Image Size and Quality, do the following: Select Discard editing data . This option removes stored data that's used to restore the image to its original state after it's been edited. Note that if you discard editing data, you won't be able to restore the image after you edit it.
Step 1: Open 'Google Drive' and hover over the location where you want to save the PowerPoint presentation. Step 2: Click on the + New option in the top left corner of the screen and select 'File Upload'. Select the desired PowerPoint presentation from your device. Your file will be uploaded on Google Drive.
Under Save presentations, in the Save files in this format list, choose the file format you want to use by default. See Also Use PowerPoint to open or save a presentation in the OpenDocument Presentation (.odp) format
Import a PowerPoint file and customize it in Adobe Express by adding text, images, animations, and more. On the Adobe Express homepage, select Upload your content in the For you section. Upload a PowerPoint presentation from your device.
However, the exact opposite can be said for adding animations, which is significantly easier to do on PowerPoint for the web than via the subscription-only app. So, to create the animations for screenshots in this section, we have used PowerPoint online, rather than the desktop app, and we recommend that you do the same.
PowerPoint Live. Present a PowerPoint file others can interact with. You need to share a presentation and want others to be able to move through it at their own pace. For info on PowerPoint sharing, see Share PowerPoint slides in a Teams meeting. Whiteboard. Collaborate with others in real time.