

Nick McCullum
Software Developer & Professional Explainer
Python Speech Recognition - a Step-by-Step Guide
Have you used Shazam, the app that identifies music that is playing around you?
If yes, how often have you wondered about the technology that shapes this application?
How about products like Google Home or Amazon Alexa or your digital assistant Siri?
Many modern IoT products use speech recognition . This both adds creative functionality to the product and improves its accessibility features.
Python supports speech recognition and is compatible with many open-source speech recognition packages.
In this tutorial, I will teach you how to write Python speech recognition applications use an existing speech recognition package available on PyPI . We will also build a simple Guess the Word game using Python speech recognition.
Table of Contents
You can skip to a specific section of this Python speech recognition tutorial using the table of contents below:
How does speech recognition work?
Available python speech recognition packages, installing and using the speechrecognition package, the recognizer class, speech recognition from a live microphone recording, final thoughts.
Modern speech recognition software works on the Hidden Markov Model (HMM) .
According to the Hidden Markov Model, a speech signal that is broken down into fragments that are as small as one-hundredth of a second is a stationary process whose properties do not change with respect to time.
Your computer goes through a series of complex steps during speech recognition as it converts your speech to an on-screen text.
When you speak, you create an analog wave in the form of vibrations. This analog wave is converted into a digital signal that the computer can understand using a converter.
This signal is then divided into segments that are as small as one-hundredth of a second. The small segments are then matched with predefined phonemes.
Phonemes are the smallest element of a language. Linguists believe that there are around 40 phonemes in the English language.
Though this process sounds very simple, the trickiest part here is that each speaker pronounces a word slightly differently. Therefore, the way a phoneme sounds varies from speaker-to-speaker. This difference becomes especially significant across speakers from different geographical locations.
As Python developers, we are lucky to have speech recognition services that can be easily accessed through an API. Said differently, we do not need to build the infrastructure to recognize these phonemes from scratch!
Let's now look at the different Python speech recognition packages available on PyPI.
There are many Python speech recognition packages available today. Here are some of the most popular:
- google-cloud-speech
- google-speech-engine
- IBM speech to text
- Microsoft Bing voice recognition
- pocketsphinx
- SpeechRecognition
- watson-developer-cloud
In this tutorial, we will use the SpeechRecognition package, which is open-source and available on PyPI.
In this tutorial, I am assuming that you will be using Python 3.5 or above.
You can install the SpeechRecognition package with pyenv , pipenv , or virtualenv . In this tutorial, we will install the package with pipenv from a terminal.
Verify the installation of the speech recognition module using the below command.
Note: If you are using a microphone input instead of audio files present in your computer, you'll want to install the PyAudio (0.2.11 +) package as well.
The recognizer class from the speech\_recognition module is used to convert our speech to text format. Based on the API used that the user selects, the Recognizer class has seven methods. The seven methods are described in the following table:
{:.blueTable}
In this tutorial, we will use the Google Speech API . The Google Speech API is shipped in SpeechRecognition with a default API key. All the other APIs will require an API key with a username and a password.
First, create a Recognizer instance.
AudioFile is a class that is part of the speech\_recognition module and is used to recognize speech from an audio file present in your machine.
Create an object of the AudioFile class and pass the path of your audio file to the constructor of the AudioFile class. The following file formats are supported by SpeechRecognition:
Try the following script:
In the above script, you'll want to replace D:/Files/my_audio.wav with the location of your audio file.
Now, let's use the recognize_google() method to read our file. This method requires us to use a parameter of the speech_recognition() module, the AudioData object.
The Recognizer class has a record() method that can be used to convert our audio file to an AudioData object. Then, pass the AudioFile object to the record() method as shown below:
Check the type of the audio variable. You will notice that the type is speech_recognition.AudioData .
Now, use the recognize google() to invoke the audio object and convert the audio file into text.
Now that you have converted your first audio file into text, let's see how we can take only a portion of the file and convert it into text. To do this, we first need to understand the offset and duration keywords in the record() method.
The duration keyword of the record() method is used to set the time at which the speech conversion should end. That is, if you want to end your conversion after 5 seconds, specify the duration as 5. Let's see how this is done.
The output will be as follows:
It's important to note that inside a with block, the record() method moves ahead in the file stream. That is, if you record twice, say once for five seconds and then again for four seconds, the output you get for the second recording will after the first five seconds.
What if we want the audio to start from the fifth second and for a duration of 10 seconds?
This is where the offset attribute of the record() method comes to our aid. Here's how to use the offset attribute to skip the first four seconds of the file and then print the text for the next 5 seconds.
The output is as follows:
To get the exact phrase from the audio file that you are looking for, use precise values for both offset and duration attributes.
Removing Noise
The file we used in this example had very little background noise that disrupted our conversion process. However, in reality, you will encounter a lot of background noise in your speech files.
Fortunately, you can use the adjust_for_ambient_noise() method of the Recognizer class to remove any unwanted noise. This method takes the AudioData object as a parameter.
Let's see how this works:
As mentioned above, our file did not have much noise. This means that the output looks very similar to what we got earlier.
Now that we have seen speech recognition from an audio file, let's see how to perform the same function when the input is provided via a microphone. As mentioned earlier, you will have to install the PyAudio library to use your microphone.
After installing the PyAudio library, create an object of the microphone class of the speech_recognition module.
Create another instance of the Recognizer class like we did for the audio file.
Now, instead of specifying the input from a file, let us use the default microphone of the system. Access the microphone by creating an instance of the Microphone class.
Similar to the record() method, you can use the listen() method of the Recognizer class to capture input from your microphone. The first argument of the listen() method is the audio source. It records input from the microphone until it detects silence.
Execute the script and try speaking into the microphone.
The system is ready to translate your speech if it displays the You can speak now message. The program will begin translation once you stop speaking. If you do not see this message, it means that the system has failed to detect your microphone.
Python speech recognition is slowly gaining importance and will soon become an integral part of human computer interaction.
This article discussed speech recognition briefly and discussed the basics of using the Python SpeechRecognition library.
Introduction to Speech Recognition with Python

Speech recognition, as the name suggests, refers to automatic recognition of human speech. Speech recognition is one of the most important tasks in the domain of human computer interaction. If you have ever interacted with Alexa or have ever ordered Siri to complete a task, you have already experienced the power of speech recognition.
Speech recognition has various applications ranging from automatic transcription of speech data (like voice-mails) to interacting with robots via speech.
In this tutorial, you will see how we can develop a very simple speech recognition application that is capable of recognizing speech from audio files, as well as live from a microphone. So, let's begin without further ado.
Several speech recognition libraries have been developed in Python. However we will be using the SpeechRecognition library, which is the simplest of all the libraries.
- Installing SpeechRecognition Library
Execute the following command to install the library:
- Speech Recognition from Audio Files
In this section, you will see how we can translate speech from an audio file to text. The audio file that we will be using as input can be downloaded from this link . Download the file to your local file system.
The first step, as always, is to import the required libraries. In this case, we only need to import the speech_recognition library that we just downloaded.
To convert speech to text the one and only class we need is the Recognizer class from the speech_recognition module. Depending upon the underlying API used to convert speech to text, the Recognizer class has following methods:
- recognize_bing() : Uses Microsoft Bing Speech API
- recognize_google() : Uses Google Speech API
- recognize_google_cloud() : Uses Google Cloud Speech API
- recognize_houndify() : Uses Houndify API by SoundHound
- recognize_ibm() : Uses IBM Speech to Text API
- recognize_sphinx() : Uses PocketSphinx API
Among all of the above methods, the recognize_sphinx() method can be used offline to translate speech to text.
To recognize speech from an audio file, we have to create an object of the AudioFile class of the speech_recognition module. The path of the audio file that you want to translate to text is passed to the constructor of the AudioFile class. Execute the following script:
In the above code, update the path to the audio file that you want to transcribe.
We will be using the recognize_google() method to transcribe our audio files. However, the recognize_google() method requires the AudioData object of the speech_recognition module as a parameter. To convert our audio file to an AudioData object, we can use the record() method of the Recognizer class. We need to pass the AudioFile object to the record() method, as shown below:
Now if you check the type of the audio_content variable, you will see that it has the type speech_recognition.AudioData .
Now we can simply pass the audio_content object to the recognize_google() method of the Recognizer() class object and the audio file will be converted to text. Execute the following script:
The above output shows the text of the audio file. You can see that the file has not been 100% correctly transcribed, yet the accuracy is pretty reasonable.
- Setting Duration and Offset Values
Instead of transcribing the complete speech, you can also transcribe a particular segment of the audio file. For instance, if you want to transcribe only the first 10 seconds of the audio file, you need to pass 10 as the value for the duration parameter of the record() method. Look at the following script:
Check out our hands-on, practical guide to learning Git, with best-practices, industry-accepted standards, and included cheat sheet. Stop Googling Git commands and actually learn it!
In the same way, you can skip some part of the audio file from the beginning using the offset parameter. For instance, if you do not want to transcribe the first 4 seconds of the audio, pass 4 as the value for the offset attribute. As an example, the following script skips the first 4 seconds of the audio file and then transcribes the audio file for 10 seconds.
- Handling Noise
An audio file can contain noise due to several reasons. Noise can actually affect the quality of speech to text translation. To reduce noise, the Recognizer class contains adjust_for_ambient_noise() method, which takes the AudioData object as a parameter. The following script shows how you can improve transcription quality by removing noise from the audio file:
The output is quite similar to what we got earlier; this is due to the fact that the audio file had very little noise already.
- Speech Recognition from Live Microphone
In this section you will see how you can transcribe live audio received via a microphone on your system.
There are several ways to process audio input received via microphone, and various libraries have been developed to do so. One such library is PyAudio . Execute the following script to install the PyAudio library:
Now the source for the audio to be transcribed is a microphone. To capture the audio from a microphone, we need to first create an object of the Microphone class of the Speach_Recogniton module, as shown here:
To see the list of all the microphones in your system, you can use the list_microphone_names() method:
This is a list of microphones available in my system. Keep in mind that your list will likely look different.
The next step is to capture the audio from the microphone. To do so, you need to call the listen() method of the Recognizer() class. Like the record() method, the listen() method also returns the speech_recognition.AudioData object, which can then be passed to the recognize_google() method.
The following script prompts the user to say something in the microphone and then prints whatever the user has said:
Once you execute the above script, you will see the following message:
At this point of time, say whatever you want and then pause. Once you have paused, you will see the transcription of whatever you said. Here is the output I got:
It is important to mention that if recognize_google() method is not able to match the words you speak with any of the words in its repository, an exception is thrown. You can test this by saying some unintelligible words. You should see the following exception:
A better approach is to use the try block when the recognize_google() method is called as shown below:
Speech recognition has various useful applications in the domain of human computer interaction and automatic speech transcription. This article briefly explains the process of speech transcription in Python via the speech_recognition library and explains how to translate speech to text when the audio source is an audio file or live microphone.
You might also like...
- Dimensionality Reduction in Python with Scikit-Learn
- Don't Use Flatten() - Global Pooling for CNNs with TensorFlow and Keras
- The Best Machine Learning Libraries in Python
Improve your dev skills!
Get tutorials, guides, and dev jobs in your inbox.
No spam ever. Unsubscribe at any time. Read our Privacy Policy.
Programmer | Blogger | Data Science Enthusiast | PhD To Be | Arsenal FC for Life
In this article
Real-Time Road Sign Detection with YOLOv5
If you drive - there's a chance you enjoy cruising down the road. A responsible driver pays attention to the road signs, and adjusts their...

Building Your First Convolutional Neural Network With Keras
Most resources start with pristine datasets, start at importing and finish at validation. There's much more to know. Why was a class predicted? Where was...
© 2013- 2024 Stack Abuse. All rights reserved.
Speech Recognition in Python
Speech recognition allows software to recognize speech within audio and convert it into text. There are many interesting use-cases for speech recognition and it is easier than you may think to add it your own applications.
We just published a course on the freeCodeCamp.org YouTube channel that will teach you how to implement speech recognition in Python by building 5 projects.
Misra Turp & Patrick Loeber teach this course. Patrick is an experienced software engineer and Mirsra is an experienced data scientist. And they are both developer advocates at Assembly AI.
Assembly AI is a deep learning company that creates a speech-to-text API. You will learn how to use the API in this course. Assembly AI provided a grant that made this course possible.
In the first project you will learn the basics of audio processing by learning how to record audio from a microphone with pyaudio and write it to a wave file. You will also learn how to plot the sound waves with matplotlib.
In the second project you will learn how to implement simple speech recognition. You will learn how to use the AssemblyAI API and how to work with APIs with the requests module.
In the third project you will learn how to perform sentiment analysis on iPhone reviews from YouTube. You will learn how to use youtube-dl and how to implement sentiment classification.
In the fourth project you will write a program that will create automatic summarizations of podcasts using the Listen Notes API and Streamlit.
In the final project you will create a voice assistant with real-time speech recognition using websockets and the OpenAI API.
Watch the full course below or on the freeCodeCamp.org YouTube channel (2-hour watch).
I'm a teacher and developer with freeCodeCamp.org. I run the freeCodeCamp.org YouTube channel.
If you read this far, thank the author to show them you care. Say Thanks
Learn to code for free. freeCodeCamp's open source curriculum has helped more than 40,000 people get jobs as developers. Get started
Table of Contents
What is speech recognition, how does speech recognition work, picking and installing a speech recognition package, installing speech recognition, the recognizer class, working with audio files, speech recognition in python: converting speech to text, opening a url with speech, speech recognition in python demo: guess a word game, conclusion , a guide to speech recognition in python: everything you should know.
Movies and TV shows love to depict robots who can understand and talk back to humans. Shows like Westworld, movies like Star Wars and I, Robot are filled with such marvels. But what if all of this exists in this day and age? Which it certainly does. You can write a program that understands what you say and respond to it.
All of this is possible with the help of speech recognition. Using speech recognition in Python , you can create programs that pick up audio and understand what is being said. In this tutorial titled ‘Everything You Need to Know About Speech Recognition in Python’, you will learn the basics of speech recognition.
Speech Recognition incorporates computer science and linguistics to identify spoken words and converts them into text. It allows computers to understand human language.

Figure 1: Speech Recognition
Speech recognition is a machine's ability to listen to spoken words and identify them. You can then use speech recognition in Python to convert the spoken words into text, make a query or give a reply. You can even program some devices to respond to these spoken words. You can do speech recognition in python with the help of computer programs that take in input from the microphone, process it, and convert it into a suitable form.
Speech recognition seems highly futuristic, but it is present all around you. Automated phone calls allow you to speak out your query or the query you wish to be assisted on; your virtual assistants like Siri or Alexa also use speech recognition to talk to you seamlessly.
Want a Top Software Development Job? Start Here!
Speech recognition in Python works with algorithms that perform linguistic and acoustic modeling. Acoustic modeling is used to recognize phenones/phonetics in our speech to get the more significant part of speech, as words and sentences.

Figure 2: Working of Speech Recognition
Speech recognition starts by taking the sound energy produced by the person speaking and converting it into electrical energy with the help of a microphone. It then converts this electrical energy from analog to digital, and finally to text.
It breaks the audio data down into sounds, and it analyzes the sounds using algorithms to find the most probable word that fits that audio. All of this is done using Natural Language Processing and Neural Networks . Hidden Markov models can be used to find temporal patterns in speech and improve accuracy.
To perform speech recognition in Python, you need to install a speech recognition package to use with Python. There are multiple packages available online. The table below outlines some of these packages and highlights their specialty.
Table 1: Picking and installing a speech recognition package
For this implementation, you will use the Speech Recognition package. It allows:
- Easy speech recognition from the microphone.
- Makes it easy to transcribe an audio file.
- It also lets us save audio data into an audio file.
- It also shows us recognition results in an easy-to-understand format.
Installing speech recognition in Python is a crucial step towards incorporating powerful voice recognition capabilities into your projects. Speech recognition, a Python library, facilitates easy access to various speech recognition engines and APIs, making it an indispensable tool for a diverse array of applications. Let's embark on a journey to explore the process of installing Speech Recognition and unlock its potential for your projects.
Installation Steps
1. python environment setup.
Ensure you have Python installed on your system. Speech Recognition is compatible with both Python 2 and Python 3 versions. However, it's recommended to use Python 3 for compatibility and support with the latest features.
2. Installation via Pip
The most straightforward method to install Speech Recognition is via pip, the Python package installer. Open your command-line interface and execute the following command:
pip install SpeechRecognition
This command will download and install the SpeechRecognition library along with its dependencies.
3. Additional Installations (Optional)
Depending on your requirements and preferences, you may need to install additional packages for specific functionalities. For instance:
- PyAudio: If you intend to capture audio input from a microphone, you'll need to install the PyAudio library. Execute the following command:
pip install pyaudio
- Note: PyAudio has dependencies that need to be fulfilled, especially on certain operating systems like Windows. Refer to the PyAudio documentation for detailed instructions.
4. Verification
After installation, you can verify whether Speech Recognition is successfully installed by importing it within a Python environment. Open a Python interpreter or your preferred Python IDE and execute the following commands:
import speech_recognition as sr
print(sr.__version__)
If the version number of Speech Recognition is displayed without any errors, congratulations! You've successfully installed Speech Recognition in your Python environment.
Features and Capabilities
Speech Recognition empowers developers with an extensive range of features and capabilities, including:
- Multi-Engine Support: Speech Recognition provides access to multiple speech recognition engines and APIs, allowing developers to choose the most suitable option for their requirements.
- Cross-Platform Compatibility: It is compatible with major operating systems, including Windows, macOS, and Linux , ensuring versatility across different development environments.
- Microphone Input: With support for microphone input, developers can capture and process real-time audio input, enabling applications such as voice commands, voice-controlled assistants, and dictation software.
- Audio File Processing: Speech Recognition can process audio files in various formats, enabling transcription, voice-activated automation, and audio analysis applications.
- Language Support: It supports recognition in multiple languages and dialects, facilitating global deployment and localization of applications.
Potential Applications
Speech Recognition opens the door to a myriad of applications across diverse domains, including:
- Virtual Assistants: Develop voice-controlled virtual assistants for performing tasks, fetching information, and managing schedules.
- Transcription Services: Build applications for transcribing audio recordings, interviews, meetings, and lectures into text format.
- Voice-Activated Automation: Create systems for controlling smart devices, home automation, and industrial processes using voice commands.
- Accessibility Solutions: Develop tools to assist individuals with disabilities by converting spoken language into text or performing actions based on voice commands.
- Language Learning: Build interactive language learning applications with speech recognition capabilities for pronunciation assessment and language practice.
The Recognizer class is a fundamental component of the SpeechRecognition library in Python, playing a central role in processing audio input and performing speech recognition tasks. It serves as the primary interface for developers to interact with various speech recognition engines and APIs, providing a unified and intuitive way to transcribe spoken language into text. In this elaborate text, we'll delve into the intricacies of the Recognizer class, exploring its functionalities, methods, and usage patterns.
The Recognizer class serves as the cornerstone of SpeechRecognition, offering a cohesive framework for incorporating speech recognition capabilities into Python applications. It encapsulates the functionality required to capture audio input from different sources, such as microphone input or audio files, and interface with diverse speech recognition engines.
Key Features
1. audio input handling.
The Recognizer class facilitates the acquisition of audio input from various sources, including:
- Microphone Input: Capturing real-time audio input from the microphone for live speech recognition.
- Audio File Input: Processing pre-recorded audio files in different formats (e.g., WAV, MP3) for offline speech recognition.
2. Speech Recognition
Using the Recognizer class, developers can transcribe speech input into text using the chosen speech recognition engine or API. This process involves sending audio data to the recognition engine and receiving the corresponding text output.
3. Multi-Engine Support
The Recognizer class supports integration with multiple speech recognition engines and APIs, giving developers the flexibility to choose the most suitable option for their applications. Commonly supported engines include Google Speech Recognition, Sphinx, and Wit.ai.
4. Language and Configuration Options
Developers can customize various parameters and configurations of the Recognizer class to optimize speech recognition performance. This includes specifying the language model, adjusting sensitivity thresholds, and configuring recognition timeouts.
Methods and Usage
The Recognizer class provides a set of methods for performing speech recognition tasks, including:
- recognize_google(): This method performs speech recognition using the Google Web Speech API. It requires an internet connection to send audio data to Google's servers for processing.
- recognize_sphinx(): Utilizes the CMU Sphinx engine for offline speech recognition. This method is suitable for scenarios where internet connectivity is unavailable or for applications with privacy concerns.
- recognize_wit(): Interfaces with the Wit.ai API for speech recognition. Wit.ai offers natural language processing capabilities, enabling developers to extract intent and entities from the transcribed text.
- listen(): Captures audio input from the specified source, such as the microphone or an audio file, and returns a SpeechRecognition AudioData object containing the raw audio data.
- record(): Records audio input from the microphone for a specified duration and returns the recorded audio as a SpeechRecognition AudioData object.
Example Usage
Working with audio files is a fundamental aspect of many programming tasks, ranging from audio processing and analysis to speech recognition and transcription. Python, with its rich ecosystem of libraries, provides powerful tools for handling audio data efficiently. In this elaborate text, we'll explore various aspects of working with audio files in Python, including reading, writing, processing, and analyzing audio data.
Reading Audio Files
1. using libraries.
Python offers several libraries for reading audio files, including:
- Librosa: A popular library for audio and music analysis, providing functionalities for reading audio files in various formats.
- Pydub: A simple and easy-to-use library for audio manipulation, supporting reading and writing audio files in different formats.
- SpeechRecognition: Although primarily focused on speech recognition, SpeechRecognition can also be used to read audio files for transcription purposes.
2. File Formats
Audio files come in different formats, such as WAV, MP3, FLAC, and OGG. Python libraries typically support multiple formats, allowing developers to work with a wide range of audio files.
Writing Audio Files
Similar to reading audio files, Python libraries offer functionalities for writing audio data to files in various formats. Libraries like Pydub and Librosa provide easy-to-use methods for saving audio data to files.
Processing and Analyzing Audio Data
1. audio processing.
Python libraries offer a wide range of tools for processing audio data, including:
- Filtering: Applying filters for noise reduction, equalization, and signal enhancement.
- Feature Extraction: Extracting features such as Mel-Frequency Cepstral Coefficients (MFCCs), Spectrograms, and Chroma features for analysis and classification.
- Time-Frequency Analysis: Analyzing audio signals in both time and frequency domains using techniques like Short-Time Fourier Transform (STFT) and Wavelet Transform.
3. Audio Visualization
Visualization tools like Matplotlib can be used to visualize audio data, spectrograms, waveforms, and other audio features for analysis and interpretation.
Now, create a program that takes in the audio as input and converts it to text.

Figure 3: Importing necessary modules
Let’s create a function that takes in the audio as input and converts it to text.
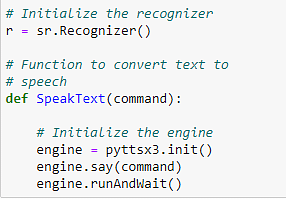
Figure 4: Converting speech to text
Now, use the microphone to get audio input from the user in real-time, recognize it, and print it in text.
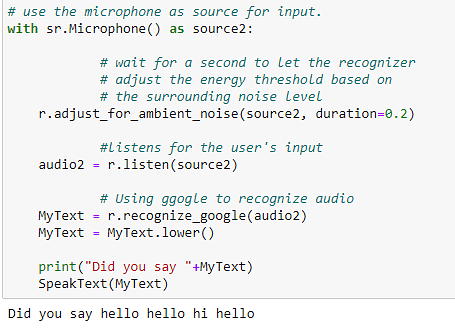
Figure 5: Converting audio input to text
As you can see, you have performed speech recognition in Python to access the microphone and used a function to convert the audio into text form. Can you guess what the user had said?
Now that you know how to convert speech to text using speech recognition in Python, use it to open a URL in the browser. The user has to say the name of the site out loud. You can start by importing the necessary modules.

Figure 6: Importing modules
Now, use speech to text to take input from the microphone and convert it into text. Then you can use the microphone function to get feedback and then convert it into speech using google. Then, using a get function in the web module, make a browser request for the site you want to open.
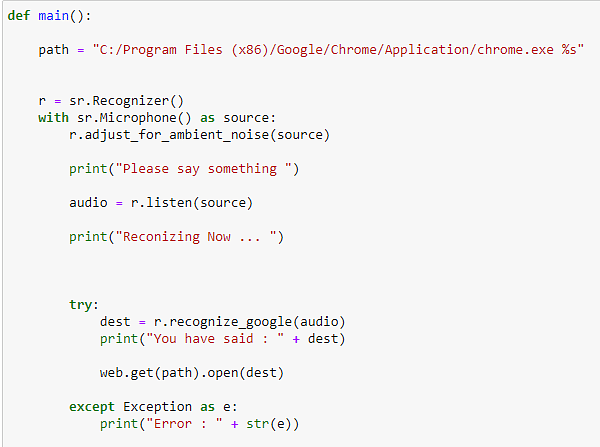
Figure 7: Opening a website using speech recognition
Now, run the function and get the output.
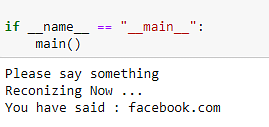
Figure 8: Opening a website using speech recognition
As you can see from the above figure, the query has successfully run, otherwise, an error message would have been thrown. Can you guess which website was opened?
Now, use speech recognition to create a guess-a-word game. The computer will pick a random word, and you have to guess what it is. You start by importing the necessary packages.

Figure 9: Importing packages
Now, create a function to recognize what is being said from the microphone. The function is the same, but you have to include exception handling in the program.
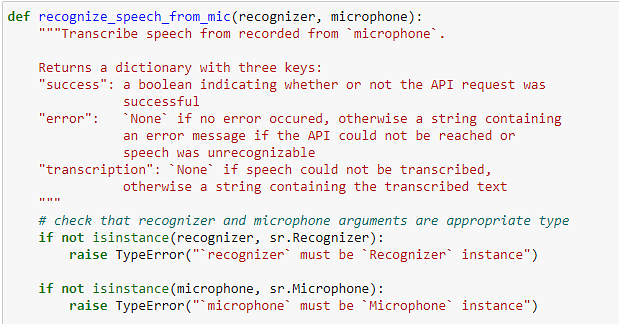
Figure 10: Handling microphone exceptions
Now, initialize your recognizer class and take in the microphone input. You will also check to see if the audio was legible and if the API call malfunctioned.
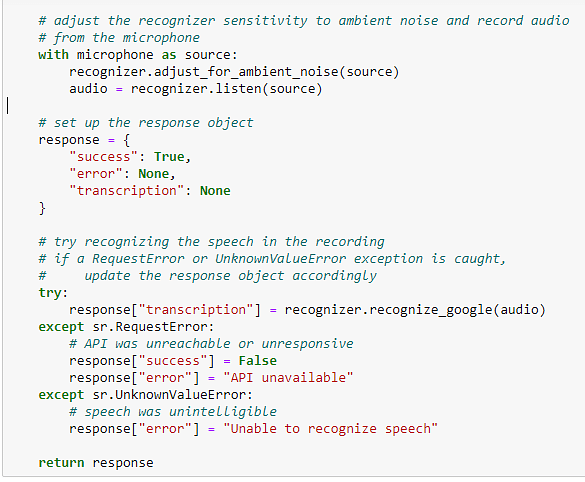
Figure 11: Converting speech to text
Now, initialize the microphone. You will also create a list that contains the various words from which the user will have to guess. You will also give the user the instructions for this game.
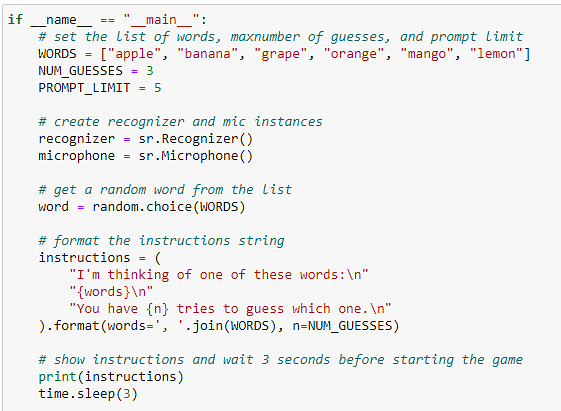
Figure 12: Setting up the microphone
Now, create a function that takes in microphone input thrice, checks it with the selected word, and prints the results.
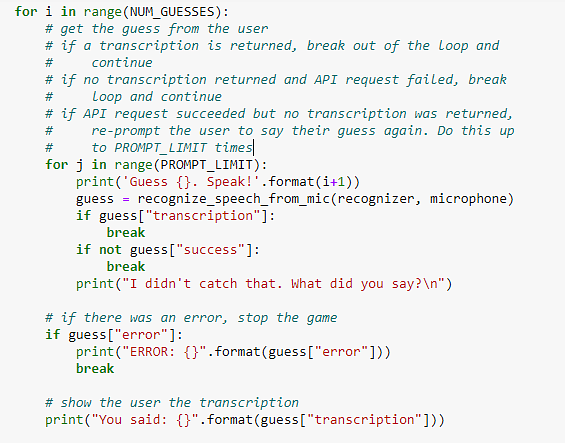
Figure 13: Setting up the game
The image below shows the various output messages and the output of the program.
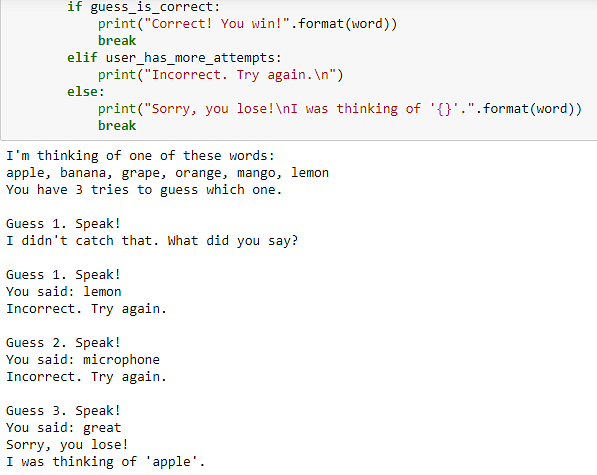
Figure 14: Game output
From the output, you can see that the word chosen was ‘apple’. The user got three guesses and was wrong. You can also see the error message which appeared because the user wasn’t audible.
In this Speech Recognition in Python tutorial you first understood what speech recognition is and how it works. You then looked at various speech recognition packages and their uses and installation steps. You then used Speech Recognition, a python package to convert speech to text using the microphone feature, open a URL simply by speech, and created a Guess a word game. And to gain deeper insights into speech recognition in Python, you can opt for a comprehensive Java Certification Training. This Java certification training will not only help you to have a profound knowledge of various Java topics but will also make you job ready in no time.
1. How does speech recognition work?
Speech recognition works by capturing audio input, preprocessing the signal to enhance its quality, extracting relevant features such as Mel-Frequency Cepstral Coefficients (MFCCs), and using a recognition algorithm to match these features to known patterns of speech, ultimately converting spoken language into text.
2. How to create a neural network for speech recognition in Python?
To create a neural network for speech recognition in Python, you can use deep learning frameworks like TensorFlow or PyTorch. Define the architecture of the neural network, including layers such as convolutional and recurrent layers, and train the network using a large dataset of labeled audio samples.
3. How to import speech recognition in Python?
Importing speech recognition in Python is straightforward using the SpeechRecognition library. Simply install the library using pip (pip install SpeechRecognition) and import it into your Python script using import speech_recognition as sr.
4. What is the best speech recognition software for Python?
The best speech recognition software for Python often depends on specific requirements and preferences. Popular choices include the SpeechRecognition library for its ease of use and versatility, as well as cloud-based APIs like Google Cloud Speech-to-Text and IBM Watson Speech to Text for their advanced features and accuracy.
Recommended Reads
Python Interview Guide
Understanding the Python Path Environment Variable in Python
Understanding Python If-Else Statement
Getting Started With Low-Code and No-Code Development
Yield in Python: An Ultimate Tutorial on Yield Keyword in Python
The Best Ideas for Python Automation Projects
Get Affiliated Certifications with Live Class programs
Python training.
- 24x7 learner assistance and support

Automation Testing Masters Program
- Comprehensive blended learning program
- 200 hours of Applied Learning
- PMP, PMI, PMBOK, CAPM, PgMP, PfMP, ACP, PBA, RMP, SP, and OPM3 are registered marks of the Project Management Institute, Inc.
- Español – América Latina
- Português – Brasil
- Tiếng Việt
- TensorFlow Core
Simple audio recognition: Recognizing keywords
This tutorial demonstrates how to preprocess audio files in the WAV format and build and train a basic automatic speech recognition (ASR) model for recognizing ten different words. You will use a portion of the Speech Commands dataset ( Warden, 2018 ), which contains short (one-second or less) audio clips of commands, such as "down", "go", "left", "no", "right", "stop", "up" and "yes".
Real-world speech and audio recognition systems are complex. But, like image classification with the MNIST dataset , this tutorial should give you a basic understanding of the techniques involved.
Import necessary modules and dependencies. You'll be using tf.keras.utils.audio_dataset_from_directory (introduced in TensorFlow 2.10), which helps generate audio classification datasets from directories of .wav files. You'll also need seaborn for visualization in this tutorial.
Import the mini Speech Commands dataset
To save time with data loading, you will be working with a smaller version of the Speech Commands dataset. The original dataset consists of over 105,000 audio files in the WAV (Waveform) audio file format of people saying 35 different words. This data was collected by Google and released under a CC BY license.
Download and extract the mini_speech_commands.zip file containing the smaller Speech Commands datasets with tf.keras.utils.get_file :
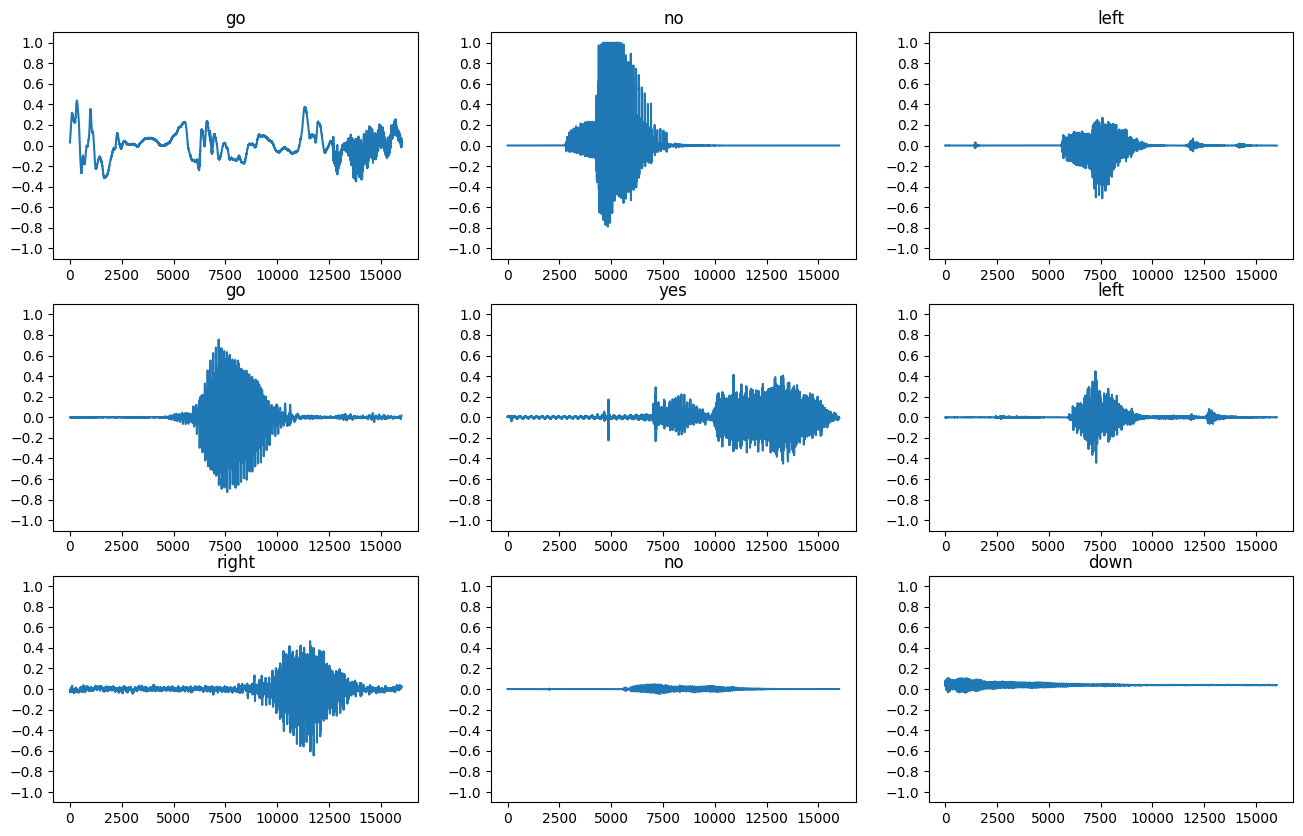
The dataset's audio clips are stored in eight folders corresponding to each speech command: no , yes , down , go , left , up , right , and stop :
Divided into directories this way, you can easily load the data using keras.utils.audio_dataset_from_directory .
The audio clips are 1 second or less at 16kHz. The output_sequence_length=16000 pads the short ones to exactly 1 second (and would trim longer ones) so that they can be easily batched.
The dataset now contains batches of audio clips and integer labels. The audio clips have a shape of (batch, samples, channels) .
This dataset only contains single channel audio, so use the tf.squeeze function to drop the extra axis:
The utils.audio_dataset_from_directory function only returns up to two splits. It's a good idea to keep a test set separate from your validation set. Ideally you'd keep it in a separate directory, but in this case you can use Dataset.shard to split the validation set into two halves. Note that iterating over any shard will load all the data, and only keep its fraction.
Let's plot a few audio waveforms:
Convert waveforms to spectrograms
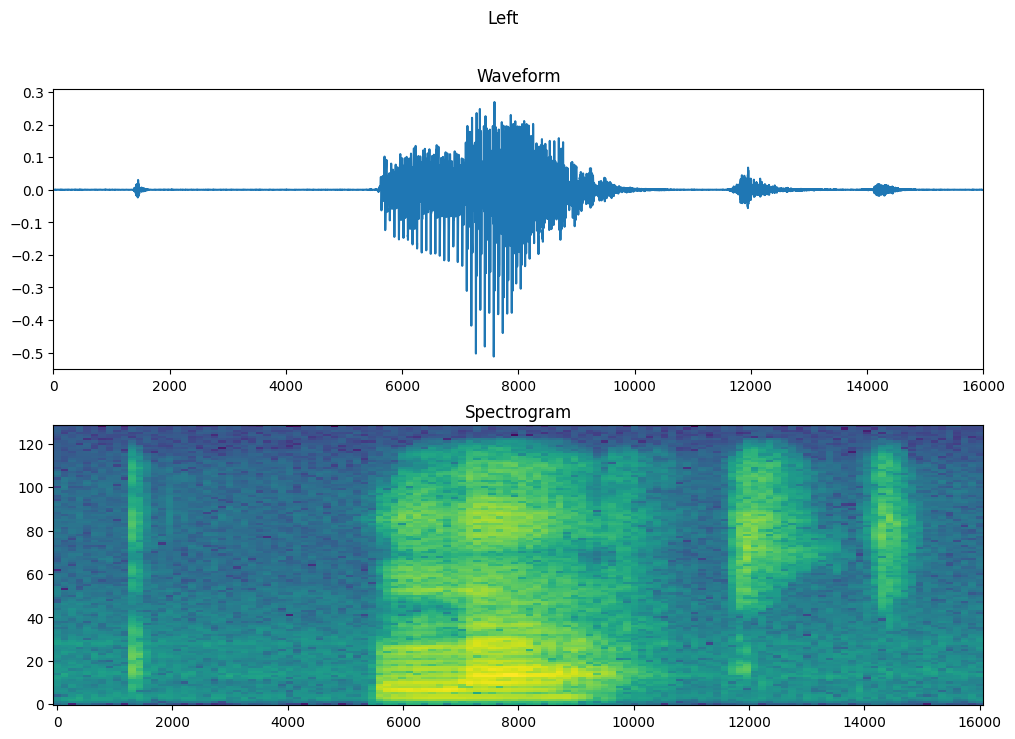
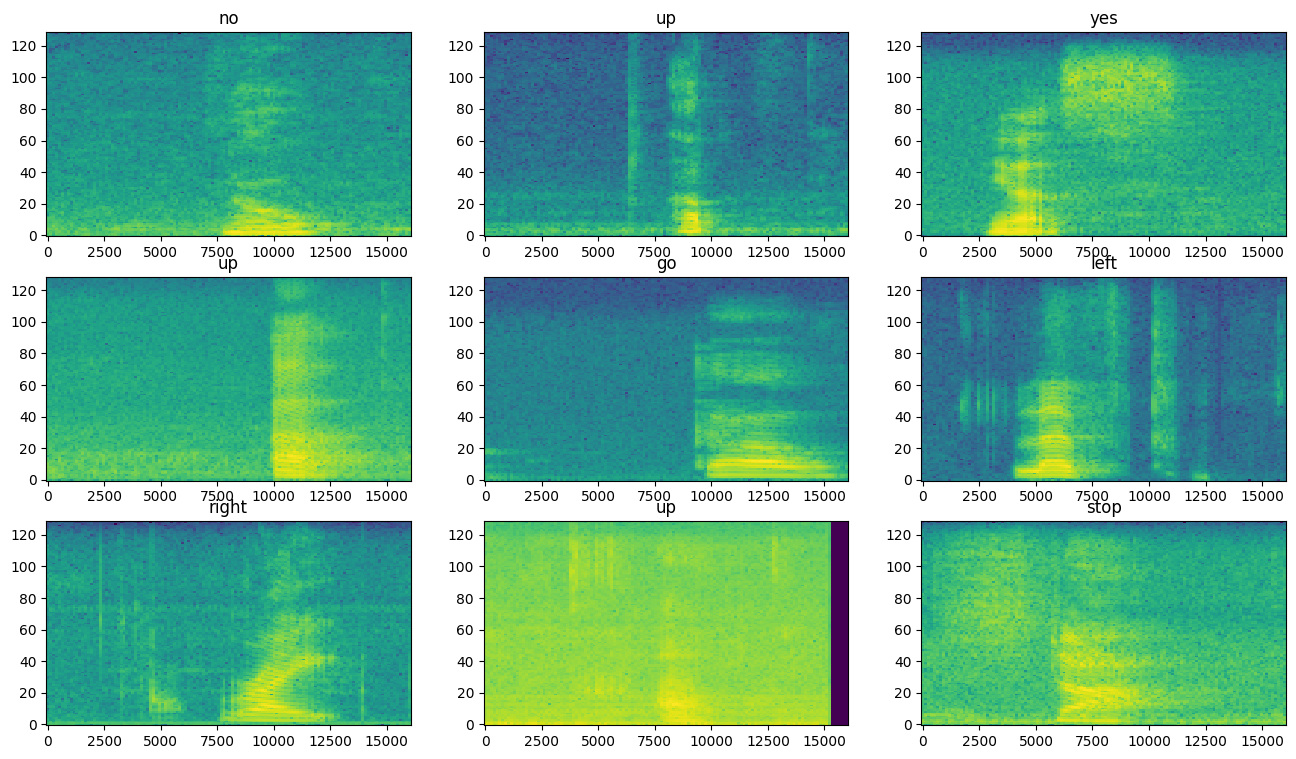
The waveforms in the dataset are represented in the time domain. Next, you'll transform the waveforms from the time-domain signals into the time-frequency-domain signals by computing the short-time Fourier transform (STFT) to convert the waveforms to as spectrograms , which show frequency changes over time and can be represented as 2D images. You will feed the spectrogram images into your neural network to train the model.
A Fourier transform ( tf.signal.fft ) converts a signal to its component frequencies, but loses all time information. In comparison, STFT ( tf.signal.stft ) splits the signal into windows of time and runs a Fourier transform on each window, preserving some time information, and returning a 2D tensor that you can run standard convolutions on.
Create a utility function for converting waveforms to spectrograms:
- The waveforms need to be of the same length, so that when you convert them to spectrograms, the results have similar dimensions. This can be done by simply zero-padding the audio clips that are shorter than one second (using tf.zeros ).
- When calling tf.signal.stft , choose the frame_length and frame_step parameters such that the generated spectrogram "image" is almost square. For more information on the STFT parameters choice, refer to this Coursera video on audio signal processing and STFT.
- The STFT produces an array of complex numbers representing magnitude and phase. However, in this tutorial you'll only use the magnitude, which you can derive by applying tf.abs on the output of tf.signal.stft .
Next, start exploring the data. Print the shapes of one example's tensorized waveform and the corresponding spectrogram, and play the original audio:
Your browser does not support the audio element.
Now, define a function for displaying a spectrogram:
Plot the example's waveform over time and the corresponding spectrogram (frequencies over time):
Now, create spectrogram datasets from the audio datasets:
Examine the spectrograms for different examples of the dataset:
Build and train the model
Add Dataset.cache and Dataset.prefetch operations to reduce read latency while training the model:
For the model, you'll use a simple convolutional neural network (CNN), since you have transformed the audio files into spectrogram images.
Your tf.keras.Sequential model will use the following Keras preprocessing layers:
- tf.keras.layers.Resizing : to downsample the input to enable the model to train faster.
- tf.keras.layers.Normalization : to normalize each pixel in the image based on its mean and standard deviation.
For the Normalization layer, its adapt method would first need to be called on the training data in order to compute aggregate statistics (that is, the mean and the standard deviation).
Configure the Keras model with the Adam optimizer and the cross-entropy loss:
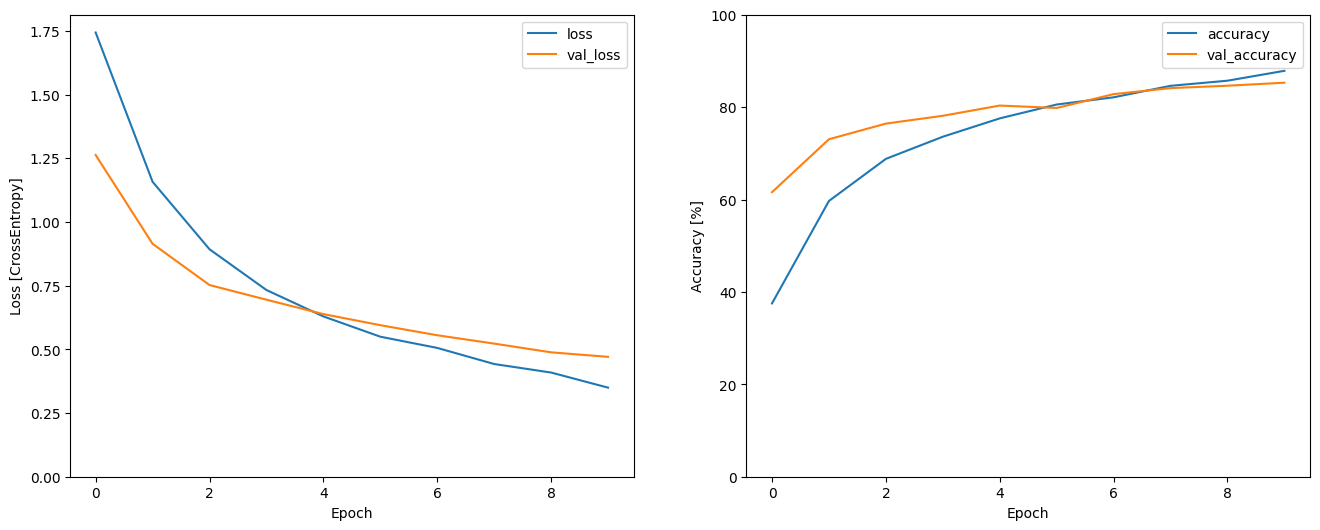
Train the model over 10 epochs for demonstration purposes:
Let's plot the training and validation loss curves to check how your model has improved during training:
Evaluate the model performance
Run the model on the test set and check the model's performance:
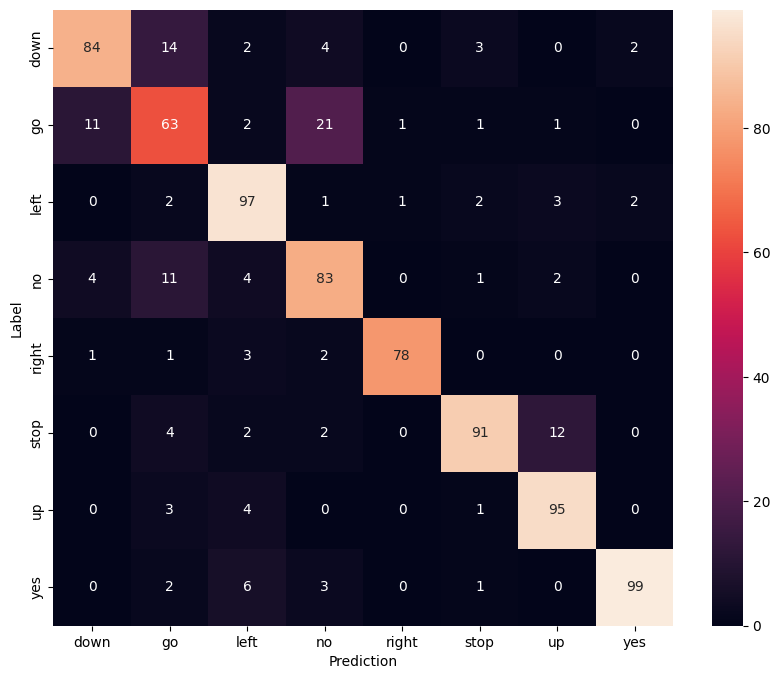
Display a confusion matrix
Use a confusion matrix to check how well the model did classifying each of the commands in the test set:
Run inference on an audio file
Finally, verify the model's prediction output using an input audio file of someone saying "no". How well does your model perform?
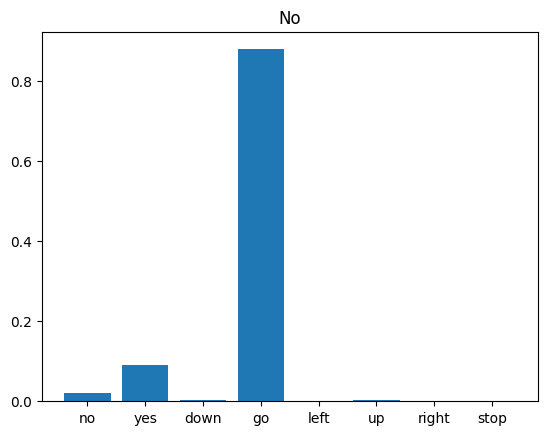
As the output suggests, your model should have recognized the audio command as "no".
How to Create a Speech Recognition System with Python

Getting Started
First, you need to install the SpeechRecognition library. To do this, open your terminal or command prompt and run the following command:
Importing the Library
Once the installation is complete, we can start by importing the SpeechRecognition library in our Python script:
Creating a Recognizer Object
Next, we need to create a Recognizer object, which will be responsible for recognizing the speech. To do this, add the following line of code:
Recording Audio
To recognize speech, we first need to record audio. We will use the Microphone class from the SpeechRecognition library to do this. You may need to install the PyAudio library to use the Microphone class. Install it using the following command:
Now, let's create a function to record audio:
Recognizing Speech
Now that we have a function to record audio, we can use the Recognizer object to recognize the speech. Add the following function to your script:
Putting It All Together
Finally, let's put everything together in a simple script that records audio and recognizes speech:
When you run this script, it will listen to your speech and print out the recognized text. Keep in mind that this is a basic example, and there are many ways to customize and improve your speech recognition system.
In this tutorial, we learned how to create a speech recognition system using Python and the SpeechRecognition library. We covered how to install the necessary libraries, record audio, and recognize speech. You can now experiment with different settings and methods to improve your speech recognition system. If you need help with your Python projects, don't hesitate to hire remote Python developers from Reintech.
If you're interested in enhancing this article or becoming a contributing author, we'd love to hear from you.
Please contact Sasha at [email protected] to discuss the opportunity further or to inquire about adding a direct link to your resource. We welcome your collaboration and contributions!
Microphone Class
The Microphone Class in software development is an application programming interface (API) that allows applications to handle audio data from a microphone. It provides methods and properties to capture audio, control the microphone's settings, and manage the audio stream. This class is frequently used in multimedia applications that require voice input or recording functionality.
Recognizer Object
A Recognizer Object is a crucial component in software development, especially when dealing with speech or pattern recognition algorithms. It refers to an object that contains methods and properties to recognize specific data patterns, such as spoken words in voice recognition or shapes in image recognition.
For more details, visit Microsoft Speech Service Documentation and Google's Machine Learning Crash Course .
SpeechRecognition
SpeechRecognition is a web-based API used in Google Chrome, Samsung Internet, and other web browsers to provide speech recognition. It enables developers to integrate voice data into their applications, which can then be transcribed into text and used for various purposes like voice commands, dictation, etc.
Optimize Your Tech Team with Remote Database & Python Developers Skilled in Bitbucket API
Optimize Your Engineering Team with Expert Remote Python Developers & Database Management Skills Including Figma Proficiency
Maximize Your Tech Team's Potential with Expert Remote Python Developers Skilled in Databases and SQLAlchemy

- Python Basics
- Interview Questions
- Python Quiz
- Popular Packages
- Python Projects
- Practice Python
- AI With Python
- Learn Python3
- Python Automation
- Python Web Dev
- DSA with Python
- Python OOPs
- Dictionaries
- 100+ Machine Learning Projects with Source Code [2024]
Classification Projects
- Wine Quality Prediction - Machine Learning
- ML | Credit Card Fraud Detection
- Disease Prediction Using Machine Learning
- Recommendation System in Python
- Detecting Spam Emails Using Tensorflow in Python
- SMS Spam Detection using TensorFlow in Python
- Python | Classify Handwritten Digits with Tensorflow
- Recognizing HandWritten Digits in Scikit Learn
- Identifying handwritten digits using Logistic Regression in PyTorch
- Python | Customer Churn Analysis Prediction
- Online Payment Fraud Detection using Machine Learning in Python
- Flipkart Reviews Sentiment Analysis using Python
- Loan Approval Prediction using Machine Learning
- Loan Eligibility prediction using Machine Learning Models in Python
- Stock Price Prediction using Machine Learning in Python
- Bitcoin Price Prediction using Machine Learning in Python
- Handwritten Digit Recognition using Neural Network
- Parkinson Disease Prediction using Machine Learning - Python
- Spaceship Titanic Project using Machine Learning - Python
- Rainfall Prediction using Machine Learning - Python
- Autism Prediction using Machine Learning
- Predicting Stock Price Direction using Support Vector Machines
- Fake News Detection Model using TensorFlow in Python
- CIFAR-10 Image Classification in TensorFlow
- Black and white image colorization with OpenCV and Deep Learning
- ML | Kaggle Breast Cancer Wisconsin Diagnosis using Logistic Regression
- ML | Cancer cell classification using Scikit-learn
- ML | Kaggle Breast Cancer Wisconsin Diagnosis using KNN and Cross Validation
- Human Scream Detection and Analysis for Controlling Crime Rate - Project Idea
- Multiclass image classification using Transfer learning
- Intrusion Detection System Using Machine Learning Algorithms
- Heart Disease Prediction using ANN
Regression Projects
- IPL Score Prediction using Deep Learning
- Dogecoin Price Prediction with Machine Learning
- Zillow Home Value (Zestimate) Prediction in ML
- Calories Burnt Prediction using Machine Learning
- Vehicle Count Prediction From Sensor Data
- Analyzing selling price of used cars using Python
- Box Office Revenue Prediction Using Linear Regression in ML
- House Price Prediction using Machine Learning in Python
- ML | Boston Housing Kaggle Challenge with Linear Regression
- Stock Price Prediction Project using TensorFlow
- Medical Insurance Price Prediction using Machine Learning - Python
- Inventory Demand Forecasting using Machine Learning - Python
- Ola Bike Ride Request Forecast using ML
- Waiter's Tip Prediction using Machine Learning
- Predict Fuel Efficiency Using Tensorflow in Python
- Microsoft Stock Price Prediction with Machine Learning
- Share Price Forecasting Using Facebook Prophet
- Python | Implementation of Movie Recommender System
- How can Tensorflow be used with abalone dataset to build a sequential model?
Computer Vision Projects
- OCR of Handwritten digits | OpenCV
- Cartooning an Image using OpenCV - Python
- Count number of Object using Python-OpenCV
- Count number of Faces using Python - OpenCV
- Text Detection and Extraction using OpenCV and OCR
- FaceMask Detection using TensorFlow in Python
- Dog Breed Classification using Transfer Learning
- Flower Recognition Using Convolutional Neural Network
- Emojify using Face Recognition with Machine Learning
- Cat & Dog Classification using Convolutional Neural Network in Python
- Traffic Signs Recognition using CNN and Keras in Python
- Lung Cancer Detection using Convolutional Neural Network (CNN)
- Lung Cancer Detection Using Transfer Learning
- Pneumonia Detection using Deep Learning
- Detecting Covid-19 with Chest X-ray
- Skin Cancer Detection using TensorFlow
- Age Detection using Deep Learning in OpenCV
- Face and Hand Landmarks Detection using Python - Mediapipe, OpenCV
- Detecting COVID-19 From Chest X-Ray Images using CNN
- Image Segmentation Using TensorFlow
- License Plate Recognition with OpenCV and Tesseract OCR
- Detect and Recognize Car License Plate from a video in real time
- Residual Networks (ResNet) - Deep Learning
Natural Language Processing Projects
- Twitter Sentiment Analysis using Python
- Facebook Sentiment Analysis using python
- Next Sentence Prediction using BERT
- Hate Speech Detection using Deep Learning
- Image Caption Generator using Deep Learning on Flickr8K dataset
- Movie recommendation based on emotion in Python
Speech Recognition in Python using Google Speech API
- Voice Assistant using python
- Human Activity Recognition - Using Deep Learning Model
- Fine-tuning BERT model for Sentiment Analysis
- Sentiment Classification Using BERT
- Sentiment Analysis with an Recurrent Neural Networks (RNN)
- Autocorrector Feature Using NLP In Python
- Python | NLP analysis of Restaurant reviews
- Restaurant Review Analysis Using NLP and SQLite
Clustering Projects
- Customer Segmentation using Unsupervised Machine Learning in Python
- Music Recommendation System Using Machine Learning
- K means Clustering - Introduction
- Image Segmentation using K Means Clustering
Recommender System Project
- AI Driven Snake Game using Deep Q Learning
Speech Recognition is an important feature in several applications used such as home automation, artificial intelligence, etc. This article aims to provide an introduction to how to make use of the SpeechRecognition library of Python. This is useful as it can be used on microcontrollers such as Raspberry Pi with the help of an external microphone.
Required Installations
The following must be installed:
Python Speech Recognition module:
PyAudio: Use the following command for Linux users
If the versions in the repositories are too old, install pyaudio using the following command
Use pip3 instead of pip for python3. Windows users can install pyaudio by executing the following command in a terminal
Speech Input Using a Microphone and Translation of Speech to Text
- Configure Microphone (For external microphones): It is advisable to specify the microphone during the program to avoid any glitches. Type lsusb in the terminal for LInux and you can use the PowerShell’s Get-PnpDevice -PresentOnly | Where-Object { $_.InstanceId -match ‘^USB’ } command to list the connected USB devices. A list of connected devices will show up. The microphone name would look like this
- Make a note of this as it will be used in the program.
- Set Chunk Size: This basically involved specifying how many bytes of data we want to read at once. Typically, this value is specified in powers of 2 such as 1024 or 2048
- Set Sampling Rate: Sampling rate defines how often values are recorded for processing
- Set Device ID to the selected microphone : In this step, we specify the device ID of the microphone that we wish to use in order to avoid ambiguity in case there are multiple microphones. This also helps debug, in the sense that, while running the program, we will know whether the specified microphone is being recognized. During the program, we specify a parameter device_id. The program will say that device_id could not be found if the microphone is not recognized.
- Allow Adjusting for Ambient Noise: Since the surrounding noise varies, we must allow the program a second or two to adjust the energy threshold of recording so it is adjusted according to the external noise level.
- Speech to text translation: This is done with the help of Google Speech Recognition. This requires an active internet connection to work. However, there are certain offline Recognition systems such as PocketSphinx, that have a very rigorous installation process that requires several dependencies. Google Speech Recognition is one of the easiest to use.
Troubleshooting
The following problems are commonly encountered
Muted Microphone: This leads to input not being received. To check for this, you can use alsamixer. It can be installed using
Type amixer . The output will look somewhat like this
As you can see, the capture device is currently switched off. To switch it on, type alsamixer As you can see in the first picture, it is displaying our playback devices. Press F4 to toggle to Capture devices.
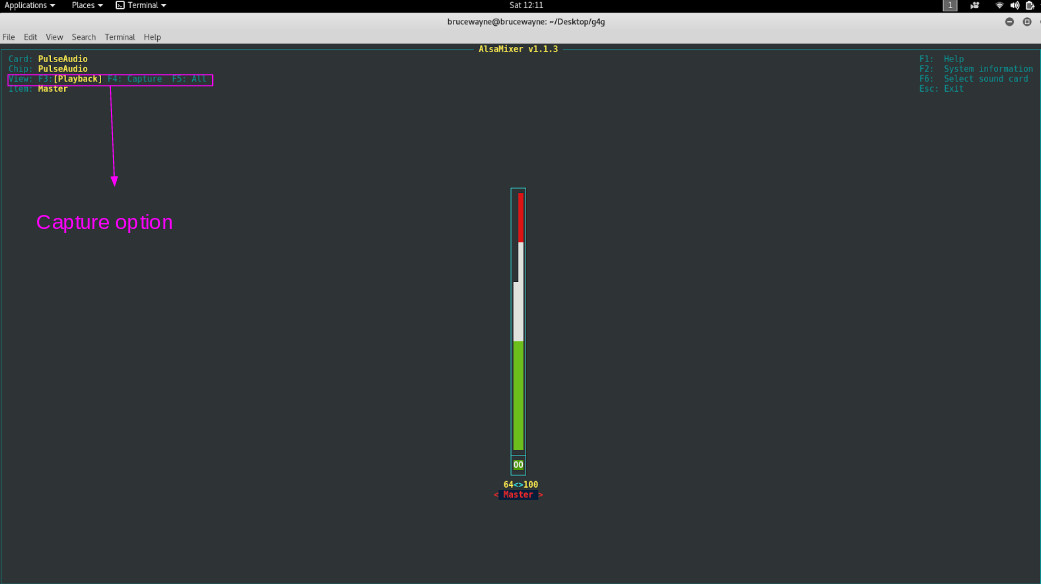
No Internet Connection: The speech-to-text conversion requires an active internet connection.
Please Login to comment...
Similar reads.

Improve your Coding Skills with Practice
What kind of Experience do you want to share?
Navigation Menu
Search code, repositories, users, issues, pull requests..., provide feedback.
We read every piece of feedback, and take your input very seriously.
Saved searches
Use saved searches to filter your results more quickly.
To see all available qualifiers, see our documentation .
- Notifications
Have a question about this project? Sign up for a free GitHub account to open an issue and contact its maintainers and the community.
By clicking “Sign up for GitHub”, you agree to our terms of service and privacy statement . We’ll occasionally send you account related emails.
Already on GitHub? Sign in to your account
No module named 'distutils' on Python 3.12 #732
SyberiaK commented Jan 31, 2024
sapozhkov commented Feb 21, 2024
- 👍 5 reactions
- ❤️ 2 reactions
Sorry, something went wrong.
Paulprojects8711 commented Mar 16, 2024
- 👍 1 reaction
ftnext commented Mar 17, 2024
- 👍 2 reactions
No branches or pull requests

IMAGES
VIDEO
COMMENTS
The accessibility improvements alone are worth considering. Speech recognition allows the elderly and the physically and visually impaired to interact with state-of-the-art products and services quickly and naturally—no GUI needed! Best of all, including speech recognition in a Python project is really simple. In this guide, you'll find out ...
Speech recognition in Python offers a powerful way to build applications that can interact with users in natural language. With the help of libraries like SpeechRecognition, PyAudio, and DeepSpeech, developers can create a range of applications from simple voice commands to complex conversational interfaces.
First, create a Recognizer instance. r = sr.Recognizer() AudioFile is a class that is part of the speech\_recognition module and is used to recognize speech from an audio file present in your machine. Create an object of the AudioFile class and pass the path of your audio file to the constructor of the AudioFile class.
It's more straightforward than you might think. In this course, you'll find out how. In this course, you'll learn: How speech recognition works. What speech recognition packages are available on PyPI. How to install and use the SpeechRecognition package —a full-featured and straightforward Python speech recognition library. Download.
The first step in starting a speech recognition algorithm is to create a system that can read files that contain audio (.wav, .mp3, etc.) and understanding the information present in these files. ... # Installing and importing necessary libraries pip install python_speech_features from python_speech_features import mfcc, logfbank sampling_freq ...
Speech recognition helps us to save time by speaking instead of typing. It also gives us the power to communicate with our devices without even writing one line of code. This makes technological devices more accessible and easier to use. Speech recognition is a great example of using machine learning in real life.
Learn how to implement speech recognition in Python by building five projects. You will learn how to use the AssemblyAI API for speech recognition.💻 Code: h...
type (audio_content) . Output: speech_recognition.AudioData Now we can simply pass the audio_content object to the recognize_google() method of the Recognizer() class object and the audio file will be converted to text. Execute the following script: recog.recognize_google(audio_content) Output: 'Bristol O2 left shoulder take the winding path to reach the lake no closely the size of the gas ...
Speech recognition (also known as speech-to-text) is the capability of machines to identify spoken words and convert them into readable text. Speech recognition systems use algorithms to match spoken words to the most suitable text representation. Although building such algorithms isn't simple, we can use an API to automatically convert audio ...
Speech Recognition in Python. Speech recognition allows software to recognize speech within audio and convert it into text. There are many interesting use-cases for speech recognition and it is easier than you may think to add it your own applications. We just published a course on the freeCodeCamp.org YouTube channel that will teach you how to ...
let the magic start with Recognizer class in the SpeechRecognition library. The main purpose of a Recognizer class is of course to recognize speech. Creating an Recognizer instance is easy we just need to type: recognizer = sr.Recognizer() After completing the installation process let's set the energy threshold value.
Speech Recognition in Python: Converting Speech to Text. Now, create a program that takes in the audio as input and converts it to text. Figure 3: Importing necessary modules. Let's create a function that takes in the audio as input and converts it to text. Figure 4: Converting speech to text.
Simple audio recognition: Recognizing keywords. This tutorial demonstrates how to preprocess audio files in the WAV format and build and train a basic automatic speech recognition (ASR) model for recognizing ten different words. You will use a portion of the Speech Commands dataset ( Warden, 2018 ), which contains short (one-second or less ...
Today we learn how to use speech recognition in Python. 📚 Programming Books & Merch 📚💻 The Algorithm Bible Book: https://www.neuralnine.co...
To quickly try it out, run python -m speech_recognition after installing. Project links: PyPI; Source code; Issue tracker; Library Reference. The library reference documents every publicly accessible object in the library. This document is also included under reference/library-reference.rst.
In this tutorial, we will learn how to create a speech recognition system using Python. Speech recognition is a technology that allows computers to understand human speech and convert it into text. This can be useful for a variety of applications, such as virtual assistants, transcription services, and more. We will be using the ...
Learn how to get started with the AssemblyAI Python SDK for speech recognition and speech understanding. In just 5 minutes you'll learn how you can transcrib...
Here is a small code-example: import speech_recognition as sr. r = sr.Recognizer() with sr.Microphone() as source: # use the default microphone as the audio source. audio = r.listen(source) # listen for the first phrase and extract it into audio data. try:
Since I am creating a voice assistant, I want to modify the above code to allow speech recognition to be much faster. Is there any way we can lower this number to about 1-2 seconds? If possible, I am trying to make recognition as fast as services such as Siri and Ok Google.
The following must be installed: Python Speech Recognition module: sudo pip install SpeechRecognition. PyAudio: Use the following command for Linux users. sudo apt-get install python-pyaudio python3-pyaudio. If the versions in the repositories are too old, install pyaudio using the following command. sudo apt-get install portaudio19-dev python ...
Steps to reproduce Install Python 3.12 Install speech_recognition and pyaudio with pip (pip install SpeechRecognition and pip install pyaudio) Create a Python script with this code: import speech_recognition as sr mic = sr.Microphone() p...
now we have to download the model for that go to this website and choose your preferred model and download it: after download, you can see it is a compressed file unzip it in your root folder, like this. ├─ vosk-model-small-en-us-.15 ( Unzip follder ) ├─ offline-speech-recognition.py ( python file ) here is the full code :
ML involves algorithms that enable machines to learn patterns from data and make predictions. DL, a subset of ML, uses neural networks to mimic human brain functions and handle complex tasks like image and speech recognition. Explore ML and DL through online courses and tutorials from platforms like Coursera, Udacity, and TensorFlow.
When I run this script on my computer, the library records the voice at normal speed. When I do it on OrangePI Zero 3, it records the voice at 1.5-2 times the normal speed. The only difference betw...